This coop was a 4-week build. I did most of the construction on the weekends and worked on the smaller stuff during the week. I have approximately $640 in the building materials, with an additional $160 in the lighting, lawn/paver patio, and antique replica door hardware. Bringing the total up to $800 (give or take a few bucks)
I would like to note that I live deep in the suburbs. The nearest "country area" to my home would be random almond orchards, and the closest one is 4.2 miles from my backyard. With that said, I am not worried about predators in my area, so I used chicken wire in my build rather than hardware cloth. If you plan to build a coop something like what you see here, you may want to go with the hardware cloth option depending on where you live and what the predator situation is in your area.
- The Build -
One random winter day we decided that we wanted to raise chickens in our backyard. I researched the local ordinances to make sure that it was legal in my neighborhood. We discovered that in our town a family is allowed to have 12 hens in a backyard.
We purchased four.
(A Black Australorp, a Silver Laced Wyandotte, a Barred Plymouth Rock, and a Speckled Sussex)
My fiance's main concern was the look of the coop. Our backyard is not that big and a person can see the entire yard from the two sets of French Doors that we have in our living room. She decided that if I was going to build a chicken coop in our backyard, then it would have to be something she would be proud to show off. I accepted the challenge and got to work.
The first thing I did was research chicken coops online for ideas. I got a lot of great ideas right here at BYC. In fact, my research here is what got me to join.
Eventually, I settled on a design that I found on Google Images.
I didn't plan to build it exactly like this one, but after discussing it with my fiance we especially liked the round top door and the way that the roof sloped further down on one side.
I drew up a basic set of plans on my computer to put together a lumber list.
To save a little money we decided to use paving stones as our foundation instead of pouring concrete. I simply leveled the ground using a shovel, a level, and a whole lot of patience.
The foundation measures 5 feet wide by 13 feet in length. My German Shepherd was my moral support through this entire build.
Once I got the foundation laid I began framing the structure. I used (40) 2x4 studs for the entire build. That is including the framing and the miscellaneous pieces of wood I would be using on all the smaller stuff.
Once I began framing the first wall I decided to increase all of the height measurements from my original drawing by one foot. I had originally drawn the roof peak at 6 feet and the top of the door frame at 5 feet. Now the door frame is 6 feet high and the roof peak is at 7 feet.
The dimensions of the coop is 5 feet wide by 4 feet deep by 7 feet high at the roof's peak.
As you can see in the pic above, it took me all day to get the foundation and framework put up. I assembled the entire frame using 3 inch wood screws, and I had to drill pilot holes for every screw to ensure that the wood would not split.
The following day I put the siding up, framed the rafters, put sheeting on the roof, and trimmed the roof line.
I used TruWood Panel Siding from Home Depot for the exterior walls. It took four sheets. I requires only one sheet of 1/2 inch plywood to sheet the roof. I also bought (3) eight foot sticks of 1x6 Pine, and (8) eight foot sticks of 1x4 Pine for all of the trim pieces.
The next step was to trim out the corners of the building with pine 1x4 and to put the composition roofing material on the roof.
Then I cut out the openings for the windows and the pop door, and I trimmed them with pine 1x4.
Next, I built and hung the nesting boxes. I built one large box with three compartments. Each compartment interior is a 12 inches cube with a 4-inch lip to prevent the eggs from accidentally falling from the nest. I built the box using pallet material that I already had on hand, so I saved a little money here.
Notice that I also put 2x4 backing between the nesting box and the siding to prevent any smaller birds from becoming wedged behind the box.
With the nesting boxes in place, I needed to put up some roosting bars. For this, I used some of the 2x4 scrap material that I had left over from the frame and some scrap plywood I had left over from the roof. I ripped the 2x4 down into 2x2 and using my belt sander I rounded off the bars for the roosts. Then I attached the rounded roost bars to some simple plywood brackets that I made to hold everything in place. The bars are mounted 15 inches away from the back side of the siding.
I got a little fancier with the roosting bar above the pop door and made the brackets from 2x2 pine that I cut at 45 degrees. I may eventually relocate this center roost to a different location inside the coop so that chickens can use the pop door without fear of being pooped on. LOL
Next, I built the frame for the chicken run. I had some old 2x4 fence wood that I used up here. You can see it in some of the 45-degree bracers located in the corners of the run framework.
My run is exactly 5 feet high by 4 feet wide by 8 feet long. I only have 4 birds so I don't require a huge run. Plus I plan to let the birds out to free range in the backyard when I'm at home.
The next thing that I built was the flower box to hang under the front window.
For this, I used pine 1x4 material. I ripped down some scrap 1x4s into 1x1s to use as an internal framework.
I assembled the flower box using 1.5-inch wood screws and reinforced everything with Titebond II Wood Glue. All of the screws were attached from the inside to give the outside of the box a cleaner look.
For the front of the box, I had to glue (3) pieces of 1x4 together and then cut them to size.
Once the glue dried I finished assembling the box and installed it on the coop.
My next step was to make the window panes. For this, I simply used 2x4 material. I cut them to shape and assembled them using only Titebond II Wood Glue. I bought some 1/8 inch thick plexiglass and had it cut to size. Then I notched the frame using a router so that the plexiglass would fit perfectly inside.
I installed the plexiglass and then I made little decorative dividers to increase the "cuteness factor"
I installed the new windows into the window openings on the coop.
Then I adjusted the hinges and made sure everything was in proper working order.
The last thing I did with the windows was to install draft blocks on the inside of the coop.
Next was the part that we had been looking forward to.....
PAINT DAY!
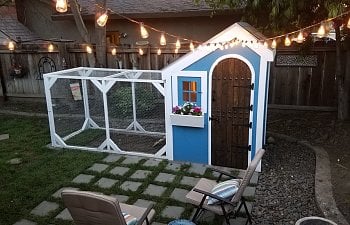
My fiance picked out the color scheme. She wanted it to have a kind of "beach" feel to it, so she chose the blue with white trim.
Next, I wanted to run power to the coop. A licensed electrician had previously installed an outlet on the end of my back patio because I used to have an above-ground pool where the coop is now. You can see the outlet at the base of the green pole on the left side of the photo below. I dug a trench from the outlet to the back corner of my coop and laid a long piece of flexible plastic conduit into the trench. I then ran my power cord through the outlet so that it was exposed at both ends of the conduit.
I drilled a hole at the bottom of the side wall and ran my conduit and cord up into the coop. Then I buried the trench and packed the dirt back down.
Here is a view of the inside.
...and here is a view of the other end of the conduit near the outlet.
As you can see, I also laid down a new lawn after I filled the trench and tamped the dirt firmly back into place.
Next, I installed a surge protector in the coop.
Then I install plug adapters at both ends of the electrical wire and plugged the cord into my outlet.
Once I had power in the coop I ran some rope lighting around the interior to help my chickens see better at night. I got a 24-foot roll for only $19.99 at Lowes. It was a little more rope than I needed so I ran the extra light halfway around the rear window.
The next step was to make a door for the coop. I had pictured in my head the door that I wanted to build. I wanted a Dutch Door that I could open from the top to get better ventilation in the summertime, but I also wanted the door to look vintage; like something from an old cottage in the woods. Almost fairytale-like.
I started by making a couple of frames (one for the upper portion and one for the lower) and attaching pine 1x4's to the frames. before attaching the 1x4's I beveled the length of each board to give them an old-world style look.
Then I drew the curved top on the door planks to match the door cutout on the coop and cut the rounded shape before sanding everything smooth.
Next, I stained the door a dark walnut to make it look like it's made from heavier wood.
...and finally, I installed the custom hinges that I had previously ordered online.
The door wasn't complete yet. I still had some more hardware coming in the mail, so I left the door in my shop until I had the other items.
Next, I decided that I would build a large door to add to the end of the run to make it easier to rake out when needed.
For this, I ripped down a couple of 2x4s into 2x2s and built a frame for the door. Then I reinforced the frame with some 45-degree bracers at each corner before attaching the chicken wire.
Then I installed the door on the end of the chicken run.
Now I have something to paint later.
While waiting for the door hardware I started putting together the screen that I would be attaching to the lower portion of the door.
A few days later, the hardware finally arrives, so I finally got to install the door. Once I got it into place I discovered that it was rubbing ever so slightly against the door frame in a couple of places. I mended that by using a power sander and taking off a very little bit of material from the door.
Next, I mounted the new door latch.
...and I'm sure you probably noticed all of the clavos that I attached to the door to hide all of the modern-day screw heads.
Next, I had to turn my new medieval-looking door into a Dutch door by splitting it in half.
To do this I simply cut the door in half using a jig saw and sanded both edges to get the appropriate gap that I was looking for. Then I attached the screen to the interior of the door and stained everything to match.
Next I added the chicken wire to the chicken run framework, and I chicken wired the window opening from the inside.
So that's my coop build. I hope you guys like it.
I know these girls will.
If you would like an even more detailed description of this build, with even more photographs, you can find it on my blog. The link can be found on my profile page.
***UPDATE 4/3/17***
Over the weekend I moved my girls into the coop, but before I did I built them a gravity feeder and a watering system for the interior of the coop. I still need to build a feeder and water system for the run.
Here is the feeder I created.
Even though the lid for the hopper is a steep 45 degrees I decided to add a little awning over the food trough in case any birds manage to perch on the lid and try to poop down into the food.
and here is the easy-to-build watering system that I made for them.
Lastly, I covered the floor with pine shavings and inserted my birds. They are really happy with their new home.
....and if you are wondering why I have a little water dish hanging when I have that new water system installed, it's because I haven't put water in the system yet. I want to make sure all of the glue and caulking are dry before I fill the bucket.