Coop Construction
Once the chickens arrived, we started planning out how we would build their new home. Here are the coop designs that we came up with:

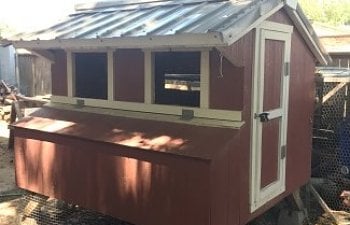
We decided on a coop that was 6’ L x 6’10” W x 4’10” H with a slanted roof and a run extending from the back of the coop. For 18 chickens, this would allow roughly 3 sq. feet of coop space, with 9 sq. feet of run space per chicken. However, we also knew that the girls would have plenty of room, figuring they would want to spend a great deal of their time free-roaming around our large backyard. The coop’s construction started not too long after the chicks arrived. First, we began building the base by laying out four 10” tall 4x4 pieces of sturdy pine wood roughly 6’10” apart, and then screwing in 2 angled 16” 2x4’s to each corner piece for extra support. Then, we screwed in the sides of the base, four 6’10” 2x4’s, to the outsides of the four corner posts. Finally, we laid out 6 more 2x4’s measuring the length of the coop, about 6 feet long, and screwed them into the sides to make the floor.

Once the base was completed, we arranged four concrete piers underneath to create a solid foundation for the corners of the base to sit upon. We then laid out a ¾” sheet of plywood to cover the top of the base. To that sheet, we laid across a roll of linoleum tile and secured it to the base using a staple gun.

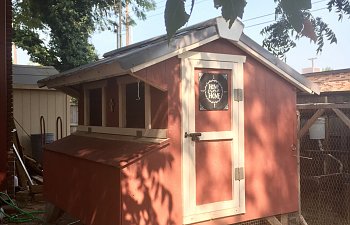
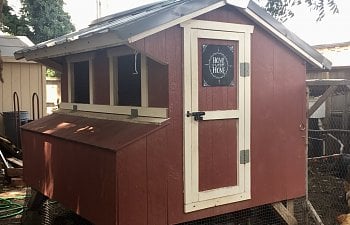
Next, we began building the sides out of SmartSide paneling, which is excellent for our region's varying climates. Our main goal was to make each side an individual piece, each which is then bolted together. This way, the entire coop can be easily disassembled and transported if needed. Some 2x2 pieces of pine wood were added to the paneling to outline the doors and windows, and also around various places that needed more structure.

The roof was constructed by placing two 7’ x 3’6” sheets of ¾” plywood on each slant, and then covering those with pieces of corrugated metal for extra durability.

Once the building was completed, it was time to paint. We first covered the coop with a white exterior paint, and then painted over that with a red exterior paint, leaving the window and door trims white.

A wire mesh was then stapled across the inside of the windows to keep critters out. We also installed sliding boards that can cover the mesh windows if it gets too cold outside.

We placed hinges on the lifting door to the nesting boxes and installed a hook which can hold up the door for easier access to eggs.


Run Construction
After the coop was built, we started on the 11’6” x 11’ run for the girls to play around in. Here are the designs for the run:

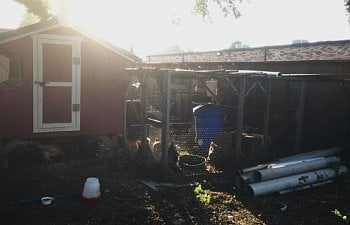
The run was made by constructing the sides shown in the designs using 2x2 pieces of pine wood, screws, and wood glue. Each side was then covered in chicken wire. The sides were then bolted together and then to the back wall of the chicken coop. Long pieces of the 2x2 wood were cut and placed along the top of the run, which was then covered by chicken wire as well. Concrete slabs were placed along the outside edges of the run to form a draining system. In order for the underneath of the coop to be accessible to the chickens from the run, a wire mesh was placed along every bottom side of the coop except the side that fed into the run.

After the exterior of the run was completed, we added a some supports inside to help hold the roof up.

A door from the coop to the run was made by cutting into the back wall of the coop, and a ramp was added at the base of the door for easier access. Then, we came up with a simple pulley system made of wire which was attached along the back wall. When pulled down, the door opens. The wire can then be hung on a screw bolted to the side in order to keep the door open for longer periods of time.


A human door from the outside was installed and is kept shut by a block of 2x2 pine wood that latches when rotated down. This door comes in handy when the chickens want to roam free in the yard!
Once construction was finally complete, we moved the girls into their new home. I’d say they seemed pretty happy, don’t you think?

General Information
The inside of the coop includes five nesting boxes, two roosting bars, and a poop drawer. This drawer was put under the roosts so that when a chicken poops while sitting on the roost, the poop falls through the wire mesh that covers the bottom of the roost and onto the drawer. This drawer can be pulled out through the back of the coop and can be easily cleaned out.


One of the many great things about chickens is that their poop is high in nitrogen and phosphorus, which makes it fantastic for composting! And with the easy-to-remove drawer, we can dump it right into our composting pile, which we constructed by setting a couple of wood pallets against each other. Once ready, the compost is then transferred to our cinder block vegetable gardens, generating a much more productive crop!


Over the years, we’ve made some enhancements to our coop. One of the things we’ve learned is that the chickens really like to make a mess of their food and watering containers! In order to keep the interior of the coop from getting wet, we found these awesome little watering cups! They screw into small holes that you drill into a 2” PVC pipe, which then connects to a larger bucket filled with fresh water. When a chicken sees the bright yellow peg inside of the cup, of course they want to peck at it! Once struck, these pegs release water, keeping the water inside the cups and not on the ground! We’ve placed these in the run for an easier refilling of the water bucket. You can find them cheap here.

In order to keep their food off the ground, we found this awesome idea using a plastic trashcan! We got seven or eight 6” elbow PVC pipes and cut holes in the can big enough for the pipes to fit inside without falling out. We then secured the pipes facing downward with some adhesive and then dumped the food directly into the can. We placed the lid back on top to keep critters out. The chickens poke their heads inside to eat, and the food will automatically replenish itself!
We like to keep the inside of the run fun and updated. We’ve added various stumps for the girls to play around on! We’ve also added a couple of roost that are made of fallen tree branches which are stuck through the sides of the chicken wire. The girls like to perch on these during the winter to keep their feet from getting too cold in the snow. We’ve also had tree branch swings installed at one point, but the chickens didn’t understand how to perch on them. Nevertheless, it still brought us joy knowing that we’d tried!

One of our favorite things to do is to tie a treat, usually a piece of a fruit or vegetable, to the roof of the run using some twine. They love it, and we get a kick out of watching them jump and peck at the treat!
In the future, we would like to add some landscaping around the exterior of the coop and run, maybe some plants and such. However, our girls love to eat anything and everything that is green, so we may have a little trouble getting anything to grow! We would also like to install a permanent heat lamp to the inside of the coop in order to keep it warm enough inside during the winter, and also to extend laying hours, as the length of daylight decreases during the colder months.
One thing we would change about our coop is that we would make the run a little taller so that we can walk around inside. Currently, we have to squat down and usually fall over when we need to go in!
Although we were skeptical of chickens at first, we’ve really grown to love and appreciate what they do for us. A lot of time has gone into making sure they have everything they need, but it’s been totally worth it! We have plenty of healthy, fresh eggs always at our fingertips, and it’s been such fun for the kids to grow up around such exciting creatures. This has definitely been one of the most memorable journeys for our big, loving, feathered family!