This is probably the best photo of the finished coop itself, without the pen:

Advantages of this design are:
1. Can be disassembled, moved, and reassembled.
2. Has gigantic front opening doors for cleaning access
You might want to build this coop if:
1. You have a compact backyard (our lot is 70x100 total)
2. You want to build the coop one place, then install it somewhere else, or you think you might want to move the coop later. (But it's NOT a "tractor")
3. You want a coop that has a "blind side" that be installed up about a foot away from a fence or building (the blind side does have a large window for ventilation.)
4. You are planning for about six chickens (using the 4sq ft rule)
If you want to build this coop you should:
1. Have *some* building experience. You can confidently and repeatedly cut lumber to measured angles and within 1/8" of the required length
2. Be able to hang a door. It helps if you've done that before, but because it's "just a chicken coop" this might be your first door hang ever. Allow extra time for this step in that case.
3. Budget very roughly $750 for materials at "Home Depot" not counting the pen/run.
Tools recommended:
1. A powerful cordless drill for deck screws. Or a pneumatic nailer if you prefer.
2. Chop/miter saw, like this one: https://www.harborfreight.com/10-in-sliding-compound-miter-saw-61972.html
3. Jigsaw
4. Circular Saw (a table saw would be better, but I don't have one)
5. Air/cordless power stapler for attaching hardware cloth to the framing
6. A "T Bevel" angle gauge
7. Laser level (you could use "old school" stakes and level)
8. Carpenter square
9. Hand tools: Hammer, 1" wood chisel, screwdrivers, 9/16" wrenches, metal snips, clamps etc...
10. 5" hole saw
Things I'd do differently:
That shingled roof is *heavy.* Given the desire to be able to move the coop pieces, I'd use plastic roofing instead of asphalt shingles next time.
Why did I call it "Ikea Style?"
Well, you know, you buy furniture from Ikea and it all comes in a bunch of flat boxes, and then you assemble it and fasten with bolts. There are six separate standalone pieces in the coop: the four walls, the floor, and the roof, and once these are assembled, they are held together with twelve 3/8" bolts. However, I do hope it will last a little longer than a typical piece of furniture.
Here are some more finished and installed photos:

Doors open for cleaning:

Pullet Tested:

Concept sketches and early plans:
The original sketch called for the chicken doors to be sliding instead of hinged. But hinged turned out to be simpler.
Approximate Materials List for Planning:
(COOP ONLY - not including the pen)
This is from my early notes, plus memory of "return shopping trips" and so is a bit approximate:
1x2" 8' furring strips: qty 4?
1x3" 8' furring strips: qty 20?
1x4" 8' furring strips: qty 9?
2x2" 8' qty 3
2x3" 8' qty 16?
2x4" 8' qty 3
2x4" 8' Pressure Treated qty 4
Plywood and Siding:
1/8" nominal plywood -- qty 1 4x8 sheet
3/8" nominal (11/32" actual) plywood -- qty 3 4x8 sheet
.315" LP Smartside panelling -- qty 3 4x8 sheet
5lb boxes of deck screws (I prefer torx head)
1.5" #8
2.5" #10
3.5" #10
5 or 6 tubes of "liquid nails" construction adhesive
Roofing materials.
When you go shopping, it's helpful to go on a day when they're not too busy and have them rip the sheets for you:
LP SmartSide cut sheet: (they won't do the diagonal cuts - your goal is rectangular pieces)
3/8" Plywood Cut Sheet: (Sorry, I don't have the exact cut dimensions for the second and third sheets. I simply had them cut those sheets to 6' length so they would fit in the back of my truck.)
Materials unloaded into the garage (This is less stuff than the list above shows, because as construction proceeded, I needed return trips to buy more material.) Ready to get started!
The general plan is, we're going to build in the following order:
1. Left and right sides.
2. Floor
3. Plain back
4. Opening front
5. Exterior corner trim
6. Trim and install nesting boxes
7. Trim and install windows
8. Roof
But there will be a little bit of "ping pong" back and forth as sometimes we have to start a phase early, before another phase is completed, in order to get final dimensions needed to complete the preceding phase.
Starting on the "left" side. CORRECTION - the Window Dimensions are 20x11, not 17x11.
Framing cut and laid out. This is pretty simple. Important Note: These side walls are NOT framed like you might expect from regular "home" construction! They are framed with the "thin" dimension of the lumber - so the side wall framing is only 1.5" thick! You might be tempted to frame them the "other" way. Don't do it. Literally everything else in this construction plan will be completely wrong.
OK, now the panel with window cut out. Final trim framing, mesh, and closing shutters will come later. Note that the correct width for the window is 20" - not 18" shown on the plans. I use quick "rough" plans and sometimes have to correct some exact measurements at construction time.
You probably already know how to cut a hole in a panel, using a drill and a jigsaw.
Finished side panel.
It's extremely important that the panel overlaps both sides of the frame by roughly about 3/8" on both sides. I'll explain why later -you'll be able to see on the "how corners fit together" diagram.
In addition to fasteners, I use "liquid nails" construction adhesive to attach the panelling to the framing. It's probably worth calling out here the use of "structural" panelling. This is "LP SmartSide" stranded panelling. A lot of panelling has no shear strength and is only designed to be attached over an OSB structural sheathing. For simplicity, cost, and weight, I wanted to use a single layer. You could use plywood, but this has a nicer outward appearance, and better weather resistance. Win-win.")
(Yes, this is a lousy glue bead. I do better when not holding the camera in the other hand.)
I promised to show why that overlap was important:
The right side panel is similar to the left, but is taller, and is framed to support the nesting boxes. I didn't end up cutting the round vent holes that are shown on this sketch.
As with the left side, the framing is "skinny side" and so the wall is framed 1.5" thick.
Cutting the siding with jigsaw:
And installed:
Time to move on to framing the floor. The outer perimeter is all 2x4s, but the inner joists are 2x3s. In case it's not completely clear from the diagram, the long dimension is 69" and the cross joists are 41" - we're creating a floor that is 72" x 44". Why only 44" ? Because that allows us to have a 2" roof overhang while using roof sheeting that's 48" wide cut from a standard 4x8 plywood sheet.
Laid out:
Covered with 3/8" plywood. That's much lighter than you'd use on a house obviously, and flexes a bit when a person walks on it. But it does support a human.
It's a 72" x 44" sheet. So it overhangs the left and right sides by 1.5" each. This is so it'll overlap the wall framing, to make it easier to assemble the modular pieces.
Now, the overhangs have to be notched, so they interlock with the frames for the sides. You can decide how tight you want those tolerances to be. I notched pretty aggressively to save time.
I tend to end up doing jobs like this by myself. Sometimes it would be handy to have a second pair of hands. But I attached a temporary support leg to the walls to make them free standing, so I could hang the floor from them.
...and then lifted the floor. It hangs by the subfloor plywood being supported by the wall framing joists. This is obviously *not* how houses are conventionally constructed.
The goal is to be able to relatively easily break the coop down to transport it. So the floor attaches to the walls with 3/8" bolts.
Viewed from underneath:
I dunno about you, but when I'm constructing anything asymmetrical, I get easily confused. Building a shed once, I cut a sheet of siding that was the mirror image of what I needed, so I had to buy another sheet! So here, I'm labelling the floor to minimize the chance of any confusion. Also, this shows the gaps that I was talking about earlier.
Starting to frame the back panel. From here on out, the sketches I drew start being more vague, with just enough info to provide direction and get a rough idea of the amount of lumber to buy at the lumber yard. But from here until completion, every piece has to be individually measured against the place it's supposed to fit. Can't just read lengths off of plans anymore.
We know we want the main top roof ridge support beam to rest on a support stud that is 48" above the floor. So the length center stud is 47.25" (48 - 3/4" of the bottom plate.)
We know the height of the top plates of the sides, because we can measure them, and cut the end studs directly from that length. (I didn't record that length - you measure it.)
Having done those two, we can rest a temporary stud across them, and measure the desired length of the middle support stud. (That's the third from the left in this photo.)
All that said, here's the sketch where I worked some of those measurements out.
But again, I caution you - from here on out - you've established your basic measurements with what you've built so far - and everything that follows is derived from the previous build, rather than from what is "on paper."
And realized - with cut studs resting on the bottom plate.
Studs now attached to the bottom plate to make them freestanding.
It's important to check crossways dimensions. We need to keep the sides parallel, and we need to keep the studs square. My first attempt created a trapezoid, and I had to recut one cross member 3/16" longer.
Taking the frame wall off to measure and attach the top diagonals that'll support the siding. This is a perfect example of "measure, then cut to fit."
Back side resting in place. As with the floor, it'll be bolted into place for relatively easy disassembly and reassembly. We need to be really careful establishing the exact top cut line on the siding. So, we won't cut the siding until after we cut the rafters, so we can measure exactly how high the siding needs to be. We need the siding to overlap behind the outermost rafter - preferably by about an inch.
Also, note that those "zig-zag" support diagonal studs aren't anything close to parallel with what the top siding line is going to be. But that's OK, and we don't care. Just don't make the mistake of cutting siding to match them!!
From the front:
Here's the more vague sketch for the front. It's actually much closer to conventional housing construction, with conventionally oriented studs, a bottom plate, top plate, and door header. Although the door header and top plate are actually kind of one and the same - since the entire wall will open as a set of double doors. Still, one half of the top plate needs to support the ridge beam, and so it gets a doubled 2x3. The bottom plate is 1x3 furring strip.
And the completed view. There are many additional members that aren't shown in the sketch at all! But you'll recognize the bottom plate, the three primary studs, the top plate, the doubled ridge support stud all from the diagram.
To that, we added the secondary support stud, the diagonals, and a squaring "right side diagonal horizontal support stud." (You don't really need to figure out which one I mean by that. ;-) Just measure and build to the picture.)
All these measurements for these are taken to fit against the already constructed pieces, rather than off of plans.
We're going to roughly frame in the roof before we cut the siding, so we can take more measurements on where to cut the siding. So now it's time to cut some rafter ridge and top-plate supports, and the secondary support, and then measure, cut, and notch some rafters.
The roof ridge and rafter support beams are 48" long, to allow the roof to be the full 48" wide of the plywood sheet. This gives a 2" overhang given that the coop floor footprint is 44" (Recall that's why we made the floor only 44" wide - to give that overhang.)
Here's the top plate support for the left side. Take note of the extra verticals. These align the supports, and are a handy alignment point when putting the roof on, as well as making the roof free standing (which is important while building the roof component assembly.) It's just resting in place. NOT attached.
This photo emphasizes the point that the top-plate roof supports rest on the side walls (and thus the coop legs) and NOT the front/back wall support studs.
OK, here we have all the rafter supports in place: ridge support, top plate supports and the "secondary support." At this time, all these are just resting there. Only the floor and left/right sides are bolted. Hit it hard enough and everything falls over like dominoes.
Time to start cutting and notching some rafters. They're made from 1x4 furring strips. I arbitrarily choose six inches of overhang. This is the cut for the top ridge support. In all cases, the notches are 1.5" into a 1x4 rafter.
Note that I did NOT provide you a length. From this point on, you're going to be taking measurements off of the parts of the coop you've already constructed.
And the cuts for the secondary support and top plate support look like this:
Here's rafter test fit number one. They all line up. That's a good thing.
Plan view of the test fit. This shows the notches better:
Rafters situated into place:
You have to be resourceful to handle your mistakes. This test fitting showed I'd made a measurement error. On the front I'd excluded the bottom plate thickness from the ridge support, while on the back I'd *included* it. The simple solution was to shim the secondary support point on the back framing with a scrap of bottom plate.
We framed and test fitted the front side, ridge supports, and rafters in order to answer the question: How much top siding clearance do I need on the back panel???
Here's the answer: 2.75" taken at this point. Would have been easier to take it at the other side of the stud, when it would have come closer to 2"
So, now, finally, we can go back and measure and install the siding on the back side. It's two pieces, centered and overlapped on the ridge support stud. Remember, this is structural siding, so it adds shear strength to the whole when properly fastened.
Also note the overlap at the bottom, to match the overlap of the floor joists on the left and right side siding.
I actually installed a complete 48" x 48" piece, then trimmed it to size after it was attached to the framing. But really, the only major trim was the diagonal, and a tiny clearance on the far right side - basically the "overlap" section.
After the second part is attached and trimmed:
Now would be the ideal time to cut the back panel vent window. I didn't end up cutting it until I'd finished nearly everything else. If you cut it now - it's 48" by 8"
Anyhow, here's the view from the opposite side. This shows that those diagonal top stud supports DO NOT run parallel to the roofline. That's OK - they're only there to provide a convenient attachment point for the siding so it doesn't have a large unsupported dimension
The back side has now been fastened into place with four 4" by 3/8" bolts.
It's time to think about those opening front doors, and get the front side of the coop panelled.
To have opening double doors, we need a door jamb to mount the hinges on. I used some 1x4. If you're hanging a "real" door, you're gonna shim the door jamb to level it. I've done that, and it's lots of fun. But for a chicken coop that sits on legs on the dirt, there's not going to be any durable concept of "level" so I just attached my door jamb directly to the rough opening with glue and decking screws.
Yes, it sticks out. That's what we want, because we have to build up the door from studs, siding, and fascia trim. Once that's all done, we'll need the door jamb to be this far out from the rough framing.
Now we'll build up the door itself - starting with its internal framing. It's going to be framed and sided basically the same as the rest of the coop. For "door within a door", we need a center stud for mounting the chicken pop door or vent window onto. And it adds rigidity to the whole thing.
I do most of my construction using deck screws. They're expensive, but worth it to me. Mostly, they are self drilling. But for thin pieces like these, decking screws can cause them to split. So I pre-drill thin pieces -- basically almost all the times I'm driving deck screws through furring strips I pre-drill the furring strips.
The door frame is built from 3 studs and a thinner top and bottom plate. The middle stud is NOT aligned on center. Rather, the line below is on center, and the EDGE of the center stud is placed on the line. The stud goes to the HINGE side, so the larger gap goes to the center side.
What are the dimensions on the door? Measure your final rough opening size, and use 1/2" less than that, so the door has 1/4" clearance in every dimension.
Here's the completed door frame. (There are two.) As we go, always check to make sure the work remains plumb and square.
And resting in their position.
With all our framing cut, and the door jamb in place, Now's the time to drill for and set the four 3/8" bolts that hold the front panel module in place. (Not shown - they'll go through the door jamb and unlike the others, the bolt heads will be on the inside - door jamb - side.) And then we can install the siding for the front side.
We'll start with the left strip next to the door jamb. In this photo, I've got the siding strip deliberately too low, so you can see how it will sit.
The brown pressure treated 2x4 on the left is part of the left side. The 2x3 stud is part of the front side. In order to preserve the ability to disassemble the coop for transport, it's critical NOT to attach these two together (except with the removable bolts) So the siding strip must be screwed and glued ONLY to the clear stud on the right - and left free and unattached from the pressure treated stud on the left.
Sides and top sided. The front actually has six separate pieces of siding. Two interlocking on top, one to each side, and two on the bottom.
Gotta side the bottom now. These are attached to the "FLOOR" assembly. So don't accidentally glue or screw them to the front side bottom plate. We have to be able to disassemble the components!
Front siding completed.
Need to notch the front and back siding for the secondary ridge support. I got impatient and botched this - I was using the jigsaw in an ackward position and just wanted to get it done. "Cut in haste, repent at leisure."
I am NOT recutting and reinstalling those siding pieces. It'll get covered up with a wider fascia trim piece than I originally planned.
OK, the siding's all completed. Time to move on to some of the finish trim. We'll do the four edge corners.
They're a piece of 1x3 on the front and back, overlapping 1x2 on the sides. As with the siding edges, there's a challenge in not permanently attaching the sides together. In fact - it's worse and unsolvable. So the front trim pieces are glued to the siding - and then screwed into the 2x4 leg studs that belongs to the side. This makes disassembly impossible!
So after the glue sets and when ready to move the coop, You must remove the ABOVE shown trim screws, then put a shorter screw in from the back that just attaches the fascia trim to the piece of front siding. Together with the construction adhesive, that'll be quite sufficient.
Here's the side view of the corner trim. This is screwed into the side studs, and causes no problems.
The side trim gets minor trimming in order to clear the removable bolts that hold the front and back to the sides.
With all four corners edged trimmed, the next step should be to build the opening panel doors. This is the one you've all been waiting for. "Hey, bjmoose, how are those front panel doors supposed to work, anyway??"
You previously saw the door frames. First, we simply panel over them. Take care to align the grooves in the siding, or the front will look funny.
Now, these are DOORs. So we want them to have maximum stiffness. So for the non-opening part, we also panel over the inside passive non-opening part with 1/8" plywood. As with the main panelling, use construction glue in addition to fasteners, for maximum strength and stiffness.
We need cutouts. They're each going to have a shuttered pop door. But figuring out where those cuts go requires looking at where the trim pieces are going to go on the doors. We don't want to WAIT until the trim pieces are installed, because then there won't be clearance for the saw. So we mock up with tiny pieces of trim, measure, and mark.
Take note of what you're looking at. On the right side, there are two pieces of trim. The pop-door shutter hinge will go so the shutter trim MEETS the fixed trim that's permanently attached.
But on the left side, the shutter trim will OVERLAP the door gap to provide a neat closure. Again - two pieces of trim. Ones the moveable pop door trim. The other is the fixed "cleaning door" trim that's permanently attached to the large cleaning door. But they butt up against one another.
The pencil line is the cutout for the pop door.
If this mockup is too hard to follow - you can just completely trim up the front doors without using any construction adhesive, and then mark for the pop door cutout, (1/2" inside the final trim) and then remove the trim, make the cutout, and then reinstall the trim with adhesive.
Do that on both doors, cut the openings in both doors, and look at it in place:
With those cuts in place, we can add the needed trim to the doors.
On the HINGE side, the trim is flush with the door edge. This is extremely important. But on the other three sides, the trim "splits the difference" half way on the door, and half way overlapping the gap between the door and the coop. So the trim covers the door gap, providing a "finished" appearance.
And with both doors:
The coop is "designed to be imperfect." You'll recall earlier I fastened and glued the door jambs. "Normal" door jambs are shimmed to be perfectly plumb. You can now see how that's going to shake out here, with non parallel gaps on the hinge sides of the doors. It's OK, it's just a chicken coop.
Oh, hey. Speaking of the door jambs. The coop breaks apart by loosening 12 bolts. But two of those bolts protrude through each of the door jambs. Those will interfere with the doors. So we have to mortice out a gap for them with a chisel.
Here's the start of the process. There are lots of YouTube videos on cutting a mortice, so I'm not going to give a lot of detail here. This is also how we're going to mortice the hinges. It pays to get a good sharp chisel. I've bought "off brand" chisels and they're not hard enough steel, and they visibly flatten and dull even when simply cutting wood. For this job I'm using a 1&1/4" chisel. You could use a 1&1/2 (might be better) or a 1".
Time to set the hinges. You can buy templates for using a router and they work really well. I don't set that many hinges, so I do it by hand the old fashioned way with a chisel. Like I said, you can find youtube videos on mortising hinges. So I'm not going to provide too much detail here. But it's critical to know that you can drive the pin out of the hinge, and you mount the jamb part, and the door part, then align the door and drive the pin back in. It is IMPOSSIBLE to hang a well fitting door of any size using a fixed pin hinge. (We'll use cheap miniature fixed pin hinges later for the shutters - but they're only about a foot square.)
First, mark for the mortices. 2" from the bottom, and 2" from the top.
Cut the mortices. and set the hinges. I use 4" hinges because they're big and strong.
This picture is hard to understand, but if you sight down the top hinge pin hole, it must perfectly line up with the bottom hinge pin hole. If it doesn't, you're gonna hate your life.
A quick calculation sheet on setting the hinges on the door. It's critical that they line up exactly and perfectly with the jamb.
Setting up to cut the door mortice. You can see how it cuts across the fascia, the panel siding, and the door frame. This is why we took great care to fasten and glue those together, to make the whole of the thing an inseparable strong door. You can also see that the trim fascia has a knot exactly at the place where we need to chisel it. If you can avoid that with piece selection earlier, it's worth it to do so. But we can work with the knot. It's just not as neat.
We set the top hinge, and use only two screws to hold it in place for an early test fitting.
Uh oh! There's a problem. The door won't quite close. We need to set the hinge deeper into the door, to allow the door to protrude slightly further out from the door frame!
Recut the top mortice 1/8" further back into the door, and then cut the bottom mortice. When it comes to hinges, small adjustments are key. We fill the old screw holes by driving tiny shim splinter/shims into the old holes with a hammer before drilling the new ones. And again, we're only drilling the two holes that are further back for each hinge until we confirm door fitment.
It is CRITICAL that the spacing on the hinges on the door EXACTLY matches the spacing on the hinges on the jamb. If they're off by as much as 1/16" you're gonna hate your life because you won't be able to hang the door. This is a 1/32" or better measurement. Take your time and get it right. Also remember to make sure the hinges align to the same exact depth on the door. I align the hinge, and then drill a SINGLE screwhole at the desired position and drive a screw to set it. Then drill and set the second screw.
Both hinges set on the door with a pair of screws, so we can do a final test fitting. At this point we EXPECT everything to line up right.
And it DOES. This is the view with the door fully open. But I've checked it through the full range of motion. You can see the second screws are going to drive into the joint between the siding and the stud. So I use a longer screw here ever-so-slightly angled to favor driving into the stud.
And here's the right side door/front panel in the closed position. it fits nearly perfectly. I used a chisel to remove a tiny bit of interfering wood so the door would swing clean. That's OK and is part of a normal door hanging fitment process.
You can still see that uneven door gap (wider at the top, narrower at the bottom.) that we highlighted earlier. If you're hanging a "real" door by leveling and shimming the jamb and building a full floating door frame, you don't have to put up with that. But this is a simplified hang. So it's OK and we don't care. It'll mean that the left and right won't align perfectly when closed. That's OK too. You gotta know what your goals are.
Here's the hung left side door. If you look closely, you'll see I had to shim out the bottom hinge. Just a very thin piece of wood between the hinge and the door. Why?
The left door frame is about 1/8" out of square. So when the hinges were directly attached to the jam, the door wouldn't close at all.
That's why "real" doors shim the door jamb to be perfectly plumb before nailing it to the rough opening. You never see those shims because they're covered up with the door casing trim.
It was still square when I attached the jamb, but I hadn't bolted the front to the sides yet. I hadn't bolted the front to the sides yet because those bolts pass through the door frame rough opening and through the door jamb. But once it was bolted and tightened, it went a little out of square. Since the jamb is glued to the frame for strength, there was no possibility of going back and shimming between the frame and the jamb.
And, as predicted, the double doors don't line up perfectly. You can fine tune the thickness of that shim for as long as you want, tweaking it to whatever tolerance you insist upon.
Next phase is the nesting boxes. As you see, this is notched to accommodate the center support. The floor of the nesting boxes is 12.5" deep, and intrudes 2.5" into the coop.
Make sure to square the floor up against the wall with your carpenter square.
The floor was already mounted. Now cut and mount the ceiling. Like the floor, this won't really show and is 3/8" plywood. Theoretically the same size as the floor, but my best piece to use was 1" shorter, so I used that. That'll taper the top of the nesting box inside the coop a tiny bit. I don't think they'll mind.
Cut the sides out of paneled siding, and cut framing pieces out of 2x2.
Easiest to attach the frames to the sides outside separately
Now mount the inside divider, which is out of 1/8" plywood, and the fixed bottom mount for the drop door.
And add corner trim to the whole thing. I took the suggestions from BYC posters about how to orient and mount the nesting box door. This will be a bottom hinged door mounted on this 3 1/2" sill you see. To keep water out, I'll extend the roof line so it drips just past the edge of the nesting boxes. That's why the top is plywood instead of siding - once the roof's in place, you pretty much won't see the top at all.
I'll do the box door later, at the same time I do the pop door and vent shutters.
So far, we have no roof, and that's kinda important. So this weekend, the goal is to build the roof.
From previous construction, we have four half rafters, and the rafter support beams. Time to measure, cut and trim the short side rafters.
We can use a protractor to get a rough idea of the included angle, but then cut and test fit a sample piece a few times to get the fit exactly right. The final angle was four degrees different from the initially measured angle.
Really, there's a much better tool for this - a "T Bevel" https://www.homedepot.com/p/Johnson-T-Bevel-B75/100353824
But I couldn't find mine at the time I needed it, so I improvised.
Marking the "right side" rafters for cutting. The pencil mark is incorrect. The notch needs to be 90 to the face, as I've illustrated in red.
And the revised cut. After I cut along those initial marks, I had to re-cut after test fitting.
And marking the notch for the other support beam.
The rafters need to be joined together for strength and in order to make an effective attachment to the support beam. I used a piece of plywood to join them. This is glued for strength.
Here, they are notched to fit the support beam. This was easy, since the rafters were already notched, so I just needed to use a jigsaw to match the existing notch into the plywood.
I haven't built the shutters and chicken doors and nesting box doors yet. But the tolerance between the nesting boxes and the roof line is VERY close. So I mocked up the nesting box doors and trim pieces and held them with tape, so I could notch the rafters to fit.
Left side center rafter marked for trim
Right side center rafter marked for trim
All rafters fitted in place.
Now we can attach rafters to support beams with L brackets, making a contiguous roof frame.
And once the frame is built, it can be removed, for decking, papering, and shingling.
Don't forget to add those long horizontal tie supports either - the ones that are sitting on the ground in this photo.
At this point, you want the freestanding frame to be easy to lift on and off the coop. If it binds or sticks anywhere make the necessary adjustment NOW. You don't want to have to do that later after the weight of the complete roofing has been added!
Only the two CENTER rafters get an additional strengthening support, cut from 1x4 (same as the rafters themselves.)
The very top of this photo shows those reinforcements in place. The strength they add is highly desirable.
(This photo was taken after the roof was already fully assembled, and was intended to show the roosts...)
The weight of the king beam is supported by ridge studs in the actual coop. But it has no support while the roof is standalone. Since we're going to be doing a lot of construction, I added temporary vertical support studs to support the roof while building it. These have to be removed later in order to put the roof back onto the coop. But there's going to be a lot of hammering and weight. And we don't want the unsupported rafters to collapse while we're doing that.
Also, this is a much better photo to see the right and left side "legs" and how the left side ones are longer so that when the roof is free-standing, it is parallel to the ground - the same way it will be when on the coop.
Decking the roof with 3/8" plywood. Unfortunately, you DO need two 4x8 sheets. One isn't enough. But this gives the extra for the top and bottom of those nesting boxes.
Installing drip edge flashing. I've put a lot of work into this project so far. It's worth spending a little extra time so that there's no water penetration to cause delamination later of the roof decking plywood. Once I've built this, I don't want to have to do it again.
Papering the roof. Held in place with staples. I think I already mentioned that due to the massive weight of the asphalt shingles, I recommend you to use plastic roofing rather than shingles.
But, shingles IS what I used.
Here we see laying the starter course of shingles. I ignored the shingle nailing pattern guidelines in favor of a nailing pattern that drove most of the nails through the deck and into the rafters. Since the roof is so low, nails that penetrate the roof deck are a potential hazard to the chickens I'll have to cover later, so I want to minimize the number of nails I have to cover later. No matter what, some shingles have to be nailed in a place where there's no rafter.
Fully shingled. Not shown: big dollop of caulking covering the four final exposed ridge shingle roofing nails.
And with the roof dropped into place back on the coop. That thing is *heavy.* Did I mention how heavy it is?
But now it actually looks like a chicken coop.
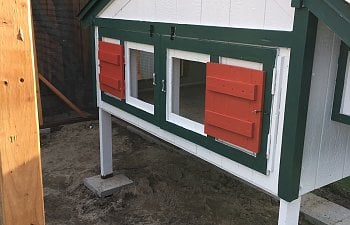
Time to trim it out, and hang the coop shutters.
You recall early on, I over did the cutouts on the siding where the ridge and support beams sit on the framing and need to have the siding notched. And I made those notches WAY too big. You'll save time in the end if you trim that side panelling accurately enough the first time.
OK, it's time to provide the cover up trim for those holes. I got some 1/8" plywood ripped to 4" thickness. Then trimmed some sample angles until I got it exactly right:
Pieces shown in place on the front. Have to do the same thing on the back. These are attached with construction glue and small 7/8" brads.
The front doors are built up out of a stacked series of trim pieces. This is because they need to be EXACTLY the same thickness as the trim pieces to which they'll be attached. If you look closely, you'll see the middle piece was ripped to an exact thickness so that the doors would fit in the measured gap provided. For this fit to work - we had to precisely align those pieces of trim earlier! Remember, the center trim is not exactly in the middle. Rather, the Hinge Edge of that piece is exactly in the middle.
Unfinished door on the left, glued and screwed door on the right. I could have drawn a pencil line down the center to align those attachment screws, but this approximate placement continues the "informal, built by hand" look that I've been cultivating so far.
Door hung on small hinges. These doors are MUCH easier to hang than the big cleaning doors. Note the safety spring hook catch that keeps it locked. You have to carefully place the loop, so that it doesn't interfere with the door being fully opened!
And the door in the fully open position. Note how the door slightly overlaps the rightmost trim piece - that's what we want and measured for earlier, so that it opens to a neatly blocked position! And then add a hook and loop to hold the door open. This hook doesn't need to be predator proof, since it's just holding the door open.
Both doors hung. One shown closed, and one open. This really shows how the doors fit. I'm very proud of that. They sit flush when fully open, and also sit flush when fully closed.
PS: (In this picture, you can also see that the "surface bolts" that I bought at home depot to hold the big front "cleaning access" doors are actually different sized on the left and right, even though I pulled them out of the same bin. I didn't see it when I installed them, but the photo sure shows it. How annoying! I ended up swapping them out later.)
And, both doors open. This is how they'll be almost all the time.
That reminds me: "Hey bjmoose, how come your chicken coop has two doors?"
"Because, if it had four doors, it would be a chicken sedan!." Ha! Ha! Ha! I kill me.
Let's build the nesting boxes door. Again, it's built up out of pieces the same thickness as the trim, so that it sits flush for neat hinging.
You see that gap at the top of the cross support pieces? That's IMPORTANT. Actually, you can see it better in the next photo.
Glued and screwed. The gap shows better here. Speaking of gaps. You can see those three horizontal pieces are not exactly the same width, leading to a tiny gap between the bottom piece and the left side trim. That gap is only one half the breadth of the saw blade wide. It really illustrates the difference between the "construction quality" that I'm going for here, and "cabinetry quality" which I have neither the tools nor the disposition to build.
Mounted in place fully open. And now you see why we need the gap. It allows the door to close flush. Otherwise the top plywood of the nesting box would interfere with those cross pieces.
And fully closed. Theres a pull handle for opening, and a hasp, secured with a carabiner, to secure it shut. I filed the burr off the drip edge flashing, to minimize the risk of cuts while opening the nesting boxes.
And the photo that shows the trim, doors, and nest box doors we added. My neighbors are now all razzing me about my "luxury chicken coop" I'm building, and asking whether it has full kitchen and air-conditioning. :-D
Once we trim out the other side windows, and cover the vents and openings with hardware cloth, we'll be done.
Speaking of vents, how much ventilation is there?
Front Doors (when open) 2x 12"x12" = 288 sq in = 2 sq ft
Left side window: 18"x11" = 200 sq in = 1 & 3/8 sq ft
Back window: 48"x8" = 384 sq in = 2 & 5/8 sq ft
Under eaves: 2x36"x2.5" = 180 sq in = 1 & 2/8 sq ft
Gable round holes 4x 5" dia = 4x2.5x2.5x3.14=80 sq in = 4/8 sq ft
Total (doors open) = 7 & 3/4 sq ft.
Gable round holes? What gable round holes?? We want some ventilation as high as possible to let the warm moist air out. So let's cut them. Using 5" hole saw.
Exactly WHERE do we cut those? Well, I used the hole saw from the INSIDE to locate where the holes could go without cutting the framing.
I never showed the cutting of the large window in the back panel. It is 48" wide by 8" high, and is cut using a jigsaw. Now add furring strip trim around it.
All my trim pieces are cut with 45 degree angles, because I think that looks better. But you could do a butt joint trim instead. All the window trim is nominal 1x3" furring strips.
And, add trim around the left side window:
We need hardware cloth over the non closing windows. Attached with a mix of #8 1/2" screws that only go into the siding, along with some longer screws that set into the trim on the other side of the window. Large fender washers over the screw heads.
This photo shows the ventilation space under the eaves, and the hardware cloth covering those openings.
And cloth the gable holes.
OK, it's now almost done. we're going to have a big family "chicken coop raising." Everyone's involved in getting it out of the garage where it's been being built, and into the back yard. This sequence will show how the coop comes apart (relatively) easily for transport. There are a lot of photos, but the whole disassembly/move/reassembly only took about an hour.
Get ready to raise the roof! Ready....
Through the narrow side gate:
Detach and remove the front wall module:
...and the back...
Not shown is unbolting the sides from the floor, carrying those back, and standing them up again.
Here, we reassemble on the grass in the backyard. Those plywood "tabs" allow the floor to "rest" on the side cross members, so we don't have to hold its weight while assembling, we only have to hold everything roughly in position so it doesn't all fall over. I'm furiously inserting bolts in the background.
Once it is bolted to be free-standing again, we put the back back on.
And bolt it up, "IKEA style." ;-D
The whole thing is held together with twelve 3/8" bolts of varying lengths.
There are four for the floor, four for the back, and four for the front. The roof just stays in place with weight and friction. I suppose you'd have to bolt it down in hurricane country, but not here.
Once it's bolted in, time for the roof. We need four folks, one for each corner.
Tolerances between the rafters and the front and back are close, so settling it into place takes a bit of shifting, finagling, and persuasion.
Ready for finishing touches. Flooring, paint.
Just a few things to go now. First is vinyl flooring for easier cleaning. We've had this leftover scrap since we refloored a bathroom a few years back. Start by flatting it out, since it's been rolled up. Yes, those *are* Girl Scout cookies holding it down.
Trim it a few inches oversized and plop it into the coop. Don't go too large. It's actually easier to align and trim neatly if you've put in a piece trimmed to be only a couple inches oversized. Now, the thing you need to know here is: I absolutely suck at flooring installation. So there are NOT going to be any closeups here. That would just highlight the ugly flaws... Starting now. This piece is too big. We only want to be a LITTLE oversized. This is a LOT oversized.
Once it's in place, roll or fold it back to reveal half the floor:
Glue that down, trim, roll/press it flat, and then fold back to repeat on the other side. Sorry, no photos at all once I started working with glue. DO wear gloves. That stuff is messy! Glued down.
Mrs bjmoose wanted me to cove the flooring around the edges to help confine the mess. No way was I doing that much work. But I tacked down a little bit of corner cove trim to help hold down the edges and help keep any "liquid" confined for cleanup.
We need some chicken perches. On a small coop, they should be removable for cleaning. They're 2x3, that runs along the depth of the coop (front to back) supported by "T" brackets on the ends:
Here they are in place. They're roughly about 18" apart. Those brackets rest on those roof supports (another reason not to forget to add them!) and you can see the additional trim pieces to hold the perches in place side-to-side so they don't shift around. But they're easy to lift up and out.
If you used asphalt shingles, the goal was most of the roofing nails were aligned with the rafters. But a few needed to be on a different offset line, and those are sticking down into the coop.
Don't want the chickens to injure themselves on them.
Dremel to the rescue. I cut them off with a cutoff wheel, then smoothed them with a stone. I probably don't need to point out this is *NOT* recommended practice when roofing your *real* house.
About the pen, there's not a lot to say. You won't want my measurements, since your space is almost certain to be a different size and shape than mine. But here are a few construction notes:
Thanks for sticking with me to the end! If you build a coop based on this design, please post up a picture here, so I can see that my effort in documenting this was worthwhile!
Advantages of this design are:
1. Can be disassembled, moved, and reassembled.
2. Has gigantic front opening doors for cleaning access
You might want to build this coop if:
1. You have a compact backyard (our lot is 70x100 total)
2. You want to build the coop one place, then install it somewhere else, or you think you might want to move the coop later. (But it's NOT a "tractor")
3. You want a coop that has a "blind side" that be installed up about a foot away from a fence or building (the blind side does have a large window for ventilation.)
4. You are planning for about six chickens (using the 4sq ft rule)
If you want to build this coop you should:
1. Have *some* building experience. You can confidently and repeatedly cut lumber to measured angles and within 1/8" of the required length
2. Be able to hang a door. It helps if you've done that before, but because it's "just a chicken coop" this might be your first door hang ever. Allow extra time for this step in that case.
3. Budget very roughly $750 for materials at "Home Depot" not counting the pen/run.
Tools recommended:
1. A powerful cordless drill for deck screws. Or a pneumatic nailer if you prefer.
2. Chop/miter saw, like this one: https://www.harborfreight.com/10-in-sliding-compound-miter-saw-61972.html
3. Jigsaw
4. Circular Saw (a table saw would be better, but I don't have one)
5. Air/cordless power stapler for attaching hardware cloth to the framing
6. A "T Bevel" angle gauge
7. Laser level (you could use "old school" stakes and level)
8. Carpenter square
9. Hand tools: Hammer, 1" wood chisel, screwdrivers, 9/16" wrenches, metal snips, clamps etc...
10. 5" hole saw
Things I'd do differently:
That shingled roof is *heavy.* Given the desire to be able to move the coop pieces, I'd use plastic roofing instead of asphalt shingles next time.
Why did I call it "Ikea Style?"
Well, you know, you buy furniture from Ikea and it all comes in a bunch of flat boxes, and then you assemble it and fasten with bolts. There are six separate standalone pieces in the coop: the four walls, the floor, and the roof, and once these are assembled, they are held together with twelve 3/8" bolts. However, I do hope it will last a little longer than a typical piece of furniture.
Here are some more finished and installed photos:
Doors open for cleaning:
Pullet Tested:
Concept sketches and early plans:
The original sketch called for the chicken doors to be sliding instead of hinged. But hinged turned out to be simpler.
Approximate Materials List for Planning:
(COOP ONLY - not including the pen)
This is from my early notes, plus memory of "return shopping trips" and so is a bit approximate:
1x2" 8' furring strips: qty 4?
1x3" 8' furring strips: qty 20?
1x4" 8' furring strips: qty 9?
2x2" 8' qty 3
2x3" 8' qty 16?
2x4" 8' qty 3
2x4" 8' Pressure Treated qty 4
Plywood and Siding:
1/8" nominal plywood -- qty 1 4x8 sheet
3/8" nominal (11/32" actual) plywood -- qty 3 4x8 sheet
.315" LP Smartside panelling -- qty 3 4x8 sheet
5lb boxes of deck screws (I prefer torx head)
1.5" #8
2.5" #10
3.5" #10
5 or 6 tubes of "liquid nails" construction adhesive
Roofing materials.
When you go shopping, it's helpful to go on a day when they're not too busy and have them rip the sheets for you:
LP SmartSide cut sheet: (they won't do the diagonal cuts - your goal is rectangular pieces)
3/8" Plywood Cut Sheet: (Sorry, I don't have the exact cut dimensions for the second and third sheets. I simply had them cut those sheets to 6' length so they would fit in the back of my truck.)
Materials unloaded into the garage (This is less stuff than the list above shows, because as construction proceeded, I needed return trips to buy more material.) Ready to get started!
The general plan is, we're going to build in the following order:
1. Left and right sides.
2. Floor
3. Plain back
4. Opening front
5. Exterior corner trim
6. Trim and install nesting boxes
7. Trim and install windows
8. Roof
But there will be a little bit of "ping pong" back and forth as sometimes we have to start a phase early, before another phase is completed, in order to get final dimensions needed to complete the preceding phase.
Starting on the "left" side. CORRECTION - the Window Dimensions are 20x11, not 17x11.
Framing cut and laid out. This is pretty simple. Important Note: These side walls are NOT framed like you might expect from regular "home" construction! They are framed with the "thin" dimension of the lumber - so the side wall framing is only 1.5" thick! You might be tempted to frame them the "other" way. Don't do it. Literally everything else in this construction plan will be completely wrong.
OK, now the panel with window cut out. Final trim framing, mesh, and closing shutters will come later. Note that the correct width for the window is 20" - not 18" shown on the plans. I use quick "rough" plans and sometimes have to correct some exact measurements at construction time.
You probably already know how to cut a hole in a panel, using a drill and a jigsaw.
Finished side panel.
It's extremely important that the panel overlaps both sides of the frame by roughly about 3/8" on both sides. I'll explain why later -you'll be able to see on the "how corners fit together" diagram.
In addition to fasteners, I use "liquid nails" construction adhesive to attach the panelling to the framing. It's probably worth calling out here the use of "structural" panelling. This is "LP SmartSide" stranded panelling. A lot of panelling has no shear strength and is only designed to be attached over an OSB structural sheathing. For simplicity, cost, and weight, I wanted to use a single layer. You could use plywood, but this has a nicer outward appearance, and better weather resistance. Win-win.
(Yes, this is a lousy glue bead. I do better when not holding the camera in the other hand.)
I promised to show why that overlap was important:
The right side panel is similar to the left, but is taller, and is framed to support the nesting boxes. I didn't end up cutting the round vent holes that are shown on this sketch.
As with the left side, the framing is "skinny side" and so the wall is framed 1.5" thick.
Cutting the siding with jigsaw:
And installed:
Time to move on to framing the floor. The outer perimeter is all 2x4s, but the inner joists are 2x3s. In case it's not completely clear from the diagram, the long dimension is 69" and the cross joists are 41" - we're creating a floor that is 72" x 44". Why only 44" ? Because that allows us to have a 2" roof overhang while using roof sheeting that's 48" wide cut from a standard 4x8 plywood sheet.
Laid out:
Covered with 3/8" plywood. That's much lighter than you'd use on a house obviously, and flexes a bit when a person walks on it. But it does support a human.
It's a 72" x 44" sheet. So it overhangs the left and right sides by 1.5" each. This is so it'll overlap the wall framing, to make it easier to assemble the modular pieces.
Now, the overhangs have to be notched, so they interlock with the frames for the sides. You can decide how tight you want those tolerances to be. I notched pretty aggressively to save time.
I tend to end up doing jobs like this by myself. Sometimes it would be handy to have a second pair of hands. But I attached a temporary support leg to the walls to make them free standing, so I could hang the floor from them.
...and then lifted the floor. It hangs by the subfloor plywood being supported by the wall framing joists. This is obviously *not* how houses are conventionally constructed.
The goal is to be able to relatively easily break the coop down to transport it. So the floor attaches to the walls with 3/8" bolts.
Viewed from underneath:
I dunno about you, but when I'm constructing anything asymmetrical, I get easily confused. Building a shed once, I cut a sheet of siding that was the mirror image of what I needed, so I had to buy another sheet! So here, I'm labelling the floor to minimize the chance of any confusion. Also, this shows the gaps that I was talking about earlier.
Starting to frame the back panel. From here on out, the sketches I drew start being more vague, with just enough info to provide direction and get a rough idea of the amount of lumber to buy at the lumber yard. But from here until completion, every piece has to be individually measured against the place it's supposed to fit. Can't just read lengths off of plans anymore.
We know we want the main top roof ridge support beam to rest on a support stud that is 48" above the floor. So the length center stud is 47.25" (48 - 3/4" of the bottom plate.)
We know the height of the top plates of the sides, because we can measure them, and cut the end studs directly from that length. (I didn't record that length - you measure it.)
Having done those two, we can rest a temporary stud across them, and measure the desired length of the middle support stud. (That's the third from the left in this photo.)
All that said, here's the sketch where I worked some of those measurements out.
But again, I caution you - from here on out - you've established your basic measurements with what you've built so far - and everything that follows is derived from the previous build, rather than from what is "on paper."
And realized - with cut studs resting on the bottom plate.
Studs now attached to the bottom plate to make them freestanding.
It's important to check crossways dimensions. We need to keep the sides parallel, and we need to keep the studs square. My first attempt created a trapezoid, and I had to recut one cross member 3/16" longer.
Taking the frame wall off to measure and attach the top diagonals that'll support the siding. This is a perfect example of "measure, then cut to fit."
Back side resting in place. As with the floor, it'll be bolted into place for relatively easy disassembly and reassembly. We need to be really careful establishing the exact top cut line on the siding. So, we won't cut the siding until after we cut the rafters, so we can measure exactly how high the siding needs to be. We need the siding to overlap behind the outermost rafter - preferably by about an inch.
Also, note that those "zig-zag" support diagonal studs aren't anything close to parallel with what the top siding line is going to be. But that's OK, and we don't care. Just don't make the mistake of cutting siding to match them!!
From the front:
Here's the more vague sketch for the front. It's actually much closer to conventional housing construction, with conventionally oriented studs, a bottom plate, top plate, and door header. Although the door header and top plate are actually kind of one and the same - since the entire wall will open as a set of double doors. Still, one half of the top plate needs to support the ridge beam, and so it gets a doubled 2x3. The bottom plate is 1x3 furring strip.
And the completed view. There are many additional members that aren't shown in the sketch at all! But you'll recognize the bottom plate, the three primary studs, the top plate, the doubled ridge support stud all from the diagram.
To that, we added the secondary support stud, the diagonals, and a squaring "right side diagonal horizontal support stud." (You don't really need to figure out which one I mean by that. ;-) Just measure and build to the picture.)
All these measurements for these are taken to fit against the already constructed pieces, rather than off of plans.
We're going to roughly frame in the roof before we cut the siding, so we can take more measurements on where to cut the siding. So now it's time to cut some rafter ridge and top-plate supports, and the secondary support, and then measure, cut, and notch some rafters.
The roof ridge and rafter support beams are 48" long, to allow the roof to be the full 48" wide of the plywood sheet. This gives a 2" overhang given that the coop floor footprint is 44" (Recall that's why we made the floor only 44" wide - to give that overhang.)
Here's the top plate support for the left side. Take note of the extra verticals. These align the supports, and are a handy alignment point when putting the roof on, as well as making the roof free standing (which is important while building the roof component assembly.) It's just resting in place. NOT attached.
This photo emphasizes the point that the top-plate roof supports rest on the side walls (and thus the coop legs) and NOT the front/back wall support studs.
OK, here we have all the rafter supports in place: ridge support, top plate supports and the "secondary support." At this time, all these are just resting there. Only the floor and left/right sides are bolted. Hit it hard enough and everything falls over like dominoes.
Time to start cutting and notching some rafters. They're made from 1x4 furring strips. I arbitrarily choose six inches of overhang. This is the cut for the top ridge support. In all cases, the notches are 1.5" into a 1x4 rafter.
Note that I did NOT provide you a length. From this point on, you're going to be taking measurements off of the parts of the coop you've already constructed.
And the cuts for the secondary support and top plate support look like this:
Here's rafter test fit number one. They all line up. That's a good thing.
Plan view of the test fit. This shows the notches better:
Rafters situated into place:
You have to be resourceful to handle your mistakes. This test fitting showed I'd made a measurement error. On the front I'd excluded the bottom plate thickness from the ridge support, while on the back I'd *included* it. The simple solution was to shim the secondary support point on the back framing with a scrap of bottom plate.
We framed and test fitted the front side, ridge supports, and rafters in order to answer the question: How much top siding clearance do I need on the back panel???
Here's the answer: 2.75" taken at this point. Would have been easier to take it at the other side of the stud, when it would have come closer to 2"
So, now, finally, we can go back and measure and install the siding on the back side. It's two pieces, centered and overlapped on the ridge support stud. Remember, this is structural siding, so it adds shear strength to the whole when properly fastened.
Also note the overlap at the bottom, to match the overlap of the floor joists on the left and right side siding.
I actually installed a complete 48" x 48" piece, then trimmed it to size after it was attached to the framing. But really, the only major trim was the diagonal, and a tiny clearance on the far right side - basically the "overlap" section.
After the second part is attached and trimmed:
Now would be the ideal time to cut the back panel vent window. I didn't end up cutting it until I'd finished nearly everything else. If you cut it now - it's 48" by 8"
Anyhow, here's the view from the opposite side. This shows that those diagonal top stud supports DO NOT run parallel to the roofline. That's OK - they're only there to provide a convenient attachment point for the siding so it doesn't have a large unsupported dimension
The back side has now been fastened into place with four 4" by 3/8" bolts.
It's time to think about those opening front doors, and get the front side of the coop panelled.
To have opening double doors, we need a door jamb to mount the hinges on. I used some 1x4. If you're hanging a "real" door, you're gonna shim the door jamb to level it. I've done that, and it's lots of fun. But for a chicken coop that sits on legs on the dirt, there's not going to be any durable concept of "level" so I just attached my door jamb directly to the rough opening with glue and decking screws.
Yes, it sticks out. That's what we want, because we have to build up the door from studs, siding, and fascia trim. Once that's all done, we'll need the door jamb to be this far out from the rough framing.
Now we'll build up the door itself - starting with its internal framing. It's going to be framed and sided basically the same as the rest of the coop. For "door within a door", we need a center stud for mounting the chicken pop door or vent window onto. And it adds rigidity to the whole thing.
I do most of my construction using deck screws. They're expensive, but worth it to me. Mostly, they are self drilling. But for thin pieces like these, decking screws can cause them to split. So I pre-drill thin pieces -- basically almost all the times I'm driving deck screws through furring strips I pre-drill the furring strips.
The door frame is built from 3 studs and a thinner top and bottom plate. The middle stud is NOT aligned on center. Rather, the line below is on center, and the EDGE of the center stud is placed on the line. The stud goes to the HINGE side, so the larger gap goes to the center side.
What are the dimensions on the door? Measure your final rough opening size, and use 1/2" less than that, so the door has 1/4" clearance in every dimension.
Here's the completed door frame. (There are two.) As we go, always check to make sure the work remains plumb and square.
And resting in their position.
With all our framing cut, and the door jamb in place, Now's the time to drill for and set the four 3/8" bolts that hold the front panel module in place. (Not shown - they'll go through the door jamb and unlike the others, the bolt heads will be on the inside - door jamb - side.) And then we can install the siding for the front side.
We'll start with the left strip next to the door jamb. In this photo, I've got the siding strip deliberately too low, so you can see how it will sit.
The brown pressure treated 2x4 on the left is part of the left side. The 2x3 stud is part of the front side. In order to preserve the ability to disassemble the coop for transport, it's critical NOT to attach these two together (except with the removable bolts) So the siding strip must be screwed and glued ONLY to the clear stud on the right - and left free and unattached from the pressure treated stud on the left.
Sides and top sided. The front actually has six separate pieces of siding. Two interlocking on top, one to each side, and two on the bottom.
Gotta side the bottom now. These are attached to the "FLOOR" assembly. So don't accidentally glue or screw them to the front side bottom plate. We have to be able to disassemble the components!
Front siding completed.
Need to notch the front and back siding for the secondary ridge support. I got impatient and botched this - I was using the jigsaw in an ackward position and just wanted to get it done. "Cut in haste, repent at leisure."
I am NOT recutting and reinstalling those siding pieces. It'll get covered up with a wider fascia trim piece than I originally planned.
OK, the siding's all completed. Time to move on to some of the finish trim. We'll do the four edge corners.
They're a piece of 1x3 on the front and back, overlapping 1x2 on the sides. As with the siding edges, there's a challenge in not permanently attaching the sides together. In fact - it's worse and unsolvable. So the front trim pieces are glued to the siding - and then screwed into the 2x4 leg studs that belongs to the side. This makes disassembly impossible!
So after the glue sets and when ready to move the coop, You must remove the ABOVE shown trim screws, then put a shorter screw in from the back that just attaches the fascia trim to the piece of front siding. Together with the construction adhesive, that'll be quite sufficient.
Here's the side view of the corner trim. This is screwed into the side studs, and causes no problems.
The side trim gets minor trimming in order to clear the removable bolts that hold the front and back to the sides.
With all four corners edged trimmed, the next step should be to build the opening panel doors. This is the one you've all been waiting for. "Hey, bjmoose, how are those front panel doors supposed to work, anyway??"
You previously saw the door frames. First, we simply panel over them. Take care to align the grooves in the siding, or the front will look funny.
Now, these are DOORs. So we want them to have maximum stiffness. So for the non-opening part, we also panel over the inside passive non-opening part with 1/8" plywood. As with the main panelling, use construction glue in addition to fasteners, for maximum strength and stiffness.
We need cutouts. They're each going to have a shuttered pop door. But figuring out where those cuts go requires looking at where the trim pieces are going to go on the doors. We don't want to WAIT until the trim pieces are installed, because then there won't be clearance for the saw. So we mock up with tiny pieces of trim, measure, and mark.
Take note of what you're looking at. On the right side, there are two pieces of trim. The pop-door shutter hinge will go so the shutter trim MEETS the fixed trim that's permanently attached.
But on the left side, the shutter trim will OVERLAP the door gap to provide a neat closure. Again - two pieces of trim. Ones the moveable pop door trim. The other is the fixed "cleaning door" trim that's permanently attached to the large cleaning door. But they butt up against one another.
The pencil line is the cutout for the pop door.
If this mockup is too hard to follow - you can just completely trim up the front doors without using any construction adhesive, and then mark for the pop door cutout, (1/2" inside the final trim) and then remove the trim, make the cutout, and then reinstall the trim with adhesive.
Do that on both doors, cut the openings in both doors, and look at it in place:
With those cuts in place, we can add the needed trim to the doors.
On the HINGE side, the trim is flush with the door edge. This is extremely important. But on the other three sides, the trim "splits the difference" half way on the door, and half way overlapping the gap between the door and the coop. So the trim covers the door gap, providing a "finished" appearance.
And with both doors:
The coop is "designed to be imperfect." You'll recall earlier I fastened and glued the door jambs. "Normal" door jambs are shimmed to be perfectly plumb. You can now see how that's going to shake out here, with non parallel gaps on the hinge sides of the doors. It's OK, it's just a chicken coop.
Oh, hey. Speaking of the door jambs. The coop breaks apart by loosening 12 bolts. But two of those bolts protrude through each of the door jambs. Those will interfere with the doors. So we have to mortice out a gap for them with a chisel.
Here's the start of the process. There are lots of YouTube videos on cutting a mortice, so I'm not going to give a lot of detail here. This is also how we're going to mortice the hinges. It pays to get a good sharp chisel. I've bought "off brand" chisels and they're not hard enough steel, and they visibly flatten and dull even when simply cutting wood. For this job I'm using a 1&1/4" chisel. You could use a 1&1/2 (might be better) or a 1".
Time to set the hinges. You can buy templates for using a router and they work really well. I don't set that many hinges, so I do it by hand the old fashioned way with a chisel. Like I said, you can find youtube videos on mortising hinges. So I'm not going to provide too much detail here. But it's critical to know that you can drive the pin out of the hinge, and you mount the jamb part, and the door part, then align the door and drive the pin back in. It is IMPOSSIBLE to hang a well fitting door of any size using a fixed pin hinge. (We'll use cheap miniature fixed pin hinges later for the shutters - but they're only about a foot square.)
First, mark for the mortices. 2" from the bottom, and 2" from the top.
Cut the mortices. and set the hinges. I use 4" hinges because they're big and strong.
This picture is hard to understand, but if you sight down the top hinge pin hole, it must perfectly line up with the bottom hinge pin hole. If it doesn't, you're gonna hate your life.
A quick calculation sheet on setting the hinges on the door. It's critical that they line up exactly and perfectly with the jamb.
Setting up to cut the door mortice. You can see how it cuts across the fascia, the panel siding, and the door frame. This is why we took great care to fasten and glue those together, to make the whole of the thing an inseparable strong door. You can also see that the trim fascia has a knot exactly at the place where we need to chisel it. If you can avoid that with piece selection earlier, it's worth it to do so. But we can work with the knot. It's just not as neat.
We set the top hinge, and use only two screws to hold it in place for an early test fitting.
Uh oh! There's a problem. The door won't quite close. We need to set the hinge deeper into the door, to allow the door to protrude slightly further out from the door frame!
Recut the top mortice 1/8" further back into the door, and then cut the bottom mortice. When it comes to hinges, small adjustments are key. We fill the old screw holes by driving tiny shim splinter/shims into the old holes with a hammer before drilling the new ones. And again, we're only drilling the two holes that are further back for each hinge until we confirm door fitment.
It is CRITICAL that the spacing on the hinges on the door EXACTLY matches the spacing on the hinges on the jamb. If they're off by as much as 1/16" you're gonna hate your life because you won't be able to hang the door. This is a 1/32" or better measurement. Take your time and get it right. Also remember to make sure the hinges align to the same exact depth on the door. I align the hinge, and then drill a SINGLE screwhole at the desired position and drive a screw to set it. Then drill and set the second screw.
Both hinges set on the door with a pair of screws, so we can do a final test fitting. At this point we EXPECT everything to line up right.
And it DOES. This is the view with the door fully open. But I've checked it through the full range of motion. You can see the second screws are going to drive into the joint between the siding and the stud. So I use a longer screw here ever-so-slightly angled to favor driving into the stud.
And here's the right side door/front panel in the closed position. it fits nearly perfectly. I used a chisel to remove a tiny bit of interfering wood so the door would swing clean. That's OK and is part of a normal door hanging fitment process.
You can still see that uneven door gap (wider at the top, narrower at the bottom.) that we highlighted earlier. If you're hanging a "real" door by leveling and shimming the jamb and building a full floating door frame, you don't have to put up with that. But this is a simplified hang. So it's OK and we don't care. It'll mean that the left and right won't align perfectly when closed. That's OK too. You gotta know what your goals are.
Here's the hung left side door. If you look closely, you'll see I had to shim out the bottom hinge. Just a very thin piece of wood between the hinge and the door. Why?
The left door frame is about 1/8" out of square. So when the hinges were directly attached to the jam, the door wouldn't close at all.
That's why "real" doors shim the door jamb to be perfectly plumb before nailing it to the rough opening. You never see those shims because they're covered up with the door casing trim.
It was still square when I attached the jamb, but I hadn't bolted the front to the sides yet. I hadn't bolted the front to the sides yet because those bolts pass through the door frame rough opening and through the door jamb. But once it was bolted and tightened, it went a little out of square. Since the jamb is glued to the frame for strength, there was no possibility of going back and shimming between the frame and the jamb.
And, as predicted, the double doors don't line up perfectly. You can fine tune the thickness of that shim for as long as you want, tweaking it to whatever tolerance you insist upon.
Next phase is the nesting boxes. As you see, this is notched to accommodate the center support. The floor of the nesting boxes is 12.5" deep, and intrudes 2.5" into the coop.
Make sure to square the floor up against the wall with your carpenter square.
The floor was already mounted. Now cut and mount the ceiling. Like the floor, this won't really show and is 3/8" plywood. Theoretically the same size as the floor, but my best piece to use was 1" shorter, so I used that. That'll taper the top of the nesting box inside the coop a tiny bit. I don't think they'll mind.
Cut the sides out of paneled siding, and cut framing pieces out of 2x2.
Easiest to attach the frames to the sides outside separately
Now mount the inside divider, which is out of 1/8" plywood, and the fixed bottom mount for the drop door.
And add corner trim to the whole thing. I took the suggestions from BYC posters about how to orient and mount the nesting box door. This will be a bottom hinged door mounted on this 3 1/2" sill you see. To keep water out, I'll extend the roof line so it drips just past the edge of the nesting boxes. That's why the top is plywood instead of siding - once the roof's in place, you pretty much won't see the top at all.
I'll do the box door later, at the same time I do the pop door and vent shutters.
So far, we have no roof, and that's kinda important. So this weekend, the goal is to build the roof.
From previous construction, we have four half rafters, and the rafter support beams. Time to measure, cut and trim the short side rafters.
We can use a protractor to get a rough idea of the included angle, but then cut and test fit a sample piece a few times to get the fit exactly right. The final angle was four degrees different from the initially measured angle.
Really, there's a much better tool for this - a "T Bevel" https://www.homedepot.com/p/Johnson-T-Bevel-B75/100353824
But I couldn't find mine at the time I needed it, so I improvised.
Marking the "right side" rafters for cutting. The pencil mark is incorrect. The notch needs to be 90 to the face, as I've illustrated in red.
And the revised cut. After I cut along those initial marks, I had to re-cut after test fitting.
And marking the notch for the other support beam.
The rafters need to be joined together for strength and in order to make an effective attachment to the support beam. I used a piece of plywood to join them. This is glued for strength.
Here, they are notched to fit the support beam. This was easy, since the rafters were already notched, so I just needed to use a jigsaw to match the existing notch into the plywood.
I haven't built the shutters and chicken doors and nesting box doors yet. But the tolerance between the nesting boxes and the roof line is VERY close. So I mocked up the nesting box doors and trim pieces and held them with tape, so I could notch the rafters to fit.
Left side center rafter marked for trim
Right side center rafter marked for trim
All rafters fitted in place.
Now we can attach rafters to support beams with L brackets, making a contiguous roof frame.
And once the frame is built, it can be removed, for decking, papering, and shingling.
Don't forget to add those long horizontal tie supports either - the ones that are sitting on the ground in this photo.
At this point, you want the freestanding frame to be easy to lift on and off the coop. If it binds or sticks anywhere make the necessary adjustment NOW. You don't want to have to do that later after the weight of the complete roofing has been added!
Only the two CENTER rafters get an additional strengthening support, cut from 1x4 (same as the rafters themselves.)
The very top of this photo shows those reinforcements in place. The strength they add is highly desirable.
(This photo was taken after the roof was already fully assembled, and was intended to show the roosts...)
The weight of the king beam is supported by ridge studs in the actual coop. But it has no support while the roof is standalone. Since we're going to be doing a lot of construction, I added temporary vertical support studs to support the roof while building it. These have to be removed later in order to put the roof back onto the coop. But there's going to be a lot of hammering and weight. And we don't want the unsupported rafters to collapse while we're doing that.
Also, this is a much better photo to see the right and left side "legs" and how the left side ones are longer so that when the roof is free-standing, it is parallel to the ground - the same way it will be when on the coop.
Decking the roof with 3/8" plywood. Unfortunately, you DO need two 4x8 sheets. One isn't enough. But this gives the extra for the top and bottom of those nesting boxes.
Installing drip edge flashing. I've put a lot of work into this project so far. It's worth spending a little extra time so that there's no water penetration to cause delamination later of the roof decking plywood. Once I've built this, I don't want to have to do it again.
Papering the roof. Held in place with staples. I think I already mentioned that due to the massive weight of the asphalt shingles, I recommend you to use plastic roofing rather than shingles.
But, shingles IS what I used.
Here we see laying the starter course of shingles. I ignored the shingle nailing pattern guidelines in favor of a nailing pattern that drove most of the nails through the deck and into the rafters. Since the roof is so low, nails that penetrate the roof deck are a potential hazard to the chickens I'll have to cover later, so I want to minimize the number of nails I have to cover later. No matter what, some shingles have to be nailed in a place where there's no rafter.
Fully shingled. Not shown: big dollop of caulking covering the four final exposed ridge shingle roofing nails.
And with the roof dropped into place back on the coop. That thing is *heavy.* Did I mention how heavy it is?
But now it actually looks like a chicken coop.
Time to trim it out, and hang the coop shutters.
You recall early on, I over did the cutouts on the siding where the ridge and support beams sit on the framing and need to have the siding notched. And I made those notches WAY too big. You'll save time in the end if you trim that side panelling accurately enough the first time.
OK, it's time to provide the cover up trim for those holes. I got some 1/8" plywood ripped to 4" thickness. Then trimmed some sample angles until I got it exactly right:
Pieces shown in place on the front. Have to do the same thing on the back. These are attached with construction glue and small 7/8" brads.
The front doors are built up out of a stacked series of trim pieces. This is because they need to be EXACTLY the same thickness as the trim pieces to which they'll be attached. If you look closely, you'll see the middle piece was ripped to an exact thickness so that the doors would fit in the measured gap provided. For this fit to work - we had to precisely align those pieces of trim earlier! Remember, the center trim is not exactly in the middle. Rather, the Hinge Edge of that piece is exactly in the middle.
Unfinished door on the left, glued and screwed door on the right. I could have drawn a pencil line down the center to align those attachment screws, but this approximate placement continues the "informal, built by hand" look that I've been cultivating so far.
Door hung on small hinges. These doors are MUCH easier to hang than the big cleaning doors. Note the safety spring hook catch that keeps it locked. You have to carefully place the loop, so that it doesn't interfere with the door being fully opened!
And the door in the fully open position. Note how the door slightly overlaps the rightmost trim piece - that's what we want and measured for earlier, so that it opens to a neatly blocked position! And then add a hook and loop to hold the door open. This hook doesn't need to be predator proof, since it's just holding the door open.
Both doors hung. One shown closed, and one open. This really shows how the doors fit. I'm very proud of that. They sit flush when fully open, and also sit flush when fully closed.
PS: (In this picture, you can also see that the "surface bolts" that I bought at home depot to hold the big front "cleaning access" doors are actually different sized on the left and right, even though I pulled them out of the same bin. I didn't see it when I installed them, but the photo sure shows it. How annoying! I ended up swapping them out later.)
And, both doors open. This is how they'll be almost all the time.
That reminds me: "Hey bjmoose, how come your chicken coop has two doors?"
"Because, if it had four doors, it would be a chicken sedan!." Ha! Ha! Ha! I kill me.
Let's build the nesting boxes door. Again, it's built up out of pieces the same thickness as the trim, so that it sits flush for neat hinging.
You see that gap at the top of the cross support pieces? That's IMPORTANT. Actually, you can see it better in the next photo.
Glued and screwed. The gap shows better here. Speaking of gaps. You can see those three horizontal pieces are not exactly the same width, leading to a tiny gap between the bottom piece and the left side trim. That gap is only one half the breadth of the saw blade wide. It really illustrates the difference between the "construction quality" that I'm going for here, and "cabinetry quality" which I have neither the tools nor the disposition to build.
Mounted in place fully open. And now you see why we need the gap. It allows the door to close flush. Otherwise the top plywood of the nesting box would interfere with those cross pieces.
And fully closed. Theres a pull handle for opening, and a hasp, secured with a carabiner, to secure it shut. I filed the burr off the drip edge flashing, to minimize the risk of cuts while opening the nesting boxes.
And the photo that shows the trim, doors, and nest box doors we added. My neighbors are now all razzing me about my "luxury chicken coop" I'm building, and asking whether it has full kitchen and air-conditioning. :-D
Once we trim out the other side windows, and cover the vents and openings with hardware cloth, we'll be done.
Speaking of vents, how much ventilation is there?
Front Doors (when open) 2x 12"x12" = 288 sq in = 2 sq ft
Left side window: 18"x11" = 200 sq in = 1 & 3/8 sq ft
Back window: 48"x8" = 384 sq in = 2 & 5/8 sq ft
Under eaves: 2x36"x2.5" = 180 sq in = 1 & 2/8 sq ft
Gable round holes 4x 5" dia = 4x2.5x2.5x3.14=80 sq in = 4/8 sq ft
Total (doors open) = 7 & 3/4 sq ft.
Gable round holes? What gable round holes?? We want some ventilation as high as possible to let the warm moist air out. So let's cut them. Using 5" hole saw.
Exactly WHERE do we cut those? Well, I used the hole saw from the INSIDE to locate where the holes could go without cutting the framing.
I never showed the cutting of the large window in the back panel. It is 48" wide by 8" high, and is cut using a jigsaw. Now add furring strip trim around it.
All my trim pieces are cut with 45 degree angles, because I think that looks better. But you could do a butt joint trim instead. All the window trim is nominal 1x3" furring strips.
And, add trim around the left side window:
We need hardware cloth over the non closing windows. Attached with a mix of #8 1/2" screws that only go into the siding, along with some longer screws that set into the trim on the other side of the window. Large fender washers over the screw heads.
This photo shows the ventilation space under the eaves, and the hardware cloth covering those openings.
And cloth the gable holes.
OK, it's now almost done. we're going to have a big family "chicken coop raising." Everyone's involved in getting it out of the garage where it's been being built, and into the back yard. This sequence will show how the coop comes apart (relatively) easily for transport. There are a lot of photos, but the whole disassembly/move/reassembly only took about an hour.
Get ready to raise the roof! Ready....
Through the narrow side gate:
Detach and remove the front wall module:
...and the back...
Not shown is unbolting the sides from the floor, carrying those back, and standing them up again.
Here, we reassemble on the grass in the backyard. Those plywood "tabs" allow the floor to "rest" on the side cross members, so we don't have to hold its weight while assembling, we only have to hold everything roughly in position so it doesn't all fall over. I'm furiously inserting bolts in the background.
Once it is bolted to be free-standing again, we put the back back on.
And bolt it up, "IKEA style." ;-D
The whole thing is held together with twelve 3/8" bolts of varying lengths.
There are four for the floor, four for the back, and four for the front. The roof just stays in place with weight and friction. I suppose you'd have to bolt it down in hurricane country, but not here.
Once it's bolted in, time for the roof. We need four folks, one for each corner.
Tolerances between the rafters and the front and back are close, so settling it into place takes a bit of shifting, finagling, and persuasion.
Ready for finishing touches. Flooring, paint.
Just a few things to go now. First is vinyl flooring for easier cleaning. We've had this leftover scrap since we refloored a bathroom a few years back. Start by flatting it out, since it's been rolled up. Yes, those *are* Girl Scout cookies holding it down.
Trim it a few inches oversized and plop it into the coop. Don't go too large. It's actually easier to align and trim neatly if you've put in a piece trimmed to be only a couple inches oversized. Now, the thing you need to know here is: I absolutely suck at flooring installation. So there are NOT going to be any closeups here. That would just highlight the ugly flaws... Starting now. This piece is too big. We only want to be a LITTLE oversized. This is a LOT oversized.
Once it's in place, roll or fold it back to reveal half the floor:
Glue that down, trim, roll/press it flat, and then fold back to repeat on the other side. Sorry, no photos at all once I started working with glue. DO wear gloves. That stuff is messy! Glued down.
Mrs bjmoose wanted me to cove the flooring around the edges to help confine the mess. No way was I doing that much work. But I tacked down a little bit of corner cove trim to help hold down the edges and help keep any "liquid" confined for cleanup.
We need some chicken perches. On a small coop, they should be removable for cleaning. They're 2x3, that runs along the depth of the coop (front to back) supported by "T" brackets on the ends:
Here they are in place. They're roughly about 18" apart. Those brackets rest on those roof supports (another reason not to forget to add them!) and you can see the additional trim pieces to hold the perches in place side-to-side so they don't shift around. But they're easy to lift up and out.
If you used asphalt shingles, the goal was most of the roofing nails were aligned with the rafters. But a few needed to be on a different offset line, and those are sticking down into the coop.
Don't want the chickens to injure themselves on them.
Dremel to the rescue. I cut them off with a cutoff wheel, then smoothed them with a stone. I probably don't need to point out this is *NOT* recommended practice when roofing your *real* house.
About the pen, there's not a lot to say. You won't want my measurements, since your space is almost certain to be a different size and shape than mine. But here are a few construction notes:
- It's also designed to be modular. It's made up of self supporting panels, framed with 2x4s. The panels are then attached to with decking screws.
- It's more important than you think to level your jobsite. I set it up on 12"x12"x2" pavers, and they're level within 1/2" of each other from one side to the other.
- The bottom plates, resting on the ground are pressure treated.
- Since I used 3' hardware cloth, my panels are 3' wide.
- Each panel has a cross-piece and diagonal for strength.
- The roof line is 3 in 12. You could go less. The roof is just hardware cloth, but we could cover it with plastic roofing later if we want.
- I attached the hardware cloth with a power stapler, using 1/8" x 1" staples.
- I used deck stain to preserve the wood.
- Where it attaches to the coop, I didn't staple into the coop, I attached extra furring strips to the coop, held on with decking screws, and stapled the cloth to that. This preserves the ability to disassemble/reassemble, just by removing a few screws.
Thanks for sticking with me to the end! If you build a coop based on this design, please post up a picture here, so I can see that my effort in documenting this was worthwhile!