Aart's Hoop Coop / Chicken Tractor

I've always been intrigued by the livestock panels as a structural material for a coop, and love the curved Quonset hut type imagery. Also like the idea of a chicken tractor to spread their industry and fertilizer in a less (human) labor intensive way...and I kinda could use some extra housing space in spring and summer, after hatch and up to fall culling. So had been pondering if and how I could build one.
Asked a few people how they transported said panels and a buddy said Ben moved the 30 used ones they bought, and Ben told me he was disassembling his hog pens and could sell me his one year old hog panels cheap and deliver them on his friends 16' trailer, they were still in good shape, just slightly corroded on the one edge but no sharp bends/kinks (which may have been a deal breaker for me, as I wanted a nice, smooth curve.) Sold!!
I had a bunch of salvaged 5/4 deck boards that I wanted to use for the base frame, tho wasn't sure they'd be stiff enough, but everything else was new material. I'm a design drafter by trade and an engineer by nature, so usually draw stuff up on CAD to work out most the design concept details, but for this I needed hands on investigating on how to proceed for most aspects of the build. I started out with seeing how hard these things were to bend and handle, had never really touched one before and I mostly work alone so it was a serious consideration...could I even move the darn things? Ended up being pretty easy, I am well versed in tip, drag, and leverage with center of gravity to actually lift as little weight as possible while moving large objects without assistance. Got it into position to determine how wide to make base frame.
Used a ratchet strap to hold the bend and dragged then tipped and flipped it into position within the frame. Not as much outward pressure as I had expected, think the frame will be fine(later had to tie together the eventual frame bow as it skewed the wheel function).
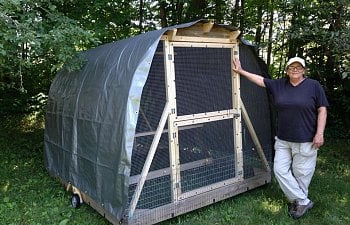
Finished size is approximately 81"W x 102"L x 75"H.
I hate fence staples, yes hate, and most hammered fasteners for that matter. Screws are easier to install, IMO..and can be re/moved if you make a mistake, and I make a lot of mistakes, or at least want to change things sooner or later. So decided to try these nylon wire shelving clamps, looks pretty good to me. I put 2 down and 1 up on each panel end. Don't think there will be too much pressure on them....and I had to move a few later in the construction...so screws, yeah see!? are the best choice for me.
The panels are slightly staggered because of rods tips beyond edge. I used vice grip pliers to clamp panels together at attachment points then applied heavy zipties
But NOT hemispherically rounded as I had envisioned...semi elliptical or egg shaped!! How appropriate for a chicken coop, eh!? I like this shape, it might even shed snow better, a real consideration where I live...but it wasn't the shape I wanted at this time for this project. So hmmmm....crap....I scratched my head for a good couple day on how to get it 'into shape'. I pulled on the top of curve and it moved pretty easily to what I wanted but how to keep it there without putting too much pressure on the shelving clamps? Finally dawned on me....got out the ratchet strap again and any extra 2x2 and 'squeezed' it down/out without putting pressure on the ends. Great! Now how to hold it there? hmmm...more head scratching.....aha! Keep it from going back to it's preferred shape with - The Spreader ...which also would be the Header for the doorway. Just a notch cut in ends of precisely measured 2x2 popped in and...TaDa!!!
It was also a bit out of plumb so angled members corrected that and bolstered support of door and offered support and attachment of end mesh.
Other end was 'Spreadered'.... then center panel...then one end spreader/header popped out and dropped to the floor! Sigh. So brackets were needed, had pondered it earlier, now confirmed. Found the perfectly sized L brackets in my stash (from furniture dismantled at least 15 years ago), hammered a bit to increase angle and spreaders were locked in.
So structural assembly is pretty much done...time to install the 1/2" Hardware Cloth mesh...more head scratching. Planned to put 16' lengths of 24" HC and secure the needs to the frame between frame and panels. The spacer on the panel clamps made this conceivable and it panned out pretty well, tho I did have to pull the panels away from the frame in spots to slide HC down in there. In some instances I actually loosened the clamp screws(eh, see?!) a bit to make it easier. So after getting one 16' piece over the top and perusing how to attach the edge and playing with some scrap mesh, I realized I should put the end mesh on first. I'll let the pics do most the talking.
Attached mesh to door frame then trimmed and bent over panel edge.
Standard pliers worked well to squeeze mesh tight to panel rod.
....and done.
HC went between panels and frame, screwed down with washers from the inside.
Then decided to bend over one square of the top mesh after attaching ends to frame.
Grabbed a scrap of wood to help bend mesh 'around the corner' and it had a notch cut out of the end which worked great.
Then zipties at about 4" increments around the front curve.
See that 14 gauge wire with a small hook at end hanging off the mesh in the lower left of pic?
That's my tie hook, works great to pull tie end thru mesh, other end is bent in a larger loop for a 'handle'.
Meshed the other end in same manner, then overlapped top pieces by 1" and ziptied at seams.
So all meshed up!!.... now for wheels and towing technique. I have seen many, many wonky wheels on chicken tractors...and many, many different designs. I figured most were wonky due to sloppy clearance holes for both wheel and lever pivot bolts....but it's hard to get tight fit with wood that is susceptible to changing with moisture exposure. I did use a flanged bushing that I just happened to have in my stash for the pivot bolt Also hard make sure the clearance holes are perpendicular to the frame they go thru. The wheel assembly I used works pretty good, but improvements are needed. It really depends on how far you plan on moving the coop and especially the ground you are moving it over. The softer and/or rougher the ground the larger the wheel you'll want...but then the harder it is to install in a simple frame. I'm not totally satisfied with these wheels, improvements simmering in my brain for the next iteration...but here is what I have.
tried a pin for the raised position stop, worked OK (not really)... until it rained, the hole swelled and pin became useless.
Update about new wheels added 12-28-16:
These 7" x 1.25" hard wheels did not work well out in the field, too small and narrow...made it very hard to move coop.
So went to a different approach, this works excellent.
Larger 10" x 3" pneumatic tires worked much better.
I don't have a pic of them installed because I installed them after delivering coop to new owners.
Where turkeys were raised in them until T-day.
Had to use a wider board to mount and a longer 'kick stand' to support in up position,
but designed to use same mounting holes on coop frame so install was easy.
The original intent for towing was to use a garden tractor or utility vehicle for moving the coop, but I pretty quickly abandoned that for a simple handle for hand moving. The frame construction is fairly delicate due to using 5/4 stock instead of 2x...I was trying to keep things light, typical chicken tractor dilemma, weight vs robustness...and was afraid that a vehicle could tear it apart if something got stuck during moving. That 'something stuck' that you wouldn't 'feel' using a vehicle that you would feel when moving by hand. The other thing was the hitch mechanism and enough length on the hitch tongue to accommodate turning radius equal dependant on width of towing vehicle. Then tested a pin on a hand truck thru screw eye on frame to raise and move....this is when I realized that DUH, the wheels needed to be in the middle of coop not on the end...SMH. So simple handle with weight of coop center balanced - easy peasy lift/push-pull/turn...at least on the concrete floor of garage. Used a temporary roost that I grabbed to test the handle theory...which has evolved from test handle to permanent handle..haha!
It moved over the gravel driveway in onto turf pretty easy.
At this point decided which end door would go on, so meshed up handle end and built and installed a dutch door. I like the dutch doors, have 4 of them on coops and runs, as you can open just the top to get a better look, feed treats and in the case of this tractor feed and water without giving easy egress for birds to exit.
Update 6-26-17: Aprons do not work well in field with long vegetation.
Next up .....Anti-Dig Aprons. I think this is an important aspect of predator protection and on a tractor it can be hard to have them and still be able to move the coop. Id' read about and seen a couple foldable aprons and decided I would develop something to work for mine. The panel clamps were kind of what I wanted for hinges for the aprons but weren't quite right. I searched for another product that might suffice but came up empty. I knew what I wanted, modeled it up in cadd, sent the model to a couple buddies to see if they might recognize a product that would fit the bill. After an hour or so of searching online and looking at my model finally decided to fabricate it myself. Dig thru my stash and came up with a piece of material that I thought would work. Got out the router table and cut a groove, then went to the drill press, then the chop saw and came up with this prototype:
Looks Perfect! So made up a few more and cut a piece of 14ga 1x2 mesh for the first apron.
Looks pretty good! Works pretty good too.....
......now I just needed to make about 20-30 more of them.
Luckily the scrap I found was long enough to do just that.
So cut and 'flattened' a side pieces, making them long enough to extend beyond end to cover corners when in down position and a separate piece(a few inches longer than gap) to go under wheels. Landscape cloth staples, used to pin apron in down position, also worked well to hold apron to mesh coop sides when in up position...wasn't sure what I was going to so about that, so solved! I put yellow tape on staples for visibility.
But extension sticking out would interfere with, or get smashed, when moving coop.
So I cut and 'self hinged' them, they slide up to clear clamps when folded up.
Adding another pic of landscape staple, before yellow tape added for visibility.
They just slide in the ground at a shallow angle to keep apron from sticking up,
especially in case tractor is on uneven ground.
And another added, with circles around staples holding apron in folded position,
you may have to zoom in on your device or copy to photo program.
Wow!! I had been thinking (for months and months) about how foldable aprons would work and how to make them....and it ended up being a fairly simple.
Being able to fabricate the hinge clamps was key. I am really, really happy with the way they turned out.
So had gotten a tarp that fit pretty good and figured I could use bungies to adjust it being up or down but it would need some permanent attachment points. As it was bit longer than coop I cut up these blocks to fashion a bit of an awning on both ends and attached with screw/washer thru tarp grommets.
Not perfect but<shrugs>but it'll do until if/ when it doesn't.
Now I had a few of ideas of how and where to use this hoop coop/tractor myself (mostly overflow housing during growout season, maybe some meat birds, etc) but from early on the plan was to loan it to a buddy (along with the young cockerels I had) who was just thinking about how/if to raise some food birds on his land. So he gets to experience having some birds and tests my design at the same time. He borrowed a trailer and came over to load it up, trailer was not what we/I expected. We thought 8x10, flat bed - no sides or ramp, brain was cranking contemplating how to strap it down without damage...but ended up with more like 7x9, large ramp and sides....and was damnnear too narrow for coop to fit...only an inch, if that, to spare...and that was with the wheels removed. But it fit. Using some 2x2's to reduce sliding resistance, and some brute strength on his part and navigation on mine, we got it on pretty easily.
Nice thing about sides and ramp, didn't need to strap it down at all......was only going about 5 miles on pretty slow roads.
Birds are happy, and once acclimated to coop will have wonderful areas to free range in
How it all plays out remains to be seen.
I've always been intrigued by the livestock panels as a structural material for a coop, and love the curved Quonset hut type imagery. Also like the idea of a chicken tractor to spread their industry and fertilizer in a less (human) labor intensive way...and I kinda could use some extra housing space in spring and summer, after hatch and up to fall culling. So had been pondering if and how I could build one.
Asked a few people how they transported said panels and a buddy said Ben moved the 30 used ones they bought, and Ben told me he was disassembling his hog pens and could sell me his one year old hog panels cheap and deliver them on his friends 16' trailer, they were still in good shape, just slightly corroded on the one edge but no sharp bends/kinks (which may have been a deal breaker for me, as I wanted a nice, smooth curve.) Sold!!
I had a bunch of salvaged 5/4 deck boards that I wanted to use for the base frame, tho wasn't sure they'd be stiff enough, but everything else was new material. I'm a design drafter by trade and an engineer by nature, so usually draw stuff up on CAD to work out most the design concept details, but for this I needed hands on investigating on how to proceed for most aspects of the build. I started out with seeing how hard these things were to bend and handle, had never really touched one before and I mostly work alone so it was a serious consideration...could I even move the darn things? Ended up being pretty easy, I am well versed in tip, drag, and leverage with center of gravity to actually lift as little weight as possible while moving large objects without assistance. Got it into position to determine how wide to make base frame.
Used a ratchet strap to hold the bend and dragged then tipped and flipped it into position within the frame. Not as much outward pressure as I had expected, think the frame will be fine(later had to tie together the eventual frame bow as it skewed the wheel function).
Finished size is approximately 81"W x 102"L x 75"H.
I hate fence staples, yes hate, and most hammered fasteners for that matter. Screws are easier to install, IMO..and can be re/moved if you make a mistake, and I make a lot of mistakes, or at least want to change things sooner or later. So decided to try these nylon wire shelving clamps, looks pretty good to me. I put 2 down and 1 up on each panel end. Don't think there will be too much pressure on them....and I had to move a few later in the construction...so screws, yeah see!? are the best choice for me.
The panels are slightly staggered because of rods tips beyond edge. I used vice grip pliers to clamp panels together at attachment points then applied heavy zipties
But NOT hemispherically rounded as I had envisioned...semi elliptical or egg shaped!! How appropriate for a chicken coop, eh!? I like this shape, it might even shed snow better, a real consideration where I live...but it wasn't the shape I wanted at this time for this project. So hmmmm....crap....I scratched my head for a good couple day on how to get it 'into shape'. I pulled on the top of curve and it moved pretty easily to what I wanted but how to keep it there without putting too much pressure on the shelving clamps? Finally dawned on me....got out the ratchet strap again and any extra 2x2 and 'squeezed' it down/out without putting pressure on the ends. Great! Now how to hold it there? hmmm...more head scratching.....aha! Keep it from going back to it's preferred shape with - The Spreader ...which also would be the Header for the doorway. Just a notch cut in ends of precisely measured 2x2 popped in and...TaDa!!!
It was also a bit out of plumb so angled members corrected that and bolstered support of door and offered support and attachment of end mesh.
Other end was 'Spreadered'.... then center panel...then one end spreader/header popped out and dropped to the floor! Sigh. So brackets were needed, had pondered it earlier, now confirmed. Found the perfectly sized L brackets in my stash (from furniture dismantled at least 15 years ago), hammered a bit to increase angle and spreaders were locked in.
So structural assembly is pretty much done...time to install the 1/2" Hardware Cloth mesh...more head scratching. Planned to put 16' lengths of 24" HC and secure the needs to the frame between frame and panels. The spacer on the panel clamps made this conceivable and it panned out pretty well, tho I did have to pull the panels away from the frame in spots to slide HC down in there. In some instances I actually loosened the clamp screws(eh, see?!) a bit to make it easier. So after getting one 16' piece over the top and perusing how to attach the edge and playing with some scrap mesh, I realized I should put the end mesh on first. I'll let the pics do most the talking.
Attached mesh to door frame then trimmed and bent over panel edge.
Standard pliers worked well to squeeze mesh tight to panel rod.
....and done.
HC went between panels and frame, screwed down with washers from the inside.
Then decided to bend over one square of the top mesh after attaching ends to frame.
Grabbed a scrap of wood to help bend mesh 'around the corner' and it had a notch cut out of the end which worked great.
Then zipties at about 4" increments around the front curve.
See that 14 gauge wire with a small hook at end hanging off the mesh in the lower left of pic?
That's my tie hook, works great to pull tie end thru mesh, other end is bent in a larger loop for a 'handle'.
Meshed the other end in same manner, then overlapped top pieces by 1" and ziptied at seams.
So all meshed up!!.... now for wheels and towing technique. I have seen many, many wonky wheels on chicken tractors...and many, many different designs. I figured most were wonky due to sloppy clearance holes for both wheel and lever pivot bolts....but it's hard to get tight fit with wood that is susceptible to changing with moisture exposure. I did use a flanged bushing that I just happened to have in my stash for the pivot bolt Also hard make sure the clearance holes are perpendicular to the frame they go thru. The wheel assembly I used works pretty good, but improvements are needed. It really depends on how far you plan on moving the coop and especially the ground you are moving it over. The softer and/or rougher the ground the larger the wheel you'll want...but then the harder it is to install in a simple frame. I'm not totally satisfied with these wheels, improvements simmering in my brain for the next iteration...but here is what I have.
tried a pin for the raised position stop, worked OK (not really)... until it rained, the hole swelled and pin became useless.
Update about new wheels added 12-28-16:
These 7" x 1.25" hard wheels did not work well out in the field, too small and narrow...made it very hard to move coop.
So went to a different approach, this works excellent.
Larger 10" x 3" pneumatic tires worked much better.
I don't have a pic of them installed because I installed them after delivering coop to new owners.
Where turkeys were raised in them until T-day.
Had to use a wider board to mount and a longer 'kick stand' to support in up position,
but designed to use same mounting holes on coop frame so install was easy.
The original intent for towing was to use a garden tractor or utility vehicle for moving the coop, but I pretty quickly abandoned that for a simple handle for hand moving. The frame construction is fairly delicate due to using 5/4 stock instead of 2x...I was trying to keep things light, typical chicken tractor dilemma, weight vs robustness...and was afraid that a vehicle could tear it apart if something got stuck during moving. That 'something stuck' that you wouldn't 'feel' using a vehicle that you would feel when moving by hand. The other thing was the hitch mechanism and enough length on the hitch tongue to accommodate turning radius equal dependant on width of towing vehicle. Then tested a pin on a hand truck thru screw eye on frame to raise and move....this is when I realized that DUH, the wheels needed to be in the middle of coop not on the end...SMH. So simple handle with weight of coop center balanced - easy peasy lift/push-pull/turn...at least on the concrete floor of garage. Used a temporary roost that I grabbed to test the handle theory...which has evolved from test handle to permanent handle..haha!
It moved over the gravel driveway in onto turf pretty easy.
At this point decided which end door would go on, so meshed up handle end and built and installed a dutch door. I like the dutch doors, have 4 of them on coops and runs, as you can open just the top to get a better look, feed treats and in the case of this tractor feed and water without giving easy egress for birds to exit.
Update 6-26-17: Aprons do not work well in field with long vegetation.
Next up .....Anti-Dig Aprons. I think this is an important aspect of predator protection and on a tractor it can be hard to have them and still be able to move the coop. Id' read about and seen a couple foldable aprons and decided I would develop something to work for mine. The panel clamps were kind of what I wanted for hinges for the aprons but weren't quite right. I searched for another product that might suffice but came up empty. I knew what I wanted, modeled it up in cadd, sent the model to a couple buddies to see if they might recognize a product that would fit the bill. After an hour or so of searching online and looking at my model finally decided to fabricate it myself. Dig thru my stash and came up with a piece of material that I thought would work. Got out the router table and cut a groove, then went to the drill press, then the chop saw and came up with this prototype:
Looks Perfect! So made up a few more and cut a piece of 14ga 1x2 mesh for the first apron.
Looks pretty good! Works pretty good too.....
......now I just needed to make about 20-30 more of them.
Luckily the scrap I found was long enough to do just that.
So cut and 'flattened' a side pieces, making them long enough to extend beyond end to cover corners when in down position and a separate piece(a few inches longer than gap) to go under wheels. Landscape cloth staples, used to pin apron in down position, also worked well to hold apron to mesh coop sides when in up position...wasn't sure what I was going to so about that, so solved! I put yellow tape on staples for visibility.
But extension sticking out would interfere with, or get smashed, when moving coop.
So I cut and 'self hinged' them, they slide up to clear clamps when folded up.
Adding another pic of landscape staple, before yellow tape added for visibility.
They just slide in the ground at a shallow angle to keep apron from sticking up,
especially in case tractor is on uneven ground.
And another added, with circles around staples holding apron in folded position,
you may have to zoom in on your device or copy to photo program.
Wow!! I had been thinking (for months and months) about how foldable aprons would work and how to make them....and it ended up being a fairly simple.
Being able to fabricate the hinge clamps was key. I am really, really happy with the way they turned out.
So had gotten a tarp that fit pretty good and figured I could use bungies to adjust it being up or down but it would need some permanent attachment points. As it was bit longer than coop I cut up these blocks to fashion a bit of an awning on both ends and attached with screw/washer thru tarp grommets.
Not perfect but<shrugs>but it'll do until if/ when it doesn't.
Now I had a few of ideas of how and where to use this hoop coop/tractor myself (mostly overflow housing during growout season, maybe some meat birds, etc) but from early on the plan was to loan it to a buddy (along with the young cockerels I had) who was just thinking about how/if to raise some food birds on his land. So he gets to experience having some birds and tests my design at the same time. He borrowed a trailer and came over to load it up, trailer was not what we/I expected. We thought 8x10, flat bed - no sides or ramp, brain was cranking contemplating how to strap it down without damage...but ended up with more like 7x9, large ramp and sides....and was damnnear too narrow for coop to fit...only an inch, if that, to spare...and that was with the wheels removed. But it fit. Using some 2x2's to reduce sliding resistance, and some brute strength on his part and navigation on mine, we got it on pretty easily.
Nice thing about sides and ramp, didn't need to strap it down at all......was only going about 5 miles on pretty slow roads.
Birds are happy, and once acclimated to coop will have wonderful areas to free range in
How it all plays out remains to be seen.