There are many proposed solutions for keeping water liquid for a backyard flock during subfreezing temperatures. Personally, I like to keep it simple and with little maintenance.
Unless multiple trips to replace the frozen water seems effortless to you, I have found no methods for maintaining ice free drinking water during sub freezing ambient temperatures, without the use of electricity.
I have been a proponent of the basic cookie tin heater for the last 4 years or so, recommending it to all who ask. Easy to construct, inexpensive, and effective.
The laws of thermodynamics, the heat source in the center of the bottom of water supply will cause the warmer water to rise, creating a continuous "current", as warm water is displaced with cold, thus circulating the water without the need for mechanical assistance. This is one of the reasons why a cookie tin heater works wonderfully for so many.
I have unfortunately since discovered one of the main attributes of a cookie tin is also a severe detriment, and with proper timing, a potential disaster.
Pros: Cookie tins, are readily available, and as such are comparably inexpensive. They are easily constructed into heaters. See my link posted above. Great!
Cons: They are also just cheap steel cans plated with a thin layer of corrosion resistant tin. Not so great...
Thus the pending disaster.
I kept my tin in my coop plugged into a thermo cube, on @ 35F off @45F,

ready to perform when called upon 24/7 365.
I used a popcorn tin due to the additional height.
It was the base to my water supply, keeping the water at the proper height, half buried in my deep bedding. It served very well for the last 4 or so years, requiring only one single bulb change during that time period.
However, upon a routine inspection this year, I discovered the opening and closing of the tin lid caused the thin tin coating to wear or scratch off. The now unprotected steel rusted the tin shut. Claw hammer in hand, I had to destroy the tin to open it... It was not a pretty sight and I rendered my heater useless.
I try not to do anything twice due to design or build flaws...no matter how inexpensive the materials, as I value my very limited time. Had I discovered this during sub freezing weather, with frozen water, well, let's just say I would not have been a happy camper and leave it at that...
Since it was discovered in a timely manner, I gave the situation some thought.
Problem:
Design and build a SIMPLE water heater that withstands inhospitable (chicken coop) conditions...
My solution:
This solution assumes the builder has a basic knowledge of electricity, coop is properly wired with GFCI protection, and ability to use hand tools.
As I have a phobia involving electricity and water, no matter how careful and well engineered the product, submerging anything electrical in the water was not going to happen. This is why I was originally attracted to the cookie tin heater design.
So...let's design, source, and build a better cookie tin heater, one that will last indefinitely!
Tools:
That's it...
Materials:
Construction:
You can probably already guess where this is going...
The pot is stainless steel, as of 12/2015, under $12. Available online.
Zoom in, I pictured all the necessary information.
Prepare the pot. Paint the inside of the pot flat black, high heat paint. As anyone sitting in the sun can attest, there is heat given off by light, I will not get into the scientifics, but why have that light bounce off reflective surfaces. This is the most efficient form of material to absorb the light and heat energy.
Next, bend the handles down, fairly easy as this is not an expensive well built pot, but perfect for what we are building.
Drill a 1/2" hole around one of the handles. Drill another one directly above, (1.5") from the bottom of the pot, and one 180 degrees away, also at (1.5") the bottom of the pot. You should have 3 holes total.
This was fairly difficult at first, be careful, the bit wanted to walk, and it took some effort to start each hole using a handheld drill as opposed to a drill press.
Once you have your holes drilled, insert the grommets from the parts list in the holes. Hint, these were purchased in the Big Orange Box (Home Depot) store. Please note, the pictures do not show the 3rd hole, opposite side, bottom of the pot.
The next step is to prepare the 10 1/2 inch brooder/clamp light fixture.
Start by removing and tossing the clamp.
Next, cut the wire about 3.5 inches from the fixture, and place the fixture into the pot. The fixture is a very tight fit, actually scraping the paint off the sides of the pot.
Note that the two grommeted holes on the bottom of the pot are there should the fixture decide to slide down, the grommets will hold the fixture in place. Mine did not slide at all. You will have to squeeze the light fixture past the two bottom grommets.
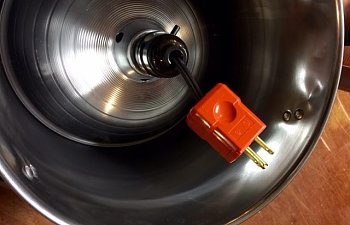
Next, install a male replacement plug to the cut fixture wire.
Now you have an option. You must decide how long a cord you will need to plug in your heater. It would be best not to have any other breaks in the power cord until plugged into the power source. My power source is less than 5 feet away, so I just used the remaining wire from the clamp light, fed it through the hole near the handle, and installed a replacement female plug. Going 25 feet? Sacrifice an extension cord, and do the same. If going a very long distance, just make sure the wiring is suitable, and install the female replacement plug.
Use some zip ties to restrain the cord as shown to the pot handle. This decreases any tension on, and protects the fixture inside the pot.
Your heater is now fully assembled!
I choose to keep the bottom open. With my application, the heater will be placed on a wooden floor.
My build tests show no heat loss (less than 0.1 degree F) from the sides of the pot at all. All the heat from the bulb is transferred to the top of the pot.
You could flip the included cover and simply tape it to the bottom of the pot.
I flipped it into the recycle/repurpose bin...
Total costs should be under $30.00
You now have to choose your heat source.
This fixture will accept normal light bulbs up to 150 watts. As I will be heating a 5 gallon nipple water bottle, I decided to use a 50 watt halogen flood. This bulb is rated for 4 years, I'm guessing around 4,000 hours. I purchased two, one for the shelf for when the one in use burns out. With today's electric prices, it will cost me around 10 cents per 24 hours use.
Well worth the cost to ensure my flock has drinkable water 24/7 365.
If heating less volume, I would recommend using less watts. I know 38 watts kept 2.5 gallons liquid till -9F, my coop's lowest recorded night time temperature.
Please drop me a note with any suggestions or comments. I'm always open to new ideas.
All the best, Ron.
Update:
A 50W halogen flood bulb consistently keeps 4-5 gallons of water in a non insulated water bottle ~30F above ambient temperatures.
1-3 gallons, more than 40F above ambient under the same conditions.
This is more than sufficient for my needs.
Take the time and build one of these base heaters, you will not have any regrets. I don't believe there is a more reliable, safer, or easily serviced heater available.
Unless multiple trips to replace the frozen water seems effortless to you, I have found no methods for maintaining ice free drinking water during sub freezing ambient temperatures, without the use of electricity.
I have been a proponent of the basic cookie tin heater for the last 4 years or so, recommending it to all who ask. Easy to construct, inexpensive, and effective.
The laws of thermodynamics, the heat source in the center of the bottom of water supply will cause the warmer water to rise, creating a continuous "current", as warm water is displaced with cold, thus circulating the water without the need for mechanical assistance. This is one of the reasons why a cookie tin heater works wonderfully for so many.
I have unfortunately since discovered one of the main attributes of a cookie tin is also a severe detriment, and with proper timing, a potential disaster.
Pros: Cookie tins, are readily available, and as such are comparably inexpensive. They are easily constructed into heaters. See my link posted above. Great!
Cons: They are also just cheap steel cans plated with a thin layer of corrosion resistant tin. Not so great...
Thus the pending disaster.
I kept my tin in my coop plugged into a thermo cube, on @ 35F off @45F,
ready to perform when called upon 24/7 365.
I used a popcorn tin due to the additional height.
It was the base to my water supply, keeping the water at the proper height, half buried in my deep bedding. It served very well for the last 4 or so years, requiring only one single bulb change during that time period.
However, upon a routine inspection this year, I discovered the opening and closing of the tin lid caused the thin tin coating to wear or scratch off. The now unprotected steel rusted the tin shut. Claw hammer in hand, I had to destroy the tin to open it... It was not a pretty sight and I rendered my heater useless.
I try not to do anything twice due to design or build flaws...no matter how inexpensive the materials, as I value my very limited time. Had I discovered this during sub freezing weather, with frozen water, well, let's just say I would not have been a happy camper and leave it at that...
Since it was discovered in a timely manner, I gave the situation some thought.
Problem:
Design and build a SIMPLE water heater that withstands inhospitable (chicken coop) conditions...
My solution:
This solution assumes the builder has a basic knowledge of electricity, coop is properly wired with GFCI protection, and ability to use hand tools.
As I have a phobia involving electricity and water, no matter how careful and well engineered the product, submerging anything electrical in the water was not going to happen. This is why I was originally attracted to the cookie tin heater design.
So...let's design, source, and build a better cookie tin heater, one that will last indefinitely!
Tools:
That's it...
Materials:
Construction:
You can probably already guess where this is going...

The pot is stainless steel, as of 12/2015, under $12. Available online.
Zoom in, I pictured all the necessary information.
Prepare the pot. Paint the inside of the pot flat black, high heat paint. As anyone sitting in the sun can attest, there is heat given off by light, I will not get into the scientifics, but why have that light bounce off reflective surfaces. This is the most efficient form of material to absorb the light and heat energy.
Next, bend the handles down, fairly easy as this is not an expensive well built pot, but perfect for what we are building.
Drill a 1/2" hole around one of the handles. Drill another one directly above, (1.5") from the bottom of the pot, and one 180 degrees away, also at (1.5") the bottom of the pot. You should have 3 holes total.
This was fairly difficult at first, be careful, the bit wanted to walk, and it took some effort to start each hole using a handheld drill as opposed to a drill press.
Once you have your holes drilled, insert the grommets from the parts list in the holes. Hint, these were purchased in the Big Orange Box (Home Depot) store. Please note, the pictures do not show the 3rd hole, opposite side, bottom of the pot.
The next step is to prepare the 10 1/2 inch brooder/clamp light fixture.
Start by removing and tossing the clamp.
Next, cut the wire about 3.5 inches from the fixture, and place the fixture into the pot. The fixture is a very tight fit, actually scraping the paint off the sides of the pot.
Note that the two grommeted holes on the bottom of the pot are there should the fixture decide to slide down, the grommets will hold the fixture in place. Mine did not slide at all. You will have to squeeze the light fixture past the two bottom grommets.
Next, install a male replacement plug to the cut fixture wire.
Now you have an option. You must decide how long a cord you will need to plug in your heater. It would be best not to have any other breaks in the power cord until plugged into the power source. My power source is less than 5 feet away, so I just used the remaining wire from the clamp light, fed it through the hole near the handle, and installed a replacement female plug. Going 25 feet? Sacrifice an extension cord, and do the same. If going a very long distance, just make sure the wiring is suitable, and install the female replacement plug.
Use some zip ties to restrain the cord as shown to the pot handle. This decreases any tension on, and protects the fixture inside the pot.
Your heater is now fully assembled!
I choose to keep the bottom open. With my application, the heater will be placed on a wooden floor.
My build tests show no heat loss (less than 0.1 degree F) from the sides of the pot at all. All the heat from the bulb is transferred to the top of the pot.
You could flip the included cover and simply tape it to the bottom of the pot.
I flipped it into the recycle/repurpose bin...
Total costs should be under $30.00
You now have to choose your heat source.
This fixture will accept normal light bulbs up to 150 watts. As I will be heating a 5 gallon nipple water bottle, I decided to use a 50 watt halogen flood. This bulb is rated for 4 years, I'm guessing around 4,000 hours. I purchased two, one for the shelf for when the one in use burns out. With today's electric prices, it will cost me around 10 cents per 24 hours use.
Well worth the cost to ensure my flock has drinkable water 24/7 365.
If heating less volume, I would recommend using less watts. I know 38 watts kept 2.5 gallons liquid till -9F, my coop's lowest recorded night time temperature.
Please drop me a note with any suggestions or comments. I'm always open to new ideas.
All the best, Ron.
Update:
A 50W halogen flood bulb consistently keeps 4-5 gallons of water in a non insulated water bottle ~30F above ambient temperatures.
1-3 gallons, more than 40F above ambient under the same conditions.
This is more than sufficient for my needs.
Take the time and build one of these base heaters, you will not have any regrets. I don't believe there is a more reliable, safer, or easily serviced heater available.