I began researching chicken care about 2 years before I made the leap to get a coop & chicks. I wanted to know everything I could because I would never want to harm anyone - due to my own lack of knowledge, or ignorance. I've had horses for 25 years... so it wasn't a huge leap... just a different, much smaller scale - endeavor.
I got my first chicks on March 9, 2018 after intently researching what the best laying & most friendly backyard chickens are, and I purchased 2 Sexlink Jersey Reds; 2 Black Australorps; 1 Buff Orpington; 1 Sexlink Jersey Blue; and 1 Gold Laced Wyandotte. *Mistake #1: Getting ONE of a particular breed. I had nothing to compare the one chick to - if a particular chick wasn't thriving... (late bloomers? runts? I didn't know) so I sadly lost the Jersey Blue, then the Gold Wyandotte at 6 & 12 weeks. Despite the medicate chick feed, ProBios, ACV, yogurt & herbs, they didn't thrive like the rest did, and remained very small. We set up the 'nursery' in the sunroom and the family thoroughly enjoyed the chicks each day... and we loved watching them grow and develop their own personalities!
.jpg")


It was still cold when my coop was delivered. I hired a local farmer to custom build it for me.
A 6'x14" size, with a 6'x5' raised coop at one end, so the chicks can go underneath for extra shelter if they wish. 2 double hung windows for ventilation, and a green, tin roof. I wanted a coop that would look pretty in the back yard, as well as be easy to clean / functional. It was delivered and I was BEYOND thrilled!

But...being a highly creative sort, a musician & an artist... it wasn't long before I started seeing details I wanted to change... and my husband's not only very kind, generous & amiable, but he's a very talented carpenter. His joke is always: "If Momma ain't happy... nobody's happy". So he sized up my dreams & set out to do some finishing work! It may seem silly, but some of the details were very safety oriented as well as for the comfort of our chicks. We worked on the 'insignificant' things because it was still SO cold outside - and the big job of digging down to place fabric wire down, surrounding the coop wasn't gonna happen yet - so we focused on the "fun stuff" first! We're located not far off the ocean on the east coast, so the cold ocean breezes made it too brisk for the chicks to go out, especially so young.
Here's the back of the coop... there is a small white line of trim, at the bottom of the coop, which is the overhang to protect the "metal poop drawer" - that slides out from below the roosting bars - for easy cleaning. The other is of coop wall - viewed from inside the run. (Note the small chicken door)

Regarding the small chicken door: (as seen above) I read over and over - that one of the greatest mistakes a chicken owner can make is underestimating the predators, so of course, I totally disliked the rectangular piece of wood with a screw in it - that was a latch to keep the door closed. It could have been easily turned & opened by a raccoon. So Philip designed a sturdy new door & put on a safety latch I could close with a carabiner, so the girls would be safe. It's also far prettier, and still predator proof.

While Philip was crafting this new, safer chick door - I set to work & replaced all the hardware outside on the nesting box, the run door, and the people door. The hardware installed by the farmer was serviceable but not as sturdy (nor as pretty) as I'd like, and Amazon had large, strong, vintage style, black decorative hinges and door clasps - which were much stronger & prettier.
When the ground got softer, the first warm day, we set to work putting down 1/2 inch hardware cloth. I bought 3 foot wide rolls - and they totally surround the coop. We sank it down 2 inches below the surface, and first, stapled it - then we screwed it to the 4x4 wooden base of the coop with large metal washers. I was not taking any chances with their safety & well being.
When the metal hardware cloth was totally down, we anchored the edges into the ground with tent hooks every few feet, and raked a bunch of topsoil over the wire to cover it. We put down grass seed and it's come in nicely... but of course, our Border Collie has run a foot track around the coop - due to his frequent patrols each day.
I also bolted hardware cloth over both the double hung windows - on the outside, leaving the window screens to keep out flies out too, and I screwed down fabric wire - up under the eves of the overhang of the roof, incase a weasel or something evil tried to get in that way. I am taking no chances.
I bought First Saturday Lime, and made a lime wash, coating the inside of the 5 nesting boxes with 2 coats of the wash. It's a purely preventative measure, it did no harm - and I certainly don't mind taking measures to avoid mites or lice or such. I use FSLime - each month in the run, coop & surrounding areas - and it does wonders keeping the flies, ticks, chiggers etc away - as well as any smell. A friend commented last weekend, saying the coop smells like a child's bedroom - hahah... I guess that's the lavender & mint I dry & use in there? I also use a marvelous lemon thyme & mint cleaning solution I make myself, that's all natural & dissolves dirt, disinfects, repels flies AND smells wonderful...
Then, we decided to insulate the coop - and after a bit of research we opted to use reflective rolls of insulation we got at Lowes - that wouldn't hold moisture. This stuff seems to repel heat in summer, and it's working GREAT! This last heat wave it was a high of 84* inside the coop, (windows open) on a blistering 98* day with a heat index in the 100's... so 84 inside the coop isn't too bad. The coop's also in a partial sun area, so I'm sure that helps keep it cooler too. I have yet to see how it does in winter but suspect it'll be great. We have good ventilation in the coop too. So Phil put this insulation on all the walls, and ceiling, and covered it over with a pretty, white, wainscoting - which is amazingly easy to clean with a quick wipe - each day.
.jpg")
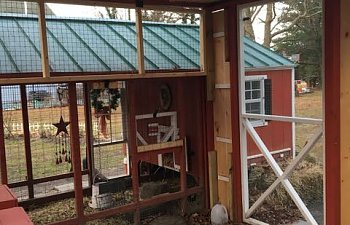
We didn't put wainscot or insulation in under the roosting bar area. The roosting bars have fabric wired underneath - and as I said earlier, there's a metal lined drawer that pulls out, that's built below the roosting bars. This drawer makes it super quick & easy to scrape clean each day. I love it. Here you can see the insulation Philip stapled to the ceiling inside the coop. He also finished the wainscoting with wood trim around the windows & the inside part of the chick door, to finish it off nicely.
I keep a small chair inside the coop for myself, that I can sit easily and clean the roost bars, and then hung a decorative shelf inside the coop, to hold a few things i need - like jars of home made nesting box herbs that I dry, & essential oils (mostly lavender, lemon grass & mint oils) for repelling flies and pests. I saw no harm in putting a useful & pretty shelf up... I go in there to clean each day, and I like a pleasant environment for myself & the chickie girls as well.")
There's also a utility shelf inside the coop, just above the people door, that holds my home made herbal cleaning sprays, fresheners and sanitizers. I had an old, broken candle holder - that was pretty, & hung it in there as well, for a few drying herbs & for fly repelling...
And oh... yes, I hung a pretty little 'glamour' mirror... because the girls just LOVE to look at themselves!!! Also a vintage, match holder that I purchased from Lisa Steele & Fresh Eggs Daily - who is a huge inspiration and source of learning. I put crushed oyster shell in the match holder - for them to help themselves as they need.

I also put up a rain chain. Philip put a small V-channel rain gutter along the edge of the tin roof. The rain was spattering mud everywhere so the v-channel worked great and the little rain chain at the end worked perfectly!
So, while Philip was doing all this fine craftsmanship (because he loves me so much)... I set to work digging up some earth - to add another herb garden... which I placed along my foot path to the coop. So it's easy to pick fresh veggies & herbs each day for the girls, and they just love the healthy treats! I also dry tons of herbs - for use all winter as well.

I planted herbs that promote respiratory health, and support healthy immune systems, as well as herbs that calm & relax... and most of these herbs also repel flies, bugs & other undesirables. I'm growing oregano, pineapple sage, thyme, rosemary, lemon thyme, lots of lavender, tons of various mints, lemon balm, echinacea & marigolds to name a few... and in other gardens we have swiss chard, tons of cucumbers & barrels of mint!
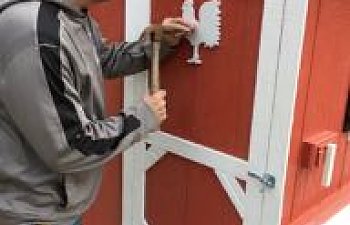
Philip put a white, painted rooster on my 'people' door... that a friend made for my coop. I love it!
So, I'm crazy about my whole chicken life... if you can't tell. Here's my happy coop (aka Cluckingham Palace) & my wonderful chickie girls:
.jpg")
Thank you for taking the time to read about my happy place! As my name reveals, I'm a fiddler - and perform/teach/play Irish fiddle... For breaks during the day, I often play fiddle out at the coop and the girls all run over to me as soon as I start playing, and stand to watch... eventually nestling down to listen... I've done it since they were little, so I guess they're use to it. hahah! It didn't show up in the pictures, but they also have a swing, and roosts in the run. I hope, this coming Fall... Philip & I will be putting up a large extension on the outside run. I am afraid to let them free range with the eagles, hawks & fox we have here. I'll update this then, if we do! Thank you for reading! Have a beautiful day!

UPDATE!!!!!!!!!!!! December 3, 2018
SO, Since I posted about my little coop... we since decided to build (OURSELVES) a large, additional, totally closed in back run - onto the base coop's run.
So first, I drew up the plans:

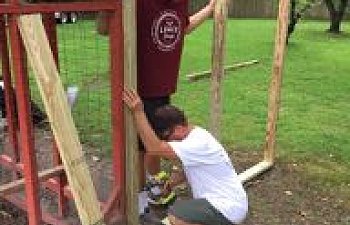
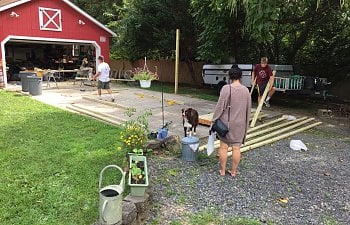
and with the help of my wonderful husband, my big, strong son, and a friend who's happy to work for my home made kombucha... we set to work!
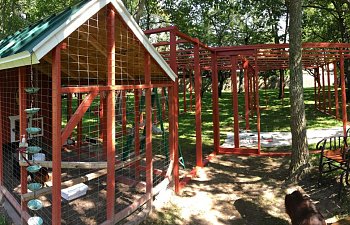
Things progressed, and it was actually the run was a bit larger than I'd imagined, but I love knowing the girls will be able to run and have freedom, still being safe from all the hawks & eagles - out in the "Back Sadie" which is what we call the new run! I've don't have to worry about them getting killed, or eaten... so this peace of mind is great!
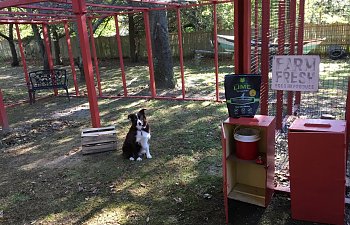
I spent the day painting it red to match the coop, while my husband set to work - building the new chicken door that will go from the core coop's run - into the new, big back run. He also built a large people door... so that it's wide enough for me to fit the gorilla cart easily through.

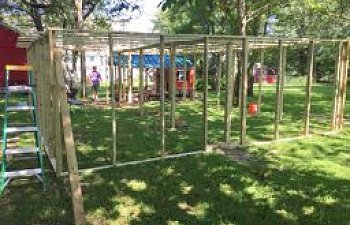
Then... the wire went up! We bought 1.5" welded, black coated wire for the walls & roof of the Back Sadie. We ran 2 feet out - along the ground, at the base of each wall... to protect from predators who may try & dig under - to get in. We used a staple gun, then put metal washers with 2" screws, every 3 feet apart, to add extra security and secure down all the wire edges - again, against predators. This part was the hardest part... the wire rolls were really heavy... and we used ELEVEN, 50' rolls of wire.
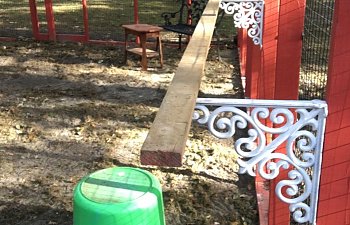
My husband was so awesome, making this dream of mine come true and laughingly customized everything for me... including the hinged door (shown below - secured by the purple carabiner in the left side of the pic) up near the roof of the coop. We put this in so I can swing it up/open, and empty off any accumulated leaves, snow or branches that fall onto the roof - so it's easier... and clean off the tin roof area that would otherwise be unaccessable.

We also decided to put a 6' deep roof... of wood, above the people door. We found pieces of replacement fence boards - for 75 cents each - on the 'end of season' clearance at Lowes... so we bought enough to put up a 6' deep section - for a little added shelter from the elements for the girls! (reinforcing it with wire too)...

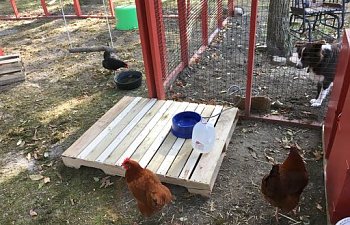
Here's the people door side - of the "Back Sadie" run...
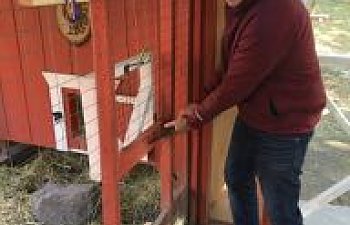
and here's the little chick door, that is close/lockable - from the Back Sadie... into the coop's base run:
I just put Christmas lights & wreaths up for the holidays... <3 I also have bales of straw around the base of the coop & under the nesting boxes, to cut down on drafts. This part of the coop has a sheltered run underneath... so the girls can get out of the elements there too, and still be outside, on bad weather days.

I'm pretty thrifty... and found some good size scraps of plexiglass that was being discarded. I had the pieces cut - to fit/cover the people door into the run, for only $3.59. They were originally $38 PER PIECE!!! To cover it in plexiglass it would have cost me $76... so I saved a lot, and this will give the girls a bit more shelter from wind, snow & rain when the Winter sets in. I asked at Lowes, and apparently, when people buy plexiglass & get it cut to fit... they usually discard whatever they don't use... so I got hold of those scraps, and had them cut for a GREATLY discounted price!
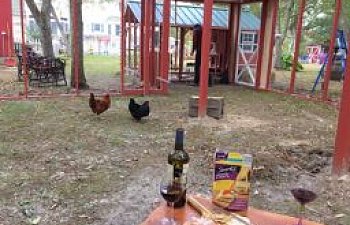
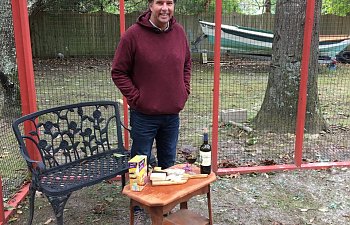
This project took us 2 months from beginning to end (working on weekends & evenings). It was a labor of love, and when we were done, my darling husband got us a bottle of wine & we brought cheese & crackers out to the Back Sadie, and sat and enjoyed watching the girls explore their big, new space... as they scratched & picked and ran around! Haha and they even learned to beg for bits of cheese from us!
This is truly my happy place, I love my chickie girls, and I'm so blessed my husband made this happen! He knows well: Happy wife = Happy Life!


I got my first chicks on March 9, 2018 after intently researching what the best laying & most friendly backyard chickens are, and I purchased 2 Sexlink Jersey Reds; 2 Black Australorps; 1 Buff Orpington; 1 Sexlink Jersey Blue; and 1 Gold Laced Wyandotte. *Mistake #1: Getting ONE of a particular breed. I had nothing to compare the one chick to - if a particular chick wasn't thriving... (late bloomers? runts? I didn't know) so I sadly lost the Jersey Blue, then the Gold Wyandotte at 6 & 12 weeks. Despite the medicate chick feed, ProBios, ACV, yogurt & herbs, they didn't thrive like the rest did, and remained very small. We set up the 'nursery' in the sunroom and the family thoroughly enjoyed the chicks each day... and we loved watching them grow and develop their own personalities!
It was still cold when my coop was delivered. I hired a local farmer to custom build it for me.
A 6'x14" size, with a 6'x5' raised coop at one end, so the chicks can go underneath for extra shelter if they wish. 2 double hung windows for ventilation, and a green, tin roof. I wanted a coop that would look pretty in the back yard, as well as be easy to clean / functional. It was delivered and I was BEYOND thrilled!
But...being a highly creative sort, a musician & an artist... it wasn't long before I started seeing details I wanted to change... and my husband's not only very kind, generous & amiable, but he's a very talented carpenter. His joke is always: "If Momma ain't happy... nobody's happy". So he sized up my dreams & set out to do some finishing work! It may seem silly, but some of the details were very safety oriented as well as for the comfort of our chicks. We worked on the 'insignificant' things because it was still SO cold outside - and the big job of digging down to place fabric wire down, surrounding the coop wasn't gonna happen yet - so we focused on the "fun stuff" first! We're located not far off the ocean on the east coast, so the cold ocean breezes made it too brisk for the chicks to go out, especially so young.
Here's the back of the coop... there is a small white line of trim, at the bottom of the coop, which is the overhang to protect the "metal poop drawer" - that slides out from below the roosting bars - for easy cleaning. The other is of coop wall - viewed from inside the run. (Note the small chicken door)
Regarding the small chicken door: (as seen above) I read over and over - that one of the greatest mistakes a chicken owner can make is underestimating the predators, so of course, I totally disliked the rectangular piece of wood with a screw in it - that was a latch to keep the door closed. It could have been easily turned & opened by a raccoon. So Philip designed a sturdy new door & put on a safety latch I could close with a carabiner, so the girls would be safe. It's also far prettier, and still predator proof.
While Philip was crafting this new, safer chick door - I set to work & replaced all the hardware outside on the nesting box, the run door, and the people door. The hardware installed by the farmer was serviceable but not as sturdy (nor as pretty) as I'd like, and Amazon had large, strong, vintage style, black decorative hinges and door clasps - which were much stronger & prettier.
When the ground got softer, the first warm day, we set to work putting down 1/2 inch hardware cloth. I bought 3 foot wide rolls - and they totally surround the coop. We sank it down 2 inches below the surface, and first, stapled it - then we screwed it to the 4x4 wooden base of the coop with large metal washers. I was not taking any chances with their safety & well being.
When the metal hardware cloth was totally down, we anchored the edges into the ground with tent hooks every few feet, and raked a bunch of topsoil over the wire to cover it. We put down grass seed and it's come in nicely... but of course, our Border Collie has run a foot track around the coop - due to his frequent patrols each day.
I also bolted hardware cloth over both the double hung windows - on the outside, leaving the window screens to keep out flies out too, and I screwed down fabric wire - up under the eves of the overhang of the roof, incase a weasel or something evil tried to get in that way. I am taking no chances.
I bought First Saturday Lime, and made a lime wash, coating the inside of the 5 nesting boxes with 2 coats of the wash. It's a purely preventative measure, it did no harm - and I certainly don't mind taking measures to avoid mites or lice or such. I use FSLime - each month in the run, coop & surrounding areas - and it does wonders keeping the flies, ticks, chiggers etc away - as well as any smell. A friend commented last weekend, saying the coop smells like a child's bedroom - hahah... I guess that's the lavender & mint I dry & use in there? I also use a marvelous lemon thyme & mint cleaning solution I make myself, that's all natural & dissolves dirt, disinfects, repels flies AND smells wonderful...
Then, we decided to insulate the coop - and after a bit of research we opted to use reflective rolls of insulation we got at Lowes - that wouldn't hold moisture. This stuff seems to repel heat in summer, and it's working GREAT! This last heat wave it was a high of 84* inside the coop, (windows open) on a blistering 98* day with a heat index in the 100's... so 84 inside the coop isn't too bad. The coop's also in a partial sun area, so I'm sure that helps keep it cooler too. I have yet to see how it does in winter but suspect it'll be great. We have good ventilation in the coop too. So Phil put this insulation on all the walls, and ceiling, and covered it over with a pretty, white, wainscoting - which is amazingly easy to clean with a quick wipe - each day.
We didn't put wainscot or insulation in under the roosting bar area. The roosting bars have fabric wired underneath - and as I said earlier, there's a metal lined drawer that pulls out, that's built below the roosting bars. This drawer makes it super quick & easy to scrape clean each day. I love it. Here you can see the insulation Philip stapled to the ceiling inside the coop. He also finished the wainscoting with wood trim around the windows & the inside part of the chick door, to finish it off nicely.
I keep a small chair inside the coop for myself, that I can sit easily and clean the roost bars, and then hung a decorative shelf inside the coop, to hold a few things i need - like jars of home made nesting box herbs that I dry, & essential oils (mostly lavender, lemon grass & mint oils) for repelling flies and pests. I saw no harm in putting a useful & pretty shelf up... I go in there to clean each day, and I like a pleasant environment for myself & the chickie girls as well.
There's also a utility shelf inside the coop, just above the people door, that holds my home made herbal cleaning sprays, fresheners and sanitizers. I had an old, broken candle holder - that was pretty, & hung it in there as well, for a few drying herbs & for fly repelling...
And oh... yes, I hung a pretty little 'glamour' mirror... because the girls just LOVE to look at themselves!!! Also a vintage, match holder that I purchased from Lisa Steele & Fresh Eggs Daily - who is a huge inspiration and source of learning. I put crushed oyster shell in the match holder - for them to help themselves as they need.
I also put up a rain chain. Philip put a small V-channel rain gutter along the edge of the tin roof. The rain was spattering mud everywhere so the v-channel worked great and the little rain chain at the end worked perfectly!
So, while Philip was doing all this fine craftsmanship (because he loves me so much)... I set to work digging up some earth - to add another herb garden... which I placed along my foot path to the coop. So it's easy to pick fresh veggies & herbs each day for the girls, and they just love the healthy treats! I also dry tons of herbs - for use all winter as well.
I planted herbs that promote respiratory health, and support healthy immune systems, as well as herbs that calm & relax... and most of these herbs also repel flies, bugs & other undesirables. I'm growing oregano, pineapple sage, thyme, rosemary, lemon thyme, lots of lavender, tons of various mints, lemon balm, echinacea & marigolds to name a few... and in other gardens we have swiss chard, tons of cucumbers & barrels of mint!
Philip put a white, painted rooster on my 'people' door... that a friend made for my coop. I love it!
So, I'm crazy about my whole chicken life... if you can't tell. Here's my happy coop (aka Cluckingham Palace) & my wonderful chickie girls:
Thank you for taking the time to read about my happy place! As my name reveals, I'm a fiddler - and perform/teach/play Irish fiddle... For breaks during the day, I often play fiddle out at the coop and the girls all run over to me as soon as I start playing, and stand to watch... eventually nestling down to listen... I've done it since they were little, so I guess they're use to it. hahah! It didn't show up in the pictures, but they also have a swing, and roosts in the run. I hope, this coming Fall... Philip & I will be putting up a large extension on the outside run. I am afraid to let them free range with the eagles, hawks & fox we have here. I'll update this then, if we do! Thank you for reading!
Have a beautiful day!
UPDATE!!!!!!!!!!!! December 3, 2018
SO, Since I posted about my little coop... we since decided to build (OURSELVES) a large, additional, totally closed in back run - onto the base coop's run.
So first, I drew up the plans:
and with the help of my wonderful husband, my big, strong son, and a friend who's happy to work for my home made kombucha... we set to work!
Things progressed, and it was actually the run was a bit larger than I'd imagined, but I love knowing the girls will be able to run and have freedom, still being safe from all the hawks & eagles - out in the "Back Sadie" which is what we call the new run! I've don't have to worry about them getting killed, or eaten... so this peace of mind is great!
I spent the day painting it red to match the coop, while my husband set to work - building the new chicken door that will go from the core coop's run - into the new, big back run. He also built a large people door... so that it's wide enough for me to fit the gorilla cart easily through.
Then... the wire went up! We bought 1.5" welded, black coated wire for the walls & roof of the Back Sadie. We ran 2 feet out - along the ground, at the base of each wall... to protect from predators who may try & dig under - to get in. We used a staple gun, then put metal washers with 2" screws, every 3 feet apart, to add extra security and secure down all the wire edges - again, against predators. This part was the hardest part... the wire rolls were really heavy... and we used ELEVEN, 50' rolls of wire.
My husband was so awesome, making this dream of mine come true and laughingly customized everything for me... including the hinged door (shown below - secured by the purple carabiner in the left side of the pic) up near the roof of the coop. We put this in so I can swing it up/open, and empty off any accumulated leaves, snow or branches that fall onto the roof - so it's easier... and clean off the tin roof area that would otherwise be unaccessable.
We also decided to put a 6' deep roof... of wood, above the people door. We found pieces of replacement fence boards - for 75 cents each - on the 'end of season' clearance at Lowes... so we bought enough to put up a 6' deep section - for a little added shelter from the elements for the girls! (reinforcing it with wire too)...
Here's the people door side - of the "Back Sadie" run...
and here's the little chick door, that is close/lockable - from the Back Sadie... into the coop's base run:
I just put Christmas lights & wreaths up for the holidays... <3 I also have bales of straw around the base of the coop & under the nesting boxes, to cut down on drafts. This part of the coop has a sheltered run underneath... so the girls can get out of the elements there too, and still be outside, on bad weather days.
I'm pretty thrifty... and found some good size scraps of plexiglass that was being discarded. I had the pieces cut - to fit/cover the people door into the run, for only $3.59. They were originally $38 PER PIECE!!! To cover it in plexiglass it would have cost me $76... so I saved a lot, and this will give the girls a bit more shelter from wind, snow & rain when the Winter sets in. I asked at Lowes, and apparently, when people buy plexiglass & get it cut to fit... they usually discard whatever they don't use... so I got hold of those scraps, and had them cut for a GREATLY discounted price!
This project took us 2 months from beginning to end (working on weekends & evenings). It was a labor of love, and when we were done, my darling husband got us a bottle of wine & we brought cheese & crackers out to the Back Sadie, and sat and enjoyed watching the girls explore their big, new space... as they scratched & picked and ran around! Haha and they even learned to beg for bits of cheese from us!
This is truly my happy place, I love my chickie girls, and I'm so blessed my husband made this happen! He knows well: Happy wife = Happy Life!