The Coop
It started with an idea to have a chicken coop. I just needed to figure out where. One night while looking over my options in our yard, I realized I had never gone on the other side of the fence on one corner of my property. Yes, it seems hard to believe after living at our new place for six months, there was still space I hadn't explored, but this area was behind a fence, tucked in behind our shop and on a slope. It was just a "dead corner" that I assumed was not very big. It just wasn't in a part of the property that we really used. The access gate was a part of the fence that was over 30 years old, so it hardly looked like a gate you could go through. Anyway, with some effort, I managed to break the sticky gate free so it would open, and this space is what I found. This picture is taken from the high side of the slope and shows the fence that I went through. It turns out that this space is where the previous owner stored his camper, boat, etc, over 30 years ago before he built the shop. The fence was put up to basically make a privacy area so that his possessions couldn't easily be seen. The fence wasn't part of a property boundary, it was a visual boundary. Once he built the shop, the space was never really used again, but the fence stayed up.

After shaking my head in disbelief, I now had my space situation resolved. A 25' x 25' square section of land that had no real use. It was going to be perfect for the chicken area. The problem was that it was not flat. Not even close. Well, we can fix that. Enter Mr. Contractor and grading equipment.

So now we have a retaining wall, no more old fence, and a nice, flat piece of workable land.
Front view
Before I got too far, I pulled power and ethernet and buried it so it was out of the way.
And the layout...

Oh, and we also have these guys. They don't grow that fast, do they?
OK, so now we have some incentive. They are going to need a new and bigger home. The plan is for an 8x8 walk in coop with 165 sq. ft. wrap around run. Here's the foundation. I used pier blocks with adjustable brackets in case I had to do additional leveling in the future. I had never attempted a project of this scope before, and I wanted to give myself some wiggle room if needed.
Next was the floor. Used 3/4" PT plywood. I bought the 21 degree air driven nailer from Harbor Freight. That turned out to be a very good purchase. If I did building professionally, I'm sure I'd go cordless and higher quality, but for my needs, and mainly this project, it's worked really, really well.
When it rains outside, you build the walls inside the shop
Then you get an unsuspecting friend and co-worker to help you set the walls and start the siding. He thinks I still owe him dozens of eggs for this day of work.
More siding. This is the LP 76 SmartSiding that I bought at Home Depot. It was really easy to work with, and I'm very glad I went with it.
Finally, siding on the front. I put drip flashing to cover the top edges for both the front and back pieces, below the gable portions. They are later covered with trim to hide the flashing.
Remember these guys? Yeah, still growing, like they were lit on fire!
The siding all on, and on to the roofing
Hardware cloth under the eaves - more detail on how I did this here.

Gable vents on the ends. This is the larger vent (12"x18") because it is at the back of the coop. The front has the door to contend with, so it was only an 8"x8" vent.

On to the roofing. This was the first roofing I had ever done, and so I read a lot online and watched some Youtube videos. It turned out to be a fun part of the project. I probably wouldn't rush out to do it again, but I'm glad I did it, and I could do it again in the future if needed.
After the tar paper was down, on to the actual shingling. The gap there is for the ridge vent.

These were Corning Architectural shingles that I bought from Home Depot. This whole coop project, we wanted to tie in with the existing structures on our land, so that's why I went with the SmartSiding and architectural shingles.
The Corning Ridge Vent. It came in 4 ft sections which simply snap together tongue and groove style. I bought 2 of them to make an 8 ft ridge. I then covered it with the ridge cap shingles. I could have saved a bit of money by cutting regular singles down to ridge cap shingles, but time was more of the essence, and the ridge cap shingles fit perfectly and ready to go out of the box. I'd still do them again, even if I wasn't under time pressure.
Next I added the awning windows. I pre-built them in the shop over several evenings. They are made from 5/4" x 4" cedar and hinged with stainless steel hinges. The basic design is a frame within a frame. I made a 1/4" gap between the frames to allow for easy opening and closing, and just in case everything wasn't perfectly square. The panes for the windows are made from 1/8" plexiglass that I had cut for me at a local store called TAP Plastics. I used a drill press to drill holes along the edges of the panes (about 3/4" in from the edge), and then I simply screwed the plastic panes to the inside window frame. To install the windows, I cut the coop wall openings to the size of the inside window frame. After cutting the openings, I hardware cloth'd over them on the outside of the coop wall, and then put the windows over the top of the opening. In effect, the windows became trim pieces around the sides of the openings, and that hid the edges of the hardware cloth to give a nice, clean finish. There are a total of 5 windows, two on each side, and one on the back wall. All of them are the same size. The plans for this coop were really a greenhouse that I just made in to a coop instead. I chose the set of plans because of all the windows and ventilation, and the fact that it was a nice 8'x8' walk-in size.
Almost to move in day. The birds are starting to fly out of the brooder pen which had 30" sides. They are ready for more space. This is the Exterior Steel door that I used. The rough opening was for 32", which meant a 30" door. But when I got to Home Depot, I had 32" stuck on my mind, so that's the size of door that I bought. Oops. Luckily, at that time, I hadn't finished framing the front wall, so I simply adjusted the rough opening to 34". Yes, that really is a deadbolt installed there. No wily neighborhood roosters are coming around to visit my ladies...

It's finally move in day. I put up a quick roost bar for them to use. This low roost bar is eventually going to be changed out for poop boards that will run along the right and back walls (think an "L" shape) at about 34" high, but for now, the poop boards are lower on the priority list. I needed to get the birds into the coop, and their run built so they could have outside time.
The Run
And on to the run we go. I chose to go the route of building panels in my shop, then attaching them to 4x4 PT posts that I cemented into the ground. The panels were created by joining the ends with pocket hole connections using the Kreg HD jig. The HD is for 2x4 construction and worked really well. It drops in to the Kreg K5 system that I have which was slick. The panels were all 78" high and varied in length depending on the distance between the posts. The welded wire - 16 gauge 1/2" x 1", 75" high and 48 ft long. Yes, quite the odd size. Turns out that it was a mistake in manufacturing. It was supposed to be 48" high and 75 ft long - which would be quite standard. But, somewhere along the way, the numbers got messed up. This turned out to be perfect because I could make it a walk-in run at 78" high, and I didn't have to splice together multiple runs of welded wire, I could just use a single piece and cut it to the length that I needed. I ended up buying two of those rolls of welded wire so that I had a little extra on hand. For fastening the welded wire to the panels, I used a DeWalt cordless 1/4" crown stapler with 1 1/2" stainless steel staples (purchased of Amazon). This was the bomb. It has no trouble holding the heavy welded wire in place to the frame, and it moves along quite quickly. Every three or four inches I'd put a staple in. I couldn't be happier. The 2x4's underneath the welded wire gave me a place to stand, and keeps the welded wire "level" while I attach it to the frame. I ended up building 8 panels in all to create my run.
This is the back of the gate to my run. It's design helped come along from suggestions of other BYC'ers input (Related gate build thread). It turned out really well, and I'm quite happy with it.
These next shots are showing the installation of the completed panels with the apron attached. I attached the apron wire fence to each panel just before installing the panel to the posts.
The last panel was the one that had to attach to a tunnel on the side of the coop. Because of the way I need to do my roof over the run, I need a space between the side of the coop and the run. This meant the birds needed a short tunnel (16") to get from the coop out into the run. The girls were quite curious why there was suddenly a hole in the side of their coop wall...
Here are some finishing shots of the current run.
Here are the girls out enjoying the run
The Roof
From reading and researching here on BYC, I learned that one of the keys to having a non-offensive smelling chicken area is to keep the run dry. Since I'm in the PNW, and we get a good amount of wet weather, that meant that covering my run was more of a requirement than a luxury. Given that my coop location is in a corner of my lot that is shaded almost all day long, I knew I needed something that would let a lot of light through, so composite and metal were out right away. This pretty much left me with clear polycarbonate as my best option.
Since HD is close by to my house, I ended up going with Suntuf clear polycarbonate as they carry it in stock. Lowes also carries a similar product which I could have happily used, but HD is more conveniently located so I went with them. I think most of your big box stores will have an option if this is the route that you want to go.
The actual installation of this roof system is pretty straight forward. What took me a while was that I had to build this without plans, so I had to come up with my own custom design. If designing roofing plans is not your normal job, this can take a little while. I basically had a "long side" which was a section that ran a little over 11 feet, and that matched up to a "short side" which was about 6 feet. To make these match, I had to come up with two different pitch measurements and calculate the associated bird mouths, etc. In the end, it came together nicely, but it was a lot of measuring along with some trial and error. I am glad I learned how to use a speed square, that's a pretty neat tool. Here's a picture of my end rafter joining together. I found it easier to set all of my short rafters first (which I was able to make from a single template), and then I had to cut all the long rafters individually because the far end of the run wasn't square. It wasn't square because I hit a tree root when setting my fence post. I had to adjust for that root, and it took the one end out of square. That manifested itself with these long rafters needing to each be different lengths.
So the way this works with the Suntuf system, is you set all your rafters. Then, depending on the snow load, or your desired weight that you want your roof to support, you set your purlin distance accordingly. Since we rarely have snow to contend with, I went with 24" on center spacing for my long run section, and 30" on center spacing for my short run. This saves on the amount of wood, as well as the number of closure strips needed. If you're in an area that see lots of snow, you'd need to have your purlins closer together to support more weight on the roof. This next shot is my rafter and purlin setup before adding the closure strips. The purlins are the 2"x3" boards running horizontal across the rafters.
And this picture shows the closure strips added to the purlins.
The closure strips are not required, but I can't imagine doing the install without them. They just make everything fit in to place so nicely, and I think it makes it really easy to keep everything aligned. Suntuf makes several different types of closure strips. The ones that I used were these "trapezoidal" looking ones. They also make a "rounded" one that looks like a low hill or smooth hump. The type that you need depends on the type of panel you buy. The less expensive panels use the "low hill" design, and the more expensive panels use this "trapezoidal" design. Make sure that you get the right one because the corrugations on panels slot in to these closure strips. Also, Suntuf makes a plastic closure strip and a wood closure strip. HD doesn't stock the plastic ones, so you either have to order them, or I lucked out and McLendon's hardware actually carried them in stock. The wood ones I don't think are worth the investment. If you have no other option or time is of the essence, you can probably make them work, but they are made from very cheap wood that is highly prone to splitting - even if you pre-drill the pilot hole. I read many a review where people were regretting the purchase. I looked at them in the store, and I've worked with enough wood to know exactly what those reviewers were talking about. If you are going to use the closure strips, save yourself the aggravation if you can, and get the plastic ones. An additional benefit to the plastic ones is that it is easy to see when you accidentally over tighten one of the screws securing the panel to the closure strip as the top of the trapezoid will start to crush down. If you see that, you can simply back the screw out a little bit, and the closure strip will return to form.
When installing the panels, you overlap one edge of a panel with the edge of the next panel. Depending on the width of the roof will dictate your overlap. In my case here, I overlapped the panels by two "channels", and it came out evenly. To secure the panels to the closure strips, I used the designated screws that Suntuf recommends (they'll be located right there next to the panels and closure strips) - at least they are at HD. They come 50 to a box, and I used almost 6 boxes. It is a 2" screw that comes with a gasket at the head of the screw. When installed properly, this gasket prevents any water from leaking through the hole. I used a 1/4" bit and pre-drilled the hole as recommended. After a little practice, I got to where I didn't have to drill all the way through, but rather just deep enough to pierce the panel. If you do drill all the way through, and then through the trapezoid support piece, it's not a big deal. The gasket around the head of the screw is big enough to cover the 1/4" pilot hole without any leaking.
These are some shots of what it looks like when it all comes together. Notice in this first picture the horizontal closure strips. They are the slightly darker pieces of wood that are running vertically up the channel. They are needed on the outside edges to close the gap so nothing can get inside. You can either buy the wood ones from HD, or you could cut your own if you have a table-saw. I bought one package to try, and while some of the pieces worked OK, I found it just as easy to make my own from some 1x4 that I had. I cut them at 7/8" wide, and I found that to be just the right size where it fit snuggly in the channel without being too wide. Suntuf does make a plastic horizontal closure strip as well, but they weren't carried in any store near me that I could see.
From underneath...
The other extra piece that I used in my setup was the ridge cap. You put this on at the time you are securing the panels, and it simply goes over the top of the two panels where they meet at the peak. If you look in this photo below, you can see the ridge going from the bottom of the picture up towards the top, about the center of the image. The ridge cap has 4" sides. I added some extra closure strips that I had left over from trimming my closure strips to size. These little extra "cut-off" end pieces worked really well in this application. I just wanted to give a little extra security in fastening the ridge cap based on where my top purlin ended up. In hind sight, that top purlin probably should have come down from the top a little more, and then I wouldn't have needed the extras, but it all worked out fine.
Finally, to finish the roof, I blocked off the end gaps between the rafters - the eaves - and then I added welded wire to the different gable sections that I had (3 in my case). I didn't take a picture yet of blocking the rafter ends, but I do have one of the gables.
The trick that I used to make it easier to cut these gable pieces was to first cut the section in a simple rectangle. Then, I used the screws and washers to tack it in to place. Next, I used a marker and I was able to trace a line that matched the slant. Once cut, I reused the washer and screws to hold it in place while I then stapled it (same setup as I used for the run) to the rafters.
So, that brings me up to where I am at here just before the 4th of July. I still have the poop boards to finish, and then finish up the inside by installing the electrical connections and network tap. I'll be adding those pictures here as I finish up each piece.
Thanks for looking, feel free to ask any questions, and I hope the pictures help you out for your journey. I would not have come near this far if it weren't for all the great advice and help on this forum.
It started with an idea to have a chicken coop. I just needed to figure out where. One night while looking over my options in our yard, I realized I had never gone on the other side of the fence on one corner of my property. Yes, it seems hard to believe after living at our new place for six months, there was still space I hadn't explored, but this area was behind a fence, tucked in behind our shop and on a slope. It was just a "dead corner" that I assumed was not very big. It just wasn't in a part of the property that we really used. The access gate was a part of the fence that was over 30 years old, so it hardly looked like a gate you could go through. Anyway, with some effort, I managed to break the sticky gate free so it would open, and this space is what I found. This picture is taken from the high side of the slope and shows the fence that I went through. It turns out that this space is where the previous owner stored his camper, boat, etc, over 30 years ago before he built the shop. The fence was put up to basically make a privacy area so that his possessions couldn't easily be seen. The fence wasn't part of a property boundary, it was a visual boundary. Once he built the shop, the space was never really used again, but the fence stayed up.
After shaking my head in disbelief, I now had my space situation resolved. A 25' x 25' square section of land that had no real use. It was going to be perfect for the chicken area. The problem was that it was not flat. Not even close. Well, we can fix that. Enter Mr. Contractor and grading equipment.
So now we have a retaining wall, no more old fence, and a nice, flat piece of workable land.
Front view
Before I got too far, I pulled power and ethernet and buried it so it was out of the way.
And the layout...
Oh, and we also have these guys. They don't grow that fast, do they?
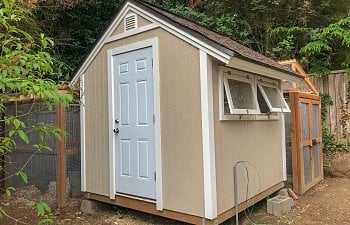
OK, so now we have some incentive. They are going to need a new and bigger home. The plan is for an 8x8 walk in coop with 165 sq. ft. wrap around run. Here's the foundation. I used pier blocks with adjustable brackets in case I had to do additional leveling in the future. I had never attempted a project of this scope before, and I wanted to give myself some wiggle room if needed.
Next was the floor. Used 3/4" PT plywood. I bought the 21 degree air driven nailer from Harbor Freight. That turned out to be a very good purchase. If I did building professionally, I'm sure I'd go cordless and higher quality, but for my needs, and mainly this project, it's worked really, really well.
When it rains outside, you build the walls inside the shop
Then you get an unsuspecting friend and co-worker to help you set the walls and start the siding. He thinks I still owe him dozens of eggs for this day of work.
More siding. This is the LP 76 SmartSiding that I bought at Home Depot. It was really easy to work with, and I'm very glad I went with it.
Finally, siding on the front. I put drip flashing to cover the top edges for both the front and back pieces, below the gable portions. They are later covered with trim to hide the flashing.
Remember these guys? Yeah, still growing, like they were lit on fire!
The siding all on, and on to the roofing
Hardware cloth under the eaves - more detail on how I did this here.
Gable vents on the ends. This is the larger vent (12"x18") because it is at the back of the coop. The front has the door to contend with, so it was only an 8"x8" vent.
On to the roofing. This was the first roofing I had ever done, and so I read a lot online and watched some Youtube videos. It turned out to be a fun part of the project. I probably wouldn't rush out to do it again, but I'm glad I did it, and I could do it again in the future if needed.
After the tar paper was down, on to the actual shingling. The gap there is for the ridge vent.
These were Corning Architectural shingles that I bought from Home Depot. This whole coop project, we wanted to tie in with the existing structures on our land, so that's why I went with the SmartSiding and architectural shingles.
The Corning Ridge Vent. It came in 4 ft sections which simply snap together tongue and groove style. I bought 2 of them to make an 8 ft ridge. I then covered it with the ridge cap shingles. I could have saved a bit of money by cutting regular singles down to ridge cap shingles, but time was more of the essence, and the ridge cap shingles fit perfectly and ready to go out of the box. I'd still do them again, even if I wasn't under time pressure.
Next I added the awning windows. I pre-built them in the shop over several evenings. They are made from 5/4" x 4" cedar and hinged with stainless steel hinges. The basic design is a frame within a frame. I made a 1/4" gap between the frames to allow for easy opening and closing, and just in case everything wasn't perfectly square. The panes for the windows are made from 1/8" plexiglass that I had cut for me at a local store called TAP Plastics. I used a drill press to drill holes along the edges of the panes (about 3/4" in from the edge), and then I simply screwed the plastic panes to the inside window frame. To install the windows, I cut the coop wall openings to the size of the inside window frame. After cutting the openings, I hardware cloth'd over them on the outside of the coop wall, and then put the windows over the top of the opening. In effect, the windows became trim pieces around the sides of the openings, and that hid the edges of the hardware cloth to give a nice, clean finish. There are a total of 5 windows, two on each side, and one on the back wall. All of them are the same size. The plans for this coop were really a greenhouse that I just made in to a coop instead. I chose the set of plans because of all the windows and ventilation, and the fact that it was a nice 8'x8' walk-in size.
Almost to move in day. The birds are starting to fly out of the brooder pen which had 30" sides. They are ready for more space. This is the Exterior Steel door that I used. The rough opening was for 32", which meant a 30" door. But when I got to Home Depot, I had 32" stuck on my mind, so that's the size of door that I bought. Oops. Luckily, at that time, I hadn't finished framing the front wall, so I simply adjusted the rough opening to 34". Yes, that really is a deadbolt installed there. No wily neighborhood roosters are coming around to visit my ladies...
It's finally move in day. I put up a quick roost bar for them to use. This low roost bar is eventually going to be changed out for poop boards that will run along the right and back walls (think an "L" shape) at about 34" high, but for now, the poop boards are lower on the priority list. I needed to get the birds into the coop, and their run built so they could have outside time.
The Run
And on to the run we go. I chose to go the route of building panels in my shop, then attaching them to 4x4 PT posts that I cemented into the ground. The panels were created by joining the ends with pocket hole connections using the Kreg HD jig. The HD is for 2x4 construction and worked really well. It drops in to the Kreg K5 system that I have which was slick. The panels were all 78" high and varied in length depending on the distance between the posts. The welded wire - 16 gauge 1/2" x 1", 75" high and 48 ft long. Yes, quite the odd size. Turns out that it was a mistake in manufacturing. It was supposed to be 48" high and 75 ft long - which would be quite standard. But, somewhere along the way, the numbers got messed up. This turned out to be perfect because I could make it a walk-in run at 78" high, and I didn't have to splice together multiple runs of welded wire, I could just use a single piece and cut it to the length that I needed. I ended up buying two of those rolls of welded wire so that I had a little extra on hand. For fastening the welded wire to the panels, I used a DeWalt cordless 1/4" crown stapler with 1 1/2" stainless steel staples (purchased of Amazon). This was the bomb. It has no trouble holding the heavy welded wire in place to the frame, and it moves along quite quickly. Every three or four inches I'd put a staple in. I couldn't be happier. The 2x4's underneath the welded wire gave me a place to stand, and keeps the welded wire "level" while I attach it to the frame. I ended up building 8 panels in all to create my run.
This is the back of the gate to my run. It's design helped come along from suggestions of other BYC'ers input (Related gate build thread). It turned out really well, and I'm quite happy with it.
These next shots are showing the installation of the completed panels with the apron attached. I attached the apron wire fence to each panel just before installing the panel to the posts.
The last panel was the one that had to attach to a tunnel on the side of the coop. Because of the way I need to do my roof over the run, I need a space between the side of the coop and the run. This meant the birds needed a short tunnel (16") to get from the coop out into the run. The girls were quite curious why there was suddenly a hole in the side of their coop wall...
Here are some finishing shots of the current run.
Here are the girls out enjoying the run
The Roof
From reading and researching here on BYC, I learned that one of the keys to having a non-offensive smelling chicken area is to keep the run dry. Since I'm in the PNW, and we get a good amount of wet weather, that meant that covering my run was more of a requirement than a luxury. Given that my coop location is in a corner of my lot that is shaded almost all day long, I knew I needed something that would let a lot of light through, so composite and metal were out right away. This pretty much left me with clear polycarbonate as my best option.
Since HD is close by to my house, I ended up going with Suntuf clear polycarbonate as they carry it in stock. Lowes also carries a similar product which I could have happily used, but HD is more conveniently located so I went with them. I think most of your big box stores will have an option if this is the route that you want to go.
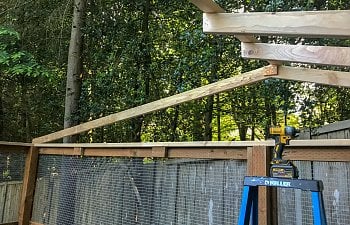
The actual installation of this roof system is pretty straight forward. What took me a while was that I had to build this without plans, so I had to come up with my own custom design. If designing roofing plans is not your normal job, this can take a little while. I basically had a "long side" which was a section that ran a little over 11 feet, and that matched up to a "short side" which was about 6 feet. To make these match, I had to come up with two different pitch measurements and calculate the associated bird mouths, etc. In the end, it came together nicely, but it was a lot of measuring along with some trial and error. I am glad I learned how to use a speed square, that's a pretty neat tool. Here's a picture of my end rafter joining together. I found it easier to set all of my short rafters first (which I was able to make from a single template), and then I had to cut all the long rafters individually because the far end of the run wasn't square. It wasn't square because I hit a tree root when setting my fence post. I had to adjust for that root, and it took the one end out of square. That manifested itself with these long rafters needing to each be different lengths.
So the way this works with the Suntuf system, is you set all your rafters. Then, depending on the snow load, or your desired weight that you want your roof to support, you set your purlin distance accordingly. Since we rarely have snow to contend with, I went with 24" on center spacing for my long run section, and 30" on center spacing for my short run. This saves on the amount of wood, as well as the number of closure strips needed. If you're in an area that see lots of snow, you'd need to have your purlins closer together to support more weight on the roof. This next shot is my rafter and purlin setup before adding the closure strips. The purlins are the 2"x3" boards running horizontal across the rafters.
And this picture shows the closure strips added to the purlins.
The closure strips are not required, but I can't imagine doing the install without them. They just make everything fit in to place so nicely, and I think it makes it really easy to keep everything aligned. Suntuf makes several different types of closure strips. The ones that I used were these "trapezoidal" looking ones. They also make a "rounded" one that looks like a low hill or smooth hump. The type that you need depends on the type of panel you buy. The less expensive panels use the "low hill" design, and the more expensive panels use this "trapezoidal" design. Make sure that you get the right one because the corrugations on panels slot in to these closure strips. Also, Suntuf makes a plastic closure strip and a wood closure strip. HD doesn't stock the plastic ones, so you either have to order them, or I lucked out and McLendon's hardware actually carried them in stock. The wood ones I don't think are worth the investment. If you have no other option or time is of the essence, you can probably make them work, but they are made from very cheap wood that is highly prone to splitting - even if you pre-drill the pilot hole. I read many a review where people were regretting the purchase. I looked at them in the store, and I've worked with enough wood to know exactly what those reviewers were talking about. If you are going to use the closure strips, save yourself the aggravation if you can, and get the plastic ones. An additional benefit to the plastic ones is that it is easy to see when you accidentally over tighten one of the screws securing the panel to the closure strip as the top of the trapezoid will start to crush down. If you see that, you can simply back the screw out a little bit, and the closure strip will return to form.
When installing the panels, you overlap one edge of a panel with the edge of the next panel. Depending on the width of the roof will dictate your overlap. In my case here, I overlapped the panels by two "channels", and it came out evenly. To secure the panels to the closure strips, I used the designated screws that Suntuf recommends (they'll be located right there next to the panels and closure strips) - at least they are at HD. They come 50 to a box, and I used almost 6 boxes. It is a 2" screw that comes with a gasket at the head of the screw. When installed properly, this gasket prevents any water from leaking through the hole. I used a 1/4" bit and pre-drilled the hole as recommended. After a little practice, I got to where I didn't have to drill all the way through, but rather just deep enough to pierce the panel. If you do drill all the way through, and then through the trapezoid support piece, it's not a big deal. The gasket around the head of the screw is big enough to cover the 1/4" pilot hole without any leaking.
These are some shots of what it looks like when it all comes together. Notice in this first picture the horizontal closure strips. They are the slightly darker pieces of wood that are running vertically up the channel. They are needed on the outside edges to close the gap so nothing can get inside. You can either buy the wood ones from HD, or you could cut your own if you have a table-saw. I bought one package to try, and while some of the pieces worked OK, I found it just as easy to make my own from some 1x4 that I had. I cut them at 7/8" wide, and I found that to be just the right size where it fit snuggly in the channel without being too wide. Suntuf does make a plastic horizontal closure strip as well, but they weren't carried in any store near me that I could see.
From underneath...
The other extra piece that I used in my setup was the ridge cap. You put this on at the time you are securing the panels, and it simply goes over the top of the two panels where they meet at the peak. If you look in this photo below, you can see the ridge going from the bottom of the picture up towards the top, about the center of the image. The ridge cap has 4" sides. I added some extra closure strips that I had left over from trimming my closure strips to size. These little extra "cut-off" end pieces worked really well in this application. I just wanted to give a little extra security in fastening the ridge cap based on where my top purlin ended up. In hind sight, that top purlin probably should have come down from the top a little more, and then I wouldn't have needed the extras, but it all worked out fine.
Finally, to finish the roof, I blocked off the end gaps between the rafters - the eaves - and then I added welded wire to the different gable sections that I had (3 in my case). I didn't take a picture yet of blocking the rafter ends, but I do have one of the gables.
The trick that I used to make it easier to cut these gable pieces was to first cut the section in a simple rectangle. Then, I used the screws and washers to tack it in to place. Next, I used a marker and I was able to trace a line that matched the slant. Once cut, I reused the washer and screws to hold it in place while I then stapled it (same setup as I used for the run) to the rafters.
So, that brings me up to where I am at here just before the 4th of July. I still have the poop boards to finish, and then finish up the inside by installing the electrical connections and network tap. I'll be adding those pictures here as I finish up each piece.
Thanks for looking, feel free to ask any questions, and I hope the pictures help you out for your journey. I would not have come near this far if it weren't for all the great advice and help on this forum.