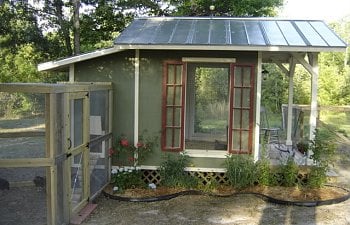
This is the beginning of our new family home!
Coop DeLisle...
This all started because of all the bugs in the yard that destroyed last year's garden. After searching the web, we found backyardchicken.com and got hooked, which was not that hard as we love animals. The platform was an old wooden screen room project that never got finished. We were about to burn, but then we got the idea to use it as the base of what you see now.Coop DeLisle...

As the building started to come together, and the more we read from ones who were sharing their experiences, we realized the coop was too small for how many chickens we were getting, so we had to add on to the back. This made the coop 11ft. X 8ft. on the inside. The back section was lowered an extra 2" for extra pine shavings under the roost to help keep it contained there.


The windows and door were some old ones we picked up in our travels. They were cheap and they had been stored in an old barn and were covered with rat droppings and a few chewed up areas. We reworked them and they turned out great. The windows are tall so the coop gets great ventilation when they are open and the chickens can see out.


We sprayed the inside with gloss paint for ease of cleaning and installed low cost vinyl flooring for cleaning. We also used plastic shoe molding along the edges because it cleans up quicker.

Next we added steps and the run.
For the run we used landscape timbers because they are only about $2.00 a post. Plus we kept the walls at 6ft. so that the hardware cloth was the 36" wide and this also kept the price down. We did cover part of the run with tin so the babies will have shade
For the run we used landscape timbers because they are only about $2.00 a post. Plus we kept the walls at 6ft. so that the hardware cloth was the 36" wide and this also kept the price down. We did cover part of the run with tin so the babies will have shade


Then we made a private entrance for them
so as to enter the run..


 [/CENTER]
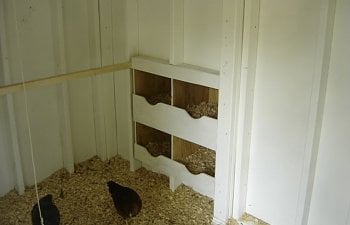
Finally, we finished it with some paint and added lattice to keep other animals from going under the coop. Then we built the nesting box off the side so as not to take up space in the main part of the coop.


After all this we are greeted every morning with a friendly bok!!!
Now we are just waiting for our return of fresh eggs

Our future plans are to get power and water to the coop, this will be the last of the work for now to
Coop DeLisle!!! PS...DeLisle is the name of the community in which we live....