Our coop and attached run:
As much as possible we used recycled materials, either given to us or purchased from our local Habitat for Humanity. The windows, front doors, and nest box door are all cabinet doors purchased for a few dollars each at habitat. The crown moulding is also from Habitat, and not only serves to pretty it up, but also to cover up my uneven siding job. The siding is rescued paneling from a turn of the century house that was being torn down.
The coop is 4 foot wide x 4 foot long. It slopes, the height going from 6 foot on one side down to 5 foot on the front. About 2 foot of that height is underneath the coop as part of the run. The section underneath the coop is covered on all 4 sides with hardware cloth, as is the bottom. There is about 4 inches of sand over the hardware cloth on the floor to protect the chickens little feet. Of course pine shavings from the coop keep toppling down there, even with a lip around the trap door.
The run is a little over 12 foot long (including the space underneath the coop) and 8 foot wide. It's about 5 foot tall. There are 2x4's framing the entire run (more of an aviary, really) and hardware cloth running all the way around and buried down. The roof of the run slopes on one side to go underneath some tall shrubs, in those places it has hardware cloth across the roof of it. At the highest points of the roof there is chicken wire. In the rainy season I am going to tarp the entire run for the whole season, but for now it's not raining often and I can just pull over the blue tarp to get most of it covered when it looks like rain. The run has a layer of about 4 inches of sand for drainage and odor control.
The roofing is primed and painted plywood (painted like the sky) with clear wavy plastic roofing. To secure the plastic roofing so that it wouldn't leak and would maintain its shape we bought some clear tubing, cut it into segments and used it to cushion the plastic roofing in the wavy parts. That way when we nailed it in we could put the nails through the upward slopes, which would keep the rain from dripping in the coop where the nails are.

Side Views:
This is where it slopes underneath my shrubbery, it ended up looking fairly elegant, but it forced the use of more support bars then anticipated. There is a window that opens for venting. The back has a nestbox extending out about 18" to give the chickens more floor space inside the coop. There is a window along the back as well, and a big branch for roosting fun. The wire chair is in there for me to hang out with the girls, it's a chair that is easy to flick poo off of.
s
The bottom of the coop has 2 doors, one just inside the run and the other in the front, for easier clean-up.
Coop Interior:
Hmm, I probably should have cleaned it before photographing it for all to see. Basic roosting ladder made out of leftover 2x4 pieces. Nest boxes are made out of leftover plywood and 2x2's. I still need to put a 2x4 lip across the nestboxes to keep the shavings from escaping. Right now they get food and water in the coop because they are babies and I am not always great about letting them out right at sunrise. I know that will have to change soon. Inside one of the front doors has a barrel lock piece to keep it secure. I found that without it if you pulled on the front doors where they meet you could create enough of a gap for a critter to squeeze through.
My hubby' s clever little trap door openers:
The hook and wire go up through the eye-hooks on the coop and attach to the door from the bottom of the coop and run to the outside of the coop, by the door framing. If you pull on the wire it opens up the lock on the little door and pulls it open, then just hook it up to the large eye on the outside of the door. To close and lock it just unhook it and it will latch closed. There is another wire going from the trapdoor/ramp in the coop out through the same eye-hooks and out the front. DH needs to replace the wire currently on that one to wire that will slide easier, then attach it to the big hook. The idea is to just be able to pull or let free the hooks and latch them up to open or close the doors from the outside. If there is a way to streamline a job and make it easier, DH will find it!
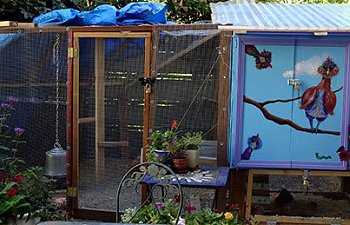
Random chicken art on the coop.
http://www.flickr.com/photos/8531043@N04/2751782834/
If I were to change anything, I would make the coop bigger to fit more chickens. It's perfectly fine for the 6 girls I have, and the 2 silkies I am going to get, but bigger is always better where chickens are concerned!
As much as possible we used recycled materials, either given to us or purchased from our local Habitat for Humanity. The windows, front doors, and nest box door are all cabinet doors purchased for a few dollars each at habitat. The crown moulding is also from Habitat, and not only serves to pretty it up, but also to cover up my uneven siding job. The siding is rescued paneling from a turn of the century house that was being torn down.
The coop is 4 foot wide x 4 foot long. It slopes, the height going from 6 foot on one side down to 5 foot on the front. About 2 foot of that height is underneath the coop as part of the run. The section underneath the coop is covered on all 4 sides with hardware cloth, as is the bottom. There is about 4 inches of sand over the hardware cloth on the floor to protect the chickens little feet. Of course pine shavings from the coop keep toppling down there, even with a lip around the trap door.
The run is a little over 12 foot long (including the space underneath the coop) and 8 foot wide. It's about 5 foot tall. There are 2x4's framing the entire run (more of an aviary, really) and hardware cloth running all the way around and buried down. The roof of the run slopes on one side to go underneath some tall shrubs, in those places it has hardware cloth across the roof of it. At the highest points of the roof there is chicken wire. In the rainy season I am going to tarp the entire run for the whole season, but for now it's not raining often and I can just pull over the blue tarp to get most of it covered when it looks like rain. The run has a layer of about 4 inches of sand for drainage and odor control.
The roofing is primed and painted plywood (painted like the sky) with clear wavy plastic roofing. To secure the plastic roofing so that it wouldn't leak and would maintain its shape we bought some clear tubing, cut it into segments and used it to cushion the plastic roofing in the wavy parts. That way when we nailed it in we could put the nails through the upward slopes, which would keep the rain from dripping in the coop where the nails are.

Side Views:
This is where it slopes underneath my shrubbery, it ended up looking fairly elegant, but it forced the use of more support bars then anticipated. There is a window that opens for venting. The back has a nestbox extending out about 18" to give the chickens more floor space inside the coop. There is a window along the back as well, and a big branch for roosting fun. The wire chair is in there for me to hang out with the girls, it's a chair that is easy to flick poo off of.
s

The bottom of the coop has 2 doors, one just inside the run and the other in the front, for easier clean-up.

Coop Interior:
Hmm, I probably should have cleaned it before photographing it for all to see. Basic roosting ladder made out of leftover 2x4 pieces. Nest boxes are made out of leftover plywood and 2x2's. I still need to put a 2x4 lip across the nestboxes to keep the shavings from escaping. Right now they get food and water in the coop because they are babies and I am not always great about letting them out right at sunrise. I know that will have to change soon. Inside one of the front doors has a barrel lock piece to keep it secure. I found that without it if you pulled on the front doors where they meet you could create enough of a gap for a critter to squeeze through.

My hubby' s clever little trap door openers:
The hook and wire go up through the eye-hooks on the coop and attach to the door from the bottom of the coop and run to the outside of the coop, by the door framing. If you pull on the wire it opens up the lock on the little door and pulls it open, then just hook it up to the large eye on the outside of the door. To close and lock it just unhook it and it will latch closed. There is another wire going from the trapdoor/ramp in the coop out through the same eye-hooks and out the front. DH needs to replace the wire currently on that one to wire that will slide easier, then attach it to the big hook. The idea is to just be able to pull or let free the hooks and latch them up to open or close the doors from the outside. If there is a way to streamline a job and make it easier, DH will find it!

Random chicken art on the coop.
http://www.flickr.com/photos/8531043@N04/2751782834/


If I were to change anything, I would make the coop bigger to fit more chickens. It's perfectly fine for the 6 girls I have, and the 2 silkies I am going to get, but bigger is always better where chickens are concerned!