Building the Clutch Hutch

We began our coop construction in the fall of 2005 after I was bitten by the chicken bug. The goal was a simple building, using a large percentage of recycled or found materials, but one that looked similar in style to the storage shed we had previously constructed not far from where the coop would be located. It had to be tall enough to walk into, and easy to clean with nests that could be accessed from outside. It had to look nice, too. Originally, I wanted a coop that was 8x10, but since the plan was to get about 8 chickens and 4 guineas, I decided for ease of construction with 4x8 sheets of plywood, we could get away with 8x8 and cut less plywood. The foundation is made of 4x4 treated posts concreted into the ground with 2x8 lumber power nailed to it to make the footprint of the coop. The roof is a shed-style roof like the storage building nearby and slopes from just over 6 ft at the front of the coop to just over 4 ft at the rear. We scavenged construction dumpsters and as we live in a mountain area with lots of second homes of the log type, we scrounged many log siding pieces and trim. We collected enough metal roofing pieces to roof the entire thing in red and green sheet metal roofing, although we did have to buy a roll of roofing felt to go underneath, which we later used on the 8x12 addition. The recently completed coop addition is roofed with a combination of composite shingles and tin roofing a neighbor gave to us.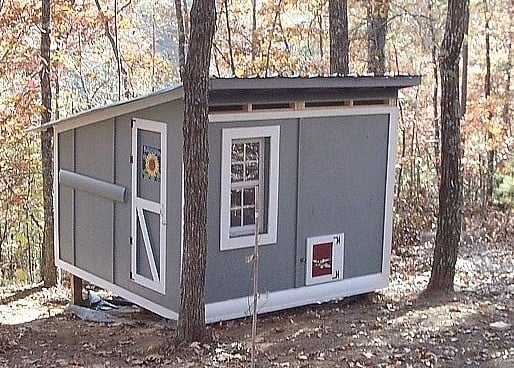
The parts we had to purchase new were the 2x8's for floor joists and the full-size 2x4's for walls and roof rafters and large sheets of plywood for the exterior and the roof decking. Those you just cant find in dumpsters. Under the floors and on top of the floor joists is a layer of hardware wire to keep predators from chewing through the floor; and the raccoons do try to pull on it so we’re glad we did that.
We built the original coop with a roost pit design with a hinged lid and removable ladders. It had a clean out door on the back of the coop that we would rake the shavings out of into a wheelbarrow and cart them to the nearby compost pile and it worked very well. We had to make a change later on when we had a problem with some foot infections (not caused by the roosts)and we felt the Girls would be better off if they didn’t jump down. We rebuilt the entire roost setup as a bleacher-style with two steps. The original coop had two windows, one we made ourselves with a piece of plexiglass we had and brickmold we found at a log home building site. The other was one of those working display windows like you see at Home Depot that a friend’s contractor husband sold us for $10. That window is better than any I’ve ever had in any house I’ve lived in!
We built the nests like a shelf then made curved pieces of wood between them as dividers. We had some metal flashing and cut it to fit over that like an awning and tacked it on. On the sharp, metal edge, we cut some clear plastic tubing and hotglued it over that to make a beaded edge. Later, we cut into the back wall and added an exterior nest box with a lid like a toy chest that could be accessed from outside and inside the coop, was entered at floor level. That was for the guineas, but the chickens decided they like those as well. The wall nests are accessed from outside with a piece of curved log siding as a pull-down door. That totals five nests in the original coop.
The interior walls are insulated with pink fiberglass insulation that we had from insulating under the floor of our own house, then covered with miscellaneous pieces of Hardi-plank exterior siding a friend let us scavenge from his own construction site and various pieces of plywood. There is ventilation on the front and back walls in addition to the window.
When we decided we needed to expand our flock and the coop, we built an additional 12' section attached to the original coop and then, when it was just about finished, cut the side window into a door leading into the new part. That plexiglass window was moved into the new addition right by the roost area where it always was. The new addition was built around an oak tree that we didn’t want to fell, making two perfect alcoves, one for the nest area and one for the roost area. The roosts are now ladder roosts, which were made partly with the dismantled roosts from the original coop and partly from a sturdy pallet given to us by a friend. The two-over-two nests were made with scrap lumber from the first coop and other things we had laying around. The floors of the original coop are covered with stick-on vinyl tiles, but the addition was covered with one of the precut room-size pieces of sheet vinyl. The walls are insulated with plastic WalMart bags. Again, the large double-pane picture window in the addition was purchased from the same contractor for $10. We made a predator screen on the inside after someone mentioned that their rooster had flown right through a closed window, shattering it! That is hinged so I can tilt it up to clean or slide the window up to open it in the summer.
A very valuable lesson we learned during the construction of the first coop is not to trust your eyes when it comes to leveling things! We built the coop on a slope so the floor rim joists looked like the entire coop’s rear was high up in the air-an optical illusion. We knew it was level because we used a level, but I kept going back out to check, then checked again with a different level!
Obviously, the biggest thing we would have done differently is to BUILD BIGGER! We had no idea how much we would love this new hobby of ours and no one could have told us we would be adding on 12' to this coop when we first built the "Clutch Hutch". Another thing is to put a window at floor level. We did do that in the coop addition. Never underestimate how much chickens love to look outside and they will stand on anything to do so! One thing I would suggest is to have a place inside your coop where you can store feed in a rodent-proof/chicken-proof container; it sure makes things easier.
As for cost, the first coop cost less than $400 total, probably less than half of what it would have if we had purchased all the materials brand new. The addition also cost $400 even though it’s larger than the first one, due to lower lumber prices.
Even if you’ve never built anything, go for it! You just have no idea what you can come up with when you have to. Necessity really is the mother of invention!
Click Here for Clutch Hutch Gallery:
https://www.backyardchickens.com/gallery/albums/clutch-hutch.6160995/


https://www.backyardchickens.com/gallery/albums/clutch-hutch.6160995/


")