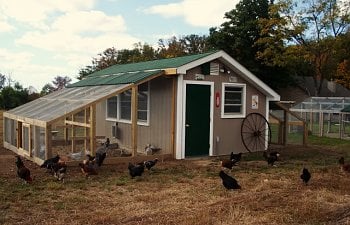
The Big Coop (a/k/a Chicken Math Coop)
I knew the first coop (https://www.backyardchickens.com/a/schroeders-schroeders-byc-chicken-coop) wasn't going to be big enough to suit me, but at the time, I just couldn't justify (esp. to my DW) a larger one. Well, just 2 years later, I built my ultimate coop:

My initial inspiration came when I purchased 7 used double paned vinyl windows off of Craig's list for $165. (I used 6 of the 7.) I designed the coop and runs around these windows. The first coop I built 100% single handedly. I cheated a bit with this one. At 12 x 20 with a 9 ft high inside peak I knew I couldn't handle it alone so I contracted out the construction of the basic building. I did all the interior work, the painting and the construction of the runs.
The Specifics
I preferred the look of the saltbox style and it allowed me to create a wall of windows facing south. There are two windows on the north side, with the roosts placed between the two. There is one smaller window on the east side to catch early morning sunlight. The west side has no openings as this is the direction from which the prevailing winds blow. The south side is 8 ft tall, and the north side is 6 ft. There are two vents at the peaks of the east and west ends, soffit vents, and a ridge vent along the length of the s
tructure.
I debated at length of whether to elevate the coop or to build it on a concrete slab. My first coop is elevated and my chickens love to get underneath out of the weather, or sun in the summer. The cost for the two options was identical i.e. the cost of pouring the slab was equal to the cost of the elevated flooring. I knew I wouldn't be happy unless I insulated under an elevated floor, and then I'd have to cover the insulation to keep the chickens from pecking at the insulation. I decided I didn't want to take the time to do this, or spend the additional money, so I went with concrete.
I went with pre-primed car siding, and alsphalt shingles to match my first coop. On the north side, I included a clean out door 3 ft wide by 8 inches high, under the roosts. I used fiberglass insulation in the walls, covered by shower board. The ceiling is insulated with 1 in foil backed rigid foam. I covered all of the windows from the outside with framed 1/2 inch hardware cloth panels. Since these photos were taken I have poured a 4 ft. x 4 ft. concrete slab in front of the door.
The Runs
I used corrugated Ondura roof panels where the roof meets the runs. This provides shade on the south side from the hottest summer sun, and directs rain water away from the windows on either side. If you look closely, you'll see the panels don't lay flat. This is because I didn't plan for enough overhang of the shingles. I had to keep the panels as tight as possible against the facia at the expense of a clean line. It works as planned, however, so I can live with the appearance.
The Inside
There are three sections inside. At the west end is a 5ft x 12ft section with a pop door to the smaller run. I will use this as an area to house breeding groups, followed by an area for 2 or 3 broody hens and their chicks. The chicks will grow up for several weeks separated from the main flock by just the door and chicken wire. I should be able to integrate the 2 groups after 6 or 8 weeks. (The roos are kept separate in a bachelor pad, my first, smaller coop.) For now I have taken out the door between the 2 sections to allow maximum space for my main flock, and access to both runs.
The middle section is 10 ft. x 12 ft. for the main flock. It has a pop door to the larger run. The roosts are of a ladder type and swing upwards when I do a major cleaning. I use the deep litter method - pine shavings. Where the floor meets the wall under the roosts I have a clean-out door through which I can sweep out the litter for periodic replacement of the deep litter. I have a 6 hole rollout nest box which deposits eggs into the storage area. Since these photos were taken, I have attached perches to the front of the nest box for ease of entry.
The section along the east wall is 5 ft. x 12 ft. It is used for storage of food, feeders, etc., and allows collection of eggs without entering the pen. I used many of the tools, cabinets, crocks, etc. I had saved from my gandparents and parents garages and basements. On the wall, I have an 1877 picture of my ancestors
who were 77 and 81 in the photo.
I made the feeder out of 6 in PVC, and oyster shell and grit dispensers out of 3 in PVC. I'm using nipple waters. Two 5 gallon buckets with 3 nipples in each. This winter I'll place a bird bath-type heater in one if they freeze up. They converted to the nipple waterers without any problems, and they stay sooo much cleaner. With 25 hens inside now, I don't have to change food or water for several days in a row.
Pop Doors
I am often gone from sunrise to sunset, so I couldn't live without my automatic pop doors. I have the Foy's model in my first coop and love it, so I wanted to use the same in this coop.
I did so for entry to the small run, but for entry to the south run I needed to put the pop door under the windows, requiring a door that swings open. So on this side, I went with the Pullet-Shut door. It was somewhat easier to to install, but I have a slight preferance for the Foy's model because it is battery operated, and the batteries last for at least a year. Pullet Shut requires a 12 volt battery with a trickle charger, or a solar powered battery. Adjusting the times is easier on the Foy's if you don't have the photocell option. Since I added the photocell option to the Pullet Shut door (as I already had on the Foy's) I never have to adjust the times.
Tribute to Dad
I lived in the city for 50 years. Growing up, my Dad always talked about the chickens he raised as a youngster, and how he longed to move to the country. He never made it but he was able to see and enjoy my setup before he died in 2011. We loved talking about my chickens. When cleaning out his things, I found this newspaper clipping from 1943 when he (Melvin Schroeder) was 14 years old, in the hospital after hernia surgery. My love for chickens is in my genes!
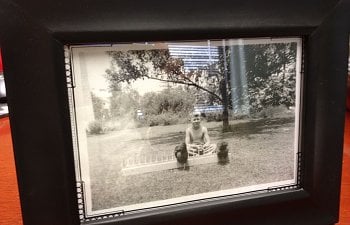
I am fortunate to have in-laws whom I think the world of. Unfortunately they live 6 hours away. My father-in-law, Allen, keeps chickens for eggs. Here is a photo of him at age 6 with his chickens..
I knew the first coop (https://www.backyardchickens.com/a/schroeders-schroeders-byc-chicken-coop) wasn't going to be big enough to suit me, but at the time, I just couldn't justify (esp. to my DW) a larger one. Well, just 2 years later, I built my ultimate coop:

My initial inspiration came when I purchased 7 used double paned vinyl windows off of Craig's list for $165. (I used 6 of the 7.) I designed the coop and runs around these windows. The first coop I built 100% single handedly. I cheated a bit with this one. At 12 x 20 with a 9 ft high inside peak I knew I couldn't handle it alone so I contracted out the construction of the basic building. I did all the interior work, the painting and the construction of the runs.
The Specifics
I preferred the look of the saltbox style and it allowed me to create a wall of windows facing south. There are two windows on the north side, with the roosts placed between the two. There is one smaller window on the east side to catch early morning sunlight. The west side has no openings as this is the direction from which the prevailing winds blow. The south side is 8 ft tall, and the north side is 6 ft. There are two vents at the peaks of the east and west ends, soffit vents, and a ridge vent along the length of the s

I debated at length of whether to elevate the coop or to build it on a concrete slab. My first coop is elevated and my chickens love to get underneath out of the weather, or sun in the summer. The cost for the two options was identical i.e. the cost of pouring the slab was equal to the cost of the elevated flooring. I knew I wouldn't be happy unless I insulated under an elevated floor, and then I'd have to cover the insulation to keep the chickens from pecking at the insulation. I decided I didn't want to take the time to do this, or spend the additional money, so I went with concrete.

The Runs

The north run is 8ft x 19 ft. and the south run is 12x19. This is the widest I could make them in order to match the pitch of the roof line. I used 4 ft wide sheets of 1/2 inch hardware cloth so the runs needed to be less than 20 f

t long to allow for overlapping. The hardware cloth extends 2 ft beyond the structure (horizontally on the ground.) When construction was finished, I got a couple of loads of top soil to cover the aprons. I decided to go with small people doors into the runs because they were easier to make than 6 ft tall ones, they were cheaper, and I just think they look better. This may have not been the best decision. I can bend way down to get inside now, but when I'm older, this might not be so easy. I used treated lumber, including 2x10's around the base. I then filled them with about 6 inches of sand.

The Inside

The middle section is 10 ft. x 12 ft. for the main flock. It has a pop door to the larger run. The roosts are of a ladder type and swing upwards when I do a major cleaning. I use the deep litter method - pine shavings. Where the floor meets the wall under the roosts I have a clean-out door through which I can sweep out the litter for periodic replacement of the deep litter. I have a 6 hole rollout nest box which deposits eggs into the storage area. Since these photos were taken, I have attached perches to the front of the nest box for ease of entry.


The section along the east wall is 5 ft. x 12 ft. It is used for storage of food, feeders, etc., and allows collection of eggs without entering the pen. I used many of the tools, cabinets, crocks, etc. I had saved from my gandparents and parents garages and basements. On the wall, I have an 1877 picture of my ancestors


Pop Doors
I am often gone from sunrise to sunset, so I couldn't live without my automatic pop doors. I have the Foy's model in my first coop and love it, so I wanted to use the same in this coop.

I did so for entry to the small run, but for entry to the south run I needed to put the pop door under the windows, requiring a door that swings open. So on this side, I went with the Pullet-Shut door. It was somewhat easier to to install, but I have a slight preferance for the Foy's model because it is battery operated, and the batteries last for at least a year. Pullet Shut requires a 12 volt battery with a trickle charger, or a solar powered battery. Adjusting the times is easier on the Foy's if you don't have the photocell option. Since I added the photocell option to the Pullet Shut door (as I already had on the Foy's) I never have to adjust the times.
Tribute to Dad
I lived in the city for 50 years. Growing up, my Dad always talked about the chickens he raised as a youngster, and how he longed to move to the country. He never made it but he was able to see and enjoy my setup before he died in 2011. We loved talking about my chickens. When cleaning out his things, I found this newspaper clipping from 1943 when he (Melvin Schroeder) was 14 years old, in the hospital after hernia surgery. My love for chickens is in my genes!

I am fortunate to have in-laws whom I think the world of. Unfortunately they live 6 hours away. My father-in-law, Allen, keeps chickens for eggs. Here is a photo of him at age 6 with his chickens..