Wow we had no idea what we were getting into. I had a lot more pics of the whole process but had a computer hard drive melt down and lost everything. It took us several weeks of research (on BYC of course!) and we came up with this. This started out as an old playhouse for my kids. It was old and very rotted out. We deconstructed the old house and rebuilt it. Upon reflection we would have been better off and would have taken a lot less time just building a new one. I spent too much time pulling nails and screws and miss mashing the whole thing together. We salvaged as much as we could off of the old structure. Mostly it was the 2x2’s it was built with and the roof joist. We made the door big enough for a real person to get into and added about 2 feet in length. It started out 4x6 as a playhouse and is now 4x8. But we tried too much to just rebuild the original structure and should have just scrapped it and started over. What we have now is perfect for our 9 hens though.
This is how it looked before, minus the trim and the roof (lost rest of pics)

This is some of the inside work insulating the walls. We did this to only 2 of the walls. They were just too heavy to maneuver to the back yard. But the walls were framed and sided in the garage. So I guess it is a modular chicken coop.
We were able to salvage a couple of the floor joists but most were rotted. We hiked it up about 10” more than what shows in this pic. We wanted the chickens to be able to get under it. Husband had to convince me of this though. I figured I would be the one crawling under there for egg retrieval. Hasn’t happened yet, thank goodness.
Finally after several weekends (and a few week days) in our garage, it was ready for installation.
We insulated the walls and the ceiling. We installed vents at the peaks but wish I would have installed more or better yet bigger vents. We covered the insulation with door skins. Real thin flimsy material. Then caulked every nook and cranny. And painted it all in kilz white primer.
I covered any openings with ½ “ welded wire mesh and on top of that bug screen to keep out flies and other flying insects. Probably over kill but I have never seen a fly in my coop. I installed trim pieces on top of the all the coverings to secure the edges.
This is the hole for the next boxes. Anything that could get water standing on it is covered with flashing, windows, roofline, nest boxes the openings for the vents and pop hole door are all aluminum flashed.
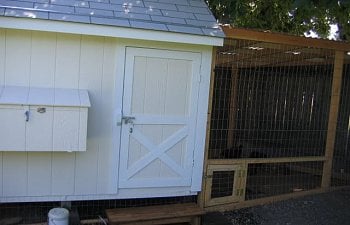
Finished product. The run is fully covered and we installed a door for chickens and for ppl. Under the nest boxes we installed an enclosed cabinet that just looks like the nest box is just really big. It has 2 doors and I keep my “stuff” there. Sorry no pics. This pic shows the removable board to keep the litter inside. It’s a pain to step over all the time but hey it keeps stuff inside.
Since this pic we added a yard of sand. It is great!!! I love the sand. Easy to clean and it rains here so much it drains really well.
I think that covering the whole run with the clear corrugated roofing was so worth it. It rains here a lot!!! My hens NEVER stay in the coop for any reason, just to roost and lay. In December it was in the low teens for a couple weeks and a foot and a half of snow on the ground, they were never kept inside. Snow, rain, sleet or hail will not keep them from happy scratching. The roof handled a foot and a half of snow. I wouldn’t want much more than that on it!
Here’s the inside. We pondered long and hard about the roost. We wanted a droppings board and wanted to get as much roost space possible without sacrificing floor space. This is what we came up with. The whole roost lifts up to scrape off poo. The whole thing is removable. We take it to the yard and pressure wash it. I can’t wait till spring pressure wash. Ahhh to be clean and new looking again. The windows are thick glass and slide on the wooden slots.
We covered the nest boxes with burlap until they started laying. Then we left burlap flaps over them for a little privacy. I wish I had a pic of them all shinny and new. They are 12x12. There is a little bit of a landing in front of the nests but not enough for them to want to hang out.
Husband made a feeder that hangs on the wall. It has adjustable heights. When we had small chicks we had it nearer the floor and now it is at back height. They kinda have to stretch just a little to reach it. We figure it holds 30 or more pounds of food. Our food comes in 40 lb bags and we seldom put it all in because there is always still some in there before we add more.
Got to love the ghetto Folgers waterer. There is a piece of wood there for the hens to hop up on to get out. This way the litter stays in the coop.
We “skirted” all the 2x4 fencing 18-20” away from the run to prevent digging. I have a fully fenced yard and have very few wandering dogs. We do have coons and opossums.
We let the hens out in the yard during the day. We have a 3’ high cheap plastic fencing I got at Wal-Mart. This triples the amount of run.
This is the chicken door to the yard surrounded by the cheap plastic fencing. We had to have a hook and eye installed here to keep the hens from accidentally closing the door. We noticed one day they were all locked out of their coop and run area when the small door was closed. We realized they will roost on it and when they hop off it sometimes swings closed. So we lock it open and closed now.
The pop hole is operated by a rope and locked open and closed with a sliding dowel, all from the outside.
Reflections on things I would have done different.
1. Bigger!!! Taller! Did I say bigger already? BIGGER!! Its almost spring and I have chick fever bad!!
2. More venting. Perhaps make one whole wall open able. It was so hot last summer. We are going to put on a screen door made out of 1/2'” welded wire this summer, sort of a summer door.
3. Start from scratch. Using used materials is difficult and didn’t trim nearly enough off the final bill to make it worth it.
4. The nestbox opening falls open towards you. We did this for ease of cleaning but the problem is they kick out shavings all over. To remedy this we put up a piece of plastic over the bottom half of the opening and haven’t had any problem.
5. Make windows easier to open perhaps on a hinge? Idk. Husband says real framed in windows. Perhaps old camper louvered windows?
6. Put electrical outlet closer to the door. Its in the ceiling now.
7. A window on the front above the nest box.
8. Incorporating the new cabinet under the nest box when being built instead of after the fact. Think about “stuff” you need next to your coop.
9. Gutters across the back of the covered run. It rains a lot here! Having the rain directed away from the run would have helped. Our run frame is right next to the fence and we have NO room to put anything to direct rain. We will address this issue as soon as it gets warmer out! This may involve moving the run back a little from the fence, that should be fun…
This is how it looked before, minus the trim and the roof (lost rest of pics)


This is some of the inside work insulating the walls. We did this to only 2 of the walls. They were just too heavy to maneuver to the back yard. But the walls were framed and sided in the garage. So I guess it is a modular chicken coop.

We were able to salvage a couple of the floor joists but most were rotted. We hiked it up about 10” more than what shows in this pic. We wanted the chickens to be able to get under it. Husband had to convince me of this though. I figured I would be the one crawling under there for egg retrieval. Hasn’t happened yet, thank goodness.

Finally after several weekends (and a few week days) in our garage, it was ready for installation.

We insulated the walls and the ceiling. We installed vents at the peaks but wish I would have installed more or better yet bigger vents. We covered the insulation with door skins. Real thin flimsy material. Then caulked every nook and cranny. And painted it all in kilz white primer.


I covered any openings with ½ “ welded wire mesh and on top of that bug screen to keep out flies and other flying insects. Probably over kill but I have never seen a fly in my coop. I installed trim pieces on top of the all the coverings to secure the edges.

This is the hole for the next boxes. Anything that could get water standing on it is covered with flashing, windows, roofline, nest boxes the openings for the vents and pop hole door are all aluminum flashed.

Finished product. The run is fully covered and we installed a door for chickens and for ppl. Under the nest boxes we installed an enclosed cabinet that just looks like the nest box is just really big. It has 2 doors and I keep my “stuff” there. Sorry no pics. This pic shows the removable board to keep the litter inside. It’s a pain to step over all the time but hey it keeps stuff inside.


Since this pic we added a yard of sand. It is great!!! I love the sand. Easy to clean and it rains here so much it drains really well.

I think that covering the whole run with the clear corrugated roofing was so worth it. It rains here a lot!!! My hens NEVER stay in the coop for any reason, just to roost and lay. In December it was in the low teens for a couple weeks and a foot and a half of snow on the ground, they were never kept inside. Snow, rain, sleet or hail will not keep them from happy scratching. The roof handled a foot and a half of snow. I wouldn’t want much more than that on it!

Here’s the inside. We pondered long and hard about the roost. We wanted a droppings board and wanted to get as much roost space possible without sacrificing floor space. This is what we came up with. The whole roost lifts up to scrape off poo. The whole thing is removable. We take it to the yard and pressure wash it. I can’t wait till spring pressure wash. Ahhh to be clean and new looking again. The windows are thick glass and slide on the wooden slots.


We covered the nest boxes with burlap until they started laying. Then we left burlap flaps over them for a little privacy. I wish I had a pic of them all shinny and new. They are 12x12. There is a little bit of a landing in front of the nests but not enough for them to want to hang out.

Husband made a feeder that hangs on the wall. It has adjustable heights. When we had small chicks we had it nearer the floor and now it is at back height. They kinda have to stretch just a little to reach it. We figure it holds 30 or more pounds of food. Our food comes in 40 lb bags and we seldom put it all in because there is always still some in there before we add more.

Got to love the ghetto Folgers waterer. There is a piece of wood there for the hens to hop up on to get out. This way the litter stays in the coop.

We “skirted” all the 2x4 fencing 18-20” away from the run to prevent digging. I have a fully fenced yard and have very few wandering dogs. We do have coons and opossums.
We let the hens out in the yard during the day. We have a 3’ high cheap plastic fencing I got at Wal-Mart. This triples the amount of run.

This is the chicken door to the yard surrounded by the cheap plastic fencing. We had to have a hook and eye installed here to keep the hens from accidentally closing the door. We noticed one day they were all locked out of their coop and run area when the small door was closed. We realized they will roost on it and when they hop off it sometimes swings closed. So we lock it open and closed now.

The pop hole is operated by a rope and locked open and closed with a sliding dowel, all from the outside.


Reflections on things I would have done different.
1. Bigger!!! Taller! Did I say bigger already? BIGGER!! Its almost spring and I have chick fever bad!!
2. More venting. Perhaps make one whole wall open able. It was so hot last summer. We are going to put on a screen door made out of 1/2'” welded wire this summer, sort of a summer door.
3. Start from scratch. Using used materials is difficult and didn’t trim nearly enough off the final bill to make it worth it.
4. The nestbox opening falls open towards you. We did this for ease of cleaning but the problem is they kick out shavings all over. To remedy this we put up a piece of plastic over the bottom half of the opening and haven’t had any problem.
5. Make windows easier to open perhaps on a hinge? Idk. Husband says real framed in windows. Perhaps old camper louvered windows?
6. Put electrical outlet closer to the door. Its in the ceiling now.
7. A window on the front above the nest box.
8. Incorporating the new cabinet under the nest box when being built instead of after the fact. Think about “stuff” you need next to your coop.
9. Gutters across the back of the covered run. It rains a lot here! Having the rain directed away from the run would have helped. Our run frame is right next to the fence and we have NO room to put anything to direct rain. We will address this issue as soon as it gets warmer out! This may involve moving the run back a little from the fence, that should be fun…