Ok everyone here's my entry,hope you all like it.
Plans is that anything like instructions? um no real plans, just a vision.
you could really take any cabinet and do similar the real heart of this is the turner trays and controls. I built the incubation chamber and heat chamber around them. this is not really to show you how but more what is possible. some ideas where borrowed from backyard chicken members as well as other sites.
materials I used 1/2" plywood , 2"x4"s, 2" foam board, 3/3" foam board. various screws 3/4", some little self tapper types, duct work elbows, sheet metal,two barn hinges ,a latch, porcelain lamp bases, a cheap extension cord, 3" PVC, 4"-3" PVC reducers, 3"PVC elbows, tube of painters caulk,water heater thermostat,4" duct booster fans, and a 1 rpm auger motor and digital timer and a old double insulated window and two heat bulbs, 14" nuts and bolts of various lengths.
I will let you all know right now I have worked in the construction trades a good portion of my life so most of this project came naturally and I find some of this hard to convey in text. if you where here in person I could show you much of it which would be the same as I learned it but its not really rocket science. I will try my best to walk you through.
measurements well there are not many, good portion of this was by eye and scribe. scribing is where you butt you work piece up and mark it then cut. lots faster then check and double check on measurements. so again no real measurements.
the cabinet ended up being 4' tall (that's how wide a sheet of plywood is) 36" deep and 32" wide. again I started by building around the egg trays with the rack then the incubation chamber around the rack and really just designing as I built.
I do hope the pictures speak for themselves, the cabinet will hold 300 eggs, has automatic timer, thermostat control and constant circulation fan an a on heat call fan.
the cabinet

detail on the door, basically built like old windows use to be then hinged, the lip fits inside.
the ventilation system, the pipe on the left is the return from the incubation chamber, center pipe is the circulation chase and fan, the heat fan you can see in the right top corner. the lamps are mounted in the upper half where the heat fan is. that comprises the heat chamber. and avoids any direct heat on the eggs. all the joints and around the pipes are chalked and note the back is removed for pictures. the ventilation system is screwed together and not glued also
front view of the ventilation and incubation camber with turner rack removed.
water tray and turner motor shelve, the louvre is cover the heating fan, and center is the ventilation systems port.
bottom ports center is ventilation and lower right is the cold air return for the heat chamber.
OK nearing completion, turner racks and egg trays as well as the 2" foam installed in the incubation chamber as well as the duel humidistat thermometer. trays tipped forward.
OK some detail on the turner racks
the turner motor, pulley and connecting arm assembly,
I still have a few things to do but I have been building this on the front porch and well its been raining here so just as soon as I can I will update this with the turner motor mounting and the heating lamps and heat shields as well as the insulated heat chamber and thermostat adjustment access's
update----
pulley side of motor box.
front of incubator motor box view
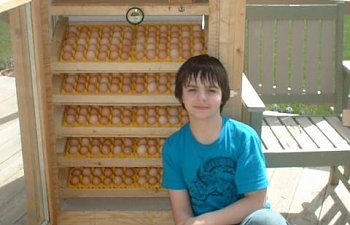
I have it bolted to the water tray shelve. you can see the connecting arm in the picture with the boy. and the slot the arm moves in in the pulley side pic.
lamps and heat shields
left from back
right from back
I cut a square of sheet metal and trimmed it to a appropriate sized circle leaving the corners and bending them down to create legs to proved a air gap at top and hold them in place.
lid off, if you look you can see the cold air return in this one its the left side.
the shields are 8" jointed elbows with tabs cut on the bottom so I could screw them on. the other side
has a few slots cut low for air circulation.
access on top to change lamps if necessary. (tops off the box but you can see the access panel)
still have to put the bottom on and
finish the top access. but other wise its functional.
fine tuning.
OK my thinking was off a little, in my original tests the lamps and thermostat where in the incubation side, well I thought the stat would be better off in the incubation side. Problem to slow to cycle and major temp swings.
the fix is the stat is just hanging in the heat side of the box between the lamps. the stat did come with a plastic cover to protect the contacts. so no bare wires exposed.
I also wired the heat fan to run continuous as well as modify the stat by drilling a few holes in it per a byc post. no more crazy temp swings!
have a 1-2 degree drift now. unit has been cycling once an hour for 5-7 mins ( just a guesstimate haven't timed it but I'm close with that guess)
temp has been holding study at 100 degrees! yay, really was racking my head on it.
the humidity issue was solved by making a rack out of coat hangers that fit in the water tray, then draping a cloth across that and using it as a wick evaporator. cloth covers the entire surface area of the tray plus enough to hit the bottom of the tray. humidity is 50%, if I need more I think if I make more racks and create multiple pleats creating more surface are I could really up the humidity.
I have two test subjects in there now will do the crack the shell then in about 4 days and another in seven.
if that works out I should have 100 or better eggs to go in!
tools I used in this where a table saw, chop saw , skill-saw ,drill press, electric drill, flat head and Phillips screw drivers , needle nose pliers with wire cutter,
fillet knife, angle finder, tape measure, 4' level, pencil,sharpie, aviation snips, several different drill bits,ratchet,small crescent wrench and a hammer for a little extra persuasion.
you could do this with a fraction of those tools, but the extra stuff really made things easy, the drill press was perfect for making the turner rack as well as tapping out the pulley to create a crank. the table saw and chop saw made repetitive cuts and special cuts easy. the fillet knife was perfect for cutting the 2" foam.
if I where to do this again I would make it taller and locate the lamps underneath the incubation chamber, and under that have a hatching/brooder box.
I like the large window but I would use a much smaller viewing wind next time, and use 4" of foam all around.
I do need to insulate the lower half of the circulation pipe and the bottom of the lamp chamber and need to run a little caulk here and there to improve efficiency. also need to pop a few ventilation holes and a little trim work and the wood bottom but it live it lives.
did I mention me and my boy turned this into a science fair project. (the eggs where just for the photo , you can see the connecting arm joining the pulley and turner racks.)
thanks for checking my build out, next my coop! feel free to pm me with any questions or suggestions.
and I would also like to state that the Back Yard Chickens forum was a major source for inspiration as well as some very necessary know how (like the thermostat modification and mounting info) it truely is a great resource!
update- well underway into the first hatch heres a few chick pics!
Thanks for the Kind Comments at the bottom of the page!
Anyone wanting to know more , and there have been a good few, best to email me at [email protected] (I check this more often,at least weekly) I would be more then happy to help in any way I can. Have a glorious day.
Well it seems most folks are interested in the turner ,more so the motor, I helped a guy today but to save you a bit of time here's the link to the company that I got it from,took a while to find, I thought I would just save us both some time and hassle
http://www.cshincorporated.com/product_info.php/products_id/5530
If you found that helpful do me a favor and give my farms facebook page a like, you'll be able to see other stuff I'm up to as well then.
https://www.facebook.com/RebelRiseFarm TYIA
Plans is that anything like instructions? um no real plans, just a vision.
you could really take any cabinet and do similar the real heart of this is the turner trays and controls. I built the incubation chamber and heat chamber around them. this is not really to show you how but more what is possible. some ideas where borrowed from backyard chicken members as well as other sites.
materials I used 1/2" plywood , 2"x4"s, 2" foam board, 3/3" foam board. various screws 3/4", some little self tapper types, duct work elbows, sheet metal,two barn hinges ,a latch, porcelain lamp bases, a cheap extension cord, 3" PVC, 4"-3" PVC reducers, 3"PVC elbows, tube of painters caulk,water heater thermostat,4" duct booster fans, and a 1 rpm auger motor and digital timer and a old double insulated window and two heat bulbs, 14" nuts and bolts of various lengths.
I will let you all know right now I have worked in the construction trades a good portion of my life so most of this project came naturally and I find some of this hard to convey in text. if you where here in person I could show you much of it which would be the same as I learned it but its not really rocket science. I will try my best to walk you through.
measurements well there are not many, good portion of this was by eye and scribe. scribing is where you butt you work piece up and mark it then cut. lots faster then check and double check on measurements. so again no real measurements.
the cabinet ended up being 4' tall (that's how wide a sheet of plywood is) 36" deep and 32" wide. again I started by building around the egg trays with the rack then the incubation chamber around the rack and really just designing as I built.
I do hope the pictures speak for themselves, the cabinet will hold 300 eggs, has automatic timer, thermostat control and constant circulation fan an a on heat call fan.
the cabinet

detail on the door, basically built like old windows use to be then hinged, the lip fits inside.

the ventilation system, the pipe on the left is the return from the incubation chamber, center pipe is the circulation chase and fan, the heat fan you can see in the right top corner. the lamps are mounted in the upper half where the heat fan is. that comprises the heat chamber. and avoids any direct heat on the eggs. all the joints and around the pipes are chalked and note the back is removed for pictures. the ventilation system is screwed together and not glued also


front view of the ventilation and incubation camber with turner rack removed.
water tray and turner motor shelve, the louvre is cover the heating fan, and center is the ventilation systems port.

bottom ports center is ventilation and lower right is the cold air return for the heat chamber.

OK nearing completion, turner racks and egg trays as well as the 2" foam installed in the incubation chamber as well as the duel humidistat thermometer. trays tipped forward.

OK some detail on the turner racks


the turner motor, pulley and connecting arm assembly,


I still have a few things to do but I have been building this on the front porch and well its been raining here so just as soon as I can I will update this with the turner motor mounting and the heating lamps and heat shields as well as the insulated heat chamber and thermostat adjustment access's
update----
pulley side of motor box.

front of incubator motor box view

I have it bolted to the water tray shelve. you can see the connecting arm in the picture with the boy. and the slot the arm moves in in the pulley side pic.
lamps and heat shields
left from back

right from back

I cut a square of sheet metal and trimmed it to a appropriate sized circle leaving the corners and bending them down to create legs to proved a air gap at top and hold them in place.
lid off, if you look you can see the cold air return in this one its the left side.

the shields are 8" jointed elbows with tabs cut on the bottom so I could screw them on. the other side
has a few slots cut low for air circulation.
access on top to change lamps if necessary. (tops off the box but you can see the access panel)

still have to put the bottom on and
finish the top access. but other wise its functional.
fine tuning.
OK my thinking was off a little, in my original tests the lamps and thermostat where in the incubation side, well I thought the stat would be better off in the incubation side. Problem to slow to cycle and major temp swings.
the fix is the stat is just hanging in the heat side of the box between the lamps. the stat did come with a plastic cover to protect the contacts. so no bare wires exposed.
I also wired the heat fan to run continuous as well as modify the stat by drilling a few holes in it per a byc post. no more crazy temp swings!
have a 1-2 degree drift now. unit has been cycling once an hour for 5-7 mins ( just a guesstimate haven't timed it but I'm close with that guess)
temp has been holding study at 100 degrees! yay, really was racking my head on it.
the humidity issue was solved by making a rack out of coat hangers that fit in the water tray, then draping a cloth across that and using it as a wick evaporator. cloth covers the entire surface area of the tray plus enough to hit the bottom of the tray. humidity is 50%, if I need more I think if I make more racks and create multiple pleats creating more surface are I could really up the humidity.
I have two test subjects in there now will do the crack the shell then in about 4 days and another in seven.
if that works out I should have 100 or better eggs to go in!
tools I used in this where a table saw, chop saw , skill-saw ,drill press, electric drill, flat head and Phillips screw drivers , needle nose pliers with wire cutter,
fillet knife, angle finder, tape measure, 4' level, pencil,sharpie, aviation snips, several different drill bits,ratchet,small crescent wrench and a hammer for a little extra persuasion.
you could do this with a fraction of those tools, but the extra stuff really made things easy, the drill press was perfect for making the turner rack as well as tapping out the pulley to create a crank. the table saw and chop saw made repetitive cuts and special cuts easy. the fillet knife was perfect for cutting the 2" foam.
if I where to do this again I would make it taller and locate the lamps underneath the incubation chamber, and under that have a hatching/brooder box.
I like the large window but I would use a much smaller viewing wind next time, and use 4" of foam all around.
I do need to insulate the lower half of the circulation pipe and the bottom of the lamp chamber and need to run a little caulk here and there to improve efficiency. also need to pop a few ventilation holes and a little trim work and the wood bottom but it live it lives.
did I mention me and my boy turned this into a science fair project. (the eggs where just for the photo , you can see the connecting arm joining the pulley and turner racks.)

thanks for checking my build out, next my coop! feel free to pm me with any questions or suggestions.
and I would also like to state that the Back Yard Chickens forum was a major source for inspiration as well as some very necessary know how (like the thermostat modification and mounting info) it truely is a great resource!
update- well underway into the first hatch heres a few chick pics!


Thanks for the Kind Comments at the bottom of the page!
Anyone wanting to know more , and there have been a good few, best to email me at [email protected] (I check this more often,at least weekly) I would be more then happy to help in any way I can. Have a glorious day.
Well it seems most folks are interested in the turner ,more so the motor, I helped a guy today but to save you a bit of time here's the link to the company that I got it from,took a while to find, I thought I would just save us both some time and hassle
http://www.cshincorporated.com/product_info.php/products_id/5530
If you found that helpful do me a favor and give my farms facebook page a like, you'll be able to see other stuff I'm up to as well then.
https://www.facebook.com/RebelRiseFarm TYIA