My wife has always liked chickens, and I of course have always liked eggs. So what’s the problem? Well, we happen to live in an ‘undisclosed’ area of Virginia where chickens ist verboten, even though our house sits on over an acre of prime chicken range. This year we decided to go into covert chicken operations anyway, and using ideas here on this forum and elsewhere, I designed and built an undercover coop to meet our particular needs.
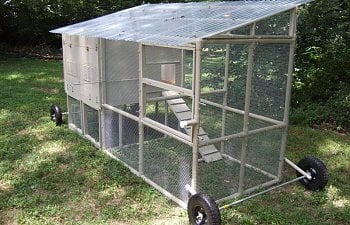
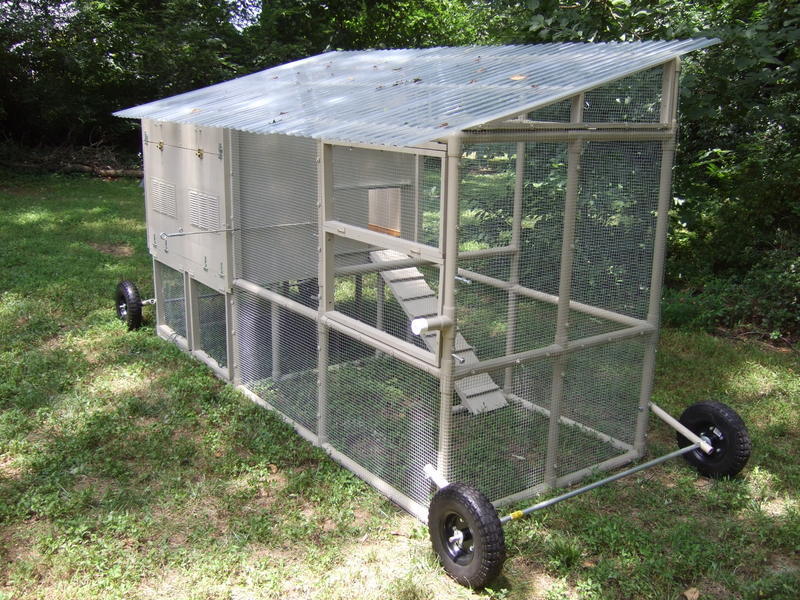
Being a couple of rebel poultry scofflaws, we needed something that was mobile, fairly unobtrusive, and yet big enough for about 3-5 hens. I have previously built some small projects out of PVC pipe, so thought this would be the ideal material for the coop being that it won’t rot out, is lightweight and won’t absorb chicken odors. I also wanted some type of wheel system so I could move the coop as needed for cleaning and occasional use as a chicken tractor.
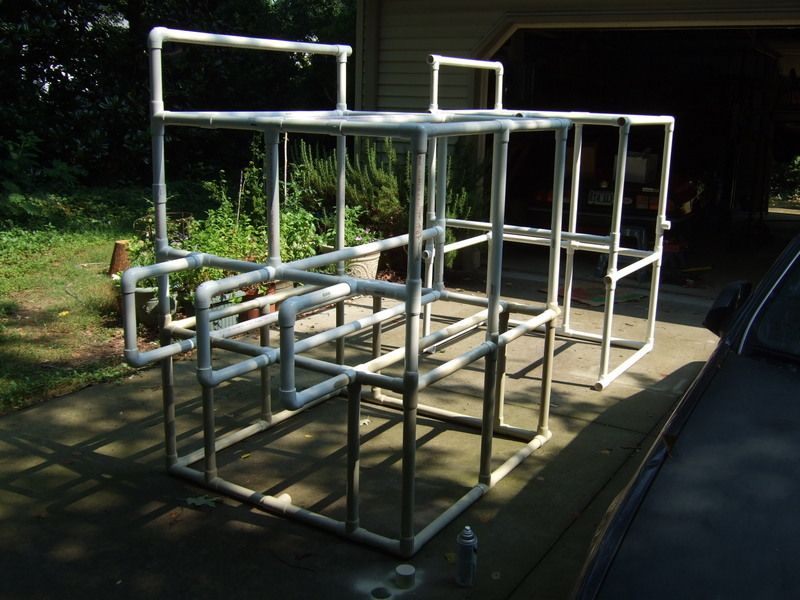
Here is the PVC skeleton of the 4x10' coop. The height dimensions are approx. 5 feet on the “low” side and 6 feet on the “high” side. I used regular 1 ¼” PVC pipe, but had to buy special 4-way, 5-way, and corner fittings made just for PVC furniture projects. There are various vendors on the Internet and Ebay that sell these fittings. I built the frame in sections; a 4’ henhouse/nestbox section (front end), a 3’ run section (back end), then connected them with a 3’ middle section. The middle section piping is missing in the photo as I eventually decided not to solvent weld the front and back sections together in case I want to take the coop apart in the future to transport it. This piping is held in place just with self-tapping screws through the PVC fittings.
Here are other features of this coop –
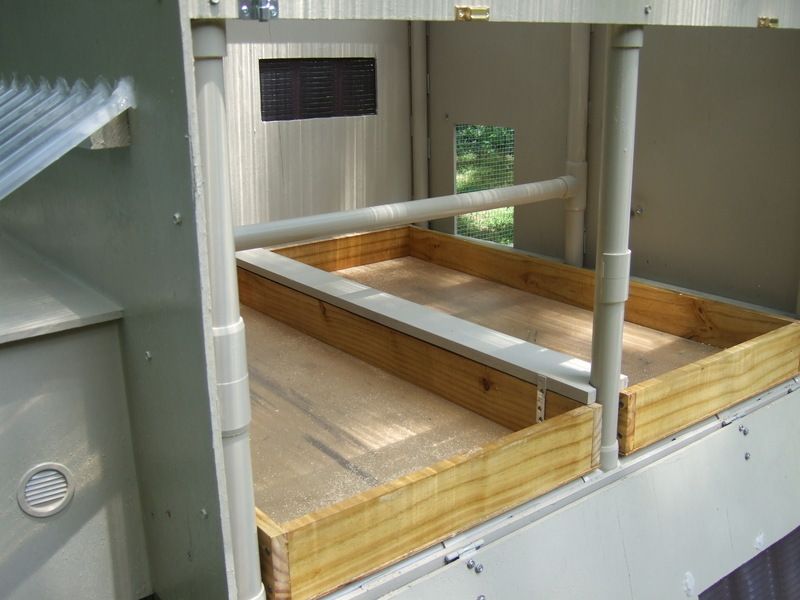
Hen house: For the 4x4’ henhouse, I ultimately decided on 11/32” plywood, but probably could have gone thinner to save weight. The plywood was primed and painted with an exterior latex which was color matched to the spray paint I used on the PVC piping. To save weight and assist in coop cleaning, I made removable, slide out drawers (aka poop boards?) that can be taken to the compost pile and dumped out. I lined the bottom of the drawers with thick plastic sheeting cut from an old office chair mat. For the gap between the poop boards I used a painted 1x4" board held in place with some mending braces.
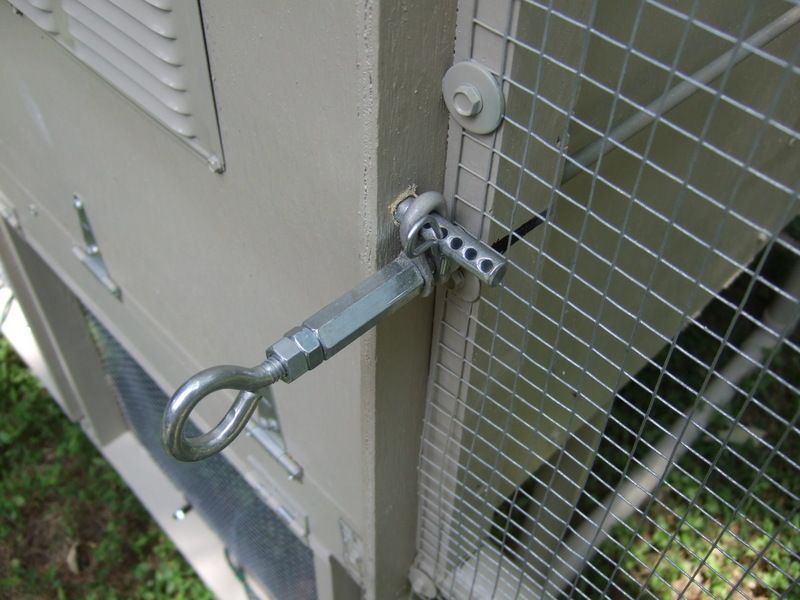
The hen house door slides on aluminum U channel and can be locked shut. I used an eye bolt, coupling nut, part of an old shackle and hitch pin for that. The closing rod is 5/16" threaded stock. It attaches to the door with some metal clips normally used for lawnmower throttle cables. All of these items, including the U channel, should be available in the hardware aisle of your local home center or hardware store.
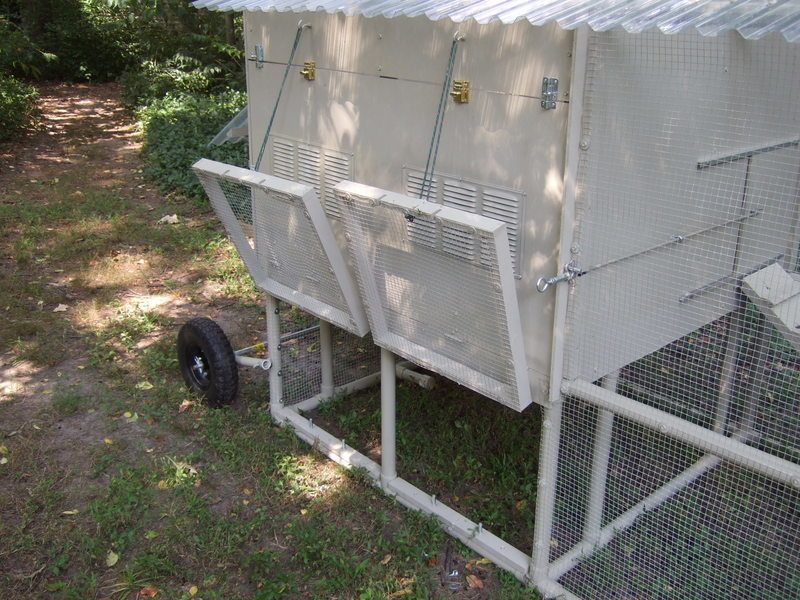
The area under the hen house is approx. 2’ high and has swing up doors to access the feeder and to let the chickens out to free range. The doors secure with latches and bolts with wingnuts. Slots are cut into the bottom of the door frames for the bolts.
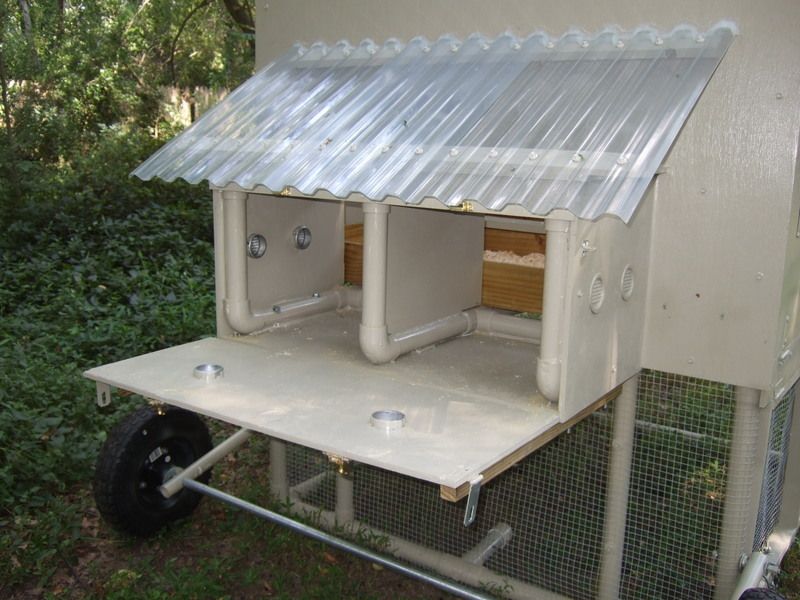
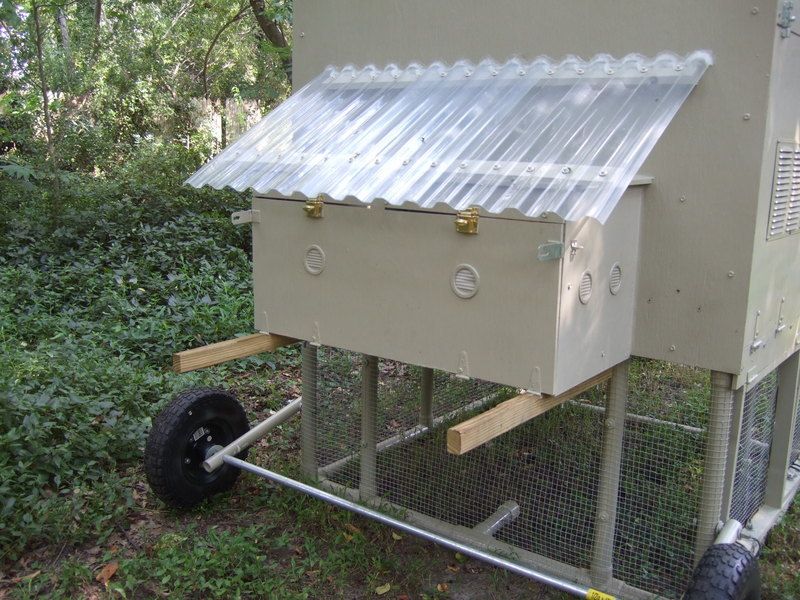
Nest boxes: The two nest boxes are approx. 12”X12”X12”. A single nest box door opens on the end to assist cleaning and there are some round air vents cut in. Since this is the heavy end of the coop, I added lift handles to assist in putting the coop up on wheels. The handles also keeps the nest box door from flopping all the way down. I used some scrap pieces of the PVC roof panels to help keep nesting materials dry and the egg layers happy!
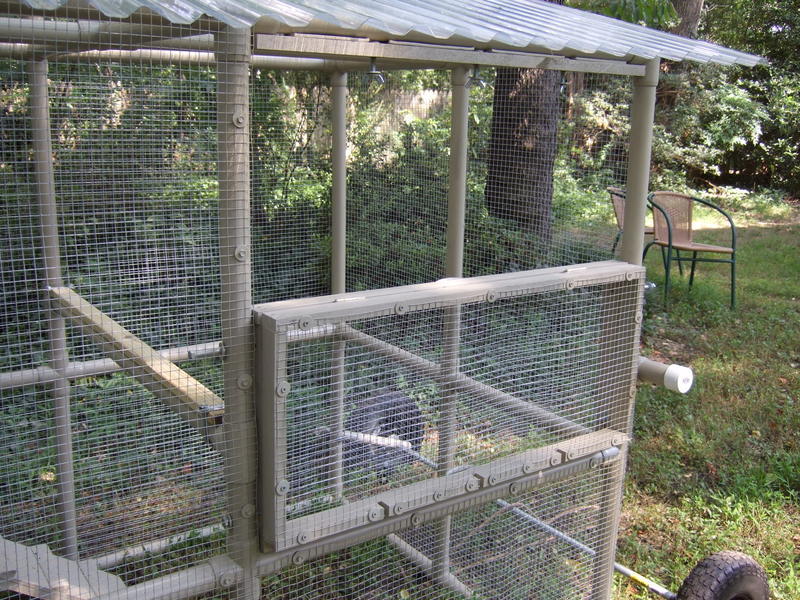
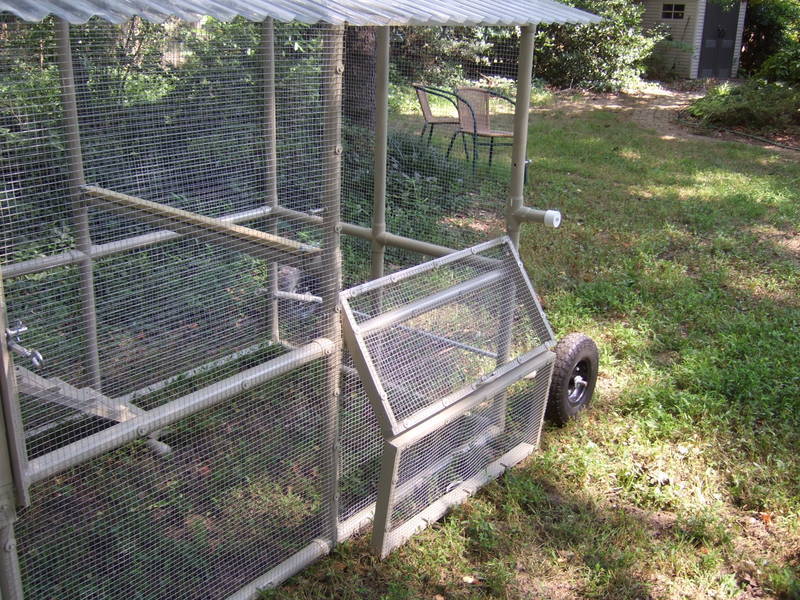
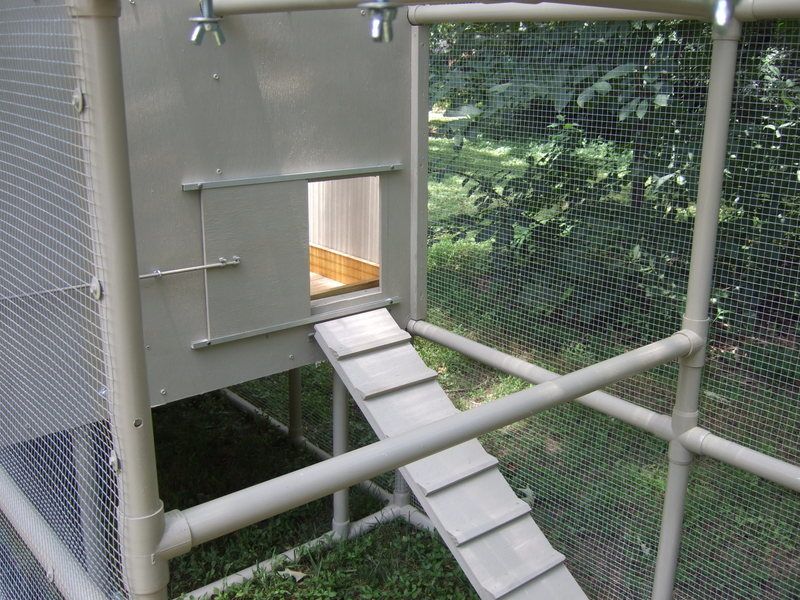
Chicken run area: The ½” wire mesh screen is attached to the PVC with #10 ¾” self-tapping screws and fender washers. About 200+ of them were used on this project, including those which attach the plywood to the henhouse section. A fold out frame allows access for throwing in scraps and also is the way to enter the coop.
Roof: I used clear corrugated PVC panels for the roof, which uses its own type of sealing self-tapping screws. You can see them in the nest box photos.
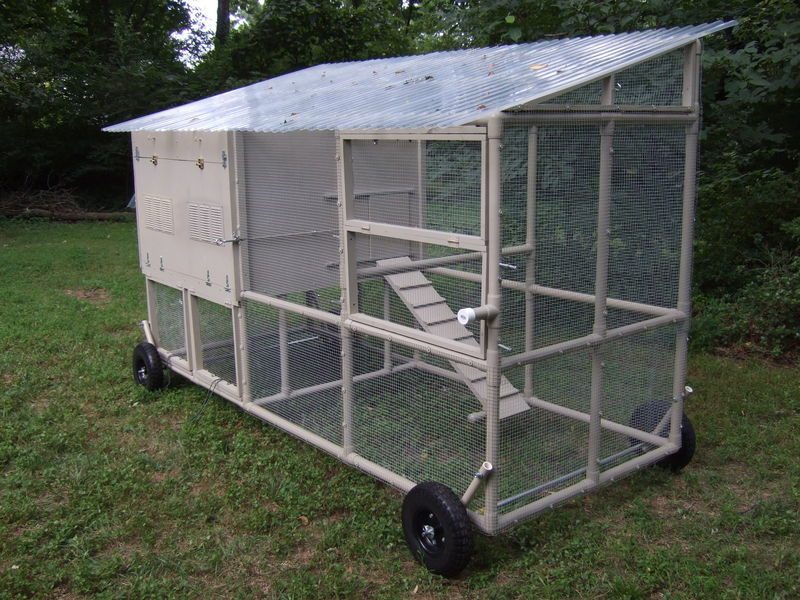
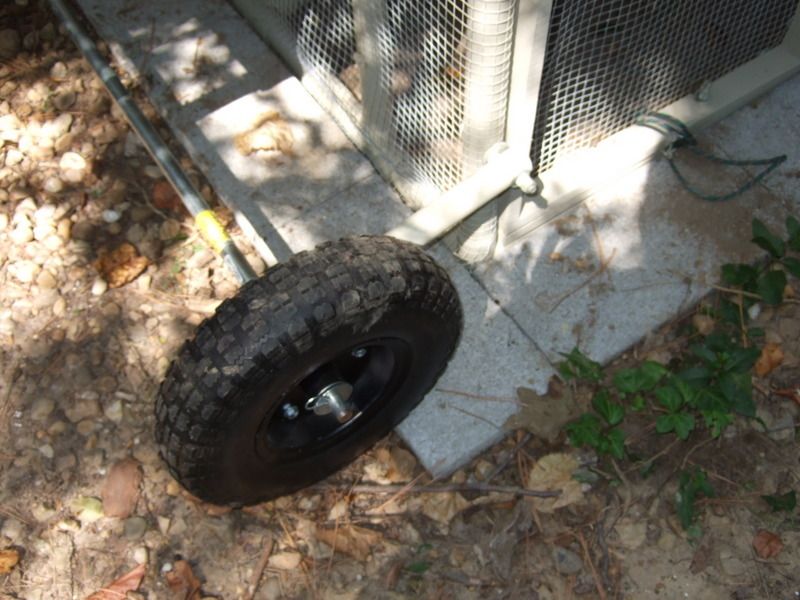
Wheel system: I wanted this coop to be mobile for several reasons. One is to aid cleaning. Instead of getting inside the coop, I wanted to just roll it off its base to assist in de-poopify operations, to include some gentle pressure washing of the coop itself. The second reason is to use it for occasional chicken tractor duty. I like to call it the Hen Hideout Hybrid – kind of like a regular coop and yet can still be moved around like a chicken tractor. The wheel system worked well beyond my expectation; I can actually roll the coop around my yard with one finger! As an added bonus, putting the coop on wheels is a snap; just lift the end and the wheels automatically roll into position. You do the same thing to take them off the wheels. It does take a bit of practice to get the motion just right (think hula hoop). I used 13” flat-free dolly wheels I bought at Harbor Freight. For axles I had a hard time finding 5/8" round stock that was long enough, so had to improvise with 1/2" galvanized pipe. I must say, if there is one feature of this coop I am most pleased with – it’s the wheel system! My wife phone-videoed me rolling the coop around with my “magic finger” and taking it off the wheels. I have now posted a longer video on YouTube about this:
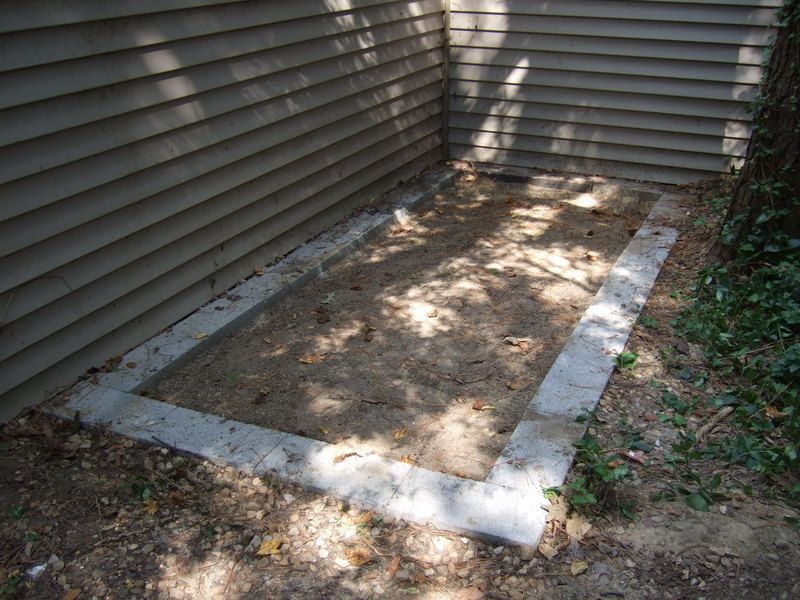
Home base for the coop: I buried standard cement block and placed 4” thick cap block on top. The wheels roll on the cap block and when in position, the bottom of the coop will sit 2” below the top of the cap blocks. Hopefully, that will take care of any predator burrowing efforts.
Some things to consider or do different ‘next time’:
- I used 1 ¼” PVC piping, but I think 1” might do just as well and would reduce weight and cost even further. Regular PVC pipe needs to be painted as it contains no UV inhibitors, however, they do sell special ‘furniture grade’ PVC that has the inhibitors in it and is available in several colors. Of course this costs a lot extra, but may be worth it in the long run. Painting doesn’t start with the letters P-A-I-N by accident. We used all of one gallon of a good grade exterior latex ($25), and about 5 cans of spray paint for plastic ($20). This doesn’t count the primer for the wood, which we already had laying around. Apparently, there is a primer for plastic too, but we didn’t use any.
- I did not put a full size “human door” on this coop as I was worried this would affect the rigidity of the PVC frame, but I now think one could be easily added to the middle section on the high side of the coop as long as you switch the chicken ladder to the other side. This would not work for our particular situation as the high side of our coop will be up against a shed most of the time, but I may consider putting a door on the low side at some point.
- I used clear corrugated PVC panels for the roof, because our yard has very dense shade. If the henhouse gets too hot, I may apply a window film, or put a silver tarp on it during the hottest part of summer. The panels do come in solid colors, as well as smoke and translucent, so there are some options there.
- The entire lower level of the coop is 2’, while the upper level is 3’. I used these dimensions consciously as the ½” hardware cloth is sold in 2’ and 3’ rolls, which made attaching it to the PVC frame much more convenient. I attached the fencing to the outside of the frame, thinking it would be harder for predators to push their way in that way and it would keep leaf debris from collecting in the crevices. After lowering the coop onto its home base, some wire would snag on the cement blocks. I corrected it by trimming up the wire and spacing the blocks out a little further, but I would seriously think about attaching the fencing on the inside of the PVC frame next time – at least at the base.
- I originally fitted the various doors on this coop while it sat on my driveway, and they had a nice, snug fit with tight gaps. My shop class teachers would have been proud. Unfortunately, as soon as we started using the coop in our yard, the doors started sticking because the coop would twist and flex slightly due to the uneven ground surface. I eventually had to take the doors off to be trimmed. Lesson learned: on PVC coops, gaps are good!
In summary: Some of the features of this coop were done due the clandestine nature of our chicken operation (aka black egg ops with Team Omelette). We have a large, L-shaped shed on our property and the coop will mainly reside with the high side right up against the crook of the ‘L’, so view of it is completely blocked on two sides. There is a pine tree that restricted the width of the coop and also made it difficult to plan in a human sized access door. The paint color blends in with the shed siding color. Really not too worried about getting ‘busted’; we have a neighbor that keeps a bee hive (also illegal) and we are going to work out an eggs for honey deal. Hey, we’re also supposed to keep our cats indoors, but we don’t do that either!
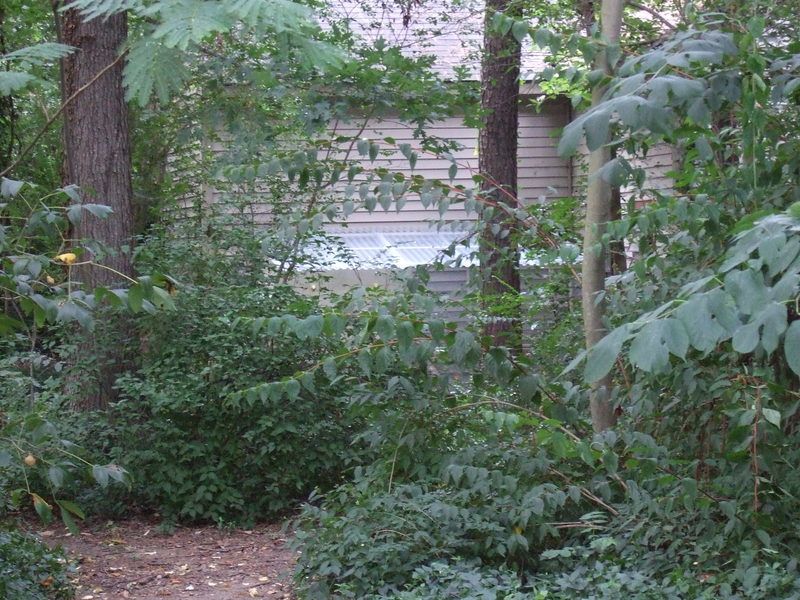
Chicken coop? There's no chicken coop back here!
This was not a cheap coop, but hopefully it will pay off in terms of longevity, ease of cleaning/reduction of maintenance, and overall happy egg layers. I sort of lost track on the cost of building materials, but I would put it in the $400-500 dollar range. Of course the ultimate test is predator protection, and we have all of them here in Virginia. Hopefully my design will withstand this test and some of you will gain a few ideas for your ‘undercover coop’!
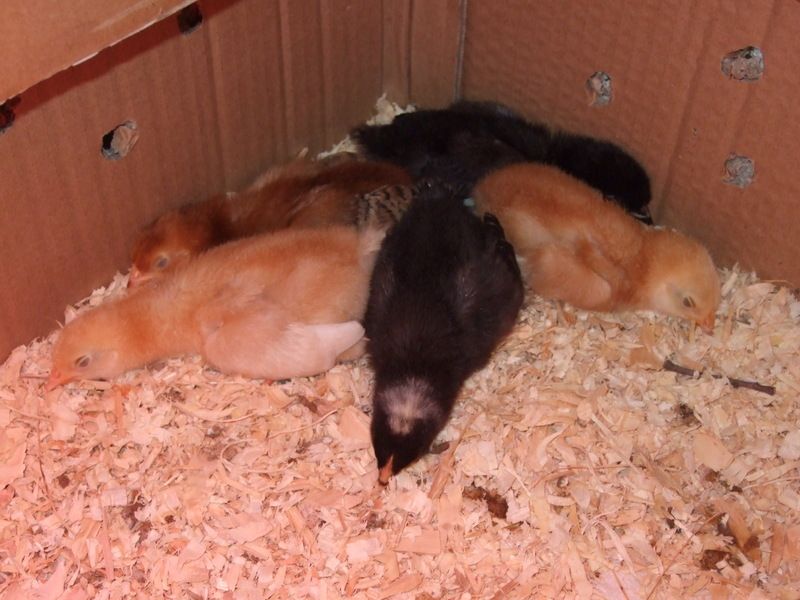
Team Omelette (1 week): Rocky, Bossy, Astro, Buffy & Jodie
Team Omelette on first assignment: Rehearsing black egg ops in deep cover somewhere in Virginia!
Due to multiple requests, I have drawn up a set of plans for this coop. Be advised, this project is not for the faint of heart. The plans will get you to the point of no return, but there will be plenty of details for you to figure out before it is completely finished. I will be happy to answer any of your questions if you decide to go for it.
Please PM me if you are interested in the plans.
Six Month Update!
Ok, it’s been about six months since I finished this coop, so I thought I would provide everyone an update on how things are working out, with a few “gladwedids” and upgrades.

First thing is even though this is really a chicken tractor design, we have mostly let it sit on its base as we became less and less anxious about letting “Team Omelette” roam around the backyard. My wife wanted to try the deep litter method, so we are going to try to leave the coop sit where it is all winter and wait until spring to roll it off its base for a good cleaning.
I made some coop curtains out of a clear tarp to keep the litter dry and odor free. One set of curtains covers just the lower part, which keeps roof run-off from the average rain shower from splashing back into the coop. Then I made a full curtain for the Nor’easters, hurricanes and any snow storms we might get. We had the full curtain up for at least three days straight when Sandy slowly blew past us – the coop litter stayed remarkably dry.
One coop feature we really like is the poop boards. I originally planned just to put a solid floor in the hen house, but now I am glad I took the time to make these slide out drawers. This feature makes access to the feeder and water fount, which we keep under the hen house, very convenient. We never have to actually step into the coop to do anything. We also like the clear PVC roof panels as they allow plenty of light into the coop so we (and the chickens) can better see what we are doing.
We can access all the feeders and nest boxes from the outside. We use an old broom to sweep poop off the chicken ladder and an adjustable rake to level out the litter - again, all done from outside the coop.
We bought two plastic nest pads for our boxes. Our four hens like them fine. We also put some plant material in there so we didn’t deprive them of the fun of arranging a laying nest (they think they are really doing something there).
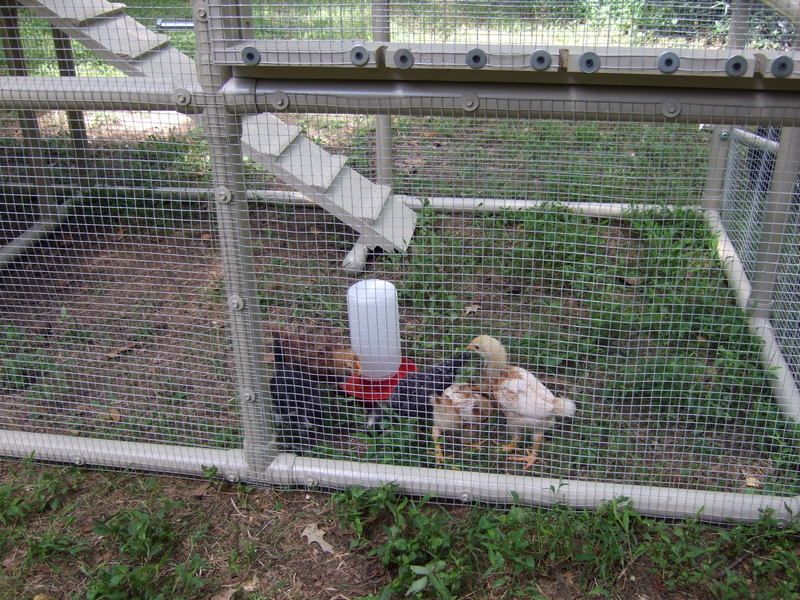
Since the chickens like to take their dust baths under the hen house, I originally put up this board to keep debris out of the water fount. It didn't work so well, even when I put the fount on an ever higher and higher stack of bricks. I eventually threw in the towel and just made my own waterer, which I call the water cross:
This waterer holds one gallon, is attached to the coop so moves with it, and uses an aquarium heater to prevent freeze-up. Best of all, it stays clean and I can fill it from outside the coop, so it is more convenient while getting rid of one daily chore. I made a page on it here with more details:
https://www.backyardchickens.com/a/water-cross-waterer-for-small-coop-or-tractor
The chooks seem to appreciate the extra floor space for their dust baths as well! Since they often dig their dust bathing pits right up against the perimeter of the coop, I highly recommend using the buried cement block for the coop home base. Without that, predators would have a very easy time of digging under and into the coop thanks to all the hard work of the chickens themselves! I now encourage their dust bathing under the hen house by sprinkling DME and fireplace ash on the litter from time to time. The slide out poop boards makes this easy to do.
It seemed like a variety of other feeders are needed to give the chickens access to grit, oyster shell and various goodies. I eventually made some out of those containers that cheese spreads come in…
… and found that an old mud pan used for drywall finishing is about perfect for feeding chickens.
I even designed a holder for vegetables and various favorite yard weeds that our girls love to peck at. None of the feeders are below any of the roosts, so they stay poop-free. Yeah, maybe our chickens are getting spoiled.
As the days started getting shorter, I worried that our hens, hatched at the end of June, might not start laying until spring. So I rigged lights in the hen house and run – using low wattage CFL’s on a timer. We got our first eggs on November 18th.
(21 weeks egg to egg – eggsactly!)
I also widened the roosts using a 1x4” board as per the suggestions on this forum (U-bolted to the PVC pipe).
Ok, so the coop is tricked out and ready for winter, we’re starting to get eggs and we’re having fun with Team Omelette! We hope you will find some ideas you can use here. The Hen Hideout is not quite so clean looking anymore, but is holding up well. A neighboring city here in Virginia just approved up to 6 laying hens per backyard – if this trend keeps up, we may have to change the name of our coop from Hen Hideout to Hen Hangout!
(P.S. Bossy turned out to be a rooster, so got kicked off Team Omelette. However, he found a good home in the same city that just changed their ordinance to allow backyard poultry!)
Three Year update!
It's been almost three years since the hen hideout went into operation so it's always interesting to hear how things are going. There's been some changes, unfortunately, backyard hens are still not allowed in this particular city in Virginia - you know, the one that has a Mayor who was also senior VP for a bank that funded development projects that he promoted and voted for - that one. Meanwhile, just about every other surrounding city is allowing backyard hens in some form.
The hen hideout is no longer doing any tractor duties, however I still roll it off it's base once a year to redo the litter, pressure wash it, and do any repairs that might be needed. It's holding up nicely, the only damage has been to the PVC roof panels. One time was due to a falling tree branch poking a hole, and the rest was the result of my not-so-careful snow removal activities. The PVC panels can crack pretty easily in cold temperatures. I am switching to polycarbonate to see how they hold up. We've had a couple of bad winters (for us).
We actually have two coops now. The 'new' one we received from someone in a neighborhood up the road from us - the lady had to move into an apartment and so no could longer could keep hens.
It's actually very nice to have a two coop set-up as we can use it to introduce new chicks into the flock, which is what we are doing this Spring (2015). I enclosed both coops with a run, and put chicken wire on top to fend off the neighborhood hawks. This has changed the Hen Hideout into more like Glucke Stalag 9. The new coop is a basic design, but the whoever built it was smart enough to put in a clean out door, making litter changes easy.
While we've had our share of hen casualties over the last three years, I am proud to say none of them were due to predators. This is about all you can ask for out of your coop design. That and making your basic hen keeping tasks as easy as possible, all the while holding up to whatever Mother Nature can dish out. So far, seems like the Hideout has what it takes. Hope you enjoyed the update!
Four Year Update (2016):
Short update this time, actually kind of boring. Once a year I pull the coop out of its "hiding spot" for a light pressure washing, repairs, and litter change. Repairs this year consisted of switching out of the last of the PVC roof panels for polycarbonate ones. The PVC was becoming very brittle and cracking; polycarbonate should perform better. The screws holding the panels on are actually fairly long, so I think in the future if I have any issues, I will simply stack new panels on top of the old ones thereby strengthening the entire roof to help prevent any new cracks when under snow load. I also replaced the lower frame for the chicken door as it was starting to rot out. Other than that, the coop pretty much looks the same. We use the deep litter method with a sand base and add additional pine shavings as the year goes on. Once a year I shovel out the litter until I hit sand, then add more sand and shavings for a fresh start. Old litter gets added to compost pile or straight to the garden for over wintering.
As far as the flock goes, the Peep Squad and the Brown Battalion have combined forces, which, along with an escape artist that jumped the fence from a neighbors coop, now makes up the Crazy 8. With that many hens we never bother with lights during the winter and just roll with what we get egg-wise. So far haven't had to resort to buying any eggs and we even sell a few during peak times.
Hope you enjoyed the update!
EIGHT YEAR UPDATE - 2020!!!
Hi everybody, can't believe it been four years since I've posted an update. First I would like to thank everyone for your kind comments and the interest you have shown in our coop. I have tried to answer all the requests for plans and I thought I had posted a link to them in here somewhere, so let me just post it right now: https://drive.google.com/drive/fold...ourcekey=0-pmycopxoSMN5RJMtNaAi3Q&usp=sharing. I have been told my piece count may be off a bit - I think the list is short one 5-way fitting and two 7" pipe lengths.
I have done NO repairs since the last update. The polycarbonate roof panels are holding up very well and I believe they are worth the extra money. The only PVC panel left is the short piece over the nest box and you can see the broken corner in photo below. I will need to fix that at some point. The coop curtains are getting a little ratty, but still doing the job. Overall, it still looks pretty good after some pressure washing.
We are adding to the flock this year - the COVID-5 (Covi, Rona, Dr. Fauci, Freckles and Plain Jane). We still have not had any losses while the hens were in the coop, however we have had some daylight predator losses when they were free ranging. Lesson learned: red foxes are bold, daring, and wily. The hens were on lock down for quite a while until they moved on.
Not much else to pass on. Hope everyone is hanging in there with all this COVID-19 stuff going on. We might have had to hunt around for some TP, but at least we didn't run out of eggs!