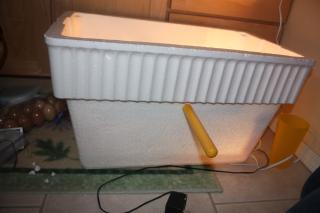
This is our Home Made Bator. We started with the directions from Miss Prissy that we found on BYC. Then we found the turner (many pages later in the same thread) posted by Tori of Sterling Meadows Hatchery.

The supplies:
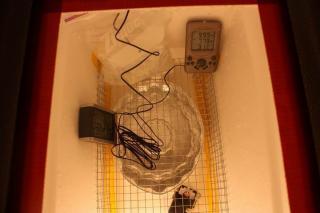
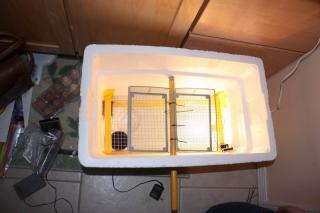
Next we cut some hardware wire to make a shelf to keep the chickies from getting to the lightbulb, the fan and the water dishes. The edges were sharp so I wrapped them in duct tape to protect the kids hands. I also added strips of tape to the inside corners of the cooler for reinforcement. The wire digs into the styrofoam and can punch holes or weaken the area allowing heat to escape.
I cut a hole in one end of the cooler to mount the lampbase in making sure the fit was tight and the bulb was not resting on the bottom. Then I placed a pie tin of water for moisture and the computer fan in the opposite end from the light. Using cut pieces of a drinking straw as spacers, the fan is held away from the wall of the cooler so air can circulate behind and through the fan. The fan blows the air across the water to collect moisture and into the bulb where it heats up.
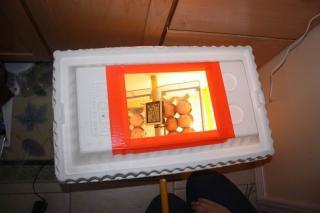
We carefully cut a hole in the lid and placed a piece of plex-glass for a window sealing the edges with duct tape. I used 2 sandwich bags with water in them, rolled together inside of another bag to place my probe from the indoor & outdoor thermometer into. The probe, being between the water bags, simulates being inside of an egg. The temp inside an egg will not change as fast as the air temp, and this allows me to monitor what we think the inside of the eggs are feeling.
I had the thermostat laying in the bottom of the cooler but I read nothr BYC post where a plumber said the thermostat worked on the temp of the metal it is attached to not the air temp so I laid it on the hardware cloth. Now I plugged everything in and waited for things to come up to temp. Over night I made a few adjustments like adding vent holes, one in each corner, small holes made with an ice pick sized aul. The heat was too much (60 watt bulb) so I switched to 25 watt, too low, I'm sticking with the 40 watt. I had WAY too much humidity so I took out the pie tin and replaced it with a smaller water holder, that wasn't enough so I added another. I used small dishes like the ones you get your sauce-on-the-side in at restaraunts.
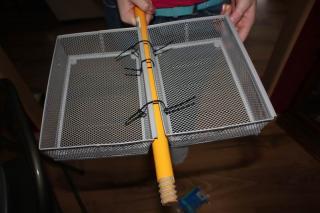
We still needed to make a turner. so this is what we came up with
Quick trip to Wal-Mart, got a plunger (for the handle) and 2 baskets (kitchen organizer section) I love zip ties, they work for everything and you don't have to think too hard to use them. We left them rather loose until the installation was complete.
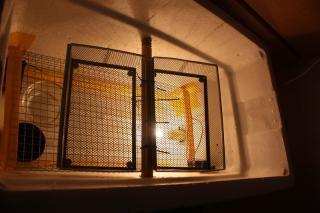
We whittled another small hole in the side of the incubator, just big enough to work the handle through, then threaded the handle through the zip ties holding the baskets and rested the end of the handle in a notch (NOT A HOLE) in the far wall. We mounted the handle high enough for the baskets to be able to tilt back and forth 45 degrees (or pretty close to 45 degrees) before they hit the hardware cloth above the lights and fan. You can see the water dishes on the left of the picture. I put them on teh end so I can pour water in them (without drizzling it across the eggs in the turner) as needed.
The handle for the turner sticks outside the incubator so I can turn the eggs from side to side without opening the lid which helps maintain temperature and humidity.
With the zipties tightened the handle can be turned and the baskets tipped VERY GENTLY. We DON'T want scrambled eggs.
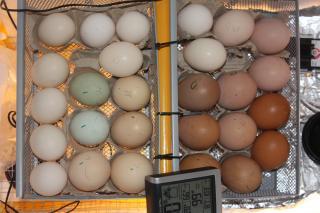
I cut sections of egg cups from a tray that our store bought eggs cam in, then I cut the bottoms out so we could maximize airflow around the eggs. We marked the sides of the eggs an got ready to start the waiting game.
The lid is on, the temp is coming back up to 99. The humidity, with the eggs, only go to 30 so I added a cup from my egg poacher with water in it. The tem isn't as even with the eggs in either so I taped over the holes behind the fan. I think cold air was being pulled in through the holes behind the fan where the mounting hardware secured it to the side (Screws didn't work so I used more zip ties). So hopefully by this afternoon it will be more stable and the eggs will be comfy and warm.
Day 2 UPDATE: Once I added eggs the temp changed. Should have tested with store bought eggs first. I ended up pulling it apart and "re-arranging the furniture". I hung the fan from the hardware cloth so it is situated right in front of the light bulb. The holes on either side of the light fixture were enlarged (I stuck a pencil in and rotated it around until it moved freely in the hole) and the holes on the upper corners of the front are bigger now too. I also added a 3rd water holder, a removable cup from my egg poaching pan. I check water levels each time I turn them, if it's low I add HOT water so it won't mess with my temps.
Incubating eggs sounded but, man, I have to wait 20 more days?!?!?!? I'll never make it.
20 more days of nose-prints on the glass.
Day 4 Update: This should be day 4. I couldn't take the waiting any longer so I held a light to the eggs last night. I can see obviouse progress in 5 of the 12. I am so excited and I REALLY hope I don't screw them up!
The dark eggs I can't see into so I will have to work on my technique or get a better light.
Can't wait till the kids get up so I can show them.
Day 7:I added more eggs. It wasn't my fault. Margie called and had some eggs from Zaa-Zaa her white silkie and Tazon her cochin Bantam. tazon is so [retty and such a gentleman how was I supposed to say no? Well now I get to build a hatcher/Brooder! More fun for me.
Had to build a Hatcher: I followed the same directions above and built a hatcher. Only difference is no fan and more humidity ( larger dish of water)
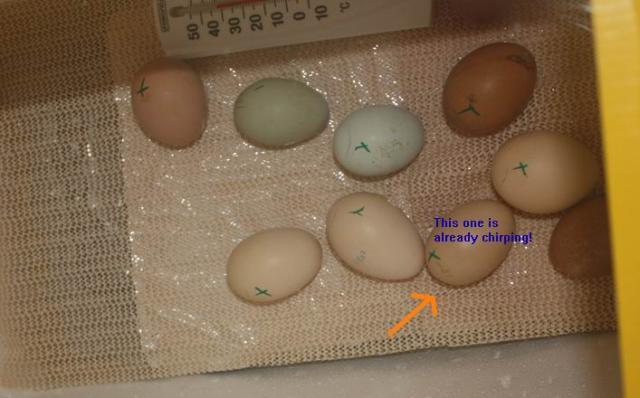
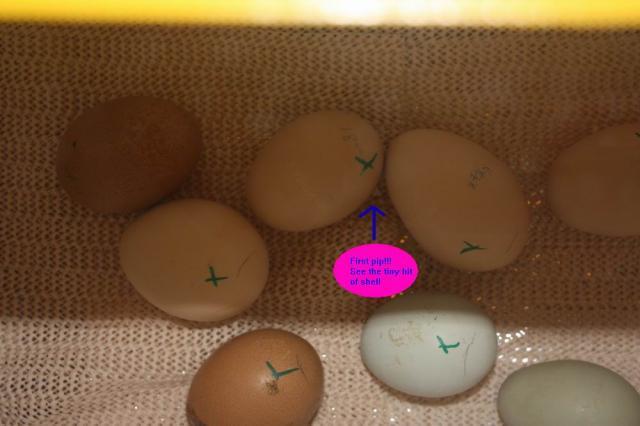
Eggs in hatcher on day 19
About 4 hours later we had pippin! She knocked out acouple little pieces of shell then zipped across the bottom.
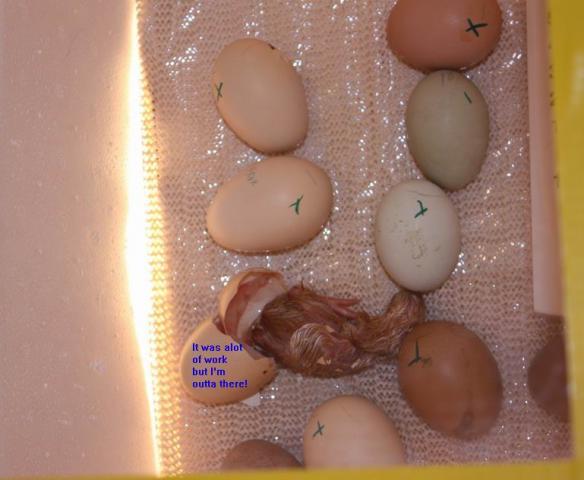
After a few good srong pushes she's out.
By morning, shes almost dry.
Ended up with 3 chicks from this batch
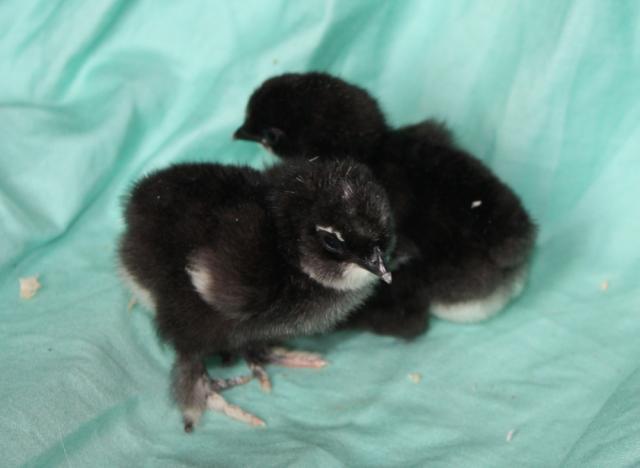
and 2 from the 2nd batch.
The 3rd batch just went in (2 dozen blue eggs with a few brown ones to round out the field)
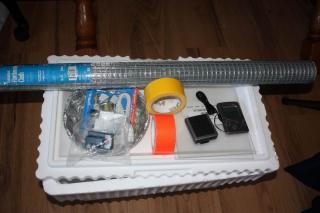
The supplies:
- Hardware Cloth (wear gloves, it's sharp)
- Styrofoam Cooler
- Bottle Lamp Kit
- Hot Water Heater Thermostat
- Thermometers with Huimidity Reading
- Duct Tape
- Light Bulb
- Water Reservoir
- Fan from our Old Computer
- 8 X 10 Plexiglass
Next we cut some hardware wire to make a shelf to keep the chickies from getting to the lightbulb, the fan and the water dishes. The edges were sharp so I wrapped them in duct tape to protect the kids hands. I also added strips of tape to the inside corners of the cooler for reinforcement. The wire digs into the styrofoam and can punch holes or weaken the area allowing heat to escape.
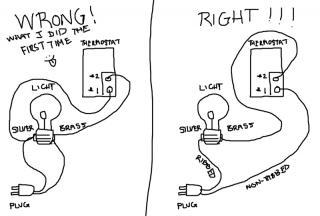
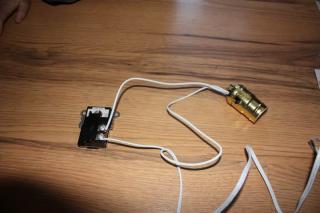
I cut a hole in one end of the cooler to mount the lampbase in making sure the fit was tight and the bulb was not resting on the bottom. Then I placed a pie tin of water for moisture and the computer fan in the opposite end from the light. Using cut pieces of a drinking straw as spacers, the fan is held away from the wall of the cooler so air can circulate behind and through the fan. The fan blows the air across the water to collect moisture and into the bulb where it heats up.
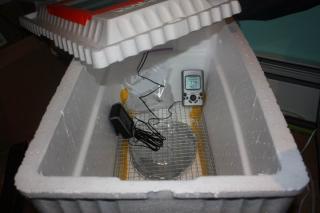
We carefully cut a hole in the lid and placed a piece of plex-glass for a window sealing the edges with duct tape. I used 2 sandwich bags with water in them, rolled together inside of another bag to place my probe from the indoor & outdoor thermometer into. The probe, being between the water bags, simulates being inside of an egg. The temp inside an egg will not change as fast as the air temp, and this allows me to monitor what we think the inside of the eggs are feeling.
I had the thermostat laying in the bottom of the cooler but I read nothr BYC post where a plumber said the thermostat worked on the temp of the metal it is attached to not the air temp so I laid it on the hardware cloth. Now I plugged everything in and waited for things to come up to temp. Over night I made a few adjustments like adding vent holes, one in each corner, small holes made with an ice pick sized aul. The heat was too much (60 watt bulb) so I switched to 25 watt, too low, I'm sticking with the 40 watt. I had WAY too much humidity so I took out the pie tin and replaced it with a smaller water holder, that wasn't enough so I added another. I used small dishes like the ones you get your sauce-on-the-side in at restaraunts.
We still needed to make a turner. so this is what we came up with
Quick trip to Wal-Mart, got a plunger (for the handle) and 2 baskets (kitchen organizer section) I love zip ties, they work for everything and you don't have to think too hard to use them. We left them rather loose until the installation was complete.
We whittled another small hole in the side of the incubator, just big enough to work the handle through, then threaded the handle through the zip ties holding the baskets and rested the end of the handle in a notch (NOT A HOLE) in the far wall. We mounted the handle high enough for the baskets to be able to tilt back and forth 45 degrees (or pretty close to 45 degrees) before they hit the hardware cloth above the lights and fan. You can see the water dishes on the left of the picture. I put them on teh end so I can pour water in them (without drizzling it across the eggs in the turner) as needed.
The handle for the turner sticks outside the incubator so I can turn the eggs from side to side without opening the lid which helps maintain temperature and humidity.
With the zipties tightened the handle can be turned and the baskets tipped VERY GENTLY. We DON'T want scrambled eggs.

I cut sections of egg cups from a tray that our store bought eggs cam in, then I cut the bottoms out so we could maximize airflow around the eggs. We marked the sides of the eggs an got ready to start the waiting game.
The lid is on, the temp is coming back up to 99. The humidity, with the eggs, only go to 30 so I added a cup from my egg poacher with water in it. The tem isn't as even with the eggs in either so I taped over the holes behind the fan. I think cold air was being pulled in through the holes behind the fan where the mounting hardware secured it to the side (Screws didn't work so I used more zip ties). So hopefully by this afternoon it will be more stable and the eggs will be comfy and warm.
Day 2 UPDATE: Once I added eggs the temp changed. Should have tested with store bought eggs first. I ended up pulling it apart and "re-arranging the furniture". I hung the fan from the hardware cloth so it is situated right in front of the light bulb. The holes on either side of the light fixture were enlarged (I stuck a pencil in and rotated it around until it moved freely in the hole) and the holes on the upper corners of the front are bigger now too. I also added a 3rd water holder, a removable cup from my egg poaching pan. I check water levels each time I turn them, if it's low I add HOT water so it won't mess with my temps.
Incubating eggs sounded but, man, I have to wait 20 more days?!?!?!? I'll never make it.
20 more days of nose-prints on the glass.
Day 4 Update: This should be day 4. I couldn't take the waiting any longer so I held a light to the eggs last night. I can see obviouse progress in 5 of the 12. I am so excited and I REALLY hope I don't screw them up!
The dark eggs I can't see into so I will have to work on my technique or get a better light.
Can't wait till the kids get up so I can show them.
Day 7:I added more eggs. It wasn't my fault. Margie called and had some eggs from Zaa-Zaa her white silkie and Tazon her cochin Bantam. tazon is so [retty and such a gentleman how was I supposed to say no? Well now I get to build a hatcher/Brooder! More fun for me.
Had to build a Hatcher: I followed the same directions above and built a hatcher. Only difference is no fan and more humidity ( larger dish of water)
Eggs in hatcher on day 19
About 4 hours later we had pippin! She knocked out acouple little pieces of shell then zipped across the bottom.
After a few good srong pushes she's out.
By morning, shes almost dry.
Ended up with 3 chicks from this batch


and 2 from the 2nd batch.
The 3rd batch just went in (2 dozen blue eggs with a few brown ones to round out the field)
