Home Sweet Home
/\
Chicken
/\
Chicken
Watering System
We want to be able to travel from time to time and be comfortable that the chickens have plenty of clean water. We also wanted it to be affordable. There are lots of good ideas here on BYC and YouTube so we tried to blend the ideas and designs that seemed would work for us.
My Original Setup (shown in detail below) used a 5 gallon bucket that sat outside the pen and fed water through pvc pipe to the water nipples. It worked well. However we expanded the coop and I had to move the bucket. At that point I decided to switch over to using nipples mounted directly in the bottom of the bucket. I like it better because I can clean it without worrying about how to clean the pvc pipe. I can also move it if/when I want to. (I used the same nipples and technique shown below.)
My Original Setup:
I decided to use watering nipples in the run, mounted in 3/4" pvc pipe, with a 5 gallon bucket installed outside the fence for easy access for filling and cleaning. Below I'll try to document what I did in case it will help others.
I started with a 5 gallon plastic bucket I got for free from a bakery. Considering its source I felt confident it would be non-toxic.
To attach the 3/4" pvc pipe to the bucket I used the items shown in the photo below, including:
A threaded male adapter (outside the bucket), a threaded female bushing (inside the bucket), and two O-rings. A 1" drill bit made a hole that was just the right size, not super tight but no gap.
A threaded male adapter (outside the bucket), a threaded female bushing (inside the bucket), and two O-rings. A 1" drill bit made a hole that was just the right size, not super tight but no gap.
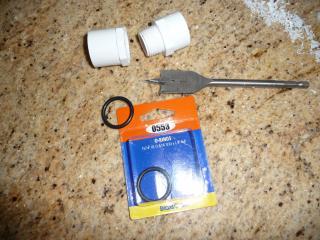
I thought o-rings would make a good water tight seal with the sides of the bucket even if the bucket or pipes get bumped or banged around some. Silicone caulk sometimes breaks loose if there's too much flex. They're also inexpensive and very easy to work with, no messy goo. In addition they give me the flexibility to take things apart and replace a part if needed. One ring is on the inside of the bucket, the other is on the outside. Tighten them really well!
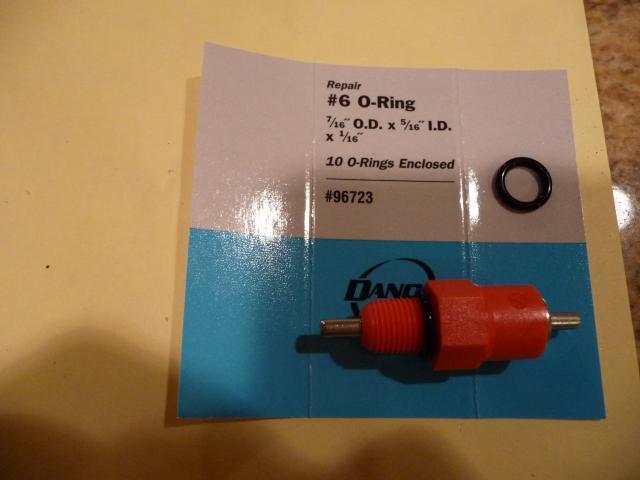
I also chose to use o-rings with the screw-in nipples.
Call me frugal and stubborn, but I didn't want to buy an 11/32" drill bit to drill just 2 holes, so I used a 5/16" bit and wiggled it around until the hole was big enough. It was a lot of extra effort and lots of trial and error. I practiced on a scrap piece of pvc pipe and it was obvious my holes weren't perfectly round. But the o-rings did a good job of closing any tiny gaps to prevent drips.
Call me frugal and stubborn, but I didn't want to buy an 11/32" drill bit to drill just 2 holes, so I used a 5/16" bit and wiggled it around until the hole was big enough. It was a lot of extra effort and lots of trial and error. I practiced on a scrap piece of pvc pipe and it was obvious my holes weren't perfectly round. But the o-rings did a good job of closing any tiny gaps to prevent drips.
Again, I had to tighten them really well. A ratcheting wrench made it really easy.
1-year update: Over a period of a few weeks we had several nights in the 20s. One day I noticed these fittings were leaking a lot, so I took them apart and replaced the O-rings which had deteriorated. The nipples had also un-screwed themselves by several turns. I can only assume the repeated expansion & contraction cause it. I also ended up replacing the nipples to get the leak to stop. I'll clean them and try to put them back in again. It seems like they should be good, after all they're stainless steel and didn't look like they were damaged. When the weather is warmer I'll test my theory.
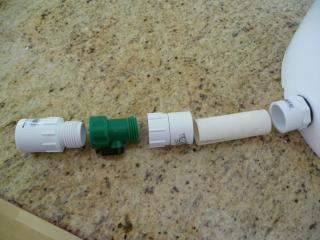
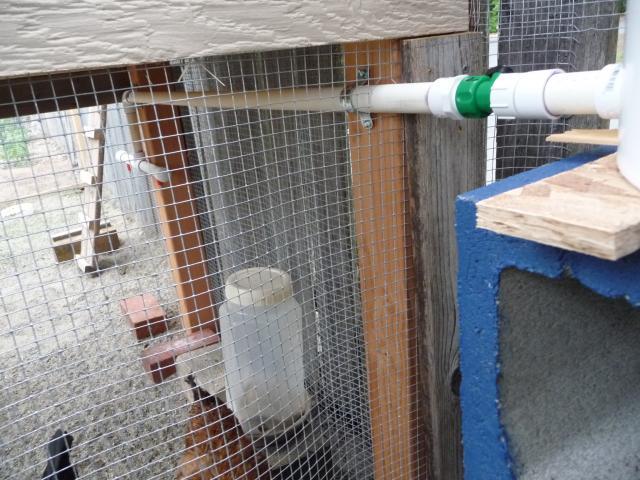
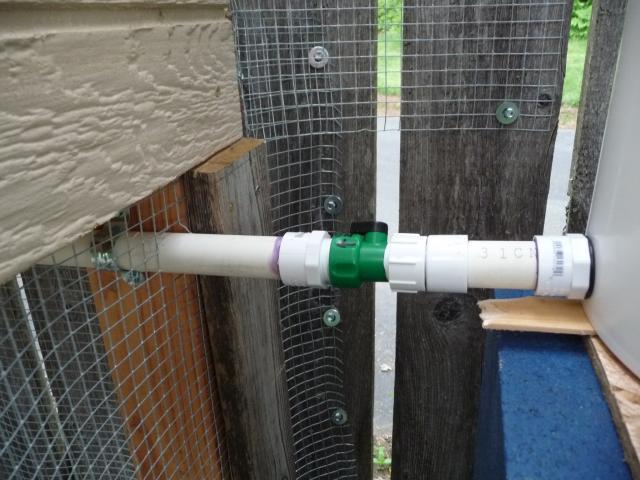
Once the fittings were seated tightly in the bucket I lined up the next several pieces. Looking at this photo and starting on the right I have a 4" piece of pvc, then a fitting that slips onto the pipe and has a hose fitting on the other end. It has a rubber washer inside and twists just like the end of a garden hose. It lets me disconnect the bucket for cleaning or repair.
Next is a fitting I took from the garden hose that lets me stop the flow of water by turning the black knob. I'll use it when I need to do maintenance downstream without emptying the bucket of water.
Next is a fitting I took from the garden hose that lets me stop the flow of water by turning the black knob. I'll use it when I need to do maintenance downstream without emptying the bucket of water.
The final fitting in this lineup is a male adapter into which I'll insert the long pipe that goes into the run under the coop.
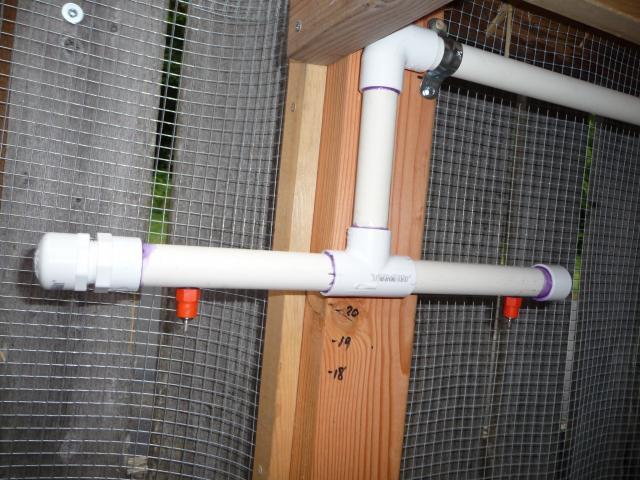
The other end, the end with the water nipples is shown here...

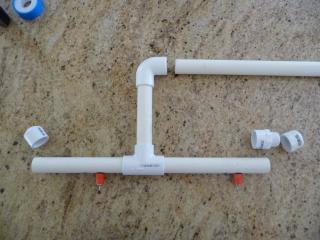
Most people wouldn't be using a T, but I'm mounting the vertical pipe to a 4x4 post and want to have one nipple on each side. That way one nipple is under the coop, out of the weather somewhat.
Each end has to have a cap; one of the end caps is threaded so that I can unscrew it and release all the water that's in the pipe. It will be handy if I need to do maintenance without emptying water from the bucket. Also, if the weather gets cold enough to freeze I can drain the pipe to prevent damage. I just have to remember to shut off the water at the green fitting first (see above) or I'll have a gusher on my hands!
An advantage, for me, was being able to install each of the nipples onto its own piece of pipe. That way I didn't have to be so careful in drilling the holes exactly in a straight line. If you're putting 2 or more nipples onto one piece of pipe they have to be in a straight line so they all point straight down. My skills with a drill aren't that perfect! Doing it my way, with a T-fitting, I installed the nipples, then put all the pieces together dry (no glue). I laid everything on a flat surface and made sure everything lined up correctly. Then I put pencil marks on the pipe & fittings to use as reference points. When I glued them together I was able to get everything in exactly the same position again. (Be sure to make the pencil marks plenty long because the excess glue may cover them up.)
This is how it all looks now that it's installed.
Notes:
- I used teflon tape on all the threaded fittings and tried not to leave tiny strands inside that might break loose and clog nipples.
- When the chickens started to investigate the nipples, they had to hop to reach them, so I put bricks below the nipples and now they're reaching them just fine.
- Although not obvious in the photos, the long piece of pvc pipe has a slight slope. I used rubber bands to hold a small level on top of the pipe when I was mounting it to the posts.
- To keep debris from entering the pipe, I stretched a piece of nylon stocking over the opening inside the bucket and secured it using another o-ring rather than a rubber band that might deteriorate quickly. (love those o-rings)
- There's a very small hole drilled into the bucket lid. Without it a vacuum would develop and the water would stop flowing to the nipples. I covered the hole with a bit of nylon stocking, too, to keep out bugs and dirt. I used pvc cement to glue the edges and hold it in place. update: Water collected on the lid of the bucket which covered this air hole, so I taped it closed with electrical tape and drilled a new hole on the side of the bucket very close to the top. It's working very well.