Hello everyone! This is my very first post on BYC so I hope I can do this correctly.
Let me start out by saying "Thank You" to everyone that has already posted their coop designs. We found so many great ideas and tips that really helped us along the way.
We live in Sandy Oregon near the base of Mount Hood, in a great little neighborhood. Our backyard is pretty small but we had just enough room for a few chickens! I was so excited to get this project going, and a big thank you to my wonderful husband for all the hard work. He built this coop all on his own, with only some small help from me.
We drew up several sketches before we started purchasing any lumber. I probably changed my mind a dozen times along the way. Poor Hubby. We finally settled on an 8'x4' base. The coop area is 3'x4'. We scored some scrap fence boards for the exterior siding. We were doing this whole project on a budget, so we skipped the pressure treated lumbar.
We started with building the basic framework and then began attaching the fence boards.

We waited to install the last few siding boards until the chicken wire was up. The fence boards on the ends help cover up that raw edge and secure the chicken wire.
I forgot to take a good photo of the roof. We purchased a pack of asphalt shingles for the roof.
For our vent we actually used the lid from our brooder. Just some hardware cloth mounted to a frame on the inside of the coop. In the winter we will be installing a removable board to cover the majority of the vent.
Below the vent are the two big side doors. These open out into the run so I can clean the coop in the wet winter months without standing in the rain.
We were able to get a piece of vinyl flooring for free from our local flooring store. They had this in their scrap pile.
Here is an inside view of the big side doors. We just made some basic frames and attached the fence boards. You can also see one of our DIY feeders in this photo. We just purchased some black pipe from the home improvement store, added an elbow, and cut a notch out of a cap. The feeders stay clean and I only have to fill them up once a week.
If you look closely in these photos, you can see the board we installed in the front to prevent shavings from falling out whenever I open the door.
Here is a view of the larger feeder out in the run. I am so glad we decided to make these. They have been amazing. We used the metal strapping to attach them so they can easily be removed for cleaning.
Inside the coop we also have part of our DIY watering system. We purchased the nipples at our local feed store, and all the pvc pipe at Home Depot.
We are using a food grade 5 Gallon bucket for our tank. We also made sure to install removable caps at the end of each line. So we can easily flush them out if needed in the future. We also plan to install a bird bath heater and small pump in the winter to prevent freezing.
The second pipe goes underneath the coop inside the run. The chickens can easily get their water whenever they want. I was worried they wouldn't take to it well, but one curious chicken came to peck and everyone else figured it out within minutes. I've only had to refill the water once a month so far.
At this point we are just missing some trim, and still in need of a clean up.
We used a basic gate latch for the front door. It can be locked with a padlock if needed, and latches automatically. To prevent being locked inside, we drilled a hole and threaded some cord through to the other side. I just have to pull the cord to get back out.
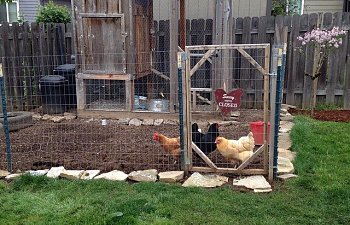
I painted some scrap wood to make some signs, and we added trim pieces to close the gaps between fence boards. We used liquid nail adhesive to attach the trim boards. The black garbage cans to the left hold pine shavings and feed. We are slowly building a flagstone patio to the left and around the edge to dress things up.
The coop has been up and running for a couple months now. We bought two bags of mulch for the run after we noticed the dirt getting packed down. Now the chickens are able to take regular dust baths and bed down in the cool dirt. They love it. Every morning I open the small coop door to let them out, and every night I go out to shut the door after they have already put themselves to bed.
Oh, and just for fun, here are some pics of our four ladies!
Above is Belle, our Americauna.
Below is Emma, our Buff Orpington
Above is Rudy, our Golden Sexlink
Below is Fiona, our Black Australorp
*****UPDATES 9/17/2015*****
We also had a bit of a rat problem. We were able to pick up the coop (using several helpers) to move it. We dug down and make a foundation framed with cinder blocks and 6 inches of gravel. The rats haven't been able to get in since.
We also installed a fence. The chickens now have their own little yard to run around, dust bathe, bask in the sun, etc, and my yard is no longer scattered with chicken poop.")
We had a nasty winter, all our pipes froze, so we lost our nice water system. I just use a bucket now, and a heated dog water bowl in the winter.
This coop has held up great! The only improvement I wish we had made.. built in nest boxes.. more than one. Other than that, I'm very happy with it.
Let me start out by saying "Thank You" to everyone that has already posted their coop designs. We found so many great ideas and tips that really helped us along the way.
We live in Sandy Oregon near the base of Mount Hood, in a great little neighborhood. Our backyard is pretty small but we had just enough room for a few chickens! I was so excited to get this project going, and a big thank you to my wonderful husband for all the hard work. He built this coop all on his own, with only some small help from me.
We drew up several sketches before we started purchasing any lumber. I probably changed my mind a dozen times along the way. Poor Hubby. We finally settled on an 8'x4' base. The coop area is 3'x4'. We scored some scrap fence boards for the exterior siding. We were doing this whole project on a budget, so we skipped the pressure treated lumbar.
We started with building the basic framework and then began attaching the fence boards.
We waited to install the last few siding boards until the chicken wire was up. The fence boards on the ends help cover up that raw edge and secure the chicken wire.
I forgot to take a good photo of the roof. We purchased a pack of asphalt shingles for the roof.
For our vent we actually used the lid from our brooder. Just some hardware cloth mounted to a frame on the inside of the coop. In the winter we will be installing a removable board to cover the majority of the vent.
Below the vent are the two big side doors. These open out into the run so I can clean the coop in the wet winter months without standing in the rain.
We were able to get a piece of vinyl flooring for free from our local flooring store. They had this in their scrap pile.
Here is an inside view of the big side doors. We just made some basic frames and attached the fence boards. You can also see one of our DIY feeders in this photo. We just purchased some black pipe from the home improvement store, added an elbow, and cut a notch out of a cap. The feeders stay clean and I only have to fill them up once a week.
If you look closely in these photos, you can see the board we installed in the front to prevent shavings from falling out whenever I open the door.
Here is a view of the larger feeder out in the run. I am so glad we decided to make these. They have been amazing. We used the metal strapping to attach them so they can easily be removed for cleaning.
Inside the coop we also have part of our DIY watering system. We purchased the nipples at our local feed store, and all the pvc pipe at Home Depot.
We are using a food grade 5 Gallon bucket for our tank. We also made sure to install removable caps at the end of each line. So we can easily flush them out if needed in the future. We also plan to install a bird bath heater and small pump in the winter to prevent freezing.
The second pipe goes underneath the coop inside the run. The chickens can easily get their water whenever they want. I was worried they wouldn't take to it well, but one curious chicken came to peck and everyone else figured it out within minutes. I've only had to refill the water once a month so far.
At this point we are just missing some trim, and still in need of a clean up.
We used a basic gate latch for the front door. It can be locked with a padlock if needed, and latches automatically. To prevent being locked inside, we drilled a hole and threaded some cord through to the other side. I just have to pull the cord to get back out.
I painted some scrap wood to make some signs, and we added trim pieces to close the gaps between fence boards. We used liquid nail adhesive to attach the trim boards. The black garbage cans to the left hold pine shavings and feed. We are slowly building a flagstone patio to the left and around the edge to dress things up.
The coop has been up and running for a couple months now. We bought two bags of mulch for the run after we noticed the dirt getting packed down. Now the chickens are able to take regular dust baths and bed down in the cool dirt. They love it. Every morning I open the small coop door to let them out, and every night I go out to shut the door after they have already put themselves to bed.
Oh, and just for fun, here are some pics of our four ladies!
Above is Belle, our Americauna.
Below is Emma, our Buff Orpington
Above is Rudy, our Golden Sexlink
Below is Fiona, our Black Australorp
*****UPDATES 9/17/2015*****
We also had a bit of a rat problem. We were able to pick up the coop (using several helpers) to move it. We dug down and make a foundation framed with cinder blocks and 6 inches of gravel. The rats haven't been able to get in since.
We also installed a fence. The chickens now have their own little yard to run around, dust bathe, bask in the sun, etc, and my yard is no longer scattered with chicken poop.
We had a nasty winter, all our pipes froze, so we lost our nice water system. I just use a bucket now, and a heated dog water bowl in the winter.
This coop has held up great! The only improvement I wish we had made.. built in nest boxes.. more than one. Other than that, I'm very happy with it.