Churk Central: A pallet coop built and dedicated to the memory of out first chicken (Churkey)
Earlier this year, after free ranging a dozen chickens over the past six years, we had our first real predator event. A male red fox decimated almost our entire population of chickens, including our six year old hen (Churkey), who was brought home by our daughter from a school hatching project. After ridding the property of the offending fox, we decided to re-build the population with an order from Murray McMurray and decided it was time to build a proper coop for the number of chickens we keep.
My wife's father works for a natural gas substation and was able to sequester 5 large industrial pallets in which the stations motors were shipped to the site. I'd venture to say that each pallet weighed 500+ lbs and consisted of triple stacked 2x6's.
My father-in law also had a pretty good pile of wood lying around to be used to fill in the gaps and a few sheets of 3/4 inch plywood. I think the only wood I ended up buying were the 2x4's for the coop's roof. With the wood in place, I just needed to draw up some rudimentary plans. I'm no carpenter, so I figured I'd keep it as simple as possible. One pallet for the floor and four pallets for each wall of the coop.
We used the largest pallet for the base, and had to cut two pallets with a chainsaw to make the rest fit a roughly 10'x8' coop. We used the most sparsely built pallet for the front, where we would eventually add a man door. The base would be 12 feet wide, providing a small 2 ft side porch that we built the chicken door leading out to. First we sunk concrete block into the ground and had to level the base because the plot we picked was not exactly level. Then we added a floor to the base pallet.
Then came the setting of the four walls. They were much too heavy to carry, so we had to break out the machinery to do the heavy lifting.
After securing the pallets together and cutting out a front door panel, we started adding the 2x4's for the roof and started cutting wall filler strips.
Then we started building the roof. We eventually added asphalt shingles, metal flashing and drip edges. Roof should last 25 years!
The shell is complete!
Perry the rooster inspects the Day 1 progress...
Day 2: Roofing, finishing in the gaps, preparing the chicken door area and adding the front wall panels.
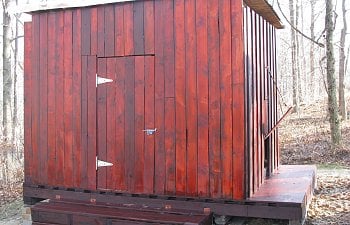
Day 3: Finishing the front paneling and adding the man door, chicken door and front steps for the man entrance.
Overall, I'm very ecstatic at how the coop turned out. It will end up housing our 17 hens and two roosters. We have roosting bars inside and a 3x3 bank of metal nesting boxes that we recycled from my father-in-laws old coop that hasn't been used in 20+ years. It took locking the chickens inside for two days to get them to use it. I think they are more than adequately spoiled now and use it as a refuge even during the daylight hours when they want to get away or seek shelter from the rain. Here are the final pictures of the chicken door and inside the coop.
The things I will probably eventually add to the coop is an indoor overhead light (which I can draw power from our adjacent garage) and new wooden nesting boxes which will have access from the outside rear of the coop (my wife was really set on using the antique nesting box and what the wife wants, she gets!). I'm also planning on putting a wood preservative on the structure in the next few weeks. Again, I am no builder and my coop design reflects my goal to build a very utilitarian coop. I shot for perfect simplicity. I'm happy with the result.
Finally, we preserved the coop with Sikkens. Here are a few shots of the finished product and my helpers!
Hope you enjoy!
Finally, we preserved the coop with Sikkens. Here are a few shots of the finished product and my helpers!
Hope you enjoy!