Our little chicken coop is in the extreme southwest corner of the state of Washington. Just a short walk to the beach and the Pacific Ocean. It's a little rainy but folks here don't mind. After years of dreaming, and trolling on this website I decided to get to building the coop. I've read on BYC many, many times, of people purchasing their chicks then starting to build their coops. I almost did that. I'm so glad that I didn't. My coop project took almost 2 years to complete. I'm a putterer. I probably wouldn't cut it on a construction job site. The coop is basically 8' x 8' give or take.
I wanted the coop to be portable. Not in the sense that you can move it around the yard weekly to allow the girls more grass. It had to be easily taken apart in case it needed to be moved. The coop sits near our septic tank system, and the enclosed runs are on top of the drain field. I couldn't use is area of the property for anything else, so the coop and run ended up there. The coop, pen area below, and the runs were constructed as panels. Then everything is clipped or bolted together.

I primed and painted all of the wood, added the floor joists, and decking. All of the parts and pieces of the coop and surrounding runs were constructed inside the garage and then moved to the site and installed. This allowed me to work despite the weather.
As a money saver, I re-purposed cabinet doors, an old french door, and an old wood window for the various sides of the coop.
This was a plan, design, change the plan again, then build project. Then sometimes rebuild....
All the walls were assembled and painted, then hauled over to the coop location.
Roosts with a dropping pit were built and installed, and lots of doors for easier clean-out.
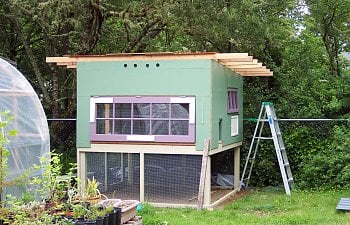
Next came the roof. I just used 12' long 2 x 4's which allowed for overhang on two sides. I had to build out the soffit at the front later on as it looked funny to me. Still might to some....
I added roofing and a polycarb panel for a skylight.
After the roof was completed I started on the run. It came together nicely.
The run will be totally predator proof. We have the typical predators, but add bear and coyote that frequent our yard, The panels above the run are re-purposed pallet racks typically used at the big box stores. Found these on Craigslist pretty cheaply.
I built a walk-in portion of the run as well as a crawl-in portion. You'll see that better explained in a future picture.
I found the best tool for cutting this hardware cloth. i had a lot to do, and my poor hands couldn't handle using wire cutters or sheet metal shears. So I bought this.....
Harbor Freight for about $20.00. Cuts through the wire like butter. Well worth it in my opinion.
Here's a picture of the nearly completed coop and run. The lowered portion of the coop run is so that we can put gallon potted plants or flats of plants on top while the chickens have access to the bottom portion.
Lots of re-purposed cabinet doors that allow for easier clean-out.
Welcome home chickies!