Well the girls are bigger now and they have out grown there old coop.
It was a old rabbit hutch that I had upgraded to a small coop .

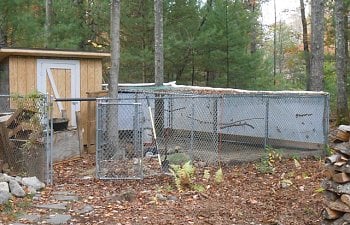
As you can see we had a dog pen that I had section off , Half for dogs (they sit by the door) the other for chickens.
When I noticed two out of the six chickens roosting outside (coop to small) ..I thought a new coop is needed.
The fencing is not very tall and I don't like stooping, so I will build it in the dog side .Winter is also coming !
So we start the build. Blocks with some gravel.
followed with pressure treated 4X4's
Now we have a good starting point.
I am using 4X8 feet wood pallets I had saved with this build in mind.
For the base of the coop I installed one pallet upside down in hopes of keeping critters out.
Next I made up the sides out of other 4x8 pallets
So I then began installing the sides.
I will not paint this coop I am hoping it will blend in a little.
Good so far! Now onto the back wall (I used two pallets cut to 6.5 feet tall) .
Hmmm what's going on here???
With that done I started on the front wall @ 7.5 feet tall ( with base just under 8 feet)
I decided to us T-111 for the front .I think it will weather to look like the pallets.
Looks kind of open so I built a roof 6'x10'
I built the frame first and used it as a table to cut the T-111.
So when I was done with the T-111, I attached the small piece of 1/2" plywood to the frame and then.... thru it up onto the coop . the bigger one went up next. I had cut and fitted the sections on the ground first.
I used the 2- cutout T-111 pieces for the door. Some primed trim and hinges were added.
So now we have this shed....
Cluck Cluck Cluck
Sorry but ( Ha Ha , pun intended) I love this shot!!")
This is were the chicken will enter the coop ( small ramp)
I plan on cutting a hole in the fence and attaching it to the coop.
I now have to add insulation. I have some 2" and 1-1/2 " insulation ( 3-1/2 thickness of 2X4 wall)
I installed it in the floor first , then onto the walls! 1/2" plywood was used over that.
I used some 1" wood chamfer to keep the sand from falling thru the cracks.
That tool shelf will be the three nest boxes, see before insulation and plywood.
Yup ... will access from out side. Need pic of that.
All during this build I felt that I was being watched.
That all the pics I have for now....
I need to insulate the roof add plywood , vents, perches..........
Hopefully I finish this coop this weekend!
I will update!
Time crawls by...
OK work has continued!
I finished the nesting area!
Here are pics taken from the outside.
The inspectors couldn't wait !
As you can see I used branches for perches .
I did install a sliding door to isolate the coop from the run.
Here is a shot before the fencing was opened.
And after, small ramp was added later.
Here is a shot of the vent inside and outside. I did screw it down with some fender washers.
I did add a 100 watt bulb ^just above here^ that is on a timer .
We have the old, small coop, with the nest boxes sticking out.
We didn't think they would get so big!
This shows the new and old.
We now have some happy campers!!!
Well most are!
I'm watching you buddy!
It's funny what these bugger will do!
Opps flash is on!
See Ya!
Sean
Updated on October 20th, 2014
So we are getting closer to winter... I installed some wood then some poly to two sides of the run.
I also extended the roof covering to cover half.
Half of the roof is covered.
He still doesn't trust me!
I think he likes it.
Sean
It was a old rabbit hutch that I had upgraded to a small coop .
As you can see we had a dog pen that I had section off , Half for dogs (they sit by the door) the other for chickens.
When I noticed two out of the six chickens roosting outside (coop to small) ..I thought a new coop is needed.
The fencing is not very tall and I don't like stooping, so I will build it in the dog side .Winter is also coming !
So we start the build. Blocks with some gravel.
followed with pressure treated 4X4's
Now we have a good starting point.
I am using 4X8 feet wood pallets I had saved with this build in mind.
For the base of the coop I installed one pallet upside down in hopes of keeping critters out.
Next I made up the sides out of other 4x8 pallets
So I then began installing the sides.
I will not paint this coop I am hoping it will blend in a little.
Good so far! Now onto the back wall (I used two pallets cut to 6.5 feet tall) .
Hmmm what's going on here???
With that done I started on the front wall @ 7.5 feet tall ( with base just under 8 feet)
I decided to us T-111 for the front .I think it will weather to look like the pallets.
Looks kind of open so I built a roof 6'x10'
I built the frame first and used it as a table to cut the T-111.
So when I was done with the T-111, I attached the small piece of 1/2" plywood to the frame and then.... thru it up onto the coop . the bigger one went up next. I had cut and fitted the sections on the ground first.
I used the 2- cutout T-111 pieces for the door. Some primed trim and hinges were added.
So now we have this shed....
Cluck Cluck Cluck
Sorry but ( Ha Ha , pun intended) I love this shot!!
This is were the chicken will enter the coop ( small ramp)
I plan on cutting a hole in the fence and attaching it to the coop.
I now have to add insulation. I have some 2" and 1-1/2 " insulation ( 3-1/2 thickness of 2X4 wall)
I installed it in the floor first , then onto the walls! 1/2" plywood was used over that.
I used some 1" wood chamfer to keep the sand from falling thru the cracks.
That tool shelf will be the three nest boxes, see before insulation and plywood.
Yup ... will access from out side. Need pic of that.
All during this build I felt that I was being watched.
That all the pics I have for now....
I need to insulate the roof add plywood , vents, perches..........
Hopefully I finish this coop this weekend!
I will update!
Time crawls by...
OK work has continued!
I finished the nesting area!
Here are pics taken from the outside.
The inspectors couldn't wait !
As you can see I used branches for perches .
I did install a sliding door to isolate the coop from the run.
Here is a shot before the fencing was opened.
And after, small ramp was added later.
Here is a shot of the vent inside and outside. I did screw it down with some fender washers.
I did add a 100 watt bulb ^just above here^ that is on a timer .
We have the old, small coop, with the nest boxes sticking out.
We didn't think they would get so big!
This shows the new and old.
We now have some happy campers!!!
Well most are!
I'm watching you buddy!
It's funny what these bugger will do!
Opps flash is on!
See Ya!
Sean
Updated on October 20th, 2014
So we are getting closer to winter... I installed some wood then some poly to two sides of the run.
I also extended the roof covering to cover half.
Half of the roof is covered.
He still doesn't trust me!
I think he likes it.
Sean