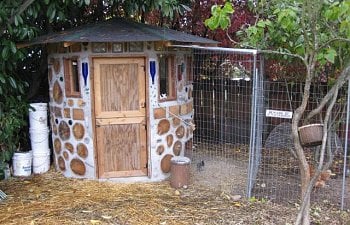
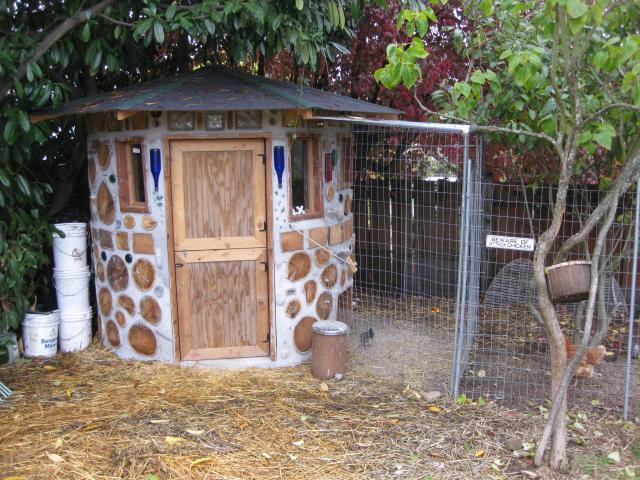
The Chicken Castle
Plans for a Crazy Coop

Cordwood Construction
Our Old Coop
We saw our first cordwood house on the Olympic Penninsula in Washinington State. It was from the 1890's and built entirely of tree rounds, some of the rounds were at least four feet across. It made quite an impression on us and the image stuck in my head. Years later Seattle constructed a light rail line about a half block from our house. The construction tore up lots of undeveloped green space. And that's when the crying began. My daughter went outside one morning to find pieces of Pepsi and Rosa, two of her beloved chickens scattered around the yard. All the raccoons and other critters from the green spaces had been forced to find new homes and new feeding routes. We were now on the route.
Our chickens had always slept in the laurel trees in our backyard. They had a coop but they really didn't care. Any coop is a way distant second to roosting in the trees and their's was just a huge doghouse with a small wire mesh yard. Nobody took it very seriously, especially them. We started putting them in the coop at night. More crying and more chicken parts as the raccoons reached though the wire mesh and did unspeakable things. The yard was reinforced and the chickens were safe. But they now spent all their time stuck in a doghouse with a small yard. We needed a new coop especially as we had been phasing out the bantys and moving on to full size chickens. Such were the beginnings of The Chicken Castle.
Plans for a New Coop
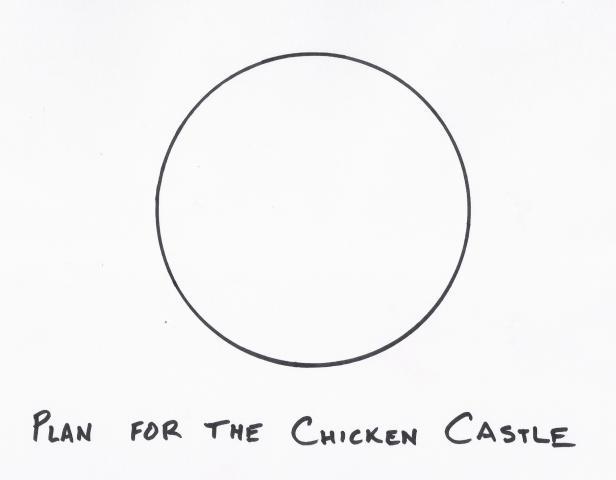
Okay, there were no plans for The Chicken Castle, I drew this up as an ode to the movie The Hudsucker Proxy. Which some of you will find very funny. These plans can also lead to a hula hoop, a straw, or a frisbee. Be careful.
A circle is the easiest shape for cordwood construction, primarily because it means you only have to build one wall instead of four and there are no corner joints to engineer. A circle also encloses the most area with the least amount of wall.The biggest planning decision was the size of the circle. I chose a nine foot diameter. This was achieved with a post and a four and a half foot rope which swiveled around the post and had a spike at the other end to mark the circle.
Then an eight inch deep trench (should be at least 12 inches deep for colder climates) was dug large enough to accommodate a 6"x12" cinder block. The circle was adjusted to fit whole cinder blocks. Premixed bags of concrete were then mixed in a wheel barrow and a thin layer was shoveled into the bottom of the trench. The blocks were then set in the concrete and leveled. Rebar spikes were driven into the dirt inside the block openings to hold them in place then small strips of metal lath were bent into a staple like shape and placed across the top of adjoining blocks stretching down into the block openings to tie them together. The block openings were then filled with concrete and a layer of concrete troweled on top of the block to bury the metal lath staples and make a level surface. This was then allowed to cure.
While the foundation cured I decided where windows and doors would go. I needed one door for us and one door for the chickens. I decided on six windows for no reason and three vent openings.The frames for the openings have to be constructed before you begin. Each frame needs a mechanical hold around the outside of the frame for the mortar to hold onto. This can be in the form of a strip of wood, nails hammered in part way and bent over, or strips of metal lath screwed into the outside of the frames (metal lath is best). Just something for the mortar to grab and hold the frame in place. During this time I also prepped the wood I would use as bricks in the mortar. We just happened to have some cedar logs that had been in the yard for a couple of years. I used a chain saw to roughly slice the logs into six inch wide rounds (disks), thicker would have been better but I only had so many logs and needed as many rounds as possible. Ideally the wood would be cut to size and allowed to cure for a few years in its cut size. After slicing the logs the bark was stripped off each slice. They say it is much easier to strip the bark from the logs when freshly cut. Split wood as opposed to rounds would be much easier to work with when you lay them in the mortar. With the foundation cured (mostly), the frames for openings built, and the logs sliced and bark stripped you're ready to begin building.
Construction
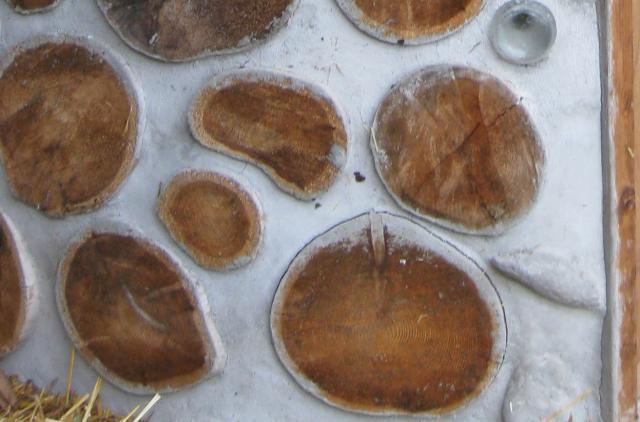
An hour or two after laying the rounds it's time to go back and start tooling and smoothing the mortar joints using gloved fingers, blades, and Bondo spreaders (the ultimate tool for this, and never mentioned in any books I read). This is the hardest part of the job, it's probably best not to care, just use a gloved hand and rub out the joints and leave them rough. Being a plasterer by trade I wanted a beautiful smooth joint recessed a half inch below the face of the wood round. It turned out nice but laying the wood and smoothing the joints by yourself was very tough to get the timing right. While the walls are still low it is easy to reach over the top and work the outside and inside of the wall. As your walls get higher it soon becomes necessary to work inside for a while and then go outside to fill the joints with mortar and do any smoothing.
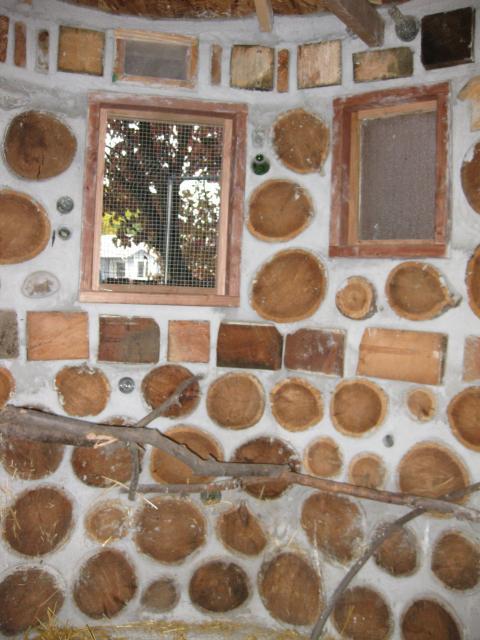
The large joints between the rounds are perfect opportunities for using bottles, rocks, or whatever to help fill the space with something other than mortar. I also used dog bones, shells, vases, a birdhouse, 2x4's, 2x6's and posts. I quickly realized I did not have enough wood rounds to finish the coops and was forced into much improvisation. It is also important to have all your wood laying out so you can pick and choose shapes that fit together and have a good flow.
As you progress up the wall be ready to put in your window frames (should you have any) as you reach the desired height. The frames are treated just like the wood rounds. Mortar is shoveled onto the previous course of logs and the frame is pushed into the mortar and securely seated. Once the frame is in position, more mortar is added to each side and begin placing your rounds for the next course always running the mortar up past the halfway point of each round to lock it in place. I also mortared branches into a couple of the courses to act as built in perches, running the branches from one side of the coop to the other. Having thin walls meant that the necks and openings to the bottles are accessible on the inside of the coop these also offer many perch possibilities since branches can be shoved into the bottle openings.
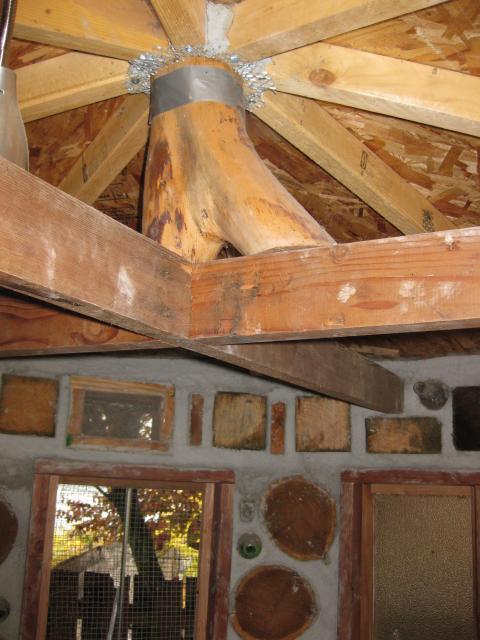
When I reached the finish height of my walls I mortared two 2x4's into the top course. This served to lock the walls into position and act as a support for the roof. The two 2x4's were notched in the middle of the board so they would interlock in an X shape with 90 degree angles and retain their four inch depth. Metal lath was wrapped around the ends of the boards that were set in the mortar wall to make sure they would not have the ability to slip and move. Once the cross members were mortared in place I set an old tree stump (a pretty one) on top of the cross members (see photo below). I then ran 8 1"X3" boards out from the top of the stump to the wall overhanging it by 18". Those boards (spokes) were then mortared into the top of the wall locking them in place. Once the spokes resting on top of the stump were set, I nailed pie shaped sections of plywood to the spokes and coated the whole thing with sheet roofing materials. After that whenever I cut some sod out of the lawn I would throw it on top of the roof. We now have a green roof.
It has been 5 years since I built the Chicken Castle and everything is holding up pretty well. The logs have shrunk some and I have a few cracks but all and all it's doing great. I use deep litter management inside the coop and clean it out once a year.
Thanks for looking at my coop page and for all the nice comments,
Steve Irish
Plans for a Crazy Coop
Cordwood Construction
Cordwood Construction is an old building technique utilizing wood and mortar. There are many books available on the subject and you should definitely read at least a couple of them before you would undertake this coop. But the process is relatively simple and straightforward. Wood is used in place of brick or stone and set in mortar. You can either use logs or split firewood that has been cured for at least two years, the longer the better. The wood is cut to the desired depth of your walls and left to cure. I cut the logs down to six inch slices or discs (the walls in a cordwood house would be at least 24" thick) and peeled off the bark. Cordwood construction is built on a concrete foundation. Once the foundation is cured its a matter of mixing mortar, and mixing mortar, and mixing mortar. The mortar is laid out on the foundation in a bed smaller than the width of the wood, the wood is then pressed into the mortar bed and then more mortar is placed around and over the log, repeat, repeat, repeat. Doors, window, vents and any other openings are simple wooden frames that are treated just like the logs and mortared in place as your walls progress. The framework for the roof is also mortared in place as you reach the top of your walls. That's it, wood and mortar, what could be easier. Ready, set, go.

Our Old Coop
We saw our first cordwood house on the Olympic Penninsula in Washinington State. It was from the 1890's and built entirely of tree rounds, some of the rounds were at least four feet across. It made quite an impression on us and the image stuck in my head. Years later Seattle constructed a light rail line about a half block from our house. The construction tore up lots of undeveloped green space. And that's when the crying began. My daughter went outside one morning to find pieces of Pepsi and Rosa, two of her beloved chickens scattered around the yard. All the raccoons and other critters from the green spaces had been forced to find new homes and new feeding routes. We were now on the route.
Our chickens had always slept in the laurel trees in our backyard. They had a coop but they really didn't care. Any coop is a way distant second to roosting in the trees and their's was just a huge doghouse with a small wire mesh yard. Nobody took it very seriously, especially them. We started putting them in the coop at night. More crying and more chicken parts as the raccoons reached though the wire mesh and did unspeakable things. The yard was reinforced and the chickens were safe. But they now spent all their time stuck in a doghouse with a small yard. We needed a new coop especially as we had been phasing out the bantys and moving on to full size chickens. Such were the beginnings of The Chicken Castle.
Plans for a New Coop
Okay, there were no plans for The Chicken Castle, I drew this up as an ode to the movie The Hudsucker Proxy. Which some of you will find very funny. These plans can also lead to a hula hoop, a straw, or a frisbee. Be careful.
A circle is the easiest shape for cordwood construction, primarily because it means you only have to build one wall instead of four and there are no corner joints to engineer. A circle also encloses the most area with the least amount of wall.The biggest planning decision was the size of the circle. I chose a nine foot diameter. This was achieved with a post and a four and a half foot rope which swiveled around the post and had a spike at the other end to mark the circle.
Then an eight inch deep trench (should be at least 12 inches deep for colder climates) was dug large enough to accommodate a 6"x12" cinder block. The circle was adjusted to fit whole cinder blocks. Premixed bags of concrete were then mixed in a wheel barrow and a thin layer was shoveled into the bottom of the trench. The blocks were then set in the concrete and leveled. Rebar spikes were driven into the dirt inside the block openings to hold them in place then small strips of metal lath were bent into a staple like shape and placed across the top of adjoining blocks stretching down into the block openings to tie them together. The block openings were then filled with concrete and a layer of concrete troweled on top of the block to bury the metal lath staples and make a level surface. This was then allowed to cure.
While the foundation cured I decided where windows and doors would go. I needed one door for us and one door for the chickens. I decided on six windows for no reason and three vent openings.The frames for the openings have to be constructed before you begin. Each frame needs a mechanical hold around the outside of the frame for the mortar to hold onto. This can be in the form of a strip of wood, nails hammered in part way and bent over, or strips of metal lath screwed into the outside of the frames (metal lath is best). Just something for the mortar to grab and hold the frame in place. During this time I also prepped the wood I would use as bricks in the mortar. We just happened to have some cedar logs that had been in the yard for a couple of years. I used a chain saw to roughly slice the logs into six inch wide rounds (disks), thicker would have been better but I only had so many logs and needed as many rounds as possible. Ideally the wood would be cut to size and allowed to cure for a few years in its cut size. After slicing the logs the bark was stripped off each slice. They say it is much easier to strip the bark from the logs when freshly cut. Split wood as opposed to rounds would be much easier to work with when you lay them in the mortar. With the foundation cured (mostly), the frames for openings built, and the logs sliced and bark stripped you're ready to begin building.
Mixing Mortar
More to the point it is time to start mixing mortar. The mortar is probably the most important part of cordwood construction and the most difficult. Using rounds as opposed to a split cord of firewood increases the difficulty. With split wood it is easier to maintain a one or two inch mortar joint. With wood rounds it is common to end up with a six inch mortar joint or larger which will be very prone to cracking. The joints on the outside of a curved wall are larger than the joints on the inside due to the outside circumference of the wall being greater than the inside circumference. The cordwood books add course sawdust (like you would get from a chainsaw) to their mortar mix to slow down the set time and deal with the problem of cracking. Being Cementitious Man, I ignored this technique and made ridiculously thick mixes of mortar. The less water you put into a mix the less water that has to dry out and the less the mortar will shrink as it dries. I had very minimal cracking in The Chicken Castle. But this is a very thick mix and very physically demanding to mix in a wheel barrow and to work with on the wall. I also used more sand in my mix than most mortar recipes. The mix I used was 10 parts sand to 3 parts lime to 2 parts portland cement, 10:3:2, sand:lime:cement. And as little water as possible, if it doesn't really hurt to mix it up you're using too much water. A mortar mixer could be used but only makes sense if you have a few people setting the wood.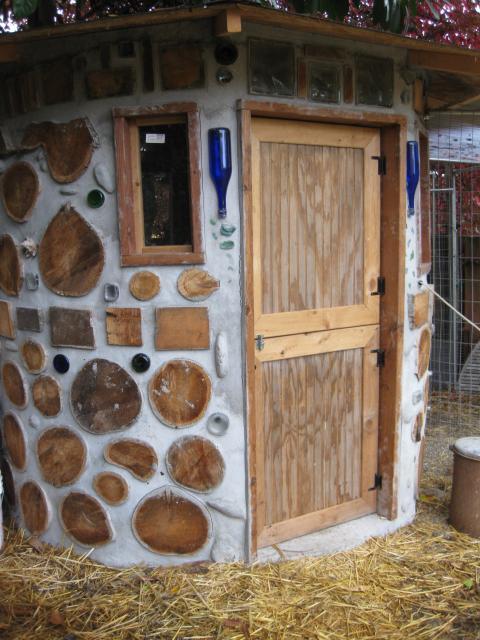
|
The large joints between the rounds are perfect opportunities for using bottles, rocks, or whatever to help fill the space with something other than mortar. I also used dog bones, shells, vases, a birdhouse, 2x4's, 2x6's and posts. I quickly realized I did not have enough wood rounds to finish the coops and was forced into much improvisation. It is also important to have all your wood laying out so you can pick and choose shapes that fit together and have a good flow.
As you progress up the wall be ready to put in your window frames (should you have any) as you reach the desired height. The frames are treated just like the wood rounds. Mortar is shoveled onto the previous course of logs and the frame is pushed into the mortar and securely seated. Once the frame is in position, more mortar is added to each side and begin placing your rounds for the next course always running the mortar up past the halfway point of each round to lock it in place. I also mortared branches into a couple of the courses to act as built in perches, running the branches from one side of the coop to the other. Having thin walls meant that the necks and openings to the bottles are accessible on the inside of the coop these also offer many perch possibilities since branches can be shoved into the bottle openings.
When I reached the finish height of my walls I mortared two 2x4's into the top course. This served to lock the walls into position and act as a support for the roof. The two 2x4's were notched in the middle of the board so they would interlock in an X shape with 90 degree angles and retain their four inch depth. Metal lath was wrapped around the ends of the boards that were set in the mortar wall to make sure they would not have the ability to slip and move. Once the cross members were mortared in place I set an old tree stump (a pretty one) on top of the cross members (see photo below). I then ran 8 1"X3" boards out from the top of the stump to the wall overhanging it by 18". Those boards (spokes) were then mortared into the top of the wall locking them in place. Once the spokes resting on top of the stump were set, I nailed pie shaped sections of plywood to the spokes and coated the whole thing with sheet roofing materials. After that whenever I cut some sod out of the lawn I would throw it on top of the roof. We now have a green roof.
It has been 5 years since I built the Chicken Castle and everything is holding up pretty well. The logs have shrunk some and I have a few cracks but all and all it's doing great. I use deep litter management inside the coop and clean it out once a year.
Thanks for looking at my coop page and for all the nice comments,
Steve Irish