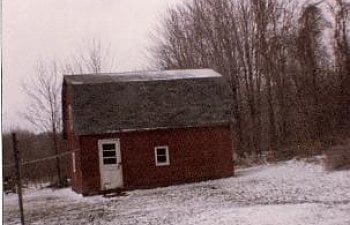
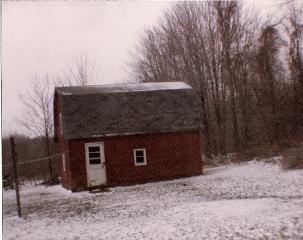
Before I begin our story, a little back story if you will indulge me...
Although I did not grow up in the 'city' we lived within city limits so we were never allowed 'barnyard' animals. So as a child I would satisfy my love of farm animals and country living by staying at my grandparents as often as I could. They lived in what felt like the middle of nowhere and I just LOVED it! One of my favorite memories of being there as a child is of waking early one morning to a very light dusting of snow outside. I remember snapping a picture of their barn because I thought i was one of the prettiest things I'd ever seen. I had to have been 10 or 12 at the time, not quite sure but that memory of the barn covered in snow stuck with me, it was what I always imagined a barn should look like. I happened to be in my basement, moving some boxes for the electric being ran to our barn and came across THE photo! I could not believe the serendipity! I had been telling DH about this photo and it had been on my mind for the last few months and there it was! I scanned it in an uploaded it. Without further delay, this is the inspiration for our barn:

and now our story begins....
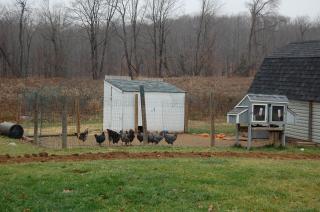
This was our coop.
We hobbled it together with scrap wood. We dug the posts for the run down a couple feet but did not cement them in so they have moved slightly, of course the 4 year old DS running a golf car into a post didn't help matters much either.") We also never managed to put up a proper gate to make our coming and going to and from the run easy. The pathetic nature of our construction added with our addiction to all things fowl and we have quickly outgrown our current setup!
We also never managed to put up a proper gate to make our coming and going to and from the run easy. The pathetic nature of our construction added with our addiction to all things fowl and we have quickly outgrown our current setup!
It was quite a crazy summer filled with many other projects but as fall was approaching we concluded that we had finally come to the point in our poultry obsession that we needed something bigger than the existing 8x10 coop, it was just no longer cutting it. We knew we had neither the time nor skill to do it ourselves. We sat down and discussed what we really needed out of a structure and slowly it all came together. We knew we needed something bigger, dare I say it...we needed a B-A-R-N.
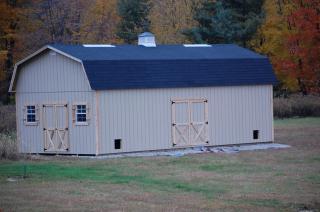
When we built our house here four years ago we both knew eventually we would be building a barn (after all, we have three acres and are in a farming area), we just never dreamed we would be building it to house poultry!") Turns out we enjoy our birds SO much more than we could have ever imagined and we just keep expanding our flock! After lots of discussions we decided to build a 16x32 barn. It has two 8x16 lofts, 4 interior pens and exterior fencing.
Turns out we enjoy our birds SO much more than we could have ever imagined and we just keep expanding our flock! After lots of discussions we decided to build a 16x32 barn. It has two 8x16 lofts, 4 interior pens and exterior fencing.
This is a recount of its construction. As of now (Nov. 2009) we are still finishing up the last bit before we get snowed in for winter. We've been feverishly working away the last couple weekends and hope to be done before the end of the month. Although, we already have our list for spring, so I guess it will never be 'done'.
The structure itself was somewhat pre-built so it went up in less then a day. yay!
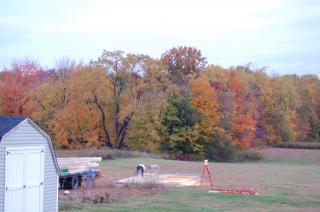
We had the prep work (gravel base) done before they arrived.
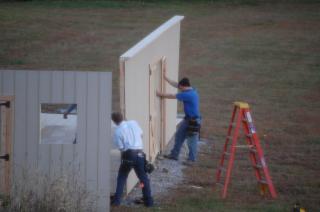
First they laid out all the exterior walls.
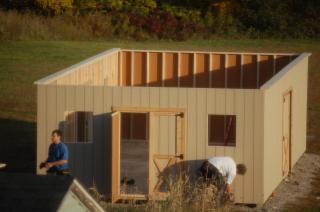
Wait! I know what you are thinking....'there is a really nice looking coop RIGHT THERE, over to the left side in that pic, in front of this new barn being built....this doesn't look like your old coop...why are you not using this beautiful building?' Well to that I say...GOOD QUESTION! lol actually that is our storage shed, it matches our house exactly and is about 12x14. It currently houses all of the random 'big boy' toys such as the tiller and mower!
ok, so back to our story...
They started putting each side up.
Before we knew it the four walls were done!
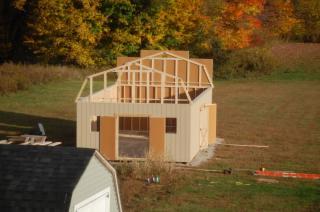
Next came the trusses which will enable a nice size loft on either side.
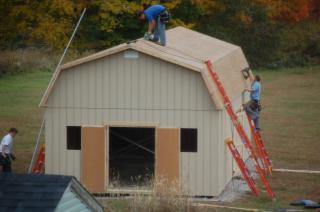
Once the trusses were finished, they started on the top section of the exterior and the roof.
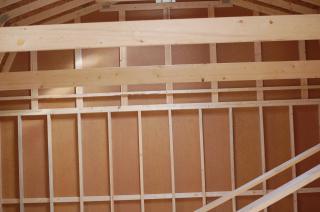
On the inside they built a loft at the far end that is 8x16.
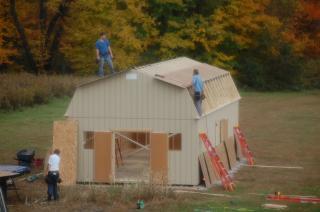
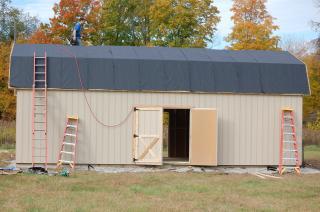
After the roof base came the roofing paper/shingles. We chose a black shingle to match with our other shed and our house.
Side view of progress. These doors will be used for the peafowl. There will also be two cut out's, one for the pheasants and one for the chickens. You can see through the peas door to another set of doors on the other side, they are an alternate set of entry/exit doors and can also be opened to allow additional air flow in the warmer months.
next came my favorite part, the cuppola and weather vane. The roof also has two 8 foot vent lights. The doors in the picture below are used to enter/exit daily. This how we view the barn from the back of our house.
By 4pm that day, we were left with this:
In this side picture, you can see the cut out's for our pheasants and chickens.
Even though it may look finished, we still have a LOT to do!
Next item of utmost importance is the interior pens of course!
The next day our master contractor neighbor came to start work on the interior pens, exterior fencing and electric. In a perfect storm of coordination, DH was off for a few days and my brother also offered to come up to help paint the outside! Things were really moving along now.
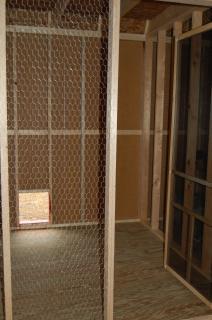
The interior pens were divided into four pens, with an option to split to five total. All of the pens have wire screening between and screen doors with double latches on the outside.
The first pen is for our chickens, this is actually two pens but we are currently using it as one as this is off breeding season. Come spring, it will be divided out into two 8x8 pens but it currently sits as one 8x16 pen with an open door between the two pens.
In this picture you can see one of the two chicken pens, the other portion is to the right of this. You enter in this pen and the door to the next pen is just to the right. The cutout you see here is not one seen in any previous pictures, a secret door if you will! It goes off the back of the barn, opposite of the main entry/exit door. This door will be used in spring when we divide the pen into two. Above this entire pen is the first of the two lofts, measuring 8x16 also. The loft is 8 feet up so this pen ceiling is 8 feet. You can see a small sliver of the loft at the very, very top of this picture.
Below is the second pen, as I said, just to the right of pen 1. I'm standing in pen 1 to take this picture. The door in the picture above is to my right in the second picture. The cut out you see here is the one that would be on the right in the previous exterior pictures of the side. On the right, you can see the open door that will divide this into two pens come spring.
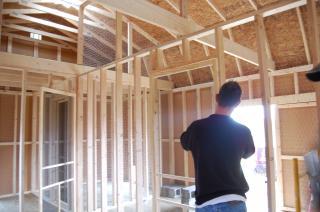
In our next picture, we can see a lovely shot of the back of DH! LOL He and neighbor were putting up the screening while I was snapping a few shots. This is a wide shot of the peafowl pen(s), you can also see the first loft and pens 1 and 2 in the far left. This is a pen that is also 16x8 but has no loft above it so it goes up to almost 15 feet at the peak. They have a roost at 8 feet and LOVE it, it is the large flat board seen at the top of the picture. The 8 foot roost is actually the divider to split the pen into two for breeding season. The large bright light you see is the door seen in the previous exterior shots of the side.
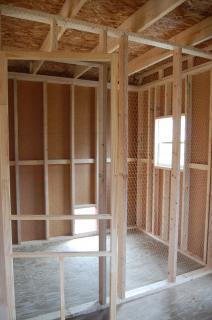
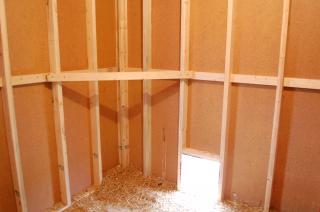
The last pen is for red golden pheasants. This pen is a bit smaller at 6x8, it also has the second loft to top it off at 8 feet. This pen is to the left of the pea pen and right next to the main entry/exit door. That door is just to the right of this picture.
Once we had the interior pens built and screened I put some of the extra screen over the cut out's to keep everyone inside until the exterior pens were built. While the interior pens were being built my DH and neighbor, dear, dear brother was busy busy working on painting the exterior.
Unfortunately, I didn't snap any in process pictures of the painting (or exterior pen build) but can you guess what color we picked? YEP...barn red! The trim was painted white as were the shutters. We opted to paint the door for the peas all red, mainly because we expect it to be open quite a bit and I thought it would be nice to have my artist aunt script our farm name across the door in white paint (spring project).
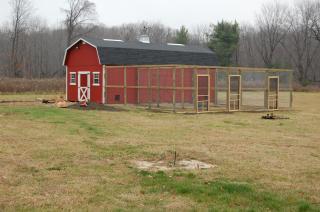
Here is a picture from the back of the house, with the paiting and pens completed. We have not reattached the shutters yet but they are painted and ready to go back on.
Another picture, but from the side. You can see the three exterior pens from here. The outside pens are (left to right) 8x23, 16x23 and 8x23. The pen to the left is for pheasants, middle for peas and the one on the far right is for the chickens. Next spring another fence will go up off the back, to allow that secret door outside access too. The plan is to build that out maybe 20 feet and then bring it around to meet with the existing three pens so a total of 39 feet long. Wire surrounds the pens and we purchased nylon poultry netting for the top.
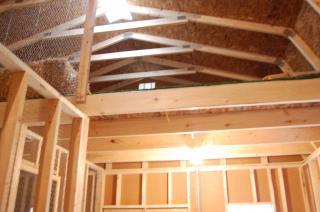
Back to the inside, here is a picture of the loft that came with the structure. It is above the chicken pen, right now it is holding our extra fencing.
On the other side is loft #2, built by our neighbor. This is above the pheasant pen. It is currently holding the extra food, bedding and cages.
We added a couple roosts to the chicken pens. This is in pen 2.
This is in pen 1. We'll still need to add more but right now everyone seems happy.
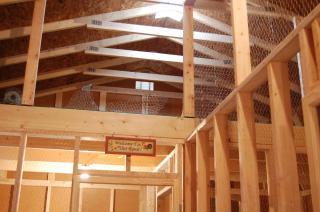
I had to add a little bit of decoration just to make it feel like home for everyone. The first is a 'Welcome to our Roost' sign, this is hanging above the chicken pen(s).
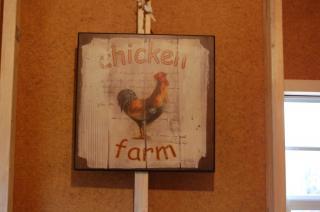
The second sign I could not pass up was a 'Chicken Farm' sign. This is hanging above where the shelving will be. The framing is done for the corner shelf but it still needs a top.
Our running TO-DO list includes:
**FINISH THIS PAGE. lol
-pictures of the inhabitants.
-run down of cost.
Inside:
-pens.
-roosts. (partly done) *we have temporary roosts up in pens 1 and 2 but I would like to build something that can be removed for easy cleaning come spring. I've seen some pics here of what I want, looks similiar to a straight ladder but wider. You just lean it against the wall.
-lighting and outlets.
-second 8x16 loft.
-shelving for storage.
-plywood divider between peas and chickens.
-shelf top
-built in steps to access lofts
Exterior:
-paint, including the trim.
-run electric.
-exterior light.
-exterior fencing.
-attach nylon netting
-doors to block cut out's.
-level out bottom of exterior fencing.
-reattach shutters
Well, that's about it. If you have any questions or comments I'd love to hear them! Feel free to send me a PM.
Although I did not grow up in the 'city' we lived within city limits so we were never allowed 'barnyard' animals. So as a child I would satisfy my love of farm animals and country living by staying at my grandparents as often as I could. They lived in what felt like the middle of nowhere and I just LOVED it! One of my favorite memories of being there as a child is of waking early one morning to a very light dusting of snow outside. I remember snapping a picture of their barn because I thought i was one of the prettiest things I'd ever seen. I had to have been 10 or 12 at the time, not quite sure but that memory of the barn covered in snow stuck with me, it was what I always imagined a barn should look like. I happened to be in my basement, moving some boxes for the electric being ran to our barn and came across THE photo! I could not believe the serendipity! I had been telling DH about this photo and it had been on my mind for the last few months and there it was! I scanned it in an uploaded it. Without further delay, this is the inspiration for our barn:
and now our story begins....
This was our coop.
We hobbled it together with scrap wood. We dug the posts for the run down a couple feet but did not cement them in so they have moved slightly, of course the 4 year old DS running a golf car into a post didn't help matters much either.
We also never managed to put up a proper gate to make our coming and going to and from the run easy. The pathetic nature of our construction added with our addiction to all things fowl and we have quickly outgrown our current setup!It was quite a crazy summer filled with many other projects but as fall was approaching we concluded that we had finally come to the point in our poultry obsession that we needed something bigger than the existing 8x10 coop, it was just no longer cutting it. We knew we had neither the time nor skill to do it ourselves. We sat down and discussed what we really needed out of a structure and slowly it all came together. We knew we needed something bigger, dare I say it...we needed a B-A-R-N.
When we built our house here four years ago we both knew eventually we would be building a barn (after all, we have three acres and are in a farming area), we just never dreamed we would be building it to house poultry!
Turns out we enjoy our birds SO much more than we could have ever imagined and we just keep expanding our flock! After lots of discussions we decided to build a 16x32 barn. It has two 8x16 lofts, 4 interior pens and exterior fencing.This is a recount of its construction. As of now (Nov. 2009) we are still finishing up the last bit before we get snowed in for winter. We've been feverishly working away the last couple weekends and hope to be done before the end of the month. Although, we already have our list for spring, so I guess it will never be 'done'.
The structure itself was somewhat pre-built so it went up in less then a day. yay!
We had the prep work (gravel base) done before they arrived.
First they laid out all the exterior walls.
Wait! I know what you are thinking....'there is a really nice looking coop RIGHT THERE, over to the left side in that pic, in front of this new barn being built....this doesn't look like your old coop...why are you not using this beautiful building?' Well to that I say...GOOD QUESTION! lol actually that is our storage shed, it matches our house exactly and is about 12x14. It currently houses all of the random 'big boy' toys such as the tiller and mower!
ok, so back to our story...
They started putting each side up.
Before we knew it the four walls were done!
Next came the trusses which will enable a nice size loft on either side.
Once the trusses were finished, they started on the top section of the exterior and the roof.
On the inside they built a loft at the far end that is 8x16.
After the roof base came the roofing paper/shingles. We chose a black shingle to match with our other shed and our house.

Side view of progress. These doors will be used for the peafowl. There will also be two cut out's, one for the pheasants and one for the chickens. You can see through the peas door to another set of doors on the other side, they are an alternate set of entry/exit doors and can also be opened to allow additional air flow in the warmer months.
next came my favorite part, the cuppola and weather vane.
The roof also has two 8 foot vent lights. The doors in the picture below are used to enter/exit daily. This how we view the barn from the back of our house.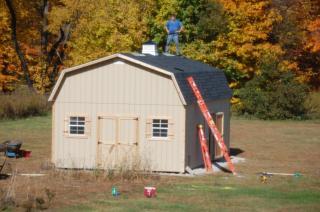
By 4pm that day, we were left with this:

In this side picture, you can see the cut out's for our pheasants and chickens.
Even though it may look finished, we still have a LOT to do!
Next item of utmost importance is the interior pens of course!
The next day our master contractor neighbor came to start work on the interior pens, exterior fencing and electric. In a perfect storm of coordination, DH was off for a few days and my brother also offered to come up to help paint the outside! Things were really moving along now.
The interior pens were divided into four pens, with an option to split to five total. All of the pens have wire screening between and screen doors with double latches on the outside.
The first pen is for our chickens, this is actually two pens but we are currently using it as one as this is off breeding season. Come spring, it will be divided out into two 8x8 pens but it currently sits as one 8x16 pen with an open door between the two pens.
In this picture you can see one of the two chicken pens, the other portion is to the right of this. You enter in this pen and the door to the next pen is just to the right. The cutout you see here is not one seen in any previous pictures, a secret door if you will! It goes off the back of the barn, opposite of the main entry/exit door. This door will be used in spring when we divide the pen into two. Above this entire pen is the first of the two lofts, measuring 8x16 also. The loft is 8 feet up so this pen ceiling is 8 feet. You can see a small sliver of the loft at the very, very top of this picture.

Below is the second pen, as I said, just to the right of pen 1. I'm standing in pen 1 to take this picture. The door in the picture above is to my right in the second picture. The cut out you see here is the one that would be on the right in the previous exterior pictures of the side. On the right, you can see the open door that will divide this into two pens come spring.
In our next picture, we can see a lovely shot of the back of DH! LOL He and neighbor were putting up the screening while I was snapping a few shots. This is a wide shot of the peafowl pen(s), you can also see the first loft and pens 1 and 2 in the far left. This is a pen that is also 16x8 but has no loft above it so it goes up to almost 15 feet at the peak. They have a roost at 8 feet and LOVE it, it is the large flat board seen at the top of the picture. The 8 foot roost is actually the divider to split the pen into two for breeding season. The large bright light you see is the door seen in the previous exterior shots of the side.
The last pen is for red golden pheasants. This pen is a bit smaller at 6x8, it also has the second loft to top it off at 8 feet. This pen is to the left of the pea pen and right next to the main entry/exit door. That door is just to the right of this picture.
Once we had the interior pens built and screened I put some of the extra screen over the cut out's to keep everyone inside until the exterior pens were built. While the interior pens were being built my DH and neighbor, dear, dear brother was busy busy working on painting the exterior.
Unfortunately, I didn't snap any in process pictures of the painting (or exterior pen build) but can you guess what color we picked? YEP...barn red! The trim was painted white as were the shutters. We opted to paint the door for the peas all red, mainly because we expect it to be open quite a bit and I thought it would be nice to have my artist aunt script our farm name across the door in white paint (spring project).
Here is a picture from the back of the house, with the paiting and pens completed. We have not reattached the shutters yet but they are painted and ready to go back on.
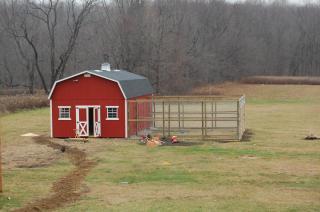
Another picture, but from the side. You can see the three exterior pens from here. The outside pens are (left to right) 8x23, 16x23 and 8x23. The pen to the left is for pheasants, middle for peas and the one on the far right is for the chickens. Next spring another fence will go up off the back, to allow that secret door outside access too. The plan is to build that out maybe 20 feet and then bring it around to meet with the existing three pens so a total of 39 feet long. Wire surrounds the pens and we purchased nylon poultry netting for the top.
Back to the inside, here is a picture of the loft that came with the structure. It is above the chicken pen, right now it is holding our extra fencing.
On the other side is loft #2, built by our neighbor. This is above the pheasant pen. It is currently holding the extra food, bedding and cages.
We added a couple roosts to the chicken pens. This is in pen 2.
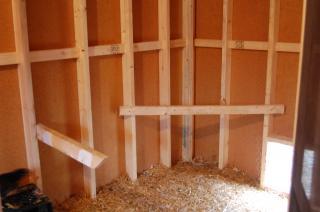
This is in pen 1. We'll still need to add more but right now everyone seems happy.
I had to add a little bit of decoration just to make it feel like home for everyone.
The first is a 'Welcome to our Roost' sign, this is hanging above the chicken pen(s). 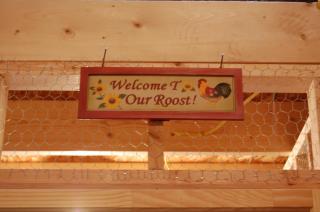
The second sign I could not pass up was a 'Chicken Farm' sign. This is hanging above where the shelving will be. The framing is done for the corner shelf but it still needs a top.
Our running TO-DO list includes:
**FINISH THIS PAGE. lol
-pictures of the inhabitants.
-run down of cost.
Inside:
-roosts. (partly done) *we have temporary roosts up in pens 1 and 2 but I would like to build something that can be removed for easy cleaning come spring. I've seen some pics here of what I want, looks similiar to a straight ladder but wider. You just lean it against the wall.
-plywood divider between peas and chickens.
-shelf top
-built in steps to access lofts
Exterior:
-attach nylon netting
-doors to block cut out's.
-level out bottom of exterior fencing.
-reattach shutters
Well, that's about it. If you have any questions or comments I'd love to hear them! Feel free to send me a PM.