Maybe I should have called this the money pit, because it started out as a small coop project and turned into a backyard renovation project.

My wife and I considered and planed this backyard chicken coop project for a whole year before we began construction. I would recommend reading up on raising chickens before you jump into raising chickens in your back yard. We live in an urban were chickens are not allowed, so we have no male chickens (rosters) because they make to much noise. I designed this coop for our local climate here in Bakersfield California, which is hot in the summer mild winters with no snow, and little rain. The design is based off the Wichita Cabin design with a larger foot print and a light duty roof.
I started this project by clearing a spot for the coop and digging a trench to bury a 2 inch diameter PCV pipe to act a a conduit for running electrical wiring to the coop. I used two 45 degree angle bends spaced slightly apart to make the 90 degree bends in the pipe. This way it will be easier to snake wiring through the conduit pipe. Then I laid down a foundation of 2”x8”x16” solid cap stone blocks, 10 across and 4 deep, this makes a 13 foot wide by 6 foot deep foundation. The PCV pipe can be seen sticking up at the left rear corner.
Next came the framing. All the wood pieces are cut to size then given one coat of Cabot’s semi-solid deck and siding stain, 17417 New Redwood. The cheaper 2x4’s at Lowe's which are still wet not dried will accept the stain with better results. The stain soaks in good looks better on the rougher surfaced wood. The base is made of 2x6 and 2x4 pressure treated lumber; the rest is all low cost pine.
Screw the vertical 2x4's to the top horizontal 2x4 then lift into position and secure with a spare 2x4, then screw in place the vertical 2x4's at the bottom. Then attach the side wall and top joists and the structure will stand on its own. Here is the plans I made, I am not an architect sorry.
These plans are not vary detailed, but they give you a basic idea of the design. You must take into consideration your own local environment when designing your coop. If it snows where you live then put a solid wood roof with asphalt shingles and increase the angle or slope of the roof so snow will slide off. I would have used a saltbox roof design if I was in a harsher environment. In the picture below you can see the roof I used, it's that wavy plastic stuff. It cut down of the cost of the coop a bit. The materials for the coop cost about $1500 not including the chicken run or lattice work to raise the fence level.
The vertical 2x4's are spaced far enough apart to allow for about 1.25" of wire cloth to over lap on the 2x4's on each side. I stapled the wire cloth to the 2x4's then screwed a 2x4 over each 2x4 the wire cloth is stapled to. This can be seen in the next photo. The front wall has the 2x4 caps in place and the right side wall does not yet have one. Also note the spacing of the 2x4's on left side of the coop is greater, because this is were the hen house will be.
In the above photo you can see the door I designed. The next photo shows the construction of the door. I purchased a Kreg pocket hole jig for $39.98 to build the door. This is the best tool investment of my life, I love this tool. I cut two sets of every piece for the door and assembled them with the pocket jig and glue. Let them dry, stained them, stapled the wire cloth in place, then screwed the two pieces together from the back side so no screws a visible from the front.
In the next photo it shows how I made the front and two side panels to the hen house open on hinges for easier cleaning. Also notice the top of the hen house is ventilated by wire cloth to help let the heat out. Two nesting box's will go in the back wall with a out side door access. We have five chickens total so two nesting box's should work fine from what I've read.
Sorry about the dogs back side in that picture. We have two dogs and they get along fine with the chickens. We purchased the chickens as baby chicks and raised them with the dogs and one cat being around them. Once there big the cat loses interest in them and they will chase her off together as a flock, its interesting to watch them chase off the cat or other birds that land in our back yard.
The above picture is of our chicken steps. I decided to use chicken steps instead of a ramp because they take up less space inside the coop. I read about someone else using chicken steps and that they can jump two feet high easily. I placed the hen house almost three feet off the ground to make it easier to clean under it. The three steps are spaced about one foot apart each. The chickens have no problems jumping up the chicken steps and its fun to watch.
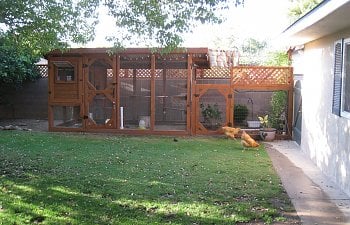
My wife decided to make the space on the right side of the coop a chicken run, which actually means I had to make it a chicken run. This also required adding a lattice privacy screen to the top of the brick wall because it was only about five feet high and the chickens could jump and fly that high. We used poop hammock under the roosting bar inside the hen house, made of sun shade cloth, which can be hosed off with water after shaking the poop into the trash. I used a removable poop board under the roost bar in the coop. There's a small chicken door that leads into the run that can be closed and latched shut from the out side.
This is the poop hammock inside the hen house. Its made from outdoor shade cloth material, just loop the material over on each end and sew it in place, then stick a section of plastic PCV pipe you can buy from Home Depot or Lowe's through the loops. The poop will dry vary fast and produce vary little odor that way. shake the dried poop into the trash and hose it off with the garden hose and your done. Works great. You can see the two nesting boxes in the back and on the wall to the right is a remote temperature sensor. We purchased a small temperature display unit that came with a remote sensor. That sits next to the kitchen sink by our back window so we can monitor the hen house temperature. Overkill I now.
This is a night time shot of the chickens getting ready to nest for the night on the out side roosting bar that has the poop board below it. Its a 1/4" thick plywood board that I stained, and laid across some 2x4 mounting brackets. My wife scrapes the poop off every other day, it is not nailed in place so it can be easily removed and hosed off. The chickens sleep on this outside bar in the summer.
In closing I would like to thank the Back Yard Chickens.com web site, I learned a lot from this site and I hope my posting will help others decide to join in on the fun of Back Yard Chickens. Thank you.
My wife and I considered and planed this backyard chicken coop project for a whole year before we began construction. I would recommend reading up on raising chickens before you jump into raising chickens in your back yard. We live in an urban were chickens are not allowed, so we have no male chickens (rosters) because they make to much noise. I designed this coop for our local climate here in Bakersfield California, which is hot in the summer mild winters with no snow, and little rain. The design is based off the Wichita Cabin design with a larger foot print and a light duty roof.
I started this project by clearing a spot for the coop and digging a trench to bury a 2 inch diameter PCV pipe to act a a conduit for running electrical wiring to the coop. I used two 45 degree angle bends spaced slightly apart to make the 90 degree bends in the pipe. This way it will be easier to snake wiring through the conduit pipe. Then I laid down a foundation of 2”x8”x16” solid cap stone blocks, 10 across and 4 deep, this makes a 13 foot wide by 6 foot deep foundation. The PCV pipe can be seen sticking up at the left rear corner.
Next came the framing. All the wood pieces are cut to size then given one coat of Cabot’s semi-solid deck and siding stain, 17417 New Redwood. The cheaper 2x4’s at Lowe's which are still wet not dried will accept the stain with better results. The stain soaks in good looks better on the rougher surfaced wood. The base is made of 2x6 and 2x4 pressure treated lumber; the rest is all low cost pine.
Screw the vertical 2x4's to the top horizontal 2x4 then lift into position and secure with a spare 2x4, then screw in place the vertical 2x4's at the bottom. Then attach the side wall and top joists and the structure will stand on its own. Here is the plans I made, I am not an architect sorry.
These plans are not vary detailed, but they give you a basic idea of the design. You must take into consideration your own local environment when designing your coop. If it snows where you live then put a solid wood roof with asphalt shingles and increase the angle or slope of the roof so snow will slide off. I would have used a saltbox roof design if I was in a harsher environment. In the picture below you can see the roof I used, it's that wavy plastic stuff. It cut down of the cost of the coop a bit. The materials for the coop cost about $1500 not including the chicken run or lattice work to raise the fence level.
The vertical 2x4's are spaced far enough apart to allow for about 1.25" of wire cloth to over lap on the 2x4's on each side. I stapled the wire cloth to the 2x4's then screwed a 2x4 over each 2x4 the wire cloth is stapled to. This can be seen in the next photo. The front wall has the 2x4 caps in place and the right side wall does not yet have one. Also note the spacing of the 2x4's on left side of the coop is greater, because this is were the hen house will be.
In the above photo you can see the door I designed. The next photo shows the construction of the door. I purchased a Kreg pocket hole jig for $39.98 to build the door. This is the best tool investment of my life, I love this tool. I cut two sets of every piece for the door and assembled them with the pocket jig and glue. Let them dry, stained them, stapled the wire cloth in place, then screwed the two pieces together from the back side so no screws a visible from the front.
In the next photo it shows how I made the front and two side panels to the hen house open on hinges for easier cleaning. Also notice the top of the hen house is ventilated by wire cloth to help let the heat out. Two nesting box's will go in the back wall with a out side door access. We have five chickens total so two nesting box's should work fine from what I've read.
Sorry about the dogs back side in that picture. We have two dogs and they get along fine with the chickens. We purchased the chickens as baby chicks and raised them with the dogs and one cat being around them. Once there big the cat loses interest in them and they will chase her off together as a flock, its interesting to watch them chase off the cat or other birds that land in our back yard.
The above picture is of our chicken steps. I decided to use chicken steps instead of a ramp because they take up less space inside the coop. I read about someone else using chicken steps and that they can jump two feet high easily. I placed the hen house almost three feet off the ground to make it easier to clean under it. The three steps are spaced about one foot apart each. The chickens have no problems jumping up the chicken steps and its fun to watch.
My wife decided to make the space on the right side of the coop a chicken run, which actually means I had to make it a chicken run. This also required adding a lattice privacy screen to the top of the brick wall because it was only about five feet high and the chickens could jump and fly that high. We used poop hammock under the roosting bar inside the hen house, made of sun shade cloth, which can be hosed off with water after shaking the poop into the trash. I used a removable poop board under the roost bar in the coop. There's a small chicken door that leads into the run that can be closed and latched shut from the out side.
This is the poop hammock inside the hen house. Its made from outdoor shade cloth material, just loop the material over on each end and sew it in place, then stick a section of plastic PCV pipe you can buy from Home Depot or Lowe's through the loops. The poop will dry vary fast and produce vary little odor that way. shake the dried poop into the trash and hose it off with the garden hose and your done. Works great. You can see the two nesting boxes in the back and on the wall to the right is a remote temperature sensor. We purchased a small temperature display unit that came with a remote sensor. That sits next to the kitchen sink by our back window so we can monitor the hen house temperature. Overkill I now.
This is a night time shot of the chickens getting ready to nest for the night on the out side roosting bar that has the poop board below it. Its a 1/4" thick plywood board that I stained, and laid across some 2x4 mounting brackets. My wife scrapes the poop off every other day, it is not nailed in place so it can be easily removed and hosed off. The chickens sleep on this outside bar in the summer.
In closing I would like to thank the Back Yard Chickens.com web site, I learned a lot from this site and I hope my posting will help others decide to join in on the fun of Back Yard Chickens. Thank you.