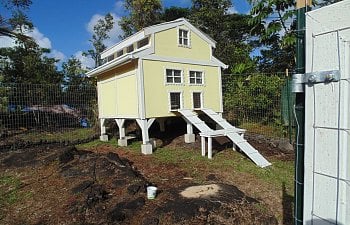
I consider this coop to be one that is medium size. At 64 square feet, its 8' x 8' foot print is small enough for most back yards but large enough for 16 hens. (16 birds*4 square feet coop space per bird= 64 square feet total). We are putting it into a pen that is 20' x 20' so this 400 square feet will easily satisfy the 10 square feet per bird for pen space. We live in Hawaii and since our year round temperature and humidity is in the 80 degree/85% range this coop has a massive amount of ventilation. Our build site is also been challenging- we live on a one acre plot of land that is mostly lava. Lava looks light a fluffy, full of air holes and spaces, but this stuff is hard! Setting posts or getting poles into the ground will require some deft thinking or big jackhammers. We decided to go 'skyscraper' and set the entire coop up off the ground. The coop is set on a pier system since that allowed us to support the coop on the very uneven ground of our "back 40" quickly and easily. This also meant we gained an additional 64 square feet of usable space for the chickens simply because they can use the space UNDER the coop for shade or rain protection.
Skill level for the techniques used: 2 of 5-though some angles can be tricky to get first try.
Basic design wanted:

I then cut and mounted the rough sawn T1-11 siding and filled the screw heads.
Walls 2 and 3 went up the same way, 24" on center framing, cross bracing as needed and plywood added, screws and filling with silicone. In this photo, the nest box area is cut out on the left wall, the wall on then right will be the hen doors. This is for chicken access to the outside pen area. The center wall will have ventilation windows and is the right side of the coop when viewing the coop from the front. The open area we are looking into the coop through(the fourth wall) will be the cleaning access doors. I plan on splitting the 8' space in half with a door on either side of a central support so we can do heavy cleaning on the coop with plenty of room for carts, wheelbarrows etc. for manure removal.
I then took the all the walls down and painted them with 2 coats of Kilz water base primer and 2 coats of a good quality exterior latex paint.
I don't have a photo of the under side of the floor panel, but it is also painted the same way- 4 coats of exterior grade paint. We live in a climate of very wet weather and invasive termites so we wanted this coop to last as long as possible.
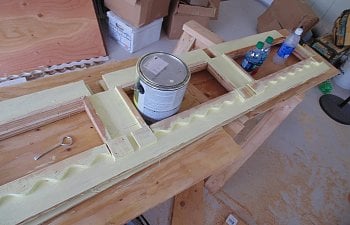
For the two gable ends, I laid out the basic shape in pencil on one side to my liking, then matched the 2x4 cuts to the plywood edges. I used staples to temporarily affix the 2x4's to the ply, then used screws and silicone to finish up. I made a second gable end to match the first, and then I was ready for making the roof joists. I copied the joists by cutting and placing them on top of the gable ends to be sure the angles were right. I used small scrap pieces of plywood as gussets and painted and sealed the screwheads as before. I made a total of three joists to fill in the roof space.
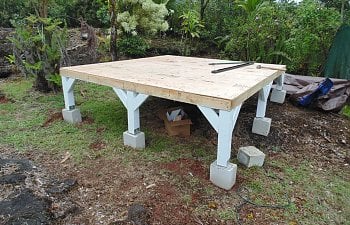
Under floor piers and footings were next. Footings were made from concrete half blocks that I filled with cement and placed a foundation bolt in them before the cement set. I could then attach the Simpson BC 4x half base to it and follow that up with the 4x4 Pier.
Cutting the piers to length was a bit tricky since is was a bit of a catch 22 - It's hard to measure down from the floor to the ground below when the floor isn't in place since there aren't any supports for it. Yeah, confusing, right? I ended up laying out the perimeter footing blocks where they were going to be placed and ran masons string at the anticipated floor level then dropped a tape to the top of the foundation block.
The tops of the piers were notched to fit snugly against the under floor joists and a hole was drilled to accommodate the bolt cemented into the block. Here are the finished piers attached to both the footings and the floor panel with diagonal bracing applied and painted. Next is the flooring. We used a vinyl 'linoleum' sheeting for ease of cleaning, stapled and sealed again with silicone.
Just an aside, the panels on the left of the upper right photo are on the bed of my truck, not on the floor of the coop, and these were put in place next. Since they were pre-painted, they went up fast! Gable ends in place next, adding bracing to hold them while the joists and the ridge beam is put in place.
The ridge beam was run under the joists to hold them up into place, rather than run as shorter individual pieces. You can also see the end gable vents- I purposefully added LOTS of window and vent area to keep the temperatures in the coop during the day down.
Once the joists were secure, I returned to the garage to build the large clean-out doors. Since the space under the 'eaves' would be too tight to get a screwdriver into, I made them part of the doors and cut the upper valance apart with a saw. That way I could attach the panel with one or two screws where I could get a driver in and have doors that fit the space perfectly.
The upper Clerestory windows were another tight fit so I made them again, in a single panel I could mount from the two ends. Trimmed out and painted beforehand, I also added the 1/2" rat / mongoose proofing at this time. Once the window went in, I added the fascia boards and purlins for the corrugated roofing. You can also see the center bracing for the two clean out doors.
The clean out doors were installed on piano hinges and tested for fit. Roofing and finish trim are getting us closer to being done. we took a short break of about 8 hours while we installed the T posts for the 5' fencing. We had to rent a rock drill and drill through the lava that is just below the surface everywhere on this island. some places it is a foot or more down, most places it is right on the surface. Thankfully we had the thinner pahoehoe rather than the harder blue rock.
We just need a few more trim the chicken doors and some more venting and we'll be close!
We added rain gutters on both sides on the lower roof for water collection. We have a 20 gallon barrel we catch it in so the girls will always have fresh rain water. The next photos show the gutters and the Nest box assembly.
The nest boxes were going to be double height, but we settled on a single level of 5 boxes for the 16 hens, the white area. The area above the nests, yellow in this photo, is for storage of egg baskets, treats, medicines, etc. And the vertical door holds the PDZ for keeping the odor down.
These two photos above show the fencing is in and the first ramps are set. We had to eventually change out the two landing system for a wider single width landing for the chickens once we had our first chicks hatch out, but as built, this is how we did it.
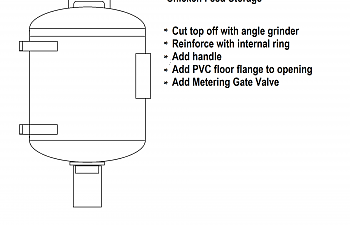
Final photo of the coop build is above left. Enlarge the photo and you may see that we added an over the pen aviary netting to ten feet high, and on the left of the coop you can just see the white tank we used for holding the feed for the gravity feed system. This didn't last long however as I had severe difficulty in keeping the rain out of this tank. We ended up going back to the red plastic feeders you can get at any feed store. I have not given up however, and I am designing a second feed distribution system as I type so stay tuned for that. The photo on the right above is showing the new ramp and a small 'mini-me' brooder I made to mirror the coop. Made for the new hatched chicks, it should be a lot of fun for them. At least they'll know where home is the first day they are moved from the brooder.
What I'd do differently:
First, I seriously underestimated the power of Chicken Math. I would make this coop twice the size I wanted it to be- in fact, JoAnn and I are doing just that- we are expanding the pen from 20'x20' to 135'x50' since we now have many more chickens and have added 10 turkeys to the mix. I had to turn down FREE ducks because we are seriously under penned for the amount of birds we have. I don't want that to happen again.
Second, I would run the gables and the roof line 90 degrees to the right. I mean, I did build it with modifying it in mind so it is just a small thing to remove a few screws and I can turn the roof, but if I had done it the first time...
Third, I'd add another coat of paint to the inner tight spots. I know 4 coats sounds like a lot but the rain here is sometimes more than 160 inches a year, humidity is understandably high because of it and the bugs are intense and love to bore, eat or destroy any wood they come in contact with.
In closing, this build cost me two months time, at least 100 (not really) trips to the local big box supply store for stuff I forgot or didn't think of while I was there, and since stuff is really pricey here in Hawaii because it all has to be shipped here by boat, it took the better part of 2 Grover Cleveland portraits.
Would I do it again? You bet!
Skill level for the techniques used: 2 of 5-though some angles can be tricky to get first try.
Basic design wanted:
- Room for at least 15 chickens
- Ability to expand with off the shelf lumber found at big box stores
- Self sustaining watering
- Auto feeding
- Nest boxes for all the hens
- Neat appearance
- Easy access for cleaning and maintenance


I then cut and mounted the rough sawn T1-11 siding and filled the screw heads.


Walls 2 and 3 went up the same way, 24" on center framing, cross bracing as needed and plywood added, screws and filling with silicone. In this photo, the nest box area is cut out on the left wall, the wall on then right will be the hen doors. This is for chicken access to the outside pen area. The center wall will have ventilation windows and is the right side of the coop when viewing the coop from the front. The open area we are looking into the coop through(the fourth wall) will be the cleaning access doors. I plan on splitting the 8' space in half with a door on either side of a central support so we can do heavy cleaning on the coop with plenty of room for carts, wheelbarrows etc. for manure removal.
I then took the all the walls down and painted them with 2 coats of Kilz water base primer and 2 coats of a good quality exterior latex paint.


I don't have a photo of the under side of the floor panel, but it is also painted the same way- 4 coats of exterior grade paint. We live in a climate of very wet weather and invasive termites so we wanted this coop to last as long as possible.


For the two gable ends, I laid out the basic shape in pencil on one side to my liking, then matched the 2x4 cuts to the plywood edges. I used staples to temporarily affix the 2x4's to the ply, then used screws and silicone to finish up. I made a second gable end to match the first, and then I was ready for making the roof joists. I copied the joists by cutting and placing them on top of the gable ends to be sure the angles were right. I used small scrap pieces of plywood as gussets and painted and sealed the screwheads as before. I made a total of three joists to fill in the roof space.


Under floor piers and footings were next. Footings were made from concrete half blocks that I filled with cement and placed a foundation bolt in them before the cement set. I could then attach the Simpson BC 4x half base to it and follow that up with the 4x4 Pier.


Cutting the piers to length was a bit tricky since is was a bit of a catch 22 - It's hard to measure down from the floor to the ground below when the floor isn't in place since there aren't any supports for it. Yeah, confusing, right? I ended up laying out the perimeter footing blocks where they were going to be placed and ran masons string at the anticipated floor level then dropped a tape to the top of the foundation block.


The tops of the piers were notched to fit snugly against the under floor joists and a hole was drilled to accommodate the bolt cemented into the block. Here are the finished piers attached to both the footings and the floor panel with diagonal bracing applied and painted. Next is the flooring. We used a vinyl 'linoleum' sheeting for ease of cleaning, stapled and sealed again with silicone.


Just an aside, the panels on the left of the upper right photo are on the bed of my truck, not on the floor of the coop, and these were put in place next. Since they were pre-painted, they went up fast! Gable ends in place next, adding bracing to hold them while the joists and the ridge beam is put in place.


The ridge beam was run under the joists to hold them up into place, rather than run as shorter individual pieces. You can also see the end gable vents- I purposefully added LOTS of window and vent area to keep the temperatures in the coop during the day down.


Once the joists were secure, I returned to the garage to build the large clean-out doors. Since the space under the 'eaves' would be too tight to get a screwdriver into, I made them part of the doors and cut the upper valance apart with a saw. That way I could attach the panel with one or two screws where I could get a driver in and have doors that fit the space perfectly.


The upper Clerestory windows were another tight fit so I made them again, in a single panel I could mount from the two ends. Trimmed out and painted beforehand, I also added the 1/2" rat / mongoose proofing at this time. Once the window went in, I added the fascia boards and purlins for the corrugated roofing. You can also see the center bracing for the two clean out doors.


The clean out doors were installed on piano hinges and tested for fit. Roofing and finish trim are getting us closer to being done. we took a short break of about 8 hours while we installed the T posts for the 5' fencing. We had to rent a rock drill and drill through the lava that is just below the surface everywhere on this island. some places it is a foot or more down, most places it is right on the surface. Thankfully we had the thinner pahoehoe rather than the harder blue rock.
We just need a few more trim the chicken doors and some more venting and we'll be close!


We added rain gutters on both sides on the lower roof for water collection. We have a 20 gallon barrel we catch it in so the girls will always have fresh rain water. The next photos show the gutters and the Nest box assembly.


The nest boxes were going to be double height, but we settled on a single level of 5 boxes for the 16 hens, the white area. The area above the nests, yellow in this photo, is for storage of egg baskets, treats, medicines, etc. And the vertical door holds the PDZ for keeping the odor down.


These two photos above show the fencing is in and the first ramps are set. We had to eventually change out the two landing system for a wider single width landing for the chickens once we had our first chicks hatch out, but as built, this is how we did it.


Final photo of the coop build is above left. Enlarge the photo and you may see that we added an over the pen aviary netting to ten feet high, and on the left of the coop you can just see the white tank we used for holding the feed for the gravity feed system. This didn't last long however as I had severe difficulty in keeping the rain out of this tank. We ended up going back to the red plastic feeders you can get at any feed store. I have not given up however, and I am designing a second feed distribution system as I type so stay tuned for that. The photo on the right above is showing the new ramp and a small 'mini-me' brooder I made to mirror the coop. Made for the new hatched chicks, it should be a lot of fun for them. At least they'll know where home is the first day they are moved from the brooder.
What I'd do differently:
First, I seriously underestimated the power of Chicken Math. I would make this coop twice the size I wanted it to be- in fact, JoAnn and I are doing just that- we are expanding the pen from 20'x20' to 135'x50' since we now have many more chickens and have added 10 turkeys to the mix. I had to turn down FREE ducks because we are seriously under penned for the amount of birds we have. I don't want that to happen again.
Second, I would run the gables and the roof line 90 degrees to the right. I mean, I did build it with modifying it in mind so it is just a small thing to remove a few screws and I can turn the roof, but if I had done it the first time...
Third, I'd add another coat of paint to the inner tight spots. I know 4 coats sounds like a lot but the rain here is sometimes more than 160 inches a year, humidity is understandably high because of it and the bugs are intense and love to bore, eat or destroy any wood they come in contact with.
In closing, this build cost me two months time, at least 100 (not really) trips to the local big box supply store for stuff I forgot or didn't think of while I was there, and since stuff is really pricey here in Hawaii because it all has to be shipped here by boat, it took the better part of 2 Grover Cleveland portraits.
Would I do it again? You bet!