The Beginner's Guide to Incubation

This guide is intended to help people new to incubation learn how to properly incubate and hatch eggs. It will walk you through how to incubate and hatch most common types of poultry, such as chickens, ducks, turkeys, geese, etc.
Choosing an Incubator
Before you can incubate eggs, you'll need an incubator. Which incubator you choose will depend on several factors, such as your budget and how many eggs you need it to be able to hold.
To start with, it is advised to avoid any of the cheap Chinese incubators you can find online at places like eBay, Amazon, AliExpress, etc. While their low prices are tempting, there's a reason the prices are so low - the quality is low too.
If you are looking for a starter incubator and you don't have a large budget, you may want to look into getting a Hovabator. Hovabators are made of Styrofoam, so they are not as good at holding temperature steady as incubators made of other materials, but they are fairly inexpensive as far as incubators go, and you can even get one with a digital readout if you so choose.
If you are willing to spend a little bit more money, and are looking for an incubator that holds around 30 eggs, then an Incuview might be the right choice for you. They are a good, reliable incubator that offers a great view of the chicks hatching when the time comes, and they come in under $200, which includes an automatic turner in the price.
If you are looking to only hatch a small amount of eggs at once, then maybe you would be interested in a Brinsea Mini. While expensive for a small incubator, they offer excellent reliability.
Brinsea also has larger models, and their incubators offer excellent reliability and are practically foolproof, not to mention they come with a warranty. However, they are on the more expensive end of tabletop incubators, especially if you need to be able to hatch more than 30 eggs at once and need one of their larger models. Brinseas are what I use and love.
Or maybe you need to hatch hundreds of eggs at once. In that case, you would want to get a cabinet style incubator. You can see recommendations for those here and here.
If you are handy and have a very small budget or just don't want to spend a lot, you could even make your own incubator. There are lots of plans and ideas to get you started in BYC's Incubators and Brooders section. You might even look at brooders while you're at it and whip yourself up one of those, since you'll need one after the hatch is over.
Now that you have chosen an incubator, it's time to talk about how to use it.
Getting Started
To start with, let’s talk about the bare bones basics. To incubate eggs, you need to monitor two things: temperature and humidity.
Temperature
Temperature determines the speed of an embryo’s development, whether it develops at all, and can kill developing embryos if it’s incorrect.
If your temperature is too low, but still high enough to start development, this will cause issues. If it’s just a little too low, it will cause your eggs to hatch later than they should, because it wasn’t high enough for the embryo to develop at a normal rate. If it’s just high enough to start development, but not high enough for normal development to occur, malformations of the embryo will occur, and the embryo likely won’t make it to hatch. If the temperature drops too low entirely, the embryos will get cold and die.
Temperature too high causes similar issues. If it is just a little too high, your embryos will develop a little too fast, and will hatch early. It could also cause your babies to grow too big for their shells, which means they may be unable to properly zip and turn to hatch. Higher than that, and malformations will occur. If your incubator gets too hot, and hits 104 degrees for a long enough time that the inside of the egg also heats up to 104, the embryos will unfortunately be killed.
Now that we've covered why temperature is so important, let's talk about what it should be. This will actually depend on the type of incubator you're using. If your incubator is forced air, meaning it has a fan in it that is blowing the air around to keep the temperature equalized throughout the incubator, you will want your temperature to be 99.5 degrees Fahrenheit/37.5 degrees Celsius. If your incubator is still air, meaning it does not have a fan, you want your temperature to be 101.5 degrees Fahrenheit/38.6 degrees Celsius measured at the top of the eggs.
How to Measure Temperature
Now that you know why temperature is important and what the temperature should be, how do you make sure it's correct? You'll need some thermometers, of course! Even if your incubator has a built in digital temperature control, you will want to check it against accurate thermometers, because it could be wrong, and the displays on some of the cheaper digital incubators are often off.
The best thermometers to use for checking the temperature of your incubator are the digital ones made for reptiles that have a probe that can be placed in the incubator, and aquarium thermometers. The reason that these are the best is because they are usually accurate and they are easy to calibrate to check for accuracy.

Calibrating Your Thermometer
Before you trust that your thermometer is accurate, you will want to calibrate it. Since, as we discussed before, even the temperature being just a little bit off will affect your eggs, it's best to make sure your thermometer is reading correctly, and if not, to know how to adjust for how off it is.
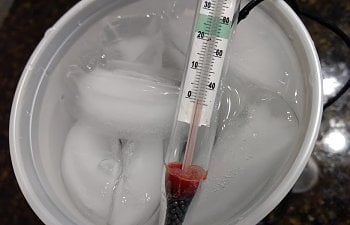
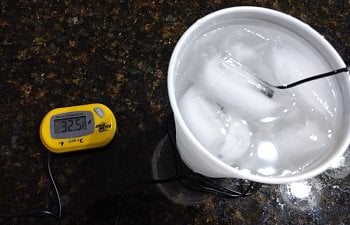
To calibrate your thermometer, fill a glass with ice and leave it out to melt until the glass is half water and half ice. Put your thermometer in the glass, give it a couple minutes to get to temperature, and check it. It should read 32 degrees Fahrenheit. If it does, great! Your thermometer is accurate and you can use it to set the temperature in your incubator.
If it's not right, not to worry, you can still use it. A little math is in order. First, you need to find out how off it is. For example, if it says 33 degrees instead of 32, you know it's reading one degree higher than the temperature actually is. Therefore, when you put it in your incubator, you want it to read one degree higher than the temperature your incubator is supposed to be set at. So in a forced air incubator, you would want it to read 100.5 instead of 99.5, because when it is reading 100.5 degrees, it means the actual temperature in the incubator is 99.5 degrees.
The same is true if it were reading low, so for instance if the thermometer reads 31 degrees instead of 32. In this case, you would want it to read one degree lower than the temperature you need your incubator to be, for the same reasons as above.

Humidity
The next very important component of incubation is humidity. The humidity in your incubator determines how much moisture an egg loses over incubation. This is a critical factor in whether an egg will hatch. If it loses too much moisture, the internal membrane can become tight around the chick, which is known as shrink wrapping. The chick is unable to move and thus it cannot hatch and will die. If an egg doesn't lose enough moisture, the chick can try to internally pip and drown due to the excess liquid in the egg. Incorrect humidity is one of the most common causes for death late in incubation.
So how do you make sure an egg is losing enough moisture? The most common way is to monitor the air cells. As the egg loses moisture, the air cell grows in size. Each week it should get a little bigger until it's time to put the egg into 'lockdown' for hatching. Below are some charts that shows how big the air should be each week and on the last day before lockdown.

Candle on the days listed on these charts and compare your eggs' air cells to the size of the ones on the charts. If they are the same size or very close, your humidity is correct. If your air cells are too large, it means your humidity has been too low, and you need to increase it. If they are too small, then your humidity has been too high, and you need to decrease it.
Weighing Your Eggs
Another, more accurate, way to track the moisture loss of an egg is to weigh it. This method is very exact and will tell you definitively if your eggs are losing the proper amount of moisture. I always weigh my more sensitive eggs like goose eggs and peafowl eggs to make sure they are losing the proper amount of moisture. It's also a good idea to weigh your eggs for your first time incubating because it will show you what you need your humidity to be with no guesswork involved. Once you know that, you could go by the air cells in the future if you prefer, but to start with weighing your eggs will allow you to calculate what is the best humidity for incubating for your location, climate, and incubator.
To weigh your eggs to track moisture loss, you will first need a base weight. Right before putting your eggs in the incubator, weigh them using a kitchen scale and write it down. I will actually write the weights right on the eggs with a sharpie pen; no way to lose the weights like you could if you misplace the piece of paper you wrote them down on, and it doesn't hurt the eggs to do this.
This weight is your base weight. An egg needs to lose 11 to 13 percent of its weight by the time it enters lockdown. Shooting for 12% is what I like to do since it's right in the middle. In that case, the formula for determining how much weight an egg should lose is the egg's weight multiplied by .12. So if a chicken egg for example weighed 100 grams, it should lose 12 grams by day 18, when it's time for lockdown. If you weigh the egg every six days to track moisture loss, that means that each time you weigh it, it should lose 4 grams. Or, if you want to weigh daily, that means it should lose roughly .67 grams each day for 18 days, which totals up to 12 grams on day 18. Weighing daily is not necessary, but you could do it if you wanted.

Bantam eggs with weights marked on them
If your eggs are not losing the correct amount of weight, you know you need to adjust humidity. If they lose too much weight, that means they are losing too much moisture and your humidity is too low and needs to be raised. If they are losing too little weight, it means they are losing too little moisture and your humidity needs to be lowered.
So What Should the Humidity Be?
You may notice that no numbers or percents were mentioned in the above explanations. That's because there are no set numbers for what humidity should be. Simply put, humidity is hugely variable and what percent you should have it at in your incubator depends upon where you are located, your local climate, and even your incubator. There's just no way to say for sure what you should keep your humidity at during the first stage of incubation (lockdown is a little different, and that will be discussed later). For the first stage of incubation, which would be the first 18 days for chicks and the first 25 days for ducklings, geese, turkeys, etc, you're just going to have to find out what will work best for you using the methods described above.
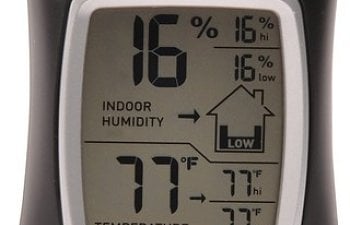
However, you will want to be monitoring what percent your humidity is at so you can know when it rises and when it lowers, and so that after getting the best humidity for yourself figured out you can just set it to that in your incubator going forward. To measure humidity, a hygrometer must be used. The best hygrometer I have found is a digital one by AcuRite, as pictured below.

Adjusting Humidity
It's very likely that as you're getting started with incubating, you're going to need to make adjustments to the humidity in your incubator, and you will definitely need to make adjustments for lockdown. Well, how do you do that? If it's too low, how do you get it to rise? If it's too high, how do you lower it?
The answer is simple: adjust the surface area of the water. Humidity is determined by how much surface area of water there is in an incubator, not the amount of water. For example, one incubator has a big jug of water in it that holds a quart of water. The opening of the jug is 3 inches square. A second incubator has a damp paper towel on the bottom that only holds one cup of water. The paper towel covers 10 square inches of the incubator. Even though the first incubator has more water in it, the second incubator will have a higher humidity.
Most incubators have water troughs built in that you can add water to for controlling humidity. If you add water to the troughs and you find it's not getting high enough, which can definitely be a concern during lockdown, you can add baby food jars or mason jars full of water with paper towels or sponges sticking out of them to wick water up and add even more surface area. Or just place a damp sponge or paper towel in the incubator (not touching the eggs).
If you add water to your troughs and the humidity is too high, then you can instead just add a folded up damp paper towel and fold it smaller until the surface area is small enough that the humidity is where you need it to be.
Or, if you are in a humid climate or your humidity just naturally stays high enough as is, you may not need to add any water at all for the first stage of incubation, which is referred to as dry hatching. However, dry hatching doesn't mean you never add water. You can see this thread for more details about that. If dry hatching is not appropriate for your area, then you will need to add water.
Calibrating Your Hygrometer
In order to make sure your hygrometer is reading correctly, you will want to calibrate it. This is easy to do via the "salt test". Take a teaspoon of salt and put it in a bottle cap or a small cup and add a few drops of water to dampen it. Take this and your hygrometer and put them inside a sealable see-through container. A Ziploc bag can work as long as it seals well. Let it sit for six hours and then check what the reading on your hygrometer is. The hygrometer should read 75%. If it doesn't, you'll know it's off, how much it's off, and you can calculate what the real humidity is by how off it is.
Setting Up The Incubator
So, now you know what the temperature should be in your incubator, you have a calibrated thermometer to measure it, and you know how to adjust humidity as needed. It's time to get your incubator set up.
Start by setting it to the proper temperature and letting it run for at least 24 hours before putting your eggs in. If you have an automatic turner that sits inside the incubator, make sure that it is running too, because the little motors on those do actually put out a little heat, and it will affect the temperature in the incubator. Even though you will not yet know what humidity is going to work best, it's good to start by setting it to 30 or 40 percent to begin with, and you can adjust as necessary from there.
You may want to add some heat sinks too. A heat sink is something that will hold heat, and in the case of the power going out or an incubator failure, it will release that heat back into the incubator and give you time to fix the problem. They can also help hold the temperature steady if your incubator is fluctuating in temperature a lot. A heat sink can be as simple as a bottle of water or some river rocks.
Once you have gotten this all set up and your incubator has been holding temperature for 24 hours, it's time to add the eggs.
The First Stage of Incubation
The first stage of incubation is the part that comes before lockdown, when you are still turning the eggs. The length of this time varies from species to species. For example, for chickens it is the first 18 days, but for ducks it is the first 25. During this stage of incubation, there are several things you'll need to do, such as turning the eggs and candling them.
Calculating the Hatch Date
The very first thing you should do, before anything else, is calculate when your eggs will be due to hatch. For example, chicken eggs hatch in 21 days. However, it's not as simple as counting days out on the calendar. To illustrate, if you set chicken eggs on the 1st of the month, they would hatch on the 22nd. Why not the 21st? Wouldn't that be 21 days later? Actually, it wouldn't. We don't count days from when the egg went into the incubator, but rather how many days they have been in there. For example, you put your eggs in at 10 am on a Monday. They haven't been in for a whole day until Tuesday at 10 am.
So take the day you put your eggs in and add however many days it takes the species you're setting to hatch to that day. That date is your hatch date. So, to revisit the earlier example with chicken eggs, setting on the 1st, we count 21 days out from the 1st and get a hatch date of the 22nd.
If you're still having a little trouble, go and get a calendar. Put your finger on the date that you're setting your eggs. Slide your finger to the next date. That's one. Slide to the day after that and that's two. Repeat for however many days the species you are hatching takes to hatch. Something else that may help to know is that species that take 21 and 28 days to hatch always hatch on the same day of the week they were set. If you set the eggs on a Sunday, they will hatch on a Sunday, etc.
Turning the Eggs
During incubation, eggs need to be turned. Turning prevents the developing embryos from sticking to the side of the egg and developing malformations due to becoming stuck. It also helps foster the growth of the chorio-allantoic membrane, which delivers oxygen to the growing embryo.
If your incubator has an auto-turner, you are probably good to go. It will turn the eggs for you and you won't have to worry about a thing. Most turners require that the eggs be placed in vertically. It is very important that you set the eggs in with the air cell up, not down. This way the chick will get into the proper orientation for hatching. Failing to put the air cell end up can lead to the chick being malpositioned at hatch.
If you don't have an auto-turner, you will need to turn your eggs by hand. It is best to turn them at least three times and day, and more is always better. Always try to turn them an odd number of times, so that they spend the longest period without turning each day on the opposite side. This time will probably be when you are sleeping, but could also be when you go to work, etc. Just try to make sure the egg ends up on its opposite side each day for these time periods.
And as was said, the more you can turn them, the better! Scientists have found that broody hens turn their eggs about 96 times each day, and interestingly a study found that 96 times per 24 hour period seems to be the optimum amount of turning. While you probably won't be able to match a hen in that regard, turning at least three times is necessary and as often as you can other than that is good too.
Once your eggs enter lockdown, you will cease turning them, but until then, turn them every day.
Candling
Candling your eggs can be the most exciting part of incubation. Candling will allow you to see the embryos grow and develop. Aside from it being amazing to candle the eggs and witness the embryos grow, candling also serves a practical purpose too. You will want to know whether your eggs are developing, and whether they are still alive or have unfortunately quit and died.
To begin with, a small bright flashlight will work for most eggs. The more lumens, the better. You could also build a candler or purchase one from sellers such as Brinsea. Purchased candlers can be helpful to see into dark eggs like marans eggs or green and blue eggs.
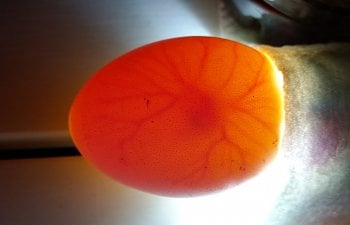
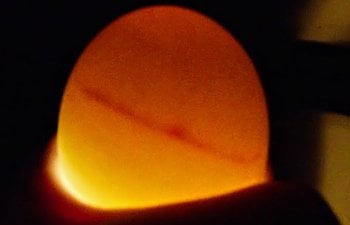
To candle, take your egg into a dark room and hold your light source up to it. It's easiest to see into the egg if you candle through the air cell. A developing embryo will look like a small red blob surrounded by a spiderweb of veins.

A developing chicken embryo on day 4 of incubation
As the embryo develops, it will get larger and take up more and more of the egg. Right before lockdown, the egg will look mostly black with only a little visible veining at the edge of the air cell. If you would like to see candling pictures of chicken embryos at each day of incubation, you can look at this article. Metzer Farms has an excellent candling chart for ducks here.
However, candling may also show you that your egg unfortunately has died, or never started to develop to begin with. By day ten at the latest, barring very dark eggs that are hard to see in, you should be able to see veining and development in the egg. If you can't, it means that the egg was infertile, or that it was too old for incubation, or possibly that it was damaged too much to develop, which often happens with shipped eggs.
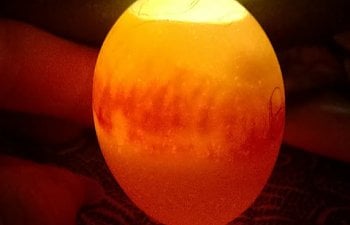
You may also see what looks like a red ring around the egg. This knows as a blood ring, and it means that the egg has died. When it died, the developing veins disintegrated, and the blood settled in a ring around the egg.
If your egg was further along in development when it died, you may see instead a ring of disconnected blood vessels along the center of the egg.

If your eggs quit later in development, instead of seeing a blood ring, you will instead see a black shape that was the embryo, but no more veins. The veins will disintegrate. Pictures of what this will look like can be seen here.
An egg that quits may also start to feel like the contents are sloshing around inside it. So that may be another clue that an egg has gone bad.
If any of your eggs do quit during incubation, remove them and discard them immediately. The rotting eggs could actually end up exploding and creating a horrible mess for you to deal with, not to mention the smell.
Ventilation
One other thing to keep in mind is ventilation. Developing embryos need oxygen, so it's important that your incubator have a few vents. Any incubator you buy should already have vents, but if you're making your own you'll want to be sure to include some. Make sure your vents are open and not blocked off so that fresh air and oxygen can get into the incubator. At the same time, try to make sure you don't have so much ventilation that you can't keep the temperature steady or that you can't keep the humidity where it needs to be. One or two small vents should be all you need.
Sniff Testing Eggs
Generally you will know if an egg has gone bad long before it starts to smell thanks to candling. But, if you have very dark eggs that you cannot candle or cannot see in well, you might not be sure if an egg has died. That's where the sniff test comes in. A bad egg will start to smell. If you're not sure about your eggs, give them a sniff. If they smell, pitch them out. If they don't smell, you can leave them in longer.
Bad eggs may also start to leak, or if the gases inside from decomposition build up enough, it could crack open inside of exploding. If you see either of these things, the egg needs to be removed and thrown out.
Shipped Eggs
If your eggs are shipped, you may have to do things a little differently. To begin with, it is best to allow eggs to rest for a full 24 hours after shipping to allow their contents to settle.
Shipping eggs can cause damage to the air cells, or even cause them to detach completely. The air cells may come down the sides of the eggs, which is known as saddling. You will be able to tell upon candling whether an air cell is saddled or detached. Saddled air cells will clearly come down the sides of the eggs. A detached air cell will roll all over when you tilt the egg around, like the bubble in a level.
Eggs with saddled air cells don't require handling all that different from regular eggs. They can still be placed in a turner as usual. You will want to track their moisture loss through weighing, since with the damaged air cell you can't reliably watch its growth to make sure they are losing the proper amount of moisture.
Detached air cells are a bit different. Since they roll around and aren't held in place, it is best to not use an auto-turner for these and instead to hand turn. You will want to place them vertically so that the air cell is staying as close as possible to its natural position, and only tilt the egg very slightly from side to side when turning. To do this, you could place the eggs in an egg carton (no lid) and just gently tilt them back and forth in the carton. If the eggs make it to day ten of incubation, the chorio-allantoic membrane should have grown enough to pin the air cell back in place, at which point it will no longer move freely about the egg.
However, shipping is hard on eggs, and damage to the air cell is indicative that they had a rough journey. Even if you do everything perfectly, these eggs may be too damaged to hatch. For shipped eggs, a 50% hatch rate is considered good.
Lockdown
You've finally reached the end of the first stage of incubation and you're ready for lockdown. Lockdown is when you stop turning your eggs and increase the humidity in your incubator in preparation for the eggs to hatch.
Before you can do that, you'll need to know when you should lock down your eggs, and this will vary based on species. You can see the chart below for when you should put your eggs in lockdown.

Increasing the Humidity
Increasing humidity is an important part of lockdown. The chicks will need the higher humidity when they start to pip and zip, so that the internal membrane of the egg doesn't dry up and stick to them, resulting in them getting stuck.
You will want to boost your humidity to 65 or 70 percent. As the chicks start pipping, the moisture released from the egg may increase the humidity further, and that is fine.
Removing the Turner and Positioning the Eggs
If you have an auto-turner that sits inside your incubator, now is when you will want to take it out, to keep chicks from getting caught in it. Keep in mind that if the motor was giving off heat, you may need to adjust your temperature a little to compensate.
You will also want to get your eggs positioned for hatch. Do one last candling of your eggs to assess air cell size and check that they are still alive, and look for the lowest point on the air cell. You may even see that the eggs have drawn down, which is when the chick gets into the final position for hatching and the air cell comes further down the side of the egg:
Picture by @WVduckchick
Whether you see that the air cell has drawn down or not, lay the eggs on their sides and position the lowest part of the air cell at the top of the egg. Having the lowest part of the air cell at the top isn't crucial, but that is where the chick will most likely pip, so it's nice to have that at the top of the egg so you can monitor the pips.
If you'd like, you can also lay down some shelf liner in the bottom of your incubator to lay the eggs on. The shelf liner provides a good grip for newly hatched chicks, helping prevent splayed legs, and also makes clean up a snap.
The Waiting Game
Your turner has been removed if you had one, the eggs are properly positioned on their sides, and you've raised the humidity. What now?
You wait. That's all that's left to do. Monitor the temperature and humidity and wait for hatch day to come.
A Note About Opening the Incubator
You may have heard around that you should never ever under any circumstances open your incubator during lockdown or your hatch will be a total bust and all your chicks will die. This is completely, totally false.
Opening the incubator will not instantly ruin your hatch and kill your chicks. While you shouldn't be opening the incubator willy-nilly or for no reason at all, if you have a good reason to, like an injured chick or the humidity has gotten too low and the troughs need to be refilled with water, or to remove chicks to the brooder, then by all means open it. Just make sure that the humidity goes back up quickly afterwards. To facilitate this, you can place a warm wet paper towel in the incubator after you close it. And try to be quick when opening the incubator for any reason.
The only thing opening the incubator may cause is the chicks getting stuck in the eggs because the membrane dried to them. While this is best avoided, it is not fatal if proper help is given to the chick, and there's very little chance of this happening if you open the incubator quickly and get the humidity right back up afterwards.
And until your chicks actually externally pip, there isn't even a danger of the above happening, so if you need to add water or make other adjustments before you have external pips, feel free to do so.
Hatch Day
The big day has finally arrived! Your calendar says your eggs are due to hatch today. Take some time you get your brooder set up if you haven't already done so, and make sure you have chick feed on hand, because you'll be needing it soon.
At this point, your job is pretty much just to watch and wait. Soon, if they haven't already, your chicks will start to externally pip.

Then, they will rest and continue to absorb the blood and yolk. Once that is done, they will start to zip, cracking through the shell in a circle around the top.

Finally, the chick will push free of the shell.

Congratulations! You have successfully hatched an egg. Now wait for the rest to hatch and give the chicks time to fluff up. You can leave them in the incubator for a day or two to wait for the rest of the eggs to hatch and give them a chance to fluff up, and then you can move them to your brooder.
For more information about caring for your newly hatch chicks, you can read this article.
Hatching Issues
Sometimes things go wrong during the hatch; this next section talks about a few of the most common things that can happen.
I Think My Chick Needs Help to Hatch!
Sometimes, due to errors in incubation, eggs being shipped, or malpositions, chicks need a little help to hatch out. Before you attempt an assisted hatch, please read the Guide to Assisted Hatching for All Poultry.
My Eggs Are Late!
Firstly, are you sure they're late? Make sure you calculated the hatch date correctly. Many times people think it's hatch day, but really the eggs aren't due until the next day.
If you're sure it's the correct hatch day, was your temperature correct? Was it 99.5 F for a forced air incubator or 101.5 F for a still air? And was your thermometer calibrated to make sure it was reading accurately?
If your eggs are late, the chances are your temperature was too low. Give them some time and they will hopefully still hatch, just a little late.
My Eggs are Hatching Early!
Again, are you sure you have the hatch date calculated correctly? Was your temperature a little too high? High temperatures will cause eggs to hatch early. Or, are you incubating a small bantam breed? Bantams often hatch early, and that is totally normal.
My Hatch is Finished, But I Didn't Get a Lot of Chicks...
Your hatch has wrapped up and you didn't get a very good hatch rate. If your eggs are shipped, this is pretty much to be expected - generally you're lucky if 50% of shipped eggs hatch for you. For other reasons your eggs may not have hatched, you can see this article, or you can do an eggtopsy on your eggs and see what went wrong inside them.
Further Reading
Here are some resources for hatching specific types of poultry. For geese, you can see this excellent guide. For incubating peafowl eggs, you can see this thread. If you'd like to see pictures of how to candle coturnix quail eggs, see this thread. For tips on incubating and brooding button quail, this thread is a good read.
And of course, you can always check out the Incubating and Hatching Eggs section of the forums and browse or post your own thread, too.