Hello BYC community!
First time chicken and duck owner and first time coop builder.
I did a lot of research on Pinterest and Google before building my coop (apparently not enough, I don't know why I didn't find BYC sooner.)
I think I have some good design functionality in my coop, but I'm sure I did some stuff wrong too (so please be kind with your feedback). Regardless, I wanted to share my coop with you.
I had some general sketches and ideas when I started, but made some major design improvements/changes along the way. I have never built anything of this scale before, so I had a lot of fun learning while doing.
Lastly, I currently have the crazy idea of doing a Kickstarter project to help me buy a new computer so I can go back and create detailed 2D/3D plans and drawings of my coop to share with other people who want to build their own coop like mine. (My 2009 MacBook is about to die)
I'm going to do my best to show pictures I took along the way, and try to explain what I was thinking when I made the design choices I did. I will also offer some ideas I had on how to do it better next time.
If you like my coop, and think you would be willing to help me create detailed plans and materials list, please consider supporting my Kickstarter. Here is a link to my draft project, I have not launched it yet. I will update this post when i do. https://www.kickstarter.com/projects/ajvince/697188462?ref=ef0csq&token=d53a5a7e
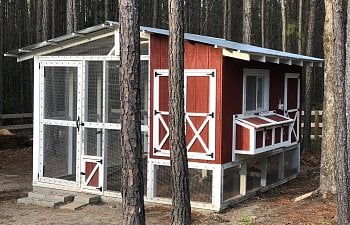
Finished Coop (28 Dec 2019):

How I built it:
Laying out the foundation (12' x 12') using wooden stakes and string. Did my best to get the strings level. Lessons learned: I should have dug the trenches first before staking out the foundation. I also should have had each string on its own two stakes, so the corners would be marked by where strings crossed each other (more precise), instead of the wooden stakes marking each corner (much less precise). Gabby (dog and building inspector) supervised the construction site.
Foundation layout (6 Apr 2019):
My first time working with concrete. I had originally planned on just setting the cinder blocks in the dirt with a little gravel, but my wife's parents just happened to be in town, and we were looking for a project. So after another few trips to Lowe's we had more tools, anchor bolts, foam seal, more gravel, concrete mix, and mortar mix. Tip: Always buy three times as much concrete mix as you think you need.
Initial foundation (14 Apr 2019):

Foundation filled (20 Apr 2019):
Unfortunately I didn't get a picture of just the sole plate (ground contact rated treated wood) down on the footer with the anchor bolts (with a foam moisture barrier in between). Drilling the holes to align with the bolts was tricky and then drilling a larger diameter so I could countersink the nuts and washers. Lesson learned: I should have drilled the larger diameter countersink first, before drilling the hole all the way through for the anchor bolt. My spade drill bit didn't have anything to center on and wanted to "walk" on me because the already drilled anchor bolt hole was too large of a diameter. I don't have any forstner bits, but I think I would have encountered the same problem. Anyways, I figured it out got the sole plate down, and then started to frame out my walls and platform.
One of my original design constraints came from the 1/2" steel mesh I knew I wanted to use. At my local Lowe's it comes in 24" and 36" widths. So, I knew I wanted to make my exterior openings 21" and 33" as often as possible to make the most of the material, limit trimming, and give myself 1.5" of overlap to anchor it to the 2x4s. Lesson learned: I used 1/2" treated plywood for the platform, with 24" spacing on the joists underneath. In my head I was thinking chickens aren't that heavy, but I didn't think about how much I was going to be standing on the platform during construction and into the future when my wife and I clean it out. I should have gone heaver on the plywood and closer spacing on the joists.
Initial Framing (22 Apr 2019):
I used a mix of standard framing lumber and #2 treated wood. Everything that would be exposed to the outside elements is #2 treated, everything inside that the birds would be exposed to is untreated. Like I said above, I have never built something of this scale before. Some day I dream of building my own home, so I wanted to "practice" building the coop in the same way I would build a house (e.g. studs 16" on center, etc.) Disclaimer: I'm not a trained carpenter, I just watch a lot of YouTube. Lesson learned: At some point I realized I needed a support midway on the platform. I initially thought the platform would be rigid enough once the walls were framed out, but it wasn't. I bought a pre-cast concrete footer, made a quick foundation with some gravel, and supported the platform with a 4x4. The windows you see were the cheapest "project" windows Lowe's carried that were screened, sliding, locking, and matched the dimensions I needed.
Where I could have used help: I think I could have used some sort of TyVek vapor barrier house wrap, and water prevention treatments to the window, but those are beyond my expertise. So I just bought the most rugged outdoor rated plywood I could find and hoped that would be good enough.
Framing continued (28 Apr 2019):
Lesson learned: You can see my makeshift worktable and saw horses. I should have made a more substantial and functional workstation/table. I thought the coop was going to take less time to build so I didn't take the time to do it right the first time. I could have been more efficient and more comfortable with a better workstation. Transporting my tools to and from my garage each day/weekend was also a pain.
Same stage of construction from another angle (28 Apr 2019):
This next stage is when I made a major design change to my original plan. I originally intended to make a simple "lean to" style roof. However, my local Lowe's only had steel roofing materials in 8' and 12' lengths. So to give the coop some overhang I was going to have to cut and overlap the roofing anyways. At the same time I also wanted to see if I could do a traditional "open gable" roof with rafters. Because I was building the coop on my own, I came up with little tricks to help me position and secure lumber as I went. For example I put 2x2 along my ridge board to help support each rafter as I went. I probably could have used some steel rafter hangers, but I don't like the way they look. Rafters are spaced 2' apart, not sure if that's to code, but it seemed right for the structure.
Framing and rafters looking North (24 May 2019):
I was also putting up the plywood siding at this time. Cutting it to fit around the windows and hen boxes was a little difficult and required many trips to and from the workbench.
Framing and rafters looking Northeast (24 May 2019):
At this phase I made my next big design decision, and that was what to make the roof out of. I was a little intimidated to try shingles, so I decided to go with 8' corrugated steel. Lesson learned: I used 2"x2" purlins, I could have gone with something wider to be stronger and make the job of screwing down the roof panels easier. 2"x2" did not leave much room for error, and tended to split at the ends. I missed the purlins with the screws only once or twice. I think if my corrugated steel becomes a rusted a mess in a few years, I will tear it off, put some plywood down and do shingles.
Roofing (26 May 2019):
Getting the roof done was a major victory, because now the entire coop, worksite, materials and tools could be protected from the spring rain.
Roofing and siding looking Northwest (26 May 2019):
This next two pictures show two key design features. The first is an accidental benefit from my decision to do the gabled roof instead of the lean to, and that is the 8" gap between the top of the wall and the roof. I turned this gap into a ventilation system, more on that later. The second design feature was splitting the 4' x 12' platform into two areas (4'x8' and 4'x4'). We figured we could use the 4'x4' area for storage or at a future time, expand the living area or have a quarantine area if we needed to separate birds or introduce more birds at a future date. I am not an expert on any of that, but we wanted to have the optional space.
As I said before this was "practice" for some house I plan to build in the future, so I tried my hand at insulation.
Coop insulation (1 Jun 2019):
Coop interior (1 Jun 2019):
Here is a shot of the underside of the roof, showing where the rafters meet the ridge beam, and the 8" gap that will become vents later.
Underside of roof (1 Jun 2019):
Here is a shot of the outside with 90% of the framing and siding complete. I haven't done the smaller doors yet because I haven't done any painting yet. The pedestrian door is hung. I used one of those prefabricated door gate kits from Lowe's that includes hinges and "L" brackets to keep the door square. The hen box lids are just temporarily screwed in place to keep water and crud out.
Framing and siding complete (2 Jun 2019):
Next phase was paint... I had no idea how long it was going to take me to paint. Lesson learned: I should have been painting all along!!!
Paint shopping at Lowe's (2 Jun 2019):

First phase of painting. Unfortunately I didn't get any photos of me cutting the doors and trim. By this time I had learned my lesson and I had pre-painted all the doors and trim, so all I had to do was screw the trim to the doors, screw the hardware/hinges to the trim, and mount the hinges to the trim on the coop. Lesson learned: I should have made better screw and adhesive choices for mounting to the trim to the doors, like I did for the trim to the coop. The trim on the coop used the same 3" decking screws going all the way into the studs. The trim on the doors is screwed with 3/4" deck screws into the plywood of the door. The screws don't have a ton of bite at the tip, and the plywood is much softer than the trim. I should have put a few screws in through the back, so the head would hold the plywood, and the tip would be in the wood of the trim. I could/should have also used an adhesive as additional holding power. Lastly, some bolts all the way through the hinges, trim and plywood would have been smart at key structural locations.
Note: By now it's the middle of June in North Carolina. It was hot and humid!
I was super happy with the classic look of white trim on barn red.
First phase of painting (15 Jun 2019):
First phase of painting looking North (15 Jun 2019):
More painting, more trim, and more doors (4 Jul 2019): <- Happy 4th of July Weekend!
95% done with painting, just some annoying little spots left under the roof (4 Jul 2019):
I remember having a strange feeling at this point. The coop started to look so much like a real "thing" that it was hard to see all the little parts and pieces that made it. When it was still just lumber and plywood I could see all the screw holes and individual pieces of wood that had to be cut, re-cut, and installed. Now it just looked like a single "thing" and I was like, "where did all my work and time go?"
The next phase was covering the exterior in heavy duty 1/2" steel screen. I started in the back, so if I made any mistakes early on, I could learn in the back, so by the time I got to the front, I was a pro. I used the same deck screws I had been using but I put 1/4 x 1 washers on them. The washers came in boxes of 100. I think i used 6 or 7 boxes...
Screen:
Washers:
Starting screening (10 Aug 2019):
More screening looking East and you can see my three vents (13 Aug 2019):
Screening complete (13 Aug 2019):
Coop is almost ready, the wife and I decide it is time to get some birds! (21 Aug 2019):
Back to the coop, I made a hinged retractable roosting bar device. I also put down linoleum on the floor to make clean up easier. Lesson learned: I should have put a piece of trim around the bottom edge of the wall to keep stuff from going into the crack between the bottom of the wall and where the linoleum ends.
Coop interior, roost down (7 Sep 2019):
Coop interior, roost up for cleaning (7 Sep 2019):
Birds are getting bigger, and outgrowing their brooder bins in the garage. This is pepper (spoiler alert: SHE turned out to be a HE!) We should have been suspicious. Pepper was much more outgoing and precocious than the other chicks. S/he was the first one to try and get out.
Pepper (7 Sep 2019):
Back to the coop... Here is a photo of the 4'x4' storage area. We keep all of our cleaning supplies, food, pine shavings, etc. in here.
Storage area (7 Sep 2019):
My wife and I live out in the woods of North Carolina. If you combine our property with all of our closets neighbors property, there is about 100 acres of woods around us. Lots of predators to worry about. We know we needed a barrier to keep animals from digging under the foundation, I had been procrastinating up to this point, because I knew how many roots we were going to have to dig through and it still feels like summer.
Buried predator barrier, all four sides (14 Sep 2019):
Now that the coop was totally secure, we started bringing the birds out in their brooder bins to let them play in the chicken run area.
The birds enjoying their new home (14-15 Sep 2019):
(Yes, that is Pepper on the far right giving the camera his best "blue steel" look)
That pretty much completes the major phases of construction. I've added additional photos below so you can see the coop from different angles with the doors open and closed.
We have made minor tweaks to make the coop more user friendly. We used to have to put the ducks away every night, we thought maybe the ramp was too steep. Then one day I was working in the yard and I saw them walk up and down the ramp several times. Those fakers.
Our major breakthrough just this past week is they started putting themselves to bed at night. The chickens ever since they were very young, have been good about putting themselves to bed at sunset.
We started getting eggs right at 16 weeks. At the time of this posting, we are averaging 6-7 eggs a day.
2nd egg (20 Dec 2019): - My wife has the picture of the 1st egg on her phone...
You will see we are doing a deep litter of pine needles in the run area. I made steps going into the pedestrian and bird doors. We added a heat lamp for the cold nights. I also put a hand sanitizer dispenser next to the storage area for dirty hands. Right now I have an exterior grade extension cord running from our well to the coop. I do not consider myself an electrician, so maybe when my dad comes out next month he can help me run some conduit and install a junction box on the coop.
Last but not least, I dug the ducks a duck pond over Christmas break. I'll post the details of that in a different article.
More coop photos (28 Dec 2019):
First time chicken and duck owner and first time coop builder.
I did a lot of research on Pinterest and Google before building my coop (apparently not enough, I don't know why I didn't find BYC sooner.)
I think I have some good design functionality in my coop, but I'm sure I did some stuff wrong too (so please be kind with your feedback). Regardless, I wanted to share my coop with you.
I had some general sketches and ideas when I started, but made some major design improvements/changes along the way. I have never built anything of this scale before, so I had a lot of fun learning while doing.
Lastly, I currently have the crazy idea of doing a Kickstarter project to help me buy a new computer so I can go back and create detailed 2D/3D plans and drawings of my coop to share with other people who want to build their own coop like mine. (My 2009 MacBook is about to die)
I'm going to do my best to show pictures I took along the way, and try to explain what I was thinking when I made the design choices I did. I will also offer some ideas I had on how to do it better next time.
If you like my coop, and think you would be willing to help me create detailed plans and materials list, please consider supporting my Kickstarter. Here is a link to my draft project, I have not launched it yet. I will update this post when i do. https://www.kickstarter.com/projects/ajvince/697188462?ref=ef0csq&token=d53a5a7e
Finished Coop (28 Dec 2019):
How I built it:
Laying out the foundation (12' x 12') using wooden stakes and string. Did my best to get the strings level. Lessons learned: I should have dug the trenches first before staking out the foundation. I also should have had each string on its own two stakes, so the corners would be marked by where strings crossed each other (more precise), instead of the wooden stakes marking each corner (much less precise). Gabby (dog and building inspector) supervised the construction site.
Foundation layout (6 Apr 2019):
My first time working with concrete. I had originally planned on just setting the cinder blocks in the dirt with a little gravel, but my wife's parents just happened to be in town, and we were looking for a project. So after another few trips to Lowe's we had more tools, anchor bolts, foam seal, more gravel, concrete mix, and mortar mix. Tip: Always buy three times as much concrete mix as you think you need.
Initial foundation (14 Apr 2019):
Foundation filled (20 Apr 2019):
Unfortunately I didn't get a picture of just the sole plate (ground contact rated treated wood) down on the footer with the anchor bolts (with a foam moisture barrier in between). Drilling the holes to align with the bolts was tricky and then drilling a larger diameter so I could countersink the nuts and washers. Lesson learned: I should have drilled the larger diameter countersink first, before drilling the hole all the way through for the anchor bolt. My spade drill bit didn't have anything to center on and wanted to "walk" on me because the already drilled anchor bolt hole was too large of a diameter. I don't have any forstner bits, but I think I would have encountered the same problem. Anyways, I figured it out got the sole plate down, and then started to frame out my walls and platform.
One of my original design constraints came from the 1/2" steel mesh I knew I wanted to use. At my local Lowe's it comes in 24" and 36" widths. So, I knew I wanted to make my exterior openings 21" and 33" as often as possible to make the most of the material, limit trimming, and give myself 1.5" of overlap to anchor it to the 2x4s. Lesson learned: I used 1/2" treated plywood for the platform, with 24" spacing on the joists underneath. In my head I was thinking chickens aren't that heavy, but I didn't think about how much I was going to be standing on the platform during construction and into the future when my wife and I clean it out. I should have gone heaver on the plywood and closer spacing on the joists.
Initial Framing (22 Apr 2019):
I used a mix of standard framing lumber and #2 treated wood. Everything that would be exposed to the outside elements is #2 treated, everything inside that the birds would be exposed to is untreated. Like I said above, I have never built something of this scale before. Some day I dream of building my own home, so I wanted to "practice" building the coop in the same way I would build a house (e.g. studs 16" on center, etc.) Disclaimer: I'm not a trained carpenter, I just watch a lot of YouTube. Lesson learned: At some point I realized I needed a support midway on the platform. I initially thought the platform would be rigid enough once the walls were framed out, but it wasn't. I bought a pre-cast concrete footer, made a quick foundation with some gravel, and supported the platform with a 4x4. The windows you see were the cheapest "project" windows Lowe's carried that were screened, sliding, locking, and matched the dimensions I needed.
Where I could have used help: I think I could have used some sort of TyVek vapor barrier house wrap, and water prevention treatments to the window, but those are beyond my expertise. So I just bought the most rugged outdoor rated plywood I could find and hoped that would be good enough.
Framing continued (28 Apr 2019):
Lesson learned: You can see my makeshift worktable and saw horses. I should have made a more substantial and functional workstation/table. I thought the coop was going to take less time to build so I didn't take the time to do it right the first time. I could have been more efficient and more comfortable with a better workstation. Transporting my tools to and from my garage each day/weekend was also a pain.
Same stage of construction from another angle (28 Apr 2019):
This next stage is when I made a major design change to my original plan. I originally intended to make a simple "lean to" style roof. However, my local Lowe's only had steel roofing materials in 8' and 12' lengths. So to give the coop some overhang I was going to have to cut and overlap the roofing anyways. At the same time I also wanted to see if I could do a traditional "open gable" roof with rafters. Because I was building the coop on my own, I came up with little tricks to help me position and secure lumber as I went. For example I put 2x2 along my ridge board to help support each rafter as I went. I probably could have used some steel rafter hangers, but I don't like the way they look. Rafters are spaced 2' apart, not sure if that's to code, but it seemed right for the structure.
Framing and rafters looking North (24 May 2019):
I was also putting up the plywood siding at this time. Cutting it to fit around the windows and hen boxes was a little difficult and required many trips to and from the workbench.
Framing and rafters looking Northeast (24 May 2019):
At this phase I made my next big design decision, and that was what to make the roof out of. I was a little intimidated to try shingles, so I decided to go with 8' corrugated steel. Lesson learned: I used 2"x2" purlins, I could have gone with something wider to be stronger and make the job of screwing down the roof panels easier. 2"x2" did not leave much room for error, and tended to split at the ends. I missed the purlins with the screws only once or twice. I think if my corrugated steel becomes a rusted a mess in a few years, I will tear it off, put some plywood down and do shingles.
Roofing (26 May 2019):
Getting the roof done was a major victory, because now the entire coop, worksite, materials and tools could be protected from the spring rain.
Roofing and siding looking Northwest (26 May 2019):
This next two pictures show two key design features. The first is an accidental benefit from my decision to do the gabled roof instead of the lean to, and that is the 8" gap between the top of the wall and the roof. I turned this gap into a ventilation system, more on that later. The second design feature was splitting the 4' x 12' platform into two areas (4'x8' and 4'x4'). We figured we could use the 4'x4' area for storage or at a future time, expand the living area or have a quarantine area if we needed to separate birds or introduce more birds at a future date. I am not an expert on any of that, but we wanted to have the optional space.
As I said before this was "practice" for some house I plan to build in the future, so I tried my hand at insulation.
Coop insulation (1 Jun 2019):
Coop interior (1 Jun 2019):
Here is a shot of the underside of the roof, showing where the rafters meet the ridge beam, and the 8" gap that will become vents later.
Underside of roof (1 Jun 2019):
Here is a shot of the outside with 90% of the framing and siding complete. I haven't done the smaller doors yet because I haven't done any painting yet. The pedestrian door is hung. I used one of those prefabricated door gate kits from Lowe's that includes hinges and "L" brackets to keep the door square. The hen box lids are just temporarily screwed in place to keep water and crud out.
Framing and siding complete (2 Jun 2019):
Next phase was paint... I had no idea how long it was going to take me to paint. Lesson learned: I should have been painting all along!!!
Paint shopping at Lowe's (2 Jun 2019):

First phase of painting. Unfortunately I didn't get any photos of me cutting the doors and trim. By this time I had learned my lesson and I had pre-painted all the doors and trim, so all I had to do was screw the trim to the doors, screw the hardware/hinges to the trim, and mount the hinges to the trim on the coop. Lesson learned: I should have made better screw and adhesive choices for mounting to the trim to the doors, like I did for the trim to the coop. The trim on the coop used the same 3" decking screws going all the way into the studs. The trim on the doors is screwed with 3/4" deck screws into the plywood of the door. The screws don't have a ton of bite at the tip, and the plywood is much softer than the trim. I should have put a few screws in through the back, so the head would hold the plywood, and the tip would be in the wood of the trim. I could/should have also used an adhesive as additional holding power. Lastly, some bolts all the way through the hinges, trim and plywood would have been smart at key structural locations.
Note: By now it's the middle of June in North Carolina. It was hot and humid!
I was super happy with the classic look of white trim on barn red.
First phase of painting (15 Jun 2019):
First phase of painting looking North (15 Jun 2019):
More painting, more trim, and more doors (4 Jul 2019): <- Happy 4th of July Weekend!
95% done with painting, just some annoying little spots left under the roof (4 Jul 2019):
I remember having a strange feeling at this point. The coop started to look so much like a real "thing" that it was hard to see all the little parts and pieces that made it. When it was still just lumber and plywood I could see all the screw holes and individual pieces of wood that had to be cut, re-cut, and installed. Now it just looked like a single "thing" and I was like, "where did all my work and time go?"
The next phase was covering the exterior in heavy duty 1/2" steel screen. I started in the back, so if I made any mistakes early on, I could learn in the back, so by the time I got to the front, I was a pro. I used the same deck screws I had been using but I put 1/4 x 1 washers on them. The washers came in boxes of 100. I think i used 6 or 7 boxes...
Screen:

Washers:

Starting screening (10 Aug 2019):
More screening looking East and you can see my three vents (13 Aug 2019):
Screening complete (13 Aug 2019):
Coop is almost ready, the wife and I decide it is time to get some birds! (21 Aug 2019):


Back to the coop, I made a hinged retractable roosting bar device. I also put down linoleum on the floor to make clean up easier. Lesson learned: I should have put a piece of trim around the bottom edge of the wall to keep stuff from going into the crack between the bottom of the wall and where the linoleum ends.
Coop interior, roost down (7 Sep 2019):

Coop interior, roost up for cleaning (7 Sep 2019):

Birds are getting bigger, and outgrowing their brooder bins in the garage. This is pepper (spoiler alert: SHE turned out to be a HE!) We should have been suspicious. Pepper was much more outgoing and precocious than the other chicks. S/he was the first one to try and get out.
Pepper (7 Sep 2019):

Back to the coop... Here is a photo of the 4'x4' storage area. We keep all of our cleaning supplies, food, pine shavings, etc. in here.
Storage area (7 Sep 2019):
My wife and I live out in the woods of North Carolina. If you combine our property with all of our closets neighbors property, there is about 100 acres of woods around us. Lots of predators to worry about. We know we needed a barrier to keep animals from digging under the foundation, I had been procrastinating up to this point, because I knew how many roots we were going to have to dig through and it still feels like summer.
Buried predator barrier, all four sides (14 Sep 2019):


Now that the coop was totally secure, we started bringing the birds out in their brooder bins to let them play in the chicken run area.
The birds enjoying their new home (14-15 Sep 2019):


(Yes, that is Pepper on the far right giving the camera his best "blue steel" look)
That pretty much completes the major phases of construction. I've added additional photos below so you can see the coop from different angles with the doors open and closed.
We have made minor tweaks to make the coop more user friendly. We used to have to put the ducks away every night, we thought maybe the ramp was too steep. Then one day I was working in the yard and I saw them walk up and down the ramp several times. Those fakers.
Our major breakthrough just this past week is they started putting themselves to bed at night. The chickens ever since they were very young, have been good about putting themselves to bed at sunset.
We started getting eggs right at 16 weeks. At the time of this posting, we are averaging 6-7 eggs a day.
2nd egg (20 Dec 2019): - My wife has the picture of the 1st egg on her phone...

You will see we are doing a deep litter of pine needles in the run area. I made steps going into the pedestrian and bird doors. We added a heat lamp for the cold nights. I also put a hand sanitizer dispenser next to the storage area for dirty hands. Right now I have an exterior grade extension cord running from our well to the coop. I do not consider myself an electrician, so maybe when my dad comes out next month he can help me run some conduit and install a junction box on the coop.
Last but not least, I dug the ducks a duck pond over Christmas break. I'll post the details of that in a different article.
More coop photos (28 Dec 2019):