
Whether you've just hatched your own chicks in your incubator, an ordered batch of chicks from the hatchery has just arrived, or you brought home a box of fuzzy butts of joy from the feed store, if you don't have a broody in your coop to raise them you will need to brood and raise them yourself. This article will lightly touch on all subjects pertaining to brooding chicks yourself, I will leave links for further reading at the bottom of the page.
What is brooding? Technically, brooding is defined as the period from hatching until supplemental heat is no longer needed. And for most people, this means chicks are kept indoors under heat for 3 to 8 weeks depending on breed and time of year you brood. (I will also cover outdoor brooding later.) This is a very critical time for your chicks, they need to be kept warm enough in a temperature-controlled environment, they need a proper diet to grow and thrive and they need to stay healthy to make it to adulthood. Chicks cannot regulate their body temperatures for the first several weeks of life until they have lost all that baby fluff and grow in their adult feathers. They will molt 6 or 7 times before they are coated in adult feathers. They can chill and overheat very easily so it's important for you to create the best possible environment for them to adapt and grow.
Let's get started... The Brooder
Always have your brooder all set up and warmed when chicks are in the incubator or you have just brought them home. They will need to be transferred quickly and easily and you don't want to be fumbling around or running to the store while setting up their new home. What all should you have on hand?
1. A suitable container as a brooder
2. A heat source
3. Thermometer
4. Bedding
5. Waterers and feeders
6. Wire hardware cloth as a topper
7. Light
8. Accessories
9. Chick Starter
The Suitable Container for a Brooder

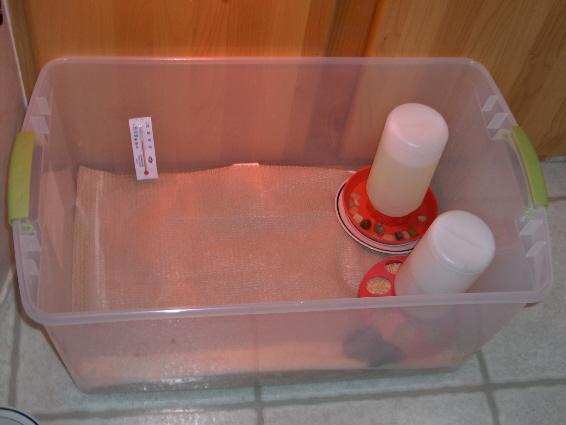
Baby chicks will need about 6 square inches per chick when they are very tiny, however as they grow you will need to expand their space to 1 to 2 foot per chick. As they grow and pecking orders develop, they will need more personal space, your brooder will also stay cleaner if you keep larger spaces in the brooder. Cleanliness is ultra important to keep mortality rates low while allowing for immunity to certain diseases to develop. This container should have 4 walls and a floor and be something you can scrub and clean. If you have used this container in the past for chicks, make sure to thoroughly disinfect it before using it again, you don't want to incubate any disease left behind from past broods. You can use cardboard boxes, plastic totes, livestock tanks are very nice to use, even extra-large wire dog crates make great brooders although you will need to cover the sides to keep out drafts and keep bedding inside. And remember, you can start out with either of these ideas and as the chicks grow, move on to another one of these.
Heat source

Once you have picked out your brooder you will need to decide on a heat source. I will discuss the most commonly used ways to heat and keep your brooder warm, you can make the decision on which one is better for you.
The standard way to brood chicks is with a heat lamp. (NEVER EVER use Food Heating lamps on chicks. The bulbs are Teflon coated and you WILL kill your chicks fast! Teflon is toxic to all birds, so always avoid Food Heat Lamps and use only those approved for Poultry, Reptiles, Human and other small animals!) There are White heat lamps, Red heat lamps, and Infra-Red heat lamps. I will recommend you only use Infra-Red heat lamps on your chicks. White lighting is a very excitable light, it does not allow for a normal sleeping pattern and it has the tendency to sit on the surface and burns hotter. Red coated bulbs are better than regular white but are still white lighting. Infra-Red is used in human applications for arthritis and healing, it heats from the inside of the body out, it's penetrating, improves circulation, relieves inflammation, does not cause excitability and allows for a natural sleeping pattern for chicks. You can start with a 100-watt or a 250-watt bulb which will be raised away from the chicks as they grow, this raising of the bulb will lower the temperature inside the brooder allowing them to adapt to a cooler atmosphere as they molt off their baby fuzz. Make sure to choose a dome with a ceramic socket as plastic can melt and make sure the entire thing is rated for the wattage you are using. If you are using a 250 Watt bulb, make sure it is rated for 250 Watts. It will say on the inside of the dome.
Also, see the Official BYC Poll: What Heat Lamp Setup Do You Use? thread.
MHP or the Momma Heating Pad

This is a different approach to keeping the chicks warm in the brooder as opposed to the traditional way of using a heat lamp, the Momma Heating Pad is a more natural way that simulates a real broody keeping them warm. You are going to basically build them a small cave in the brooder using hardware cloth or some sort of wire fencing, anything you can bend and shape into a small grove-like cave, something that won't collapse if they all pile on top. A heating pad is placed over this wire cave and make sure to use a heating pad that does not have an auto shut off after 2 hours, which many of them do. Purchase a pad that has an over-ride switch so the pad stays on at all times. You will lay a towel over the heating pad and tuck it in under all the edges of the cave so there are no parts for the chicks to get caught in or cut themselves on. This towel will also protect the heating pad from being soiled when chicks get on top. The chicks will huddle inside the cave when they need heat just as they would tuck themselves under momma's fluff and when they feel they are warm enough will venture out and away from the warm cave. This method is as close to brooding with a real broody as possible.
Brooder Plate

If you aren't the builder but want to brood your chicks in the same fashion as the MHP, you can purchase a Brinsea EcoGlow chick brooder. I love these brooders!! These are fabulous for brooding your chicks. They come in a couple of sizes for small or larger amounts of chicks, they are heavy enough they won't tip over. You raise the heater pad up as the chicks grow, these radiant heaters are safe to use and chicks feel as if their broody momma is right there to keep them warm.
Thermometer

Using a thermometer is super important to have when brooding with the Heat Lamp method or using the MHP so you know just how warm it is beneath the lamp or in the cave. (Some heating pads come with a temperature readout which is very handy instead of a thermometer.) When you brood with a heat lamp, you will need to know the exact temperature directly under the heat lamp so you aren't overheating the babies. You aren't interested in what the temperature is in other areas of the brooder as long as the temp under the light or in the cave is the proper temperature. Don't use any old thermometer that may not be accurate, purchase a good thermometer from a brooding catalog or online.
Read more here: Testing the Brooder Temperature/chicks coming this week/few questions~
Bedding

The chicks will need bedding to keep them warm, absorb waste and give them sturdy footing. Pine shavings are the traditional way to go, pine shavings are warm, absorbent, and are easy to clean. They can be purchased at any pet shop or feed store. Grass hay makes for nice bedding, if you keep other livestock, chances are you keep grass hay bales. Grass hay is very warm and poop tends to drop down into the bedding away from the chicks. Grass hay can be purchased at feed stores that focus on larger livestock. Corn Cob bedding is the new thing these days. These are especially nice in brooders as they do a wonderful job at absorbing moisture and trapping odors. Corn Cob absorbs twice as much liquid compared to traditional bedding making it great in helping to prevent Coccidiosis in chicks. You can purchase this stuff at many feed and pet stores.
Raising them on Wire

This is a different approach that many people don't often do, but I started this doing after raising quail which are quite susceptible to contracting Coccidiosis and that is raising chicks on wire. I found that chicks became immune to Cocciosis very quickly with this method and so after learning this with quail I began raising all chicken chicks on wire as well. Basically, it's done with a raised floor using pieces of cut PVC piping as stands and hardware cloth set on top of these pieces of PVC to keep the floor raised an inch or two off the floor of the brooder. (You need to lay newspaper down on the very bottom of the brooder before putting in your PVC pieces and wire on top to make it easier to clean.) Most of the poop falls through the holes of the wire, however, the chicks come in contact with enough of the poop to develop immunity. (You can start with 1/4 inch cloth but after the first week, you will need to move up to 1/2 inch cloth)The drawback to this method is that the wire needs to be cleaned daily so the poop doesn't harden and this may be something you don't want to do, tear down the brooder daily. I don't mind doing it and if you don't either, it is a very sanitary way to raise chicks without all the bedding getting into the water and feeders, chicks laying on waste. I like to give them a place to get off the wire with a small towel laid down under the heat source for sleeping or resting on, otherwise, they are on wire until they go outside.
Waterers and Feeders

You will need to stop by your local feed store and pick up some waterers and feeders. Depending on the size of your brooder, you will want quart-sized waterers and feeders for smaller brooders, for stock tank sized brooders, you can get away with gallon-sized waterers and feeders.
The Topper for the Brooder

Chicks grow very fast and within the first week or two, they will be testing their wings and possibly trying to fly out of the brooder. You don't want them to do this. They can fall and die, they can get lost in the house, the family dog can eat them, etc...Another reason you need something to cover your brooder and this pertains to those that choose to heat with heat lamps, you NEED to keep a barrier between the lamp and the brooder in case it should come loose and fall in. This wire topper will protect your chicks from being burned or worse yet, start a fire. It also keeps cats out, small kids from reaching in, this wire topper will just keep your chicks safe.
You will want to use something very airy like hardware cloth or even chicken wire will work. You need a place for the heat to air off as it builds up, ammonia smells from the poop need to lift off and out, dust from the bedding and the dander the chicks are constantly sloughing off needs to float out, humidity from all the pooping and breathing needs to air off and of course, oxygen needs to enter. So NEVER completely close off the top of the brooder with a solid material. Air, air, and more air!!!
Light

It's easy to forget that birds need light. They need daylight just as any other creature does to help with the natural pattern of waking, sleeping and other functions in the body that respond to light. Light is especially important when using the MHP style of brooding since there is no light involved in the heating process. So make sure the chicks have natural light or even an artificial light from a lamp from the time the sun rises and till it sets. Try and keep them on the normal times with the sun, when it's dark outside, chicks should be sleeping. When the sun comes up, light should be made available.
Accessories

Accessories? Yes, chicks need things to do in the brooder to stop boredom, help them learn to roost, and stop cannibalism. When chicks get bored they start pecking at eyes, toes, plucking feathers, biting, all kinds of unwanted habits. So why not stimulate their minds and allow them to burn calories?! And what does this entail? Put in some cut branches from a tree outside, start out with small diameters and have different sizes to climb on. Put in a roost bar! My chicks are already roosting at 2 weeks of age so when they head out to the coop, they know exactly what to do! Roost bars also give them places to escape in the brooder and sit quietly. Entertain them with a low-cut cereal box or something similar. Put crushed up dried leaves, grass hay, alfalfa leaves, some chick starter, a sprinkling of sand (Parakeet grit/sand works well), and watch them entertain themselves for hours! No more pecking toes and eyeballs in a brooder with a fun box! You can put in a small Parakeet mirror, just the idea that there are chicks on the other side of this mirror will fascinate your chicks for hours on end!

Along the lines of keeping chicks from getting bored in the brooder, you might give them a few "field trips" to the out of doors to keep them entertained. This not only burns off energy but gets them used to new places and things, making the transition to the coop a whole lot easier.
You can start with your living room, lay down an old bed sheet and get the chicks out on the floor for 10 minutes a day. (Make sure all cats, dogs and other dangers are locked safely away.) Sit down with them and watch them explore and play. Be careful however, this quickly turns them into "lap hounds" as they run to your lap for safety! Take them out to the coop on those warm sunny days for 10 or 15 minutes a day. Introducing them to their future home is a great way to ease the stress of that big move they will soon make. Never leave them unattended outside and always keep them in a secure area as well. All this will help them weather out the brooder stage and strengthen their bodies and minds.
Chick Starter

Chick starter is a complete balanced food specialized for growing chicks. It contains all they need to grow up to be healthy adults. Chicks will eat approximately a pound a week per chick, so purchase enough! Chick Starter comes in Medicated and Non-Mediated. Medicated starter contains a low amount of Amprolium which is an anticoccidial drug that lessens the chances that your chicks will contract Coccidiosis. Non-Medicated is just that, just plain chick feed. The medicated will not treat any other disease, it's only action is toward Coccidiosis. Whether you go with medicated or non-medicated is totally up to you. Medicated will not allow natural immunity to develop as non-medicated does, however it will prevent a deadly attack of Coccidiosis. This is totally your call on which one you go with, the medicated will not hurt them, however, around the age of 6 weeks you will need to get them on standard non-medicated chick feed at this point so they can develop immunity to Coccidiosis.
Setting up the Brooder
This is the fun part!! Load in your bedding of choice. Set up your heat lamp, MHP or EcoGlow off to one side. (PLEASE attach your heat lamp very firmly to the wall, ceiling, a post, what ever you use, it MUST be attached well so it can't fall. Never rely on the clamp as it can come loose easily, so attach a chain to the hook on the dome or the cord along with the clamp, you can use duct tape as well to keep it on, just don't let it fall.) You don't want to heat an even temperature all over the brooder but rather you want chillier places for birds to cool off, chicks are still learning to regulate their heating and cooling systems and the way to do this is find cool spots in the brooder along with their warm spots. You will want to keep your food and water sources opposite of your heat for this reason as well, this gives them a reason to leave their heat and get sustenance. If you use bedding you will want to slightly raise your water and food stations to keep the bedding out. You can use bricks, a cut 2x4, just anything to raise up the stations. You need to keep the bedding dry, wet bedding leads to Coccidiosis fast. So keep those water stations raised up and keep bedding out of them. Raising the stations also keeps poop out of these places, chicks seem to love to poop in water and food. Fill your water fonts, fill the chick feeder. I like to lay down paper towels those first few days and sprinkle feed all around the feeder so they can find where the food is stored. They need to eat soon after arrival and you don't want them unable to locate food. After a couple of days and the chicks are getting the hang of where the food is, you can remove the paper towels. Get your heat fired up and with your thermometer DIRECTLY under your heat source on the floor, you will start your day old chicks off at 88 to 89 degrees Fahrenheit. Warmer temps can can aggression and they really don't need it any warmer unless they are sick. If you like the idea of "accessories", put in some branches, a 1x1 or 1x2 roost bar, (you can screw it on from the outside of the brooder with some long wood screws) place a small mirror, put in a small box filled with entertaining stuff!
Grit
Do they need grit? Technically no they do not if all they are eating is Chick Starter. It's a water-soluble product, their bodies break it down and it passes right through them. However, if you are introducing treats in the brooder such as greens, veggies or any other stiffer non water-soluble food stuff, they will need grit. Parakeet sand works perfectly. Just a pinch here and there is sufficient for sand, don't leave a lot of it laying around as they can confuse it with food, gorge on it and it will then kill them.
Yay, it's Chickie Day!

So your chicks have arrived safely and it's time to transfer your bouncing bundles of joy to their new home, the brooder. What you should do upon transfer is hold the chick gently but firmly and dip each chicks' beak into the water very quick like and stand that chick right up next to the water. They need to be shown where the water is and of course, after their long journey will need water. This will get them started in drinking, as they should drink before eating, this will help prevent "Pasty Butt". Do this with each chick. After all of them have seen where the water is stored, tap with your finger at the food as if you are eating it. This will help them find and understand they need to eat what you are tapping at. That first day make sure they all are seen eating and drinking. If you have to redip a beak in the water, do so. And again, after a couple of days, you can stop with the paper towels and sprinkling of the feed.
That first week the chicks will spend a ton of time sleeping, this is very natural. If you see them all piling on top of each other under the heat source or constantly peeping, your temperature is too low. If you see them all sprawled out along the edges panting with wings extended, they are overheating and you need to reduce the temp. Remember, the temperature of the room will reflect the temperature inside the brooder. When the room heats up, so will the brooder. When it cools down, as will the brooder.

Clean the brooder daily. This is very important for chicks to stay healthy. The number one killer of small chicks is Coccidiosis. Every bird has Coccidiosis in it's intestinal tract and chicks are expelling it at fast rates in the brooder. Chicks need to come into contact with some poop to develop immunity however you don't want them to become overwhelmed with it as it does kill them if they have not developed enough immunity. Coccidiosis thrives in wet, warm conditions such as brooders, so you want to keep the brooder as clean and dry as possible. (Symptoms of Coccidiosis is blood in the stool, fluffed up, depressed, lethargic, does not eat or drink. If you think your chicks have Coccidiosis, which generally hits at the 2-4 week mark, you will need to get them on Corid or something with Amprolium immediately before they die. Please visit our Emergency section for more help.) Keep the brooder as clean as possible. Clean waterers daily and give fresh water. Keep feeders clean and discard any soiled feed.

At the two week mark and every week there after, you will want to lower your heat by 5 degrees. With a heat lamp this is done by raising the lamp up, with the MHP this is done by using a lower temperature setting and opening up the cave so they can stand a bit more. With the EcoGlow the base is raised up. Keep lowing the temperature each week by 5 degrees until you reach room temperature.
When chicks are fully cloaked in adult feathers (sometime around 5 or 6 weeks of age) chicks will be ready to permanently go outside! Chicks should be somewhat hardened off to heat changes and can tolerate 10 to 20 degree swings off what they were used to inside your house. If you find the temp is going to drop dramatically that week, feel free to take your heat source outside with them! Keep it off to the side so they don't have to use it if they don't need it however it is there if they do. If it's a roasting hot summer's day above 90 degrees Fahrenheit, please keep a fan on your chicks. They are still learning how to adjust their internal temperature regulator and over heating will kill them.
Outdoor chick brooding

Some people just can't fathom raising chicks indoors. And this is OK!
The same rules pretty much apply to what I just said about raising them indoors except you are going to be doing this outside. The most important difference is, you will need to choose a suitable building or space with the least amount of drafts and one that remains fairly stable in temp. This is very important as chicks can't have drafts sucking the heat out of their bodies. You don't want to be running out to check the heat all the time, so pick an area that is draft-free and temps don't vary a whole lot. This could be your garage, barn or workshop, etc... The same applies to the brooder and all its equipment...livestock tanks, rabbit hutches, extra-large wire dog crates, even plastic tubs or horse stalls. You can use a heat lamp, MHP, or EcoGlow as well. Follow all the same rules as stated above, but make SURE they are draft-free and in a safe place. Check on them frequently to make sure they are all ok.
Closing Statements
Brooding chicks is an ongoing learning experience and as you raise your chicks you will learn how to read their body language as to what they need, don't need, what you should and should not do in the future. I hope this article has given you some helpful tips to raising your brood to grow to be happy and healthy adult chickens!

Happy chickies make happy chickens!
Please stop by the following links for further reading:
Homemade brooders
https://www.backyardchickens.com/articles/homemade-chicken-brooder-designs-pictures.47736/
Heat lamps
https://www.backyardchickens.com/threads/heat-lamps.1205801/
MHP
https://www.backyardchickens.com/articles/brooding-with-mama-heating-pad.67728/
https://www.backyardchickens.com/th...d-in-the-brooder-picture-heavy-update.956958/
Ecoglow brooders
https://www.backyardchickens.com/reviews/ecoglow-50-the-larger-chick-brooder.11345/
Fire Safety
https://www.backyardchickens.com/articles/fire-safety-in-the-coop-and-barn.72414/
Teflon poisoning
https://www.backyardchickens.com/th...not-attacked-update-teflon-poisoning.1215065/
Raising baby chicks
https://www.backyardchickens.com/articles/how-to-raise-baby-chicks—the-first-60-days-of-raising-baby-chickens.47691/
For more help with your chicks, please post in our Raising Baby Chicks Forums
https://www.backyardchickens.com/forums/raising-baby-chicks.11/
