Hi everyone
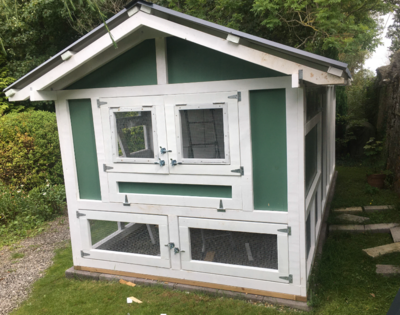
I know a lot of people are building this style of coop now, but I'd thought I'd share my experience as someone that isn't that practical and definitely not a DIYer kind of guy and share my 'doh' moments - previously my limits are putting up shelves or assembling IKEA furniture ... Anyway - this is the finished (ish) article and it only took me 10 months to build - there were a few weeks where nothing got done")
Please feel free to ask questions, suggest improvements or make comments.
I had originally planned to build up against the wall, but that is a protected status so I would have required planning permission to attach something to it ...
Run is 18 x 8 and the coop is 8 x 6 ...

Stuff I took in to consideration
Stuff I did right
Stuff I did wrong
Stuff I used (approx)

First of all is where to position the coop? This pic shows our house - the reason I picked this location (red square) is that we are northerly facing and get quite strong winds (for the UK) a few times a year and this would provide the most shelter ...

December 22nd 2019 - I'd finally stopped procrastinating and decided where it was going. My garden is on a slope so I had to dig out to make it even ... I added gravel to the bottom of the 'trench' and then two rows of concrete blocks to build upon. It's not shown in this photo, but you can see it later on, I ran a pressure treated 4x2 on top of the brickwork to build on top of. This is the only pressure treated timber in the project ...


Then I started building the frames. For the run I used 4 x 2 framing, added 16g ½" wire mesh and then made a second 4 x 2 frame to sandwich the mesh ... All the framing was put together using heavy duty pocket screws and joints were glued. For reference I cut my 16g ½" weld mesh with a jigsaw with a metal blade and it was great. This part of construction is just the run, I won't bore you with pics of adding the coop part as it will just appear in the next pics ....


Top tip - don't leave the paint next to the frame after painting - the frame got blown over knocking the newly opened paint tin ... This was 5 months ago and I still have a white patch on my drive ...

Now all the framing is done, it's time for the roof and I know 0% about roofing - fortunately YT has many great videos about this (I even learned how to use a square!), but if you're not interested in all that, my mitre saw had a 'lock' at 22.5 degrees which happens to to be a 5:12 roof pitch.. I made a template rafter using the 5:12 pitch and also two cuts for the ;birds mouth' (I built this and still don't know what half these things mean!).
I saw a YT video about making a template which is what I did ... I laid down my original rafters on a piece of plywood and fastened some block to it so that every rafter afterwards would be the exact same angle ...


From this pic you can see my next cluck up .... I hadn't realised at this point that the outward opening door wouldn't make it past the rafters so had to cut each one - I know I only had to cut the two near the door but I couldn't settle for them being different!

I cut and painted the rafters and purlins and they are fitted every 24" and are held in place using those simpson ties and twisty galvanised nails. I later blocked up the gaps under the eaves with hardware cloth - it would have been much easier to do at this point rather than after I put the roof on!


Steel roofing sheets and skylights are screwed into the purlins.


Now all I had to do was wall and floor out the coop, for this I used ¾" plywood. Unlike the original Carolina Coops I put doors on the back and front of my coop and also doors underneath the coop. On the run side of the coop I used hardware cloth at the top for extra ventilation - this side isn't exposed to the wind.


Chicken Guard fitted on the outside of the coop so I don't have to go in to open / close the door. Even though it's right under the roof overhang the light sensor seems to work fine.

I don't have a picture of the otherside, but it also has a matching window. I didn't realise until too late that this perspex does state that it shouldn't be used outside so not sure how long it will last. However it will be fairly easy to replace if I need to. There is hardware cloth behind it.

I ran a 3 foot 14g 1"x1" green hardware cloth around the run. Pinned it down with those galvanised tent pegs and fastened it to the brickwork with concrete screws and 40mm washers. It would have been easier to do the apron right back at the beginning when I was placing the bricks as I could have sandwiched it between the two rows, but this seems to be secure, especially now the grass is growing through it ...


Levelled off the ground inside and topped up with poultry wood chip

Added guttering and rain barrel on the back. Due to my mistake with the rafters / door I'm struggling to fit guttering on the front so that bit is still a work in progress! (Jan 2021 - eventually worked it out and now installed!)

We had a tree come down a couple of weeks back so a natural perch and dust bath in the run

FINALLY the rehoming date is announced and we could bring our rescued ex battery hens home! I'd like to share a link to the British Hen Welfare Trust which is an amazing charity here in the UK that has rescued over 800,000 ex battery hens to date!

Now to think of 10 names!
Just arrived home and we already have our first egg!

Inspecting the coop - I hope they like it

She's not really this shape - an odd effect created by the panorama image!


Thank you all for reading!
Update Jan 2021 - Coop & Run cameras
For Christmas my lovely wife bought me 2 x solar wifi cameras to install in the coop and run. To make this work I had to install an external wifi extender on the back of the house so that the signal was strong enough, but it's been worth it!
This allows me to check on them where I am from my phone (or PC) and also to check the auto door has opened, etc.


I know a lot of people are building this style of coop now, but I'd thought I'd share my experience as someone that isn't that practical and definitely not a DIYer kind of guy and share my 'doh' moments - previously my limits are putting up shelves or assembling IKEA furniture ... Anyway - this is the finished (ish) article and it only took me 10 months to build - there were a few weeks where nothing got done
Please feel free to ask questions, suggest improvements or make comments.
I had originally planned to build up against the wall, but that is a protected status so I would have required planning permission to attach something to it ...
Run is 18 x 8 and the coop is 8 x 6 ...
Stuff I took in to consideration
- We have foxes, badgers, owls and hawks. As well as our pet cats (5) and dogs (1 at present).
Stuff I did right
- Doors on both sides of the coop definately makes access easier.
- I managed to do this without serious injury!
Stuff I did wrong
- For reasons I don't understand I drew my plans in Excel (really) - I think I was using it as 'digital graph paper'. It sort of worked but not the right tool for the job.
- I 'sandwiched' the mesh which is great, but I assembled it in the garage rather than at the site and it's heavy if you have carry it anywhere
- I wish I could have got ½" 16g black mesh - but the options were a larger holes or weaker (19g) mesh
- RAFTERS! I made them so that I had 12" overhang, but didn't factor in the door opening past them (it didn't!)
- Didn't realise how much paint I'd use - 25l of white (+ the 5l I knocked over) and 5l of the green. I would have bought cheaper paint if I'd realised!
Stuff I used (approx)
- 60 x 4"x2"x12 feet timber
- 6 x 4"x2"x12 feet pressure treated timber
- 6 x ¾" sheets of exterior plywood
- 100 foot of 16g ½" hardware cloth
- 50 foot of 14g 1" hardware cloth
- Lots of different types of screws and nails
- 25 litres of paint
- 10 sheets of 32/1000 box profile steel sheets. These are (pre) painted and have an anti condensation coating on the underside.
- 2 sheets of 32/1000 clear box profile roof lights
- Matching ridge flashings
- Stitcher screws and caps
- 100 litre water butt and mini profile guttering
- 2 pairs of butt hinges
- 11 pairs of 4" tee hinges
- Chicken Guard opener and locking door
- 2 x Reolink Argus 2 + solar panels
First of all is where to position the coop? This pic shows our house - the reason I picked this location (red square) is that we are northerly facing and get quite strong winds (for the UK) a few times a year and this would provide the most shelter ...
December 22nd 2019 - I'd finally stopped procrastinating and decided where it was going. My garden is on a slope so I had to dig out to make it even ... I added gravel to the bottom of the 'trench' and then two rows of concrete blocks to build upon. It's not shown in this photo, but you can see it later on, I ran a pressure treated 4x2 on top of the brickwork to build on top of. This is the only pressure treated timber in the project ...
Then I started building the frames. For the run I used 4 x 2 framing, added 16g ½" wire mesh and then made a second 4 x 2 frame to sandwich the mesh ... All the framing was put together using heavy duty pocket screws and joints were glued. For reference I cut my 16g ½" weld mesh with a jigsaw with a metal blade and it was great. This part of construction is just the run, I won't bore you with pics of adding the coop part as it will just appear in the next pics ....
Top tip - don't leave the paint next to the frame after painting - the frame got blown over knocking the newly opened paint tin ... This was 5 months ago and I still have a white patch on my drive ...
Now all the framing is done, it's time for the roof and I know 0% about roofing - fortunately YT has many great videos about this (I even learned how to use a square!), but if you're not interested in all that, my mitre saw had a 'lock' at 22.5 degrees which happens to to be a 5:12 roof pitch.. I made a template rafter using the 5:12 pitch and also two cuts for the ;birds mouth' (I built this and still don't know what half these things mean!).
I saw a YT video about making a template which is what I did ... I laid down my original rafters on a piece of plywood and fastened some block to it so that every rafter afterwards would be the exact same angle ...
From this pic you can see my next cluck up .... I hadn't realised at this point that the outward opening door wouldn't make it past the rafters so had to cut each one - I know I only had to cut the two near the door but I couldn't settle for them being different!
I cut and painted the rafters and purlins and they are fitted every 24" and are held in place using those simpson ties and twisty galvanised nails. I later blocked up the gaps under the eaves with hardware cloth - it would have been much easier to do at this point rather than after I put the roof on!
Steel roofing sheets and skylights are screwed into the purlins.
Now all I had to do was wall and floor out the coop, for this I used ¾" plywood. Unlike the original Carolina Coops I put doors on the back and front of my coop and also doors underneath the coop. On the run side of the coop I used hardware cloth at the top for extra ventilation - this side isn't exposed to the wind.
Chicken Guard fitted on the outside of the coop so I don't have to go in to open / close the door. Even though it's right under the roof overhang the light sensor seems to work fine.
I don't have a picture of the otherside, but it also has a matching window. I didn't realise until too late that this perspex does state that it shouldn't be used outside so not sure how long it will last. However it will be fairly easy to replace if I need to. There is hardware cloth behind it.
I ran a 3 foot 14g 1"x1" green hardware cloth around the run. Pinned it down with those galvanised tent pegs and fastened it to the brickwork with concrete screws and 40mm washers. It would have been easier to do the apron right back at the beginning when I was placing the bricks as I could have sandwiched it between the two rows, but this seems to be secure, especially now the grass is growing through it ...
Levelled off the ground inside and topped up with poultry wood chip
Added guttering and rain barrel on the back. Due to my mistake with the rafters / door I'm struggling to fit guttering on the front so that bit is still a work in progress! (Jan 2021 - eventually worked it out and now installed!)
We had a tree come down a couple of weeks back so a natural perch and dust bath in the run
FINALLY the rehoming date is announced and we could bring our rescued ex battery hens home! I'd like to share a link to the British Hen Welfare Trust which is an amazing charity here in the UK that has rescued over 800,000 ex battery hens to date!
Now to think of 10 names!
Just arrived home and we already have our first egg!
Inspecting the coop - I hope they like it
She's not really this shape - an odd effect created by the panorama image!
Thank you all for reading!
Update Jan 2021 - Coop & Run cameras
For Christmas my lovely wife bought me 2 x solar wifi cameras to install in the coop and run. To make this work I had to install an external wifi extender on the back of the house so that the signal was strong enough, but it's been worth it!
This allows me to check on them where I am from my phone (or PC) and also to check the auto door has opened, etc.


 The coop looks amazing and has given me some ideas. I love that you were able to utilize the downed tree to give your hens some entertainment.