When I discovered that the big comb of my Crested Cream Legbar rooster hampered him whenever came the time to eat from the coop’s Tube Feeder, I knew I had to build a new type of feeder to better accommodate him.
BackYard Chickens is a lifesaver when it comes to searching through it for ways to solve urgent problems. It did not disappoint. In a short amount of time I had an idea of what I wanted to build, and then I was ready to start.
Here’s a list of what I used to build my Tower Feeder:
Tools:
1 flat screwdriver
1 hot glue gun
1 roll of scotch tape
1 flat metal filer
1 exacto knife
1 potato peeler
1 measuring tape (or a ruler)
1 marker pen
1 pair of scissors
1 mask
1 pair of safeguard glasses
1 drill
1 TINY circular saw (that kind)
1 jigsaw
1 metal handsaw
1 x 3¼ inch hole saw
1 x 2-1/8 inch hole saw
Items:
1 x 11L (3 gallon) empty water bottle → free (found it in the shed, its price ranges between 10-16$ at our local grocery stores)
1 x 2 inch wide Rubber Adapter Flex Prepper → 3,09$
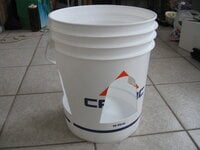
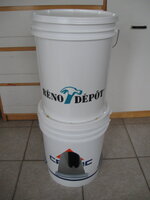
2 x 5 gallon buckets → 3,97$ x 2 → 7,94$
2 x 5 gallon bucket lids → 2,97$ x 2 → 5,94$
1 x 1 inch wide by 2 feet long tube → 2,42$ (I used 1½ feet of it, so 1,80$) ***it can be any kind of tube you want, so long as it’s one inch wide and two feet long***
1 x 2 inch wide by 3 feet long pvc pipe – 3,29$ (3 feet long was the shortest length I could find. I used 9¼ inches of it, so 82¢)
For a grand total of 22,06$ in bought materials, the final cost being a DIY 5 gallon Tower Feeder for 19,59$ in used materials.
Want to build your own tower feeder? Alright then, make sure you have all the things listed above, and let’s get started!
First, the feeding bucket.
1. Each opening in the feeding bucket is 3½ inches high from the bucket bottom, 5 inches wide and 9 inches high (from the bottom). Use the measuring tape/ruler and marker pen to mark your wanted measurements, then use the 3¼ inch hole saw to hole out the upper part of the openings, and the jigsaw to cut the curved triangle. Use your legs to keep the bucket still so it does not vibrate along with the jigsaw!

You can make up to four openings for the chickens; I only made three for mine, as I intended my tower feeder to lean against a wall. Before continuing, make sure to trim the edges to get a smooth finish. This is done to ensure no clumsy chicken cuts itself against the edges of the holes, or gets tempted to eat plastic bits.
2. Measure 6 inches of 1 inch-wide tube, 3 times. Cut those pieces. (if your bucket has four openings instead of 3, a 2 foot long tube gives you 4 pieces.) Follow the curve of your tube pieces and mark their center with the marker pen.
3. Clamp each piece, and use the tiny circular saw to cut the middle of the tube. Only cut one side of the tube, not both sides, otherwise you will end up with a 6 inch tube cut in two and that is not what you want for this design.
*** WARNING: Brace yourself and hang on tight to your tiny circular saw when you start cutting. As you cannot flatten it to the tube lest it cut said tube in two, the rotating blade will yank at your hands and try to run off. Do your best to keep cutting in a straight line, and take your time. There is also the possibility of the saw struggling to cut and eventually stopping altogether. That will happen if your tube is held too tightly by the clamp. The pressure of the cut edges will squeeze at the saw blade like the breaks do on the wheels of a car to help it come to a stop. Adjust the clamp on your tube as needed so you can cut safely. ***
3. Once you have half-cut all of your pieces, turn them to the uncut side, take your scissors, and cut a half inch line at each ends.
4. Mount your tube pieces to the bottom edges of your feeding bucket. The base of the Tower Feeder is now complete!
Next, the makeshift funnel.
1. Take the metal handsaw, and saw off the beak of the 11L water bottle (after having used all its water, of course). Wear your safety goggles and your mask to shield your eyes and your nose from airborne plastic dust!
2. Saw off the ‘funnel’ part of the water bottle, until you get two separate pieces. That part took me a solid half-hour to do by hand, so make sure you take frequent breaks, or you will run yourself to the ground in no time.

You will only need the funnel part of the bottle. Don’t throw away the rest of the bottle – buckets are always handy to have at hand, no matter their size and shapes!
As the funnel is going to support the weight of one of the 5 gallon buckets, I sawed roughly ¾ inches after its curving edge to ensure the funnel would not bend under the pressure.
4. Remember that potato peeler I wrote back in the list? You hadn’t read wrong, I really did use one to make this feeder. If you’re wary of the exacto knife like I am, replace it with your potato peeler to safely file down the edges of the funnel. The only downside is that the potato peeler tends to dig and take chumps of plastic instead of giving somewhat straight cuts like the exacto knife, but you don’t need a millimeter-straight edge to do this feeder, so it’s alright if your funnel edges are not 100% straight. So long as there are no quarter-inch deep gaps, it’s fine.
5. Take the 2 inch-wide by 3 feet long pvc pipe, and saw off 12 inches (1 foot) from it with either the jigsaw or the metal handsaw. Then, cut and adjust openings at one end of the pipe – that’s where the chicken feed will come out, and the size of the openings will vary depending on what kind of feed you give them. After several adjustments with the measuring tape, my own openings were 1 inch wide by 1 ½ inch high. (apologies for the bucket image two pics below showing triangle holes at the funnel's base, that picture was taken before I found out that square holes were the better shape of the two.)
6. Attach the Rubber Adapter Flex Prepper to the PVC pipe. Tighten the screw of the adapter with the flat screwdriver for a tight, snug fit.
7. Attach and tighten the other end of the adapter to the funnel's beak to make a makeshift funnel!
Now, take a break!
Drag out a chair, put your makeshift funnel inside the feeding bucket, and admire your hard-earned work while you eat your dinner.
End of break, back to work!
Take one of the bucket lids, put it on the funnel-bucket shown above, and flip the whole thing upside down.
Check to see if the funnel leaves any gaps between the lid and the bucket, and adjust (cut) its length as necessary until the bucket clamps down on the lid and leaves the funnel in a tight, snug fit inside it. The funnel must not move inside the bucket, and it must not be glued/taped/screwed to the lid either. The snug fit inside the feeding bucket, plus the weight of the feeding reservoir will hold funnel still just fine.
For my part, I cut at the PVC pipe several times until I found the right length, which was 9 ¼ inches.
Finally, the feeding reservoir.
1. Take the second bucket and place it over the second bucket lid. Hot glue the bucket base to the top of the lid.
2. Flip over the glued item and cut a hole into the center of underside of the lid (and through the bucket base). I don’t have a full assembly of hole saws, so I used the 2-1/8” one to get as close to the 2 inch opening of the funnel.
3. After generously shaking the holed items to take out any plastic particles left behind by the hole saw (triple check to make sure there are absolutely no leftovers, you don’t want plastic bits to mix with the chicken feed), trim the two holes, press the lid and bucket bottom together and scotch tape them shut.
This is done so grain does not accumulate in-between the two layers as it falls through the hole. I also preferred scotch tape over screws, bolts or glue because if I ever need to dismantle the entire thing for a quick washup, I can easily cut out the scotch tape and scratch out the hot glue buds to separate the lid from the bucket. Plus in my eyes putting screws or bolts would mean weakening the structure supporting the grain by poking more holes through it, so scotch tape it was.
4. This is an option: scotch tape the ends of the adapter’s metallic belts so they don’t stick out. I did this because I did not want them to take dust or risk my chickens potentially cutting their combs on it.
And the result is…!
You now have the feeding bucket, the makeshift tunnel and the grain reservoir all built-up. Assemble all the pieces to make the final product: your Tower Feeder!
So, what says the chickens over this new feeder?
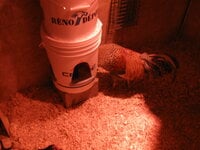
My main goal was to have a large capacity feeder that my rooster could eat from without problems. So, I took my invention out into the coop for a test. I mounted the Tower Feeder on a square brick, and filled three quarters of the reservoir with grain.
Then, I stood back and checked his reaction.
Teacher was wary of the Tower Feeder at first. The thing was massive... way out of his league if push somehow came to shove. But then he heard the tell-tale sound of grain being dumped in the reservoir, and immediately started calling his hens over for dinner. My rooster knew I had put grain somewhere, so he searched the usual spots where I leave treats first. When he found nothing he searched harder, until eventually he ambled close enough to the feeding bucket to spot the grain inside it. In just under a minute, he had his entire head in the bucket and was eating the grain with gusto.
He stayed a full five minutes inside the feeding bucket, eating and clucking to his hens excitedly. In ten minute’s time all three openings were occupied by various flock members, and when the rest of the hens realized what the Tower Feeder was for, there was quite a bit of squabbling to nab the grain. Thankfully Teacher is a good rooster, and he doubled his advances on the dominant hens so the lower-ranking hens could try out the Tower Feeder unpecked. Everyone got a taste of it.
When I left the coop for dinner, he was back head-first in the Tower Feeder and having the equivalent of a rooster's feast.
Update: April 3, 2020:
Ever since the Tower Feeder has been put inside the coop a month ago, I see Teacher eating a lot, whereas I rarely saw him eat with the Tube Feeder. His crowing has definitely grown louder, and he feels heavier in my arms than before. He is also displaying the vigorous energy of a young cock who feels spring is just around the corner, running after and ambushing his ladies for quickies all over the place. Oh, and he flaps his wings more often. All in all, he shows all the signs of a male with lots of energy to spend, and I get the feeling he considers the Tower Feeder as his personal treasure, for he constantly calls his hens over to eat in it. From all these observations, I think it’s safe to say that my Tower Feeder is a crowing success!
A big Thank You goes to aart’s Waste-Free Funnel Bucket Feeder, which was the major source of inspiration behind my creation of the Tower Feeder. Thank you for sharing your experiences and creative mind on BYC!
Pros on the Tower Feeder:
- The Tower feeder takes 1 square foot of floor space, whereas the Tuber Feeder takes 1 ½ square foot of floor space.
- Adult chickens of all comb types can eat from it, including single comb roosters.
- I don’t have to fill the reservoir often, since it can hold up to 5 gallons of grain (and more in the funnel). At 8 chickens in the coop that don’t free range, I’ve lasted roughly three weeks and a half before I had to refill, and it was still a good quarter full with grain. Teacher was also making up for lost time by eating ravenously. Now that he has somewhat calmed down I hope I will be able to hit monthly refills.
- As someone who has to deal with snowstorms that can dump up to three feet of snow plus a layer of ice on the property in a single night, having time to break and shovel away all that snow is an immense relief. That same relief also applies for when I’m bedridden with sickness. In both cases I can skip the chicken duties, knowing my chickens will not starve.
- The upturned grain does not spill out of the feeding bucket. The edges are high enough to prevent that, and the chickens’ shoulders help keep the grain inside the feeder whenever they toss the feed every which way.
- If you put a Tower Feeder beside a Tube Feeder (like me), in 90% of the cases the flock will go eat in the Tower Feeder. Comfort and popularity-wise, the Tower Feeder is a major hit with my chickens.
- The tube pieces that were put on the bottom edges of the openings are doing an excellent job at preserving my chickens from breast feather damage!
Cons on the Tower Feeder:
- The Tower Feeder can only feed four chickens at once, whereas the Tube Feeder can feed up to six chickens at once.
- The openings of the feeding bucket inevitably allow bedding to enter. My Tower Feeder is positioned high enough that dug up bedding cannot get in, but pine shavings sent flying by flapping wings is impossible to keep out. Surprisingly, very little bedding -does- get inside the feeder; it is usually just a few pieces, quickly plucked out by hand.
- The Tower Feeder is a tall feeder. It cannot be put inside every coop or run. If you build a smaller model, know it is unlikely to hold 5 gallons of feed in it.
- As this is a tall feeder, it is best to secure the reservoir against a wall, a wire fence or a hook, it so it does not topple over from a chicken jumping on or from it.
- Chicks and young chickens can’t eat from this feeder. (Update October 27, 2020: Actually the teenagers can eat from this feeder, by jumping/flying up through the openings to land feet-first in the grain. If you have a flock of mixed age, either put a plank between the cement block and feeder so the juveniles can hop onto it to access the feed (and hide under it from the pecking adults) or change the cement block for a smaller brick so the feeder is of easier access to the stretching juveniles. Watch out for poop/rip in the grain though.) If you have a broody hen with peeps, though, it is better to give them another kind of feeder, one that’s better fit to their needs.
- If not covered, the hollow tube pieces that make the bottom edges of the feeding bucket offer an excellent spot for parasites to hide in. I decided to risk it, as my chickens are fond about pecking any kind of glue they can find on the items I build for them. Thankfully I can wiggle off those pieces and wash them, so hopefully I won’t have any troubles on that side.
- Update October 27, 2020: Watch out for accumulated powdery feed eventually hiding the funnel's square holes. 25kg poultry feed sacs are heavy, part of their grain gets crushed under the packed weight. That powdery grain isn't always eaten by the chickens, so it eventually settles at the bottom of the feeder and accumulates. My hens could no longer access the rest of the grain, but thankfully I was keeping an eye out and quickly caught on to their problem. It took less than five minutes to clean out the powdery grain by hand, and as soon as I got up the hens immediately went back to eat in the Tower Feeder. In 8 months of utilization, this is the first time my feeder ever required maintenance. And as far as I'm concerned, that was super easy to do.
Is there anything you would like to ameliorate in your Tower Feeder?
Yes. If I do another Tower Feeder, then I want to cut a bigger hole into the feeding reservoir next time. The one I currently have is useful, but I find it a bit on the small side. Also, I will try and find buckets whose handles are easy to take off. They're great to transport the feeder, but once installed the handles can make staking the feeder against a wall a little tricky. Ah, and if I'm unable to secure the feeder against a wall, then I definitely want to find a bucket with a twisting lid to avoid grain spills if one of my ladies decides to use my feeder as a trampoline.
Update March 7, 2021: I would also change the square brick that supports my Tower Feeder. It might be half a cement block, but it is heavy, and I need all my strength to carry it out of the coop whenever it's time to clean the bedding. And if I, as a young person, have difficulty carrying half a cement block, I cannot even begin to imagine the physical struggle an elderly person endures at the same task. Also, if I slip in the ice or my arms give out, I risk serious injury to my knees and feet should the block fall from my hands. To prevent this, I will either buy some type of small plastic bench, or build a small wooden bench from pallet scraps to support my Tower Feeder at its desired height in the coop. Personally I would prefer the plastic bench as it's light and easy to clean, but if it's a wooden bench then at least it'll be much easier to carry out of the coop than the block ever will be. And I can always burn it and make another one if it's too hard to scrub clean. But my advice is this: don't use cinder blocks in places you have to move them often. Otherwise you'll wind up carrying those cinder blocks again, and that's a receipt for injury if you're not a strong man in the prime of your life.
But hey… what happened to that 3 gallon bucket bottle you didn’t need to build your Tower Feeder??
In my search to preserve eggs in a way that didn’t use the fridge or any electricity whatsoever (I have off-grid self-sufficient vibes), I found this very nice lady on youtube who had re-discovered how our ancestors dealt with their chickens who stopped to lay through their molt and the cold season. My bucket bottle found its use in providing a big container inside which I could mix the ingredients for this age-old practice, called water-glassing.
By an ironic twist of fate, I started to test out this method right before the corona virus struck. As unwashed eggs can last up to two months in the fridge (to my current knowledge), I will wait at least this long before giving my water-glassed eggs a very cautious test-taste. If this out works and I don’t end up in the hospital like many other unfortunate persons, I might write an article about it in the future to record my results.
I also upcycled the hole saw pieces that came from my buckets, making up a few DIY spools with them to roll up some of my tangled leftover yarn. The extra length of pvc pipe that I ended up cutting off from the funnel went to a DIY chick feeder. I haven’t yet found a use for the cut-off beak of the 3 gallon water bottle, so I’m keeping it in my scrap box for now.
With all that said, I hope you found this article informative and helpful! Good luck building your own DIY feeders out there!
BackYard Chickens is a lifesaver when it comes to searching through it for ways to solve urgent problems. It did not disappoint. In a short amount of time I had an idea of what I wanted to build, and then I was ready to start.
Here’s a list of what I used to build my Tower Feeder:
Tools:
1 flat screwdriver
1 hot glue gun
1 roll of scotch tape
1 flat metal filer
1 exacto knife
1 potato peeler
1 measuring tape (or a ruler)
1 marker pen
1 pair of scissors
1 mask
1 pair of safeguard glasses
1 drill
1 TINY circular saw (that kind)
1 jigsaw
1 metal handsaw
1 x 3¼ inch hole saw
1 x 2-1/8 inch hole saw
Items:
1 x 11L (3 gallon) empty water bottle → free (found it in the shed, its price ranges between 10-16$ at our local grocery stores)
1 x 2 inch wide Rubber Adapter Flex Prepper → 3,09$
2 x 5 gallon buckets → 3,97$ x 2 → 7,94$
2 x 5 gallon bucket lids → 2,97$ x 2 → 5,94$
1 x 1 inch wide by 2 feet long tube → 2,42$ (I used 1½ feet of it, so 1,80$) ***it can be any kind of tube you want, so long as it’s one inch wide and two feet long***
1 x 2 inch wide by 3 feet long pvc pipe – 3,29$ (3 feet long was the shortest length I could find. I used 9¼ inches of it, so 82¢)
For a grand total of 22,06$ in bought materials, the final cost being a DIY 5 gallon Tower Feeder for 19,59$ in used materials.
Want to build your own tower feeder? Alright then, make sure you have all the things listed above, and let’s get started!
First, the feeding bucket.
1. Each opening in the feeding bucket is 3½ inches high from the bucket bottom, 5 inches wide and 9 inches high (from the bottom). Use the measuring tape/ruler and marker pen to mark your wanted measurements, then use the 3¼ inch hole saw to hole out the upper part of the openings, and the jigsaw to cut the curved triangle. Use your legs to keep the bucket still so it does not vibrate along with the jigsaw!
You can make up to four openings for the chickens; I only made three for mine, as I intended my tower feeder to lean against a wall. Before continuing, make sure to trim the edges to get a smooth finish. This is done to ensure no clumsy chicken cuts itself against the edges of the holes, or gets tempted to eat plastic bits.
2. Measure 6 inches of 1 inch-wide tube, 3 times. Cut those pieces. (if your bucket has four openings instead of 3, a 2 foot long tube gives you 4 pieces.) Follow the curve of your tube pieces and mark their center with the marker pen.
3. Clamp each piece, and use the tiny circular saw to cut the middle of the tube. Only cut one side of the tube, not both sides, otherwise you will end up with a 6 inch tube cut in two and that is not what you want for this design.
*** WARNING: Brace yourself and hang on tight to your tiny circular saw when you start cutting. As you cannot flatten it to the tube lest it cut said tube in two, the rotating blade will yank at your hands and try to run off. Do your best to keep cutting in a straight line, and take your time. There is also the possibility of the saw struggling to cut and eventually stopping altogether. That will happen if your tube is held too tightly by the clamp. The pressure of the cut edges will squeeze at the saw blade like the breaks do on the wheels of a car to help it come to a stop. Adjust the clamp on your tube as needed so you can cut safely. ***
3. Once you have half-cut all of your pieces, turn them to the uncut side, take your scissors, and cut a half inch line at each ends.
4. Mount your tube pieces to the bottom edges of your feeding bucket. The base of the Tower Feeder is now complete!
Next, the makeshift funnel.
1. Take the metal handsaw, and saw off the beak of the 11L water bottle (after having used all its water, of course). Wear your safety goggles and your mask to shield your eyes and your nose from airborne plastic dust!
2. Saw off the ‘funnel’ part of the water bottle, until you get two separate pieces. That part took me a solid half-hour to do by hand, so make sure you take frequent breaks, or you will run yourself to the ground in no time.
You will only need the funnel part of the bottle. Don’t throw away the rest of the bottle – buckets are always handy to have at hand, no matter their size and shapes!
As the funnel is going to support the weight of one of the 5 gallon buckets, I sawed roughly ¾ inches after its curving edge to ensure the funnel would not bend under the pressure.
4. Remember that potato peeler I wrote back in the list? You hadn’t read wrong, I really did use one to make this feeder. If you’re wary of the exacto knife like I am, replace it with your potato peeler to safely file down the edges of the funnel. The only downside is that the potato peeler tends to dig and take chumps of plastic instead of giving somewhat straight cuts like the exacto knife, but you don’t need a millimeter-straight edge to do this feeder, so it’s alright if your funnel edges are not 100% straight. So long as there are no quarter-inch deep gaps, it’s fine.
5. Take the 2 inch-wide by 3 feet long pvc pipe, and saw off 12 inches (1 foot) from it with either the jigsaw or the metal handsaw. Then, cut and adjust openings at one end of the pipe – that’s where the chicken feed will come out, and the size of the openings will vary depending on what kind of feed you give them. After several adjustments with the measuring tape, my own openings were 1 inch wide by 1 ½ inch high. (apologies for the bucket image two pics below showing triangle holes at the funnel's base, that picture was taken before I found out that square holes were the better shape of the two.)
6. Attach the Rubber Adapter Flex Prepper to the PVC pipe. Tighten the screw of the adapter with the flat screwdriver for a tight, snug fit.
7. Attach and tighten the other end of the adapter to the funnel's beak to make a makeshift funnel!
Now, take a break!
Drag out a chair, put your makeshift funnel inside the feeding bucket, and admire your hard-earned work while you eat your dinner.
End of break, back to work!
Take one of the bucket lids, put it on the funnel-bucket shown above, and flip the whole thing upside down.
Check to see if the funnel leaves any gaps between the lid and the bucket, and adjust (cut) its length as necessary until the bucket clamps down on the lid and leaves the funnel in a tight, snug fit inside it. The funnel must not move inside the bucket, and it must not be glued/taped/screwed to the lid either. The snug fit inside the feeding bucket, plus the weight of the feeding reservoir will hold funnel still just fine.
For my part, I cut at the PVC pipe several times until I found the right length, which was 9 ¼ inches.
Finally, the feeding reservoir.
1. Take the second bucket and place it over the second bucket lid. Hot glue the bucket base to the top of the lid.
2. Flip over the glued item and cut a hole into the center of underside of the lid (and through the bucket base). I don’t have a full assembly of hole saws, so I used the 2-1/8” one to get as close to the 2 inch opening of the funnel.
3. After generously shaking the holed items to take out any plastic particles left behind by the hole saw (triple check to make sure there are absolutely no leftovers, you don’t want plastic bits to mix with the chicken feed), trim the two holes, press the lid and bucket bottom together and scotch tape them shut.
This is done so grain does not accumulate in-between the two layers as it falls through the hole. I also preferred scotch tape over screws, bolts or glue because if I ever need to dismantle the entire thing for a quick washup, I can easily cut out the scotch tape and scratch out the hot glue buds to separate the lid from the bucket. Plus in my eyes putting screws or bolts would mean weakening the structure supporting the grain by poking more holes through it, so scotch tape it was.
4. This is an option: scotch tape the ends of the adapter’s metallic belts so they don’t stick out. I did this because I did not want them to take dust or risk my chickens potentially cutting their combs on it.
And the result is…!
You now have the feeding bucket, the makeshift tunnel and the grain reservoir all built-up. Assemble all the pieces to make the final product: your Tower Feeder!
So, what says the chickens over this new feeder?
My main goal was to have a large capacity feeder that my rooster could eat from without problems. So, I took my invention out into the coop for a test. I mounted the Tower Feeder on a square brick, and filled three quarters of the reservoir with grain.
Then, I stood back and checked his reaction.
Teacher was wary of the Tower Feeder at first. The thing was massive... way out of his league if push somehow came to shove. But then he heard the tell-tale sound of grain being dumped in the reservoir, and immediately started calling his hens over for dinner. My rooster knew I had put grain somewhere, so he searched the usual spots where I leave treats first. When he found nothing he searched harder, until eventually he ambled close enough to the feeding bucket to spot the grain inside it. In just under a minute, he had his entire head in the bucket and was eating the grain with gusto.
He stayed a full five minutes inside the feeding bucket, eating and clucking to his hens excitedly. In ten minute’s time all three openings were occupied by various flock members, and when the rest of the hens realized what the Tower Feeder was for, there was quite a bit of squabbling to nab the grain. Thankfully Teacher is a good rooster, and he doubled his advances on the dominant hens so the lower-ranking hens could try out the Tower Feeder unpecked. Everyone got a taste of it.
When I left the coop for dinner, he was back head-first in the Tower Feeder and having the equivalent of a rooster's feast.
Update: April 3, 2020:
Ever since the Tower Feeder has been put inside the coop a month ago, I see Teacher eating a lot, whereas I rarely saw him eat with the Tube Feeder. His crowing has definitely grown louder, and he feels heavier in my arms than before. He is also displaying the vigorous energy of a young cock who feels spring is just around the corner, running after and ambushing his ladies for quickies all over the place. Oh, and he flaps his wings more often. All in all, he shows all the signs of a male with lots of energy to spend, and I get the feeling he considers the Tower Feeder as his personal treasure, for he constantly calls his hens over to eat in it. From all these observations, I think it’s safe to say that my Tower Feeder is a crowing success!
A big Thank You goes to aart’s Waste-Free Funnel Bucket Feeder, which was the major source of inspiration behind my creation of the Tower Feeder. Thank you for sharing your experiences and creative mind on BYC!
Pros on the Tower Feeder:
- The Tower feeder takes 1 square foot of floor space, whereas the Tuber Feeder takes 1 ½ square foot of floor space.
- Adult chickens of all comb types can eat from it, including single comb roosters.
- I don’t have to fill the reservoir often, since it can hold up to 5 gallons of grain (and more in the funnel). At 8 chickens in the coop that don’t free range, I’ve lasted roughly three weeks and a half before I had to refill, and it was still a good quarter full with grain. Teacher was also making up for lost time by eating ravenously. Now that he has somewhat calmed down I hope I will be able to hit monthly refills.
- As someone who has to deal with snowstorms that can dump up to three feet of snow plus a layer of ice on the property in a single night, having time to break and shovel away all that snow is an immense relief. That same relief also applies for when I’m bedridden with sickness. In both cases I can skip the chicken duties, knowing my chickens will not starve.
- The upturned grain does not spill out of the feeding bucket. The edges are high enough to prevent that, and the chickens’ shoulders help keep the grain inside the feeder whenever they toss the feed every which way.
- If you put a Tower Feeder beside a Tube Feeder (like me), in 90% of the cases the flock will go eat in the Tower Feeder. Comfort and popularity-wise, the Tower Feeder is a major hit with my chickens.
- The tube pieces that were put on the bottom edges of the openings are doing an excellent job at preserving my chickens from breast feather damage!
Cons on the Tower Feeder:
- The Tower Feeder can only feed four chickens at once, whereas the Tube Feeder can feed up to six chickens at once.
- The openings of the feeding bucket inevitably allow bedding to enter. My Tower Feeder is positioned high enough that dug up bedding cannot get in, but pine shavings sent flying by flapping wings is impossible to keep out. Surprisingly, very little bedding -does- get inside the feeder; it is usually just a few pieces, quickly plucked out by hand.
- The Tower Feeder is a tall feeder. It cannot be put inside every coop or run. If you build a smaller model, know it is unlikely to hold 5 gallons of feed in it.
- As this is a tall feeder, it is best to secure the reservoir against a wall, a wire fence or a hook, it so it does not topple over from a chicken jumping on or from it.
- Chicks and young chickens can’t eat from this feeder. (Update October 27, 2020: Actually the teenagers can eat from this feeder, by jumping/flying up through the openings to land feet-first in the grain. If you have a flock of mixed age, either put a plank between the cement block and feeder so the juveniles can hop onto it to access the feed (and hide under it from the pecking adults) or change the cement block for a smaller brick so the feeder is of easier access to the stretching juveniles. Watch out for poop/rip in the grain though.) If you have a broody hen with peeps, though, it is better to give them another kind of feeder, one that’s better fit to their needs.
- If not covered, the hollow tube pieces that make the bottom edges of the feeding bucket offer an excellent spot for parasites to hide in. I decided to risk it, as my chickens are fond about pecking any kind of glue they can find on the items I build for them. Thankfully I can wiggle off those pieces and wash them, so hopefully I won’t have any troubles on that side.
- Update October 27, 2020: Watch out for accumulated powdery feed eventually hiding the funnel's square holes. 25kg poultry feed sacs are heavy, part of their grain gets crushed under the packed weight. That powdery grain isn't always eaten by the chickens, so it eventually settles at the bottom of the feeder and accumulates. My hens could no longer access the rest of the grain, but thankfully I was keeping an eye out and quickly caught on to their problem. It took less than five minutes to clean out the powdery grain by hand, and as soon as I got up the hens immediately went back to eat in the Tower Feeder. In 8 months of utilization, this is the first time my feeder ever required maintenance. And as far as I'm concerned, that was super easy to do.
Is there anything you would like to ameliorate in your Tower Feeder?
Yes. If I do another Tower Feeder, then I want to cut a bigger hole into the feeding reservoir next time. The one I currently have is useful, but I find it a bit on the small side. Also, I will try and find buckets whose handles are easy to take off. They're great to transport the feeder, but once installed the handles can make staking the feeder against a wall a little tricky. Ah, and if I'm unable to secure the feeder against a wall, then I definitely want to find a bucket with a twisting lid to avoid grain spills if one of my ladies decides to use my feeder as a trampoline.
Update March 7, 2021: I would also change the square brick that supports my Tower Feeder. It might be half a cement block, but it is heavy, and I need all my strength to carry it out of the coop whenever it's time to clean the bedding. And if I, as a young person, have difficulty carrying half a cement block, I cannot even begin to imagine the physical struggle an elderly person endures at the same task. Also, if I slip in the ice or my arms give out, I risk serious injury to my knees and feet should the block fall from my hands. To prevent this, I will either buy some type of small plastic bench, or build a small wooden bench from pallet scraps to support my Tower Feeder at its desired height in the coop. Personally I would prefer the plastic bench as it's light and easy to clean, but if it's a wooden bench then at least it'll be much easier to carry out of the coop than the block ever will be. And I can always burn it and make another one if it's too hard to scrub clean. But my advice is this: don't use cinder blocks in places you have to move them often. Otherwise you'll wind up carrying those cinder blocks again, and that's a receipt for injury if you're not a strong man in the prime of your life.
But hey… what happened to that 3 gallon bucket bottle you didn’t need to build your Tower Feeder??
In my search to preserve eggs in a way that didn’t use the fridge or any electricity whatsoever (I have off-grid self-sufficient vibes), I found this very nice lady on youtube who had re-discovered how our ancestors dealt with their chickens who stopped to lay through their molt and the cold season. My bucket bottle found its use in providing a big container inside which I could mix the ingredients for this age-old practice, called water-glassing.
By an ironic twist of fate, I started to test out this method right before the corona virus struck. As unwashed eggs can last up to two months in the fridge (to my current knowledge), I will wait at least this long before giving my water-glassed eggs a very cautious test-taste. If this out works and I don’t end up in the hospital like many other unfortunate persons, I might write an article about it in the future to record my results.
I also upcycled the hole saw pieces that came from my buckets, making up a few DIY spools with them to roll up some of my tangled leftover yarn. The extra length of pvc pipe that I ended up cutting off from the funnel went to a DIY chick feeder. I haven’t yet found a use for the cut-off beak of the 3 gallon water bottle, so I’m keeping it in my scrap box for now.
With all that said, I hope you found this article informative and helpful! Good luck building your own DIY feeders out there!