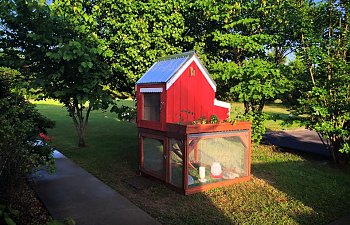
I looked high and low for a coop online I could build that would be big enough without being too big. I'm new to chickens, and I have never built anything other than a bird house in high school ag class. My husband is overseas so He couldn't build it for me. I found a coop I loved and sent him the pictures. He drew some rough plans, and gave me a materials list. The plans gave me a Great idea of where to start, but I had to adjust measurements, and angles as I went along, as well as just sort of "wing" it lol. I'm sorry, I skipped some pictures during this process because I was trying to get to a stopping point before nap time ended. After several trips to lowes and one to Home Depot, several minor injuries including a possibly fractured index finger, and a wasp sting.... I am DONE!
These are the plans My awesome husband drew up based on the pictures I sent. I did shorten the width of the run door.
The first cut. I was terrified I would mess this up or possibly cut off my finger. Every single cut I did with a jig saw.
Once I got the frame completed I had to take it back apart and place the boards the right way.
Placed the support for the planter.
Putting the ladder on the hinges.
I stained and and sealed the run and the next day I put on the hardware cloth. Much easier to cut it to length than to try to round the corner. I acquired MANY scratches. I would advise gloves and long sleeves. and be sure to cover the edges or cut it as flush as possible.
I used rust-oleom ultimate wood stain in american walnut. Finished with a flat minwax exterior polyurethane spray. Used 2 coats of the minwax.
My two year old son took this out of my flower bed and put it in the coop..... He doesn't even understand how ironic that is! lol I didn't find this until the next day and it scared the bejesus out of me!
I went ahead and installed the drip edge for the planter since I was using tin as the base.
I cut all my boards for the siding. Each have a 45 degree angle.
I put up the side boards and the trim as well as the tin and back board for the planter which I forgot to take a picture of.
The next day I put up the other side. The bottom board I screwed in to make sure I was installing them level. It was just a temporary piece.
I painted the trim and exterior. I used Valspar indoor/outdoor with primer Spray paint. It only took ONE coat! then I went back over it with a flat clear exterior spray.
I ran out of roofing sheet metal screws so I had to secure it enough till I could get to lowes to pick more up the next morning. I also ran out of the closure piece. I bought one sheet of each. I Eventually bought 3 sheets of corrugated metal, 3 sticks of drip edge and one ridge cap.
With the snakes I have seen as of late I was concerned with the gaps under the ridges of the roofing so I purchased this pre-glued foam. Fits like a glove and gives me peace of mind knowing I took that little extra step in keeping my girls safe.
Cut stained and installed all of the outer trim pieces to cover the hardware cloth and nails/staples. (at this point I haven't even made the upper door.) Quick tip on the planter! Get a cheap shower curtain to use as a liner! Cheap solution to something that is going to be buried under dirt anyway! It will keep your chickens heads dry! Just Line your planter with it so the water runs only to the front of the box and over the drip edge.
I wanted a little flare, and a little country so I went out while waiting on my husband to Skype me and cut the top out of a 1x3 then cut the side pieces to mesh with the top.
Once I finished The door and got it installed I had to make one last trip for my ridge cap!
These pavers were installed the day after the girls moved in.
This was taken Pre-lock instillation.
The shutters were a last minute thought. I'm glad I made, and installed them. Keeps the rain out.
Got these girls some tasty snacks growing above their cute little heads!
I could Not find smaller hanging feeders and waterers so I went to the co-op and bought some smaller ones since I only have 3 birds. and drilled holes in the tops and installed an eyebolt, rubber washer and nut on each. Worked like a charm! Hanging containers for less than half the price!
I have some happy chickens! Now if the two bigger ones would take to the new chick like they took to their coop!

