Okay, I lied, I did actually buy heavy duty hinges, a box of sheet metal screws, and paid $9 for all my plywood, which was recycled. Most of my materials were found in people's trash, though! It's mind-blowing what the average homeowner throws out! My boyfriend has a sort of hobby doing scrap metal, which basically means he's a trash-picker! Very often I go looking with him, and as soon as we decided to get chickens I went a LOT so I could make sure I picked up all the useable wood we saw! Since it was early spring, quite a few people were re-doing sections of their decks, so much of the coop is built with old decking boards. Some of it, like the 4x4 posts I used, came from people who were replacing or repairing sections of stockade fencing. So many people were thrilled to have the wood reused, and some even helped us load the wood into the truck!
The materials I already had on hand were about a dozen interior grade 2x4's, a large double hung tilt out vinyl window, and a few sections of metal sheathing left over from when our garage was built. Our total cost was less than $30!! Honest!!
Okay, first and foremost, I had to have an idea of what I wanted, and what I thought I could actually build. I have zero training in carpentry, but I'm very mechanically inclined and have had lots of play time with power tools, since I was a kid! Well, I must have drooled over a hundred coops here on BYC before I came up with what I thought would be appropriate for our climate and amount of chickens. I went large, since everyone said go bigger than you think you'll need. This is what I sketched up:
I imagined it in an adorable medieval-style cottage look, and had grand plans of cutting my rafter ends into decorative chicken heads! Yeah, that didn't happen, lol. Building a coop by yourself is a lot of work, and chickens grow fast!
This is what I originally wanted it to look like! Baba Yaga's cottage!! Lol!! I'm a big fan of folk and fairy tales.
The site I had was overgrown with weeds, and had lots of junk that needed cleaning up. There was also a very large fallen limb in the middle that I had to have my boyfriend cut up and haul away for our firewood stockpile. I'll operate just about any power tool you set in front of me, but chainsaws scare the bejeezus outta me!
I tried to make the most out of the lengths of wood I'd scavenged, so I laid out my floorboards in a way that I thought would use the most board, with the least amount of cuts. Once I got my final measurements, I got to work! Those are the floorboards stacked up in the middle of my framing. The main posts are repurposed posts from a stockade fence that someone was replacing. Most of the sections had nothing at all wrong with them, other than the discoloration from weathering. Many times when people replace sections of rotted fence, they take the whole section, whether there are good parts left or not, and replace all of it, because they don't like the look of the old with the new. It's sort of a shame, but... it sure got me some great free wood!
Here are the floorboards in place. I think these were leftover stair boards for various decks. After the fact, (as in after I'd built 90% of the coop) I found that one board was rotted. I had to break it out and replace it. Lesson learned, there! I knew it was a bit soft, but thought it would hold up. The wood was also a bit wet, which really hid the extent of the rot from my noviced eyes. Luckily I only used that one piece, and it wasn't structural.
I started framing in the side walls with pallet wood that I got for free from a local pallet manufacturer. I went there to buy some used plywood, and got a load of unused 2x4's as a free bonus!
For the window, I employed a bit of backyard ingenuity and rigged something up from what I had. All the windows I had on hand were very large double hung, tilt-out windows. Way too big. But a half a window... that would work. Turns out the bottom half of a double hung tilt out window? It has one little peg on either side at the bottom, where the window pivots for the tilt-action. Well, if you turn that half upside down, you can use those pivot-pins to hang the window without using hinges! I chiseled a channel into the framing and screwed in a stop plate at the bottom of the channel to keep the window from settling with time.
See how the channel tilts downward then allows the pin to drop into place? Just underneath it I screwed in a scrap of steel plate to keep it from sagging over time. I was quite proud of myself for thinking this one up! And for pulling it off!
My dog Lerch really liked the window, too! He wanted this for his doghouse!
I figured out how to do rafters by watching YouTube videos. I made some mistakes, but nothing too awful. Using a mitering chop saw made the job a lot easier since once I set the right angle I could be sure all the other cuts would be the same. And believe it or not... I found the chop saw in someone's trash!!
After I got the bulk framed out, I started on the exterior nest boxes, Then worked on putting on the plywood sheathing.
I left the back side open so I could build wide swing-open doors for easy access and cleaning. Boy am I glad I did!! With no lip on the edge of my flooring, I just rake the mess out with an old child's garden hoe and into a bin. From there it goes right into the compost heap. Easy peasy.
This is what I used for my roofing! Looks like a load of trash, right? Nope, it's leftover wall panels from our pole barn style garage - basically indestructible stuff! I dragged it out, washed it up, and cut it to fit with a pair of shears. I made the ridge cap just by folding a piece lengthwise and screwing it down. No need for fancy venting - it's a chicken coop, not the Taj Mahal.
Okay, once the roof was in place, I built me some doors. These were from another deck that was being replaced. What a great resource! Just by cruising some local developments I found SO many great materials. All it cost was the gas money it took to bring them home, and none of this stuff ever made it into a landfill! Note my hinges. They were new. I wanted something I knew would hold the weight of these massive doors over time. I think these should do. The hinges on the nest box lid were a found item, though! Oh, did I mention that every single nail and screw in this thing were all salvaged? People go through their garages for spring cleaning and will sometimes chuck out entire boxes and tins full of brand new nails, screws, latches, doorknobs, etc. Oh, speaking of doorknobs...
They don't function, but they're adorable!! I close the doors with an eye hook, which wasn't yet installed at the time I took this picture.
Unfortunately, I didn't take detailed pictures of my chicken door. I built it so it slides up on a simple track that I made by putting wood strips behind the door edges inside the coop. I hope that makes sense. On the outside, I put one eyehook at the bottom of the door, and another about a foot and a half above the door. I tied a thin rope to the bottom hook, threaded it through the top hook, and left the end of the rope outside the fenced in run so all I have to do is pull the rope to open the door and tie it off on a small cleat. Easy peasy.
Here we are, just before I put up the run. I don't have any pictures of that, sorry. I used all repurposed materials on that, too. A few years back we lucked out and actually found an entire roll of chicken wire in someone's trash!! UNbelievable!! We didn't know when we'd use it, but we knew to take it! Lo and behold, we wound up actually using it for chickens about two years later!
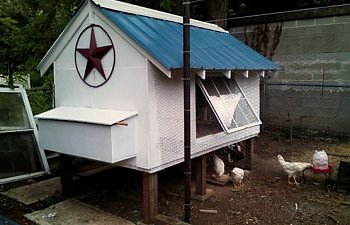
Here we are, all done! Someone threw out a 5 gallon bucket of exterior grade white paint that was just over half full! I have enough paint to do two coats on this one, and two coats for a friend who asked me to build a coop for her! Hooray! The window tilts out, and for now I just prop it open with a piece of scrap wood. It does lock shut using the original window lock, which I simply repositioned for my needs. I found that gorgeous red star in the trash, too! It was just bent a little on the round part - it looked like someone dropped it. Well, um - I bent it back - and it's as good as new!! The pole you see is from a heavy gazebo that someone threw out. I used several for my run support posts. I used both wire and zip ties to secure the chicken wire to the posts, and the chicken wire is secured to all wood surfaces using those big heavy things that look like staples that you have to hammer in. Cuz, yep, I found a bucket of them! I have heavy railroad ties running along the bottom of my run that are all staked down. The poles are secured to the RR ties with brackets. I don't have a top. My leghorns were flying over the run wall (about 7' high!) so I tried putting extra height up there with string. That didn't work. My leghorns now have clipped wings!
I recently opened up the nest boxes, which I'd kept closed off while the girls were growing. I added privacy curtains for them... you'll never guess what I used. Fabric from a discarded patio umbrella! More savings for me, less landfill use for the planet! Win!
Now, I can't finish this post without giving credit where credit is due. I wanted to include the main inspiration for my wide, swing-open doors, and rake-out cleaning idea.
I also took my cues for how to build the nest boxes from a great how-to page I found. This person made much nicer boxes than mine, with a hinged wall that opens for easy cleaning! I was running low on materials and wasn't sure I could pull it off as well, so I decided to just use the basic frame this person offered as a guide. If I had it to do over again, I'd make that wall flip down! Maybe next year I'll make some adjustments to it, who knows!
Okay, I hope you've enjoyed looking at my coop - I sure had fun building it and learning in the process!