Here is my coop design for our 6 girls. It is based a lot on The Triple C - The Crouches Chicken Coop
The dimensions of the coop is 4' wide by 7 1/2' long. The run is another 15' long so the overall size is 19' long and 7 1/2' wide. It is 7' tall on the high side and 6 1/2' tall on the low side. It used a full 48" x 100' long roll of 1/2" hardware cloth to cover it.
Here I have dug out the holes for the foundation blocks as well as digging a 12" deep trench so I can bury
the hardware cloth around the entire coop.
I have the foundation pier bases in and lined up. It was my idea to keep the bottom lumber just off the ground
to help keep it from rotting.
The wall for the entrance door is up.
The 4 walls are up! I am using 2x4 stained treated lumber.
The hardware cloth will be installed on the inside.
I installed the roof trusses with the furring strips to screw down the corrugated roof.
Also a horizontal support around the coop at 3' from the bottom
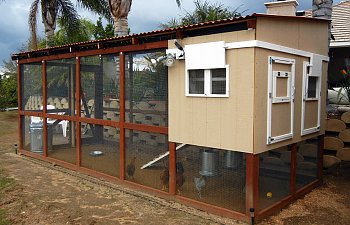
Another view of the coop/run
Fiberglass corrugated roof is installed. Only 200 screws to hold it down!
The floor and roof of the coop is installed. I'm using linoleum flooring on the coop floor.
I painted the top of the roof and the bottom of the floor under the linoleum to help protect the wood.
I have the coop run door installed and have started installing the 1/2" hardware cloth.
An air stapler is almost a necessity for this.
I'm about half way through the hardware cloth installation. I made the distance between the vertical studs
at 48" so I could cut and install my hardware cloth in pieces since the roll was 48" wide. It is buried 12"
underground around the entire coop.
I tried something different for the coop windows and doors. Over the next 3 pictures here you can see
that I installed the trim boards (3/4" by 3 1/2") and screwed them in from the back side so you don't see
the screws. I then used a circular saw and cut out the windows/doors sawing through the trim board and siding
at once. Time will tell whether this was a good idea or not.
Here is what is looked like after screwing in the trim boards.
This is what is looks like on the back side. I had to screw in the trim boards top and bottom
since I would be sawing through the center of them. (Lots of screws)
Here is what the door with window looks like after I cut through the center of the trim board
and installed the hinges.
This will be the egg door with a window above. I used trailer luggage door
latches to hold open the windows/doors when open.
Window is open being held that way with the trailer luggage door latch.
I made my ramp out of vinyl ranch rail fence material. The ramp has 2 of the 6" wide ranch rails
held together by the cross strips. Those are actually cut from the edge of the rails as well so the entire
ramp will never have to be painted or rot or warp. It will be easy to clean and never have to be replaced.
I think it will work out well.
Front view of the perch. It is held up using kind of a hook-n-eye setup so I
can remove it for cleaning if necessary.
Side view of the perch. I split 2x4's so they are approx. 1 3/4" wide by 1 1/2" tall
Interior view of the coop where the nesting boxes will sit. I installed electrical so I could use a light if necessary. I also installed a motion sensor light on the outside to scare off night time predators and of course an outlet so I could put up the Christmas lights on the coop!
Here is the nesting boxes. I installed the angled board on top so they wouldn't sit up there when someone was nesting.
I made 2 large doors w/windows that opened flush with the floor so everything could be scooped out easily if necessary.
I decided to make a sliding coop door that could be opened from the outside of the coop. I had some scrap aluminum L-shaped angle pieces that I attached to the 2x4 on the left side and I mounted another piece from the vinyl fence rail on the right side that I could attach the aluminum rail to. This made a nice channel for the door to slide up in. The string goes through a pulley at the top and out the side near the egg door through another pulley
for ease of pulling up the door.
The girls are checking out their new pad!
Home sweet home
They have their Christmas lights on each night!
Our first egg! From Nicole our Rhode Island Red, 4 1/2 months old.