Coop Plans
Note: I made plans for the build months ago. Once I started connecting the wall panels I realized a large mistake. I had not included the fact that some of the walls would be covered by chicken wire in my calculations. THis has caused the coop itself to not be a 4 ft x 4 ft square, but a slight rectangle shape. Luckily I measured the cuts on the barn siding based off the physical frame and not the drawings. I would suggest doing the same. I did my best to recreate the plans based off the finished structures, not how I intentended them to be. The height shown on the drawings are all based off a 72" board cut for the studs. THis makes the actual height about 3 to 4 inches taller. Please read through te whole thing before you go cutting. Most of the boards are the same size so you can save time by doing all your cuts at once. Also we decided that the 18inches from the ground to the bottom of the coop would actually be 18inches from the top of the bottom board. I don't know why that is but if you go on center or from the ground it will only change the finshed size of the coop. When connecting the run walls to each other, the East and West walls are attached to the inside ofthe North and South walls. As you are looking at the East side of the run you should see the East wall straight on and the two exposed ends of the North and South wall.

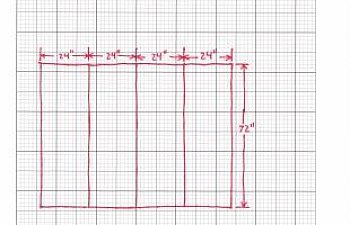
The above drawing is of the East facing run wall. The cut list is two 2x4 studs 8 feet long, and five 2x4 studs 72 inches long. I connected all with deck screws. One stud at each end and the interior studs at 24" on center. This allows the chicken wire to be attached to each section. I would suggest painting the stud frame prior to added chciken wire.
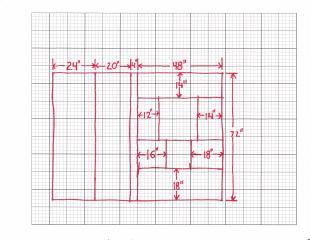
This is th North Run wall as well as the North wall of the coop. This section represents the first time the chicken wire bit me in the but. As it is assemled you have two sections at 24 inches apart, on center with chicken wire attached THe 48 inch section only has chicken wire on the lower 18 inch section as this is below the floor of the coop (this has worked out great whe nthe silly ladies don't get in before it rains). As you can see from the drawing, the second 24 inch panel has a second upright stud. This stud made up the difference in size that the coop grew when I started building the interior walls. My suggestion, if you want to duplicate my coop (including the on the fly changes) would be to assermble the main part of this wall with the two 2x4 8foot top and bottom pieces and the five 2x4 72inch upright studs. Then I would measure your widths for the horizontal elements of the coop frame at 18inches off the bottom board and 14inches off the top board. This is because a 2x4 is not 2 or 4 inches in either direction so you are dealing with roughly 3/4 on either side of the center measurement. The one measurement that I left off is that the height of hte opening for the access door is 24inches. Again, I would paint before applying the wire to the exposed sections.
The above drawing is for the South wall of the run. The cut list is four 2x4 studs at 72inches and two 2x4 8foot boards top and bottom. Chicken wire covers the two 24 inch sections. THe center section is the access gate to the run. I built that section free style based off the measured size of the opening. I used 2x2 boards for the gate itself and covered it witrh chciekn wire. I will include a pic of the gate shortly.
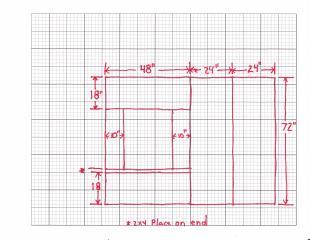
This is the West run wall and coop wall. It has the opening for the nest box. I will draw those plans up shortly. THe cut list for the main structure is four 2x4 72inch studs and two 2x4 8 foot top and bottom. the bottom is 18inches from the bottom board with and second 2x4 placed on its side to act as a divider from the main space. 18 inches from the top is the top of the nest box support frame. The upright boards are 10inches from the outside pieces on center.
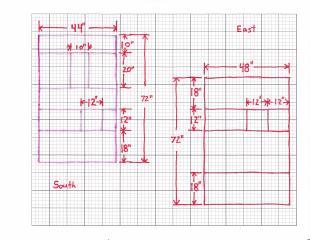
OK these dimensions didnt scan real well so I will do my best to make it clearer. ON the left is the south side coop wall that includes an opening framed for a chicekn sized door and the window I added later. THe cut list for the main structure is two 2x4 44inch top and bottom and two 2x4 72inch studs. 10 inches from the top is the top support for the window frame. 20inches lower is the bottom of the window. THe uprights for the window are 17inches from the side making the opening 10 inches. THe bottom of the door is the same 18inches from the bottom board as the other sides. The door frame is 12inches on each side. Mine is about 10 inches from the right side. Inside the door frame a placed a scrap of 2x4 to keep the bedding from falling out of the coop.
THe drawing on the right is the East coop wall with the screen window. I stapled the screen material to hte window frame prior to installing the barn siding. Again two 2x4 72inch studs and two 2x4 48inch to pand botom pieces. THe window is is inches from the top board and the coop floor is still 18 inches from the bottom board. THe window fram is 12 inches from the right side and is a 12 inch square opening.
That takes care of the framing of the structure. Time to install the floor and ceiling. My floor is a leftover floor board from a househould repair that I cut to fit as is the flat wood roof. A scrap piece of 2x6 board provides the East side joist for the green roofing. Onthe west side it is secured with a scrap of 2x2 attached to the outside of he West wall.
The barn siding dimensions are as follows: North, width 52" height 57
West, width 51" height 57
East, width 49" height 57
South, width 50" height 57
I wouls suggest that you build your frame and measure for your barn siding after the fact so that any oddities that may happen are taken into account. As far as the opening for the windows and doors, we used the method of simply holding up a panel on the outside while someone on the inside traced to opening on the back of the board.
As soon as I get the chance, I will draw up the plans for the nest box, the doors and the ramp.
The above drawing is of the East facing run wall. The cut list is two 2x4 studs 8 feet long, and five 2x4 studs 72 inches long. I connected all with deck screws. One stud at each end and the interior studs at 24" on center. This allows the chicken wire to be attached to each section. I would suggest painting the stud frame prior to added chciken wire.
This is th North Run wall as well as the North wall of the coop. This section represents the first time the chicken wire bit me in the but. As it is assemled you have two sections at 24 inches apart, on center with chicken wire attached THe 48 inch section only has chicken wire on the lower 18 inch section as this is below the floor of the coop (this has worked out great whe nthe silly ladies don't get in before it rains). As you can see from the drawing, the second 24 inch panel has a second upright stud. This stud made up the difference in size that the coop grew when I started building the interior walls. My suggestion, if you want to duplicate my coop (including the on the fly changes) would be to assermble the main part of this wall with the two 2x4 8foot top and bottom pieces and the five 2x4 72inch upright studs. Then I would measure your widths for the horizontal elements of the coop frame at 18inches off the bottom board and 14inches off the top board. This is because a 2x4 is not 2 or 4 inches in either direction so you are dealing with roughly 3/4 on either side of the center measurement. The one measurement that I left off is that the height of hte opening for the access door is 24inches. Again, I would paint before applying the wire to the exposed sections.

The above drawing is for the South wall of the run. The cut list is four 2x4 studs at 72inches and two 2x4 8foot boards top and bottom. Chicken wire covers the two 24 inch sections. THe center section is the access gate to the run. I built that section free style based off the measured size of the opening. I used 2x2 boards for the gate itself and covered it witrh chciekn wire. I will include a pic of the gate shortly.
This is the West run wall and coop wall. It has the opening for the nest box. I will draw those plans up shortly. THe cut list for the main structure is four 2x4 72inch studs and two 2x4 8 foot top and bottom. the bottom is 18inches from the bottom board with and second 2x4 placed on its side to act as a divider from the main space. 18 inches from the top is the top of the nest box support frame. The upright boards are 10inches from the outside pieces on center.
OK these dimensions didnt scan real well so I will do my best to make it clearer. ON the left is the south side coop wall that includes an opening framed for a chicekn sized door and the window I added later. THe cut list for the main structure is two 2x4 44inch top and bottom and two 2x4 72inch studs. 10 inches from the top is the top support for the window frame. 20inches lower is the bottom of the window. THe uprights for the window are 17inches from the side making the opening 10 inches. THe bottom of the door is the same 18inches from the bottom board as the other sides. The door frame is 12inches on each side. Mine is about 10 inches from the right side. Inside the door frame a placed a scrap of 2x4 to keep the bedding from falling out of the coop.
THe drawing on the right is the East coop wall with the screen window. I stapled the screen material to hte window frame prior to installing the barn siding. Again two 2x4 72inch studs and two 2x4 48inch to pand botom pieces. THe window is is inches from the top board and the coop floor is still 18 inches from the bottom board. THe window fram is 12 inches from the right side and is a 12 inch square opening.
That takes care of the framing of the structure. Time to install the floor and ceiling. My floor is a leftover floor board from a househould repair that I cut to fit as is the flat wood roof. A scrap piece of 2x6 board provides the East side joist for the green roofing. Onthe west side it is secured with a scrap of 2x2 attached to the outside of he West wall.
The barn siding dimensions are as follows: North, width 52" height 57
West, width 51" height 57
East, width 49" height 57
South, width 50" height 57
I wouls suggest that you build your frame and measure for your barn siding after the fact so that any oddities that may happen are taken into account. As far as the opening for the windows and doors, we used the method of simply holding up a panel on the outside while someone on the inside traced to opening on the back of the board.
As soon as I get the chance, I will draw up the plans for the nest box, the doors and the ramp.