Up to a few months ago, having a flock of back yard chickens was the last thing on my mind. My daughter, six years old at the time, was wanting a pet bunny, and I was talking about it at work one day, and my boss suggested that I get some chickens for her. "Chickens???" I asked. He introduced me to BYC, and I quickly became intrigued. I suggested it to my wife, who was for the bunny, and her response was like mine - "Chickens???". After doing a little research, I bought four chicks on April 1st - two Barred Rock and two Buff Orpington pullets. (We've since added three Cochins to the mix.)
CONSTRUCTION
Soon after, I got to work on building a coop. Fortunately, I had most of the material on hand, either left over from previous projects or given to me. I only had to buy one sheet of plywood and some miscellaneous hardware. All the other plywood, lumber, shingles, chicken wire, etc. were already available to me, so I think I ended up with less than $100 in this venture. The roof was actually taken from a second-hand swingset/clubhouse that had been given to my daughter the previous fall. When I assembled it for her, we decided to leave the clubhouse "open" rather than putting a roof on it, so the A-frame worked perfectly for our coop. The roof incorporates pickets to make the gables more ornate, which happens to also provide excellent ventilation for the girls.
Here are some photos taken during various stages of construction. I used 2"x4" drops that I had to frame the floor and walls, and I had some 4"x4" drops which I used as uprights, which place the floor of the coop about 30" off of the ground.
The overall dimensions of the floor of the coop are 6ft x 3ft, with the roosting area being 4-1/2ft x 3ft. I took two hardwood branches, which are about 2-1/2" in diameter, and crisscrossed them over each other for roosting poles.
There are two laying boxes on the end, which are each approximately 18" x 18" and which are divided by a piece of plywood. The laying boxes are accessed by a small door on the end of the coop which drops down.
The photos above show the coop built near an old dog kennel and run, which I am no longer using. I originally intended to use this run for the girls, but I later found out that the posts of the run had rotted at the ground. More about that later.
The roosting area has an access door in the other end of the coop, which allows easy access for periodic cleaning and replacement of pine shavings.
The interior walls and floor were lined with some heavy mil black construction film that I had for easy clean-up. Here's a view from one of the nesting boxes looking back into the roosting area. "Penny" struck a pose for this one.
Final stages of construction:
The legs look a bit crooked in the last photo, simply because they were.

Afterwards, I started to concentrate on the run. As I said earlier, I intended to use the old dog run that I was no longer using, but I quickly learned that the posts were rotten at the ground. Upon discovering this, I disassembled the run and I decided to use the chain link kennel which was attached to it as the run for my girls. I placed the chain link kennel (approximately 8ft x 8ft) up against the coop and cut an access hole through the fence so that the girls can enter/exit the coop through a 14" x 16" opening I made in the back side. I also attached some coated 1" chicken wire that was donated to me to the inside of the kennel chain link with literally hundreds of nylon cable/wire ties, and I also stretched some 1" x 3" welded wire over the top which I had taken from the old dog run to keep predators from accessing the run from above. I also wire tied some of the coated chicken wire over this. In addition, I attached some of the 1" x 3" welded wire to the bottom of the chain link kennel which stretches out as a skirt approximately 2ft around the perimeter of the kennel. Coated chicken wire was also attached to the skirt, and it was covered in a couple of inches of dirt. I chose this option rather than digging down approximately one foot to keep predators from coming in from beneath. In the end, the kennel seems to have worked out to be the better option, as I think it is a bit more secure than the dog run which I had.
I provided the girls with a ladder which leads up into the coop, and some co-workers of mine were kind enough to modify a door off of an old dog crate by cutting down the dimensions, re-attaching the latches, and welding on some hinges. I spray painted it with some rust colored primer which blends in well with the color of the coop. It has been my practice to lock the girls in the coop at night as an added layer of protection. Good night girls, sleep tight!
After the girls learned to go into the coop and perch on their roosts (had to work with them a bit on this), I decided that they should have a roost in the run itself, so I wire tied a large branch to the chain link fence. This was a much appreciated addition.
I made my own bucket waterer with poultry nipples and a bucket feeder (each 2 gallon capacity), both of which hang from the side of the coop by some short pieces of chain which have been lag bolted to the coop. The bucket handles attach to some s-hooks on the ends of the chains, which makes for easy removal for refills. The buckets are placed just inside the kennel door, so it is easy to access them. (I remove the bucket feeder at night to prevent issues with rodent infestation.) In addition, I made a shroud out of some of the 1" chicken wire to keep the girls from perching on the buckets, which keeps everything nice and clean.
OTHER PRECAUTIONS
I had read somewhere that snakes don't like to cross lava rock, due to roughness of the material. Not sure if this is true or not, but I don't believe I've ever seen a snake in any beds that I had used lava rock as the ground cover. So, I decided to put a 12" border of red lava rock all the way around the run. I also trimmed all low hanging limbs which were overhead to prevent easy access/escape by coons, possums, etc.
FINISHING TOUCHES
I soon deciced that an awning was necessary on the back side of the coop. The awning serves three purposes: keeps rain water from blowing in the girl's access door to the coop, keeps their feed somewhat dry, and keeps me dry when I duck in to get their feed and water buckets after a rain (nothing like brushing your back against wet chicken wire overhead when you are letting your girls out of the coop at 6:30am, just before leaving for work).

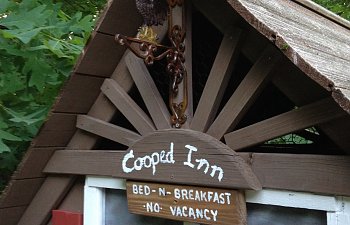
Not wanting the coop to look too utilitarian, I decided to make it look more like a home for the girls. The exterior was stained a light brown/tan color. My mother-in-law provided an old window frame and a wrought iron rooster which are mounted to the front of the coop. Some smoke gray and some white spray paint was applied to wall of the coop within the window frame to give the effect of light reflecting off of glass. I built a small window box which I mounted beneath the window frame and also added some shudders. I also shingled the coop using some shingles left over from the construction of my own home. Ladies and gentlemen, welcome to "Cooped Inn":
THINGS I WOULD CHANGE
I've always heard it said "It's hard to beat free". In this case it's true, since I had most all of the materials on hand. If I could make any changes, probably the one that I would make would be to have a taller run since the chain link kennel is only 4ft tall. But it's not been too much of a problem, since their food and water are easily accessible in front of the run door. All in all, the whole family has been very happy with this project. "Chickens???"