Hello all...I wanted to share my coop design with everyone on here. I used this website for designing my coop, so I figured the least I could do was document my setup and let someone steal ideas from me.
Most of my design came from:
Log Cabin Coop - Love the wood look.
The Palace - Indeed, great coop.
I ordered chicks on mypetchicken.com. 8 Red Stars and 8 Australorps. One Australorp came DOA, and another died the next day. They refunded me promptly. Good company, I highly recommend them. Down to 14 healthy chicks.
The first 4-5 weeks they stayed in the brooder box.
It was simply a 4'x3' box, I put some plastic at the bottom to make it easy to clean. I then put cabinet rubber and paper towels in there for the first two weeks, changed the paper towels daily. Next two weeks I used Pine Shavings. They outgrew this brooder by the 5th week.

Meanwhile...construction on the coop began. I had help from my father, my mother, my wife and two brother in-laws. Although, It was mainly my dad and I.
The base:
8'x8' base on 2x6s. Two 4x8 sheets of plywood fit...well perfectly.
To finish the base, I covered it in linoleum left over from a house project.
All framed out and ready for the roof. The 2x4s came from left over projects.
Framed the roof and installed metal roofing with an extra foot overhang to cover the nesting boxes.
Covered it in plastic, an extra wind barrier. Winters in central PA can get bitter.
I used stained pine boards for the sides. I sometimes work for a lumberjack on the weekends and this was my "pay"!
Next up, the nesting boxes. There's 6 nesting boxes here. 12"x12"x16". We constructed the box in our shed, all we had to do was attach it to the coop.
I put a space (and a board) between the 2x4s and the slats I used to divide the boxes that I can move up for easy cleaning. Also installed more linoleum.
Meanwhile, I constantly was introducing the lil peeps to our two dogs (both Cockapoo's), they got along great. No problems.
Installed the two windows in the front of the coop. Inside I used screen and covered that with chicken wire. Then, on the front, I made frames and had plexiglass windows made to fit the frame.
Side window above their roosts:
Next up was the man door. I decided I wanted to make it a double-door so I wouldn't have escapees and giving them feed and water easily. I also wanted a window so I could look in before opening. I later installed bolt locks for each section of the door. There's my dad showing how it works!
Moving back inside, we installed the chicken run door. I put it on a pulley system so i could open/close it from reaching inside the door to the left. Easy!
The outside steps for the chicks. Measured about 3 ft. long.
Meanwhile, my wife and the dogs enjoy the day outside in an old dog pen that I had from raising lab puppies. Chicks are getting bigger, pushing us to wrap up this project!
Next, I made roosting bars & painted them. Ripped a 2x4 in half and sanded the edges. I thought they would use all the rungs, but turns out they only like the top one.
While I was at it, I made a roost bar in front of the nesting boxes. Chains you see hanging there are for their food and water.
We added a roof over the chicken run steps. The chicken door faces the North West, this will help prevent the wind and rain from getting in.
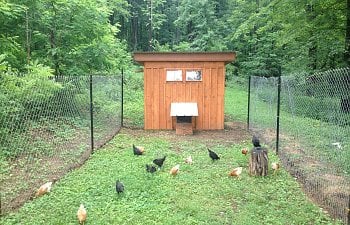
Here's the finished coop, ready for "move in". I also gave them a 40'x15' run. I still have to cover it with some aviary netting, but so far haven't had any aerial attacks!
The chicks moved in around 5 weeks old. The nights were warm enough I wasn't too worried about them getting cold.
I left them "coop'd" up for about a week and a half to make them learn what home was. The one day after work I surprised them with life on the outside.
And sometimes, the best laid plans are the ones you never had! The girls like the 2x4s as roosts too I guess.
But, as they grew older, they no longer fit on the 2x4s. And about a half hour before dark all the girls are roosted for the night. They're like clock-work.
Start to Finish it took about 6 weeks, working on Saturdays and Sundays. Most of our cost was in screws and nails. Most wood was from leftover project. If you have any questions, drop me a note. I'll be more than happy to go into further detail. Hope you enjoyed my pictures and brief comments!
-Dan
Most of my design came from:
Log Cabin Coop - Love the wood look.
The Palace - Indeed, great coop.
I ordered chicks on mypetchicken.com. 8 Red Stars and 8 Australorps. One Australorp came DOA, and another died the next day. They refunded me promptly. Good company, I highly recommend them. Down to 14 healthy chicks.
The first 4-5 weeks they stayed in the brooder box.
It was simply a 4'x3' box, I put some plastic at the bottom to make it easy to clean. I then put cabinet rubber and paper towels in there for the first two weeks, changed the paper towels daily. Next two weeks I used Pine Shavings. They outgrew this brooder by the 5th week.
Meanwhile...construction on the coop began. I had help from my father, my mother, my wife and two brother in-laws. Although, It was mainly my dad and I.
The base:
8'x8' base on 2x6s. Two 4x8 sheets of plywood fit...well perfectly.
To finish the base, I covered it in linoleum left over from a house project.
All framed out and ready for the roof. The 2x4s came from left over projects.
Framed the roof and installed metal roofing with an extra foot overhang to cover the nesting boxes.
Covered it in plastic, an extra wind barrier. Winters in central PA can get bitter.
I used stained pine boards for the sides. I sometimes work for a lumberjack on the weekends and this was my "pay"!
Next up, the nesting boxes. There's 6 nesting boxes here. 12"x12"x16". We constructed the box in our shed, all we had to do was attach it to the coop.
I put a space (and a board) between the 2x4s and the slats I used to divide the boxes that I can move up for easy cleaning. Also installed more linoleum.
Meanwhile, I constantly was introducing the lil peeps to our two dogs (both Cockapoo's), they got along great. No problems.
Installed the two windows in the front of the coop. Inside I used screen and covered that with chicken wire. Then, on the front, I made frames and had plexiglass windows made to fit the frame.
Side window above their roosts:
Next up was the man door. I decided I wanted to make it a double-door so I wouldn't have escapees and giving them feed and water easily. I also wanted a window so I could look in before opening. I later installed bolt locks for each section of the door. There's my dad showing how it works!
Moving back inside, we installed the chicken run door. I put it on a pulley system so i could open/close it from reaching inside the door to the left. Easy!
The outside steps for the chicks. Measured about 3 ft. long.
Meanwhile, my wife and the dogs enjoy the day outside in an old dog pen that I had from raising lab puppies. Chicks are getting bigger, pushing us to wrap up this project!
Next, I made roosting bars & painted them. Ripped a 2x4 in half and sanded the edges. I thought they would use all the rungs, but turns out they only like the top one.
While I was at it, I made a roost bar in front of the nesting boxes. Chains you see hanging there are for their food and water.
We added a roof over the chicken run steps. The chicken door faces the North West, this will help prevent the wind and rain from getting in.
Here's the finished coop, ready for "move in". I also gave them a 40'x15' run. I still have to cover it with some aviary netting, but so far haven't had any aerial attacks!
The chicks moved in around 5 weeks old. The nights were warm enough I wasn't too worried about them getting cold.
I left them "coop'd" up for about a week and a half to make them learn what home was. The one day after work I surprised them with life on the outside.
And sometimes, the best laid plans are the ones you never had! The girls like the 2x4s as roosts too I guess.
But, as they grew older, they no longer fit on the 2x4s. And about a half hour before dark all the girls are roosted for the night. They're like clock-work.
Start to Finish it took about 6 weeks, working on Saturdays and Sundays. Most of our cost was in screws and nails. Most wood was from leftover project. If you have any questions, drop me a note. I'll be more than happy to go into further detail. Hope you enjoyed my pictures and brief comments!
-Dan