I've been wanting to hatch eggs since I first thought about getting chickens. I did my research on BYC and discovered that the least expensive and most common 'bators (the hova-bators) were unreliable. You get what you pay for. The nicer incubators were out of my price range (I really really want a brinsea). But during my research I found how easy it was to build your own. I've always been a DIYer, but I didn't want to lay out a bunch of money for the parts (defeats the purpose!) So the first year I just bought chicks and I set to scrounging for the parts for a good home made 'bator.
Two years later, here's what I gathered.
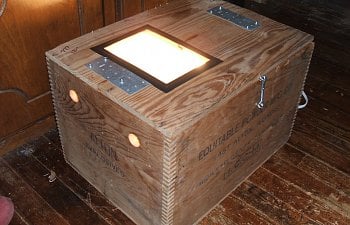
The best box ever!
It was 12 dollars at one of my local thrift stores, but I traded some stuff for it instead.
Next I set about gathering the innards
.
The light socket was left over from the house remodel (as was the electrical box we put it in, which is not pictured). The fan (and the cell phone charger plug, not shown) I got from a friend of mine who builds and repairs computers. It was free. The socket costs about 5.00 new, the electrical box is about 2.50, the fan would run you 5ish dollars, although I've seen ones that run on A/C power (so you don't need a 12 volt adapter) for 9-12 dollars.
The socket splitter cost 1.50, the thermometer/hydrometer cost 12.00, the grill toppers cost 2.00 for the pair, the extension cord (white one, not pictured) cost 3.00.
Next I lined the box with foam insulation
I made a foam box to fit in my box! A full sheet of insulation will run you 13-16 dollars, but it's a HUGE sheet. This box only required 1/3 of a sheet! So go in on it with somebody if you can. Otherwise you'll have 2/3 of a sheet of silver foam insulation hanging around your yard for two years...(or was that just me?)
Next I drilled four one inch holes. Two on the bottom of one side, two on the top of the other.
The airflow in there is GREAT!
For the 'floor' of the hatching area, I followed another BYCer's suggestion and used grill toppers. They were cheap, and they are fairly stable. Perfect. I cut them to size with a set of tin snips, although you could use utility scissors no problem. Then I used a pair of needle nose pliers to turn the edge under. Those little edges are SHARP! So be careful!! I bent up one edge for a lip, but decided it wasn't tall enough. So I cut the second topper to size to make a full height wall, and then 'sewed' the two pieces together with a fine wire.
To lift the grate off the bottom of the box I used canning jars filled with water (also great heat sinks. Win-win!) and the water tray is a Ziploc container that is the same height as the jars, so it supports the floor too! I had to punch holes around the top of the tray for better air flow to the water. A small plastic tube will run to the tray through one of the top holes, as soon as I get my paws on some!
The thermostat is a water heater thermostat, like so many folks use. Mine came with a little plastic guard though, which is handy for keeping the electrical contacts from touching the foil sides, and your fingers when you adjust the temperature. It's also useful for a place to mount it to the wall off the incubator.
I wired the thermostat and the light fixture together using the same diagram everybody here has.
The only difference is I ran mine through a plastic light box so all the exposed wires were enclosed. It also added some height to the bulbs and set them in the perfect spot for the thermostat. A word to the wise, make sure you pull your cords through the cord hole BEFORE you hook them up to the light. The plugs won't fit through the hole. LOL! You can see the screw in the bottom of the light box and on the thermostat cover here.
The lid consists of two slats, so I had to attach them together. But first I cut out the hole for the window. The glass is from a picture frame. I cut the hole before I attached the two slats so I could maneuver the saw better. I laid the glass down, traced around it and then used a jig saw to cut out the hole.
Then I laid the two slats together put a bead of glue down the center lip, and used three brackets to hold the slats together and strengthen the join. Then I attached the hinges and tacked down the cords. I had to chisel out some wood on the inside lip so the lid would close all the way. These hinges aren't technically supposed to attach this way and the counter sink recesses are on the other side. If I'd have thought this through, I'd have put the strap part of the hinge on backwards so the internal ones could countersink properly. Oh well. Live and learn.
I have a socket splitter so that I can have two bulbs running off of one socket. That way if one bulb goes out it's not a disaster. The thermostat sits right between them.
Finally, I taped the glass in place, set the grating on, attached the latch and BAM! a dynamite incubator!
I'm eventually going to drill a hole to the thermostat knob and put in an egg turner, but for all intents and purposes, I've got a fully functional incubator! It holds the temperature well at 99-100 degrees and the humidity at about 40% (ignore the temp and humidity in the picture, I *just* turned it on)
Now, for EGGS!!
First hatch
I've done my first hatch, and now I know what improvements need to be made.
I received my eggs Feb 18, badly shaken up and one broken. I set them anyway because it was for my daughter's school. (I know, first hatch, home made incubator, first hatch in my home made incubator...could have been planned better)
Out of 14 shipped eggs, 5 hatched (Out of 6 local eggs 1 hatched, 1 piped and died due to malpositioning)
I had a very hard time bringing the humidity up during lockdown, which I'm sure contributed to the poor hatch. The best I was ever able to obtain was 57%, and it usually hovered around 40%. This was due to the lid warping in the extra humidity. I really like the idea of a wooden lid, but in the end, with this old dry wood, it simply did not work. I will be replacing the lid with plexiglass with weather stripping around the edge.
The knob to adjust the temperature simply would not stay glued! I used super glue, but that just doesn't work well attaching plastic to wood. So to adjust the temperature, I had to open up the incubator, remove the thermostat from it's plastic housing, and turn the knob, all the while having my hands RIGHT next to the super hot light bulbs. Not ideal. So once this hatch was over, I grabbed some plumbers putty and epoxied that sucker in to place. It works great now.
I'm also planning on putting some feet on this box. I'd *like* them to be pretty, but I'll take simply functional. Under our house (and in the walls frankly, It's an OOOOOLD house) we have a HUGE ant nest. We are completely infested with sugar ants. They aren't poisonous, but they do bite. Even though it's a tiny bite, it still smarts a bit when they do. They are highly attracted to liquid and protein, especially liquid pro tine. Guess what's left over in the egg when chicks hatch...yeah. It was a battle to keep them out of the incubator and off the chicks. Putting legs on the box will allow me to set the incubator in small jars full of salt, which will keep the ants out.
I'll take pictures once the upgrade is done! I've got eggs waiting to go into the incubator, so it'll be soon!
PICTURES!
Ok, still not *quite* done, but here's what I've got so far for round two!
Well, after an *extraordinarily* disappointing hatch, the explosibator got mothballed for the year. I firmly believe it was the eggs, not the incubator though.
Stay tuned in for this years modifications and upgrades (feet! a real heating element instead of a light bulb! an egg turner! ACTUALLY MOUNTING THE FAN! Hold on to your hats folks! We're lookin' to get really fancy here!)