Egg-U-Bator
ok, here they are..... 
I looked through alot of homemade incubator directions and didn't like just one, so I took ideas from a few of them here on BYC and came up with this.
First of all, here it is.....
if you plan on making it Please read through all the directions before starting
Materials needed to build our Egg-U-Bator........
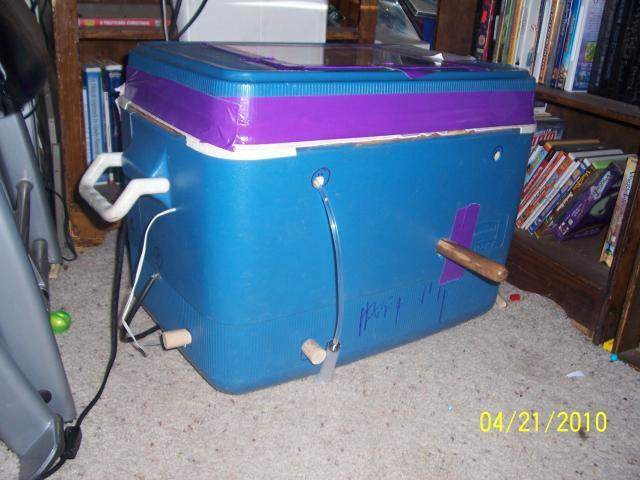
[FONT=comic sans ms,sand]an old cooler (any size, mine is 21"W x 16" Tall x 14 across the top, I would not go smaller than that), plexi glass, duct tape ur choice of color, 4 corks, fish tank tubing, 2t. syringe from pharmacy, 1/4" hardware cloth, tray for water (I asked my DH to buy me a hungryman just for the plastic tray
tools needed are wire cutter, screw gun/drill, 1/2" drill bit, jig saw...using it to cut hole for window.
Now that the hard part is over it's time to put it together........Ready? 3 more hours MAX (no promises)
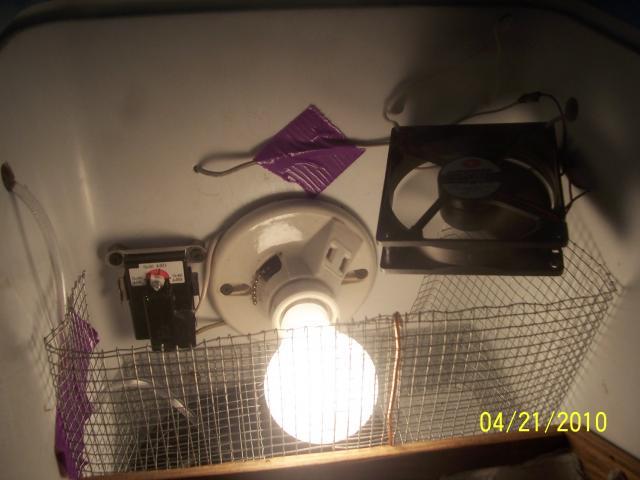
[FONT=comic sans ms,sand]drill your holes, 2 on the front toward the top (see pic),on the right side of mine is the coolers plug, i just leave that open. and I also drilled a hole in the lower left area, on the back theres 2 holes toward the top (same as the front) and one in the lower left area. Now is the time to decide where you want the light, mine is on the left side/end of the cooler, Wait to drill a hole for the light fixture till you got the hardware cloth in the cooler.... the fans wire can be ran through the backs top hole. you'll see holes in the pics that I didn't tell u to drill, that's cause they shouldn't be there, there under the thermostat (not a good idea) and I keep them pluged. live and learn I guess. [/FONT]
this might be a good time to cut the window out..... my glass rests on the lid about an inch all around. I wrapped duct tape around all the edges of the glass, just cause I could and I made a duct tape hinge for the window so I could open the window up and not have to open to WHOLE lid. I did however place small pieces of tape on the edges to keep heat/humidity in.
ok lets see, what next?..... how about the hardware cloth? (nasty,nasty!, get out ur gloves)..... measure the inside dimentions of ur cooler and add 4 inches to width and length so when you bend it over, it will be 2 inches off the coolers bottom. cut it using ur wire cutters. bend it, and place it into the cooler.... hows it look/fit? adjust the cloth/wire as needed and slip ur water tray under there.(my tray is under where the light bulb will be) speaking of the light bulb, you can now drill ur hole above the hardware cloth for ur light fixture. You can now cut a "wall" with "sides" to keep the chicks away from the business part of the 'bator. make it tall so they can't get over it (mine's 6 inches tall).
the light, this is not my department, but I'll try to be of some help. There are more places on BYC to help you wire the thing up and hooking the thermostat to it. Don't touch the bare wires once you plug it in..... This is what I did, maybe my "how to wire your water heater thermostat to your light" diagram will help. (had to put that whole name in there so the diagram can be searched and found)
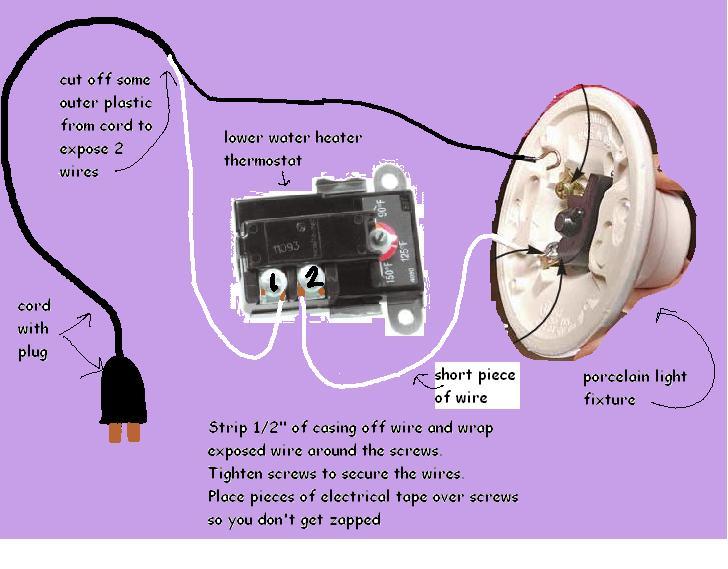
now run the power cord through the hole in the cooler and finish wiring it in. So now you got it wired right?? carefully, Plug it in! does it work??? now screw the fixture to the wall and don't screw through a wire...... now screw the thermostat to the wall using the spacers and screws. (you need to space it from the wall, it registers heat from the back) now place a bulb in the fixture and mark on ur wire how far the bulb sticks out to cut out a hole in the wire. I don't think this is nessesary but I did it. ??(I thought the wire would get to hot) put ur bulb back in and set up ur "wall". Now how's it look? safe? is it working? does the thermostat shut off the light? turn the temp dial, does it turn off/on the light?
The Fan..... snip the very end of the fans wire, leaving a long wire attached to the fan. grab ur power pack/phone charger and snip the end off (the end that plugs into the phone) you NEED the wall plug and the long cord. now "splice" (remove and inch of the coating) the fan cord and the wall plug in....... run the cord through the cooler wall, and wire the 2 cords together...... tape each color wire separtly and THEN tape them together. plug it in..... does it work? if not wire it the other way! :O) String up the fan so it's NOT blowing on the eggs but still will stir the air. I ran a strong wire through the fans corners and looped the wire on the ends and screwed the wire to the walls. you can kind of see this in the pics.
adding or removing water..... run the fish tank hose through the hole closest to ur water tray....... putting the end of the tube, hole down, in the lowest spot of the tray. is the hose behind ur "wall"? tape the hose to the inside wall of the cooler, get a cup of hot tap water, using the syringe suck up some water and put the tip of the syringe in the end (outside the cooler) of the tubbing. push the plunger down to add water and pull it out to remove some water..... removing water works better when theres more water in the 'bator. I put 3 syringes in everytime I add water + I put a 4th syringe full in the hose/tube and keep the syringe "in" the tube all the time. I add water when my 'bator is at 30% humidity I don't KEEP my 'bator at a certain %, I just add water when i gets low.(30%) at lockdown I up it to 65-75%. It worked wonderful for me. as for temps, mine swings between 97 and 102 degrees. I figure that 99 is somewhere in the middle of that. And that also worked great for me.
the turner....
materials... wood, hardware cloth/wire, stapler (not ur office one) 2 egg cartons, screws and washers, dowel/broom stick (1"x 18") needs to go completaly through the cooler front to back, so check YOUR coolers dimentions.
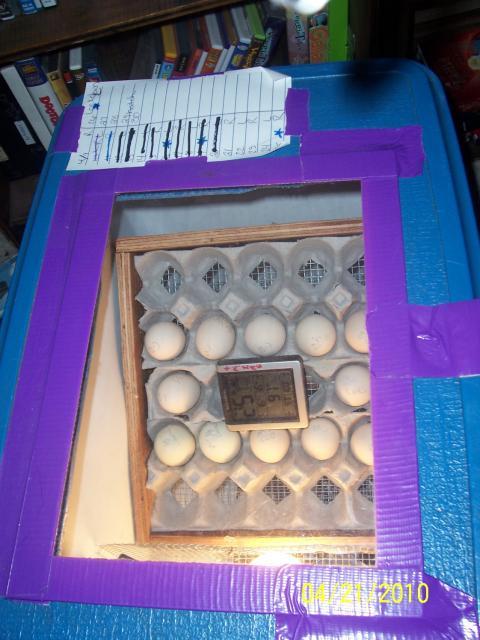
I made the turner, however I had the use of a chop saw. for the sizing of my turner I took egg cartons and cut the end 2 spots off (carefully) I took cartons and put them long sides together.... then I put the "end" holes between them (see pic) ..... and I meausured outside dimentions, if your cooler is the same size as mine THIS is the size box you need. when building note that there should be 1" gaps to allow for turning. to build the turner.... find some scrap wood 1/2"ish thick x 2"ish tall and make ur box. staple on some hardware cloth/wire for the bottom..... oh and I cut the bottoms off the egg cartons for air flow. now find and mark the center of ur turner ....... put the turner in the cooler and locate and mark where the center of the turner will be on the sides of the cooler by centering the turner between ur wire wall and the coolers wall (you should have an inch gap between the walls and the turner on both ends, not the sides) (take ur time, if it's not right it WONT work). Drill ur holes about 2-3 inches off the top of the hardware cloth that's in the cooler bottom. drill them in the front and back walls of the cooler the size of ur dowel. (CLEAN cooler) slid ur dowel through the cooler till about an inch is sticking out of the back and you should have a good sized handle out the front. now set the turner on it and fasten the turner to the dowel with screws and washers. The washers keep the screws from pulling through the wire....Well here we are again!.... hows it work?.... does ur egg cartons fit? :O) I hope so.....
is that everything?...... clean out all of ur messes...... close the cooler lid (I taped my lid shut cause it leaked heat). turn on the light, set the thermostat, plug in ur fan, place ur thermometer/hygrometer(s) on the egg carton anywhere (but note that each one will read a bit differently) I would also calibrate ur hygrometer first. (google it) and now let it run for a day. see what ur temps are, adjust accordingly. when your temps are stable for 24 hours THEN add the eggs. Remember my temp lows are 97 with highs of 100 -102. my humidity at days 1-18 is 30-40 (gets to 30, I add water) days 18+ humidity is up'ed to 64 and can reach 75 when eggs are hatching. For lock down I take out all the eggs,remove the turner and dowel, candle the eggs, put shelf liner over the hardware cloth, cover that with flattened coffee filters, put the eggs back in the'bator on their sides. I put like 4 filters in there that I don't flatten out and put an egg in them, just to keep the eggs from rolling all over the place. just me, you can do what you want, but please don't hatch in the turner. they could get trapped under it. remove the turner!!!
PM me if you got questions and Happy Hatching!
Amy