So, as i am in the military, i need to be able to move house every 1-2 years, sometimes short distances, sometimes abroad. so the need arose for a coop which was easy to transport but also not take up huge amounts of our precious 25 cubic meters of allowance. Plans started forming utilizing the ready supply of pallets i have through work.
On friday (two days ago) i took the car and liberated 7 pallets from various rubbish piles around camp. My plan was simple, to create a coop and run large enough for my two leghorns, to separate them from my two bantams and their three chicks.
I started with stripping 4 pallets back to their bare frames and covering them with some chicken wire. Now i know a lot of people don't think chicken wire is adequate protection, however, we have no predators where i am apart from our cats who pay no attention to the chickens at all. having said this though it would be easy enough to get the more heavy-duty mesh most people use and use that instead.
i then paired two of these fence panels together and added hinges to the top so they fold out like so:
to the bottom i attached a length of small link chain to ensure the frames did not spread out too far. the distance i chose for this will become clearer when i get to the coop and is up to the individual and what their requirements are.
Now the coop; a pair of the pallets i got were slightly wider then the others and in better condition, so i used these to form the basis for the coop. now i decided to set the floor of the coop at two feet wide, this allowed me to make the floor slide in and out of the A-frame on the structure of the pallet itself with no need for fastening, see the picture below to make it a bit clearer:
this is where the chain at the bottom comes in, it allows the pallet frames to spread apart to exactly the right width to allow the floor to slide in but no too wide that the floor simply falls down.
the front and sides of the coop are made of offcuts cut to size with a jig-saw and hinged so the floor for the coop folds down flat.
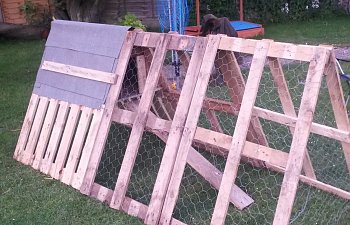
in the above picture you can see that i have covered the coop with some leftover roofing felt from the other coop. This will eventually be clad in wooden shingles to make it a bit more attractive, i am just waiting to find some suitable wood for it.
on one side i have cut through the upright timbers at the coop part to insert a door the full length of the coop so i can get any eggs out and give it the occasional clean. you can see the horizontal timber which acts as a handle and keeps the roofing material in place. The reason it protrudes beyond the door on the right hand side is because this overlap holds the door to the side of the frame when it is closed so it doesn't just 'flop' into the coop.
so the above is it all assembled. the same chain as was used for the bottom is used in conjunction with small hooks to hold the three sections together without the need for bolts etc. The drawbridge is attached to the coop floor with a hinge and is lifted up at night by a rope.
the happy residents now in situ.
This coop may not be the prettiest, but it is functional and suits all of my needs. lightweight and easy to take apart i am going to treat it like a tractor and move it around the garden.
for a total build cost of £20, and about a days worth of work i think ive done pretty well and now separates my ''egg flock'' from my ''meat flock''