My wife and I had discussed the possibility of raising chickens before, and I felt that our son, 3 and a half, was at the perfect age for the experience.
Before deciding on the type of coop design to use for our first flock, we considered the following things:
Having ironed out the flock specifics, I started researching coop designs. In doing so, the question came up, "Are we going to free range or not?" The short answer was, no. We only have an acre and a half, and our neighbor's free range chickens tend to be a nuisance. Last year, they ate/destroyed another neighbor's tomatoes, and I'm concerned they are going to destroy my plot of sweet corn and the pumpkin patch we're planting this year. In turn, we decided to go with a design that would allow enough room (coop and run) to keep the chickens happy, with limited time to free range. Then, during supervised time, we would allow the chickens to leave the coop and run. As responsible, respectful neighbors, we felt that this was the best option.
After looking over all of the outstanding designs provided by the members of the BYC community, my wife and I decided to go with something inspired by the "Chichen Paradise Coop" and "The Triple C".
Once I had the concept fixed in my mind, I had to think about placement of the coop. Since our coop/run was going to be fixed and not a tractor, I wanted to make sure I was conforming to local zoning enforcement. Although I don't remember the exact distances, according to our local zoning, the coop had to be built a certain distance from the side and rear borders of our property, so that it wouldn't be encroaching our neighbor's property.
My wife and I chose a location, and then I began digging and leveling the foundation.
Here's a list of the items I needed for my foundation:
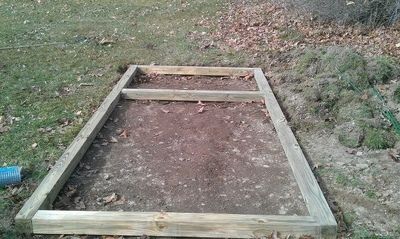
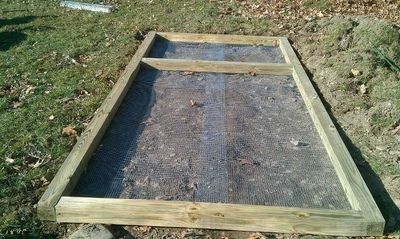
After digging and leveling the foundation, I assembled my foundation using pressure treated 4" x 4"s. Once the frame for the foundation was assembled (a rectangle with a cross support 4' from one end), I stapled hardware cloth to the bottom of the frame, to keep predators from being able to dig in to the coop/run. FYI, all of my T brackets and flat corner brackets are attached UNDERNEATH the framing, so my wall framing could fit flush with the 4" x 4"s.

After making sure the frame/foundation was level, I started filling it in with stone and then sand. I decided to go with stone and sand, beneath some of the removed earth material, because I felt that it would provided a nice drainage medium. I also felt that over time, the stone would break up and make good grit for the chickens.
I did find that I hadn't purchased enough sand, so later in the process, I used dirt to top the foundation off. I wanted to make sure there was plenty of top material, so that when the birds are dust bathing, they don't hit the hardware cloth below.
Here's my 3 and a half year old pitching in a hand.
After the foundation was completed, I started putting together the framing for the walls. I built the frames in my driveway and moved them to the coop location once they were assembled. The front wall is 12' long by 7+' tall (the plus is to account for the width of the 2" x 4" header and footer). I used UNTREATED pine 2" x 4"s for all of the above grade framing. Except for the area that will be the coop, all of the studs were spaced 2' on center. I did 2' on center so that I did not have to make any extra cuts (width) in the hardware cloth, just length wise.
I was working pretty much by sight, so I changed the plans as I proceeded. Originally, the side by side frames you see in the coop area, on the left, were going to be double door access. Later on, I decided to make that the nesting box area, which you will see later. I also decided that I wanted the coop bigger, in terms of height, so I added another support, two feet off the ground, in the coop area on the left.
IMPORTANT NOTE: If you do not have them, investing in a few 90 degree angle clamps to help ensure that everything is squared up. Also, if you have access to a pneumatic FRAMING NAILER, it cuts the work time by hours, and it also helps you avoid splitting/cracking studs.
After completing the front wall, I built the side wall of the run that would incorporate the door frame. The height of this frame is 6 feet, not including the header and footer height.
Once these two frames were completed I raised them, before building the other wall frames.
The next wall that I framed and raised was the main access side of the coop. The overall height of this wall, like the frame for the door, is 6', not including the header and footer. The horizontal cross beam is two feet off of the ground. In the end, this will serve as a shady portion of of the run, beneath the coop. The interior vertical framing is for vertical venting and for the main coop access door (for cleaning).
Next I framed the rear wall, which was very basic. It was 6' in height, not including headers and footers, and all of the studs were 2' on center, except for in the coop area. In the coop area, there was a cross/horizontal beam at 2 feet, and then I eded a center support, vertically from that cross beam to the footer (just to sure things up). Next, I created a 2 foot high framed support "wall" for the inner side of the coop, to serve as a floor support.
In the following photo, you can see I added another horizontal cross beam in the coop area, which would later serve as a vent, and support for the ceiling.
Now that framing was done, I covered the coop vents with hardware cloth BEFORE putting on the siding. I also covered the run beneath the coop with hardware cloth, because I knew the siding would cover the top edge of the hardware cloth here as well.
NOTE TO SELF AND OTHERS.....I should have painted the frame with white primer BEFORE putting on the hardware cloth and siding, but I didn't. If I were doing it again, I definitely would do that.
For the siding, I used 5/8" thick sheets of paneled siding. I had them pre cut my height, 53", at the lumber shop. I just figured they had the equipment to make more exact cuts there. I did all the other cutting at home using a circular saw, miter saw, and jig saw, depending on the particular application. As you'll see in later photos, I'm no professional carpenter, so many of my internal cuts (vent cuts in the siding) are "wavy", but I guess it doesn't matter. I just had to keep telling my self, "It's a chicken coop!"
After the siding and the hardware cloth were up on the coop end, I hung the rafters. I used truss/rafter anchors to hang the rafters. As you'll notice from my photos, I ended up going off center a bit, because I wanted a slight overhang on the coop side. In turn, I am short a couple of inches on the run side. Oh, well. I toed each rafter, front and back. To figure out the correct angle, I simply held a piece of string attached to a scrap piece of board at the top, front corner of one rafter. I traced the line it made, and then I used my miter to toe all of the rafters, front and back.
Once the rafters were up I started assembly of my nesting box.
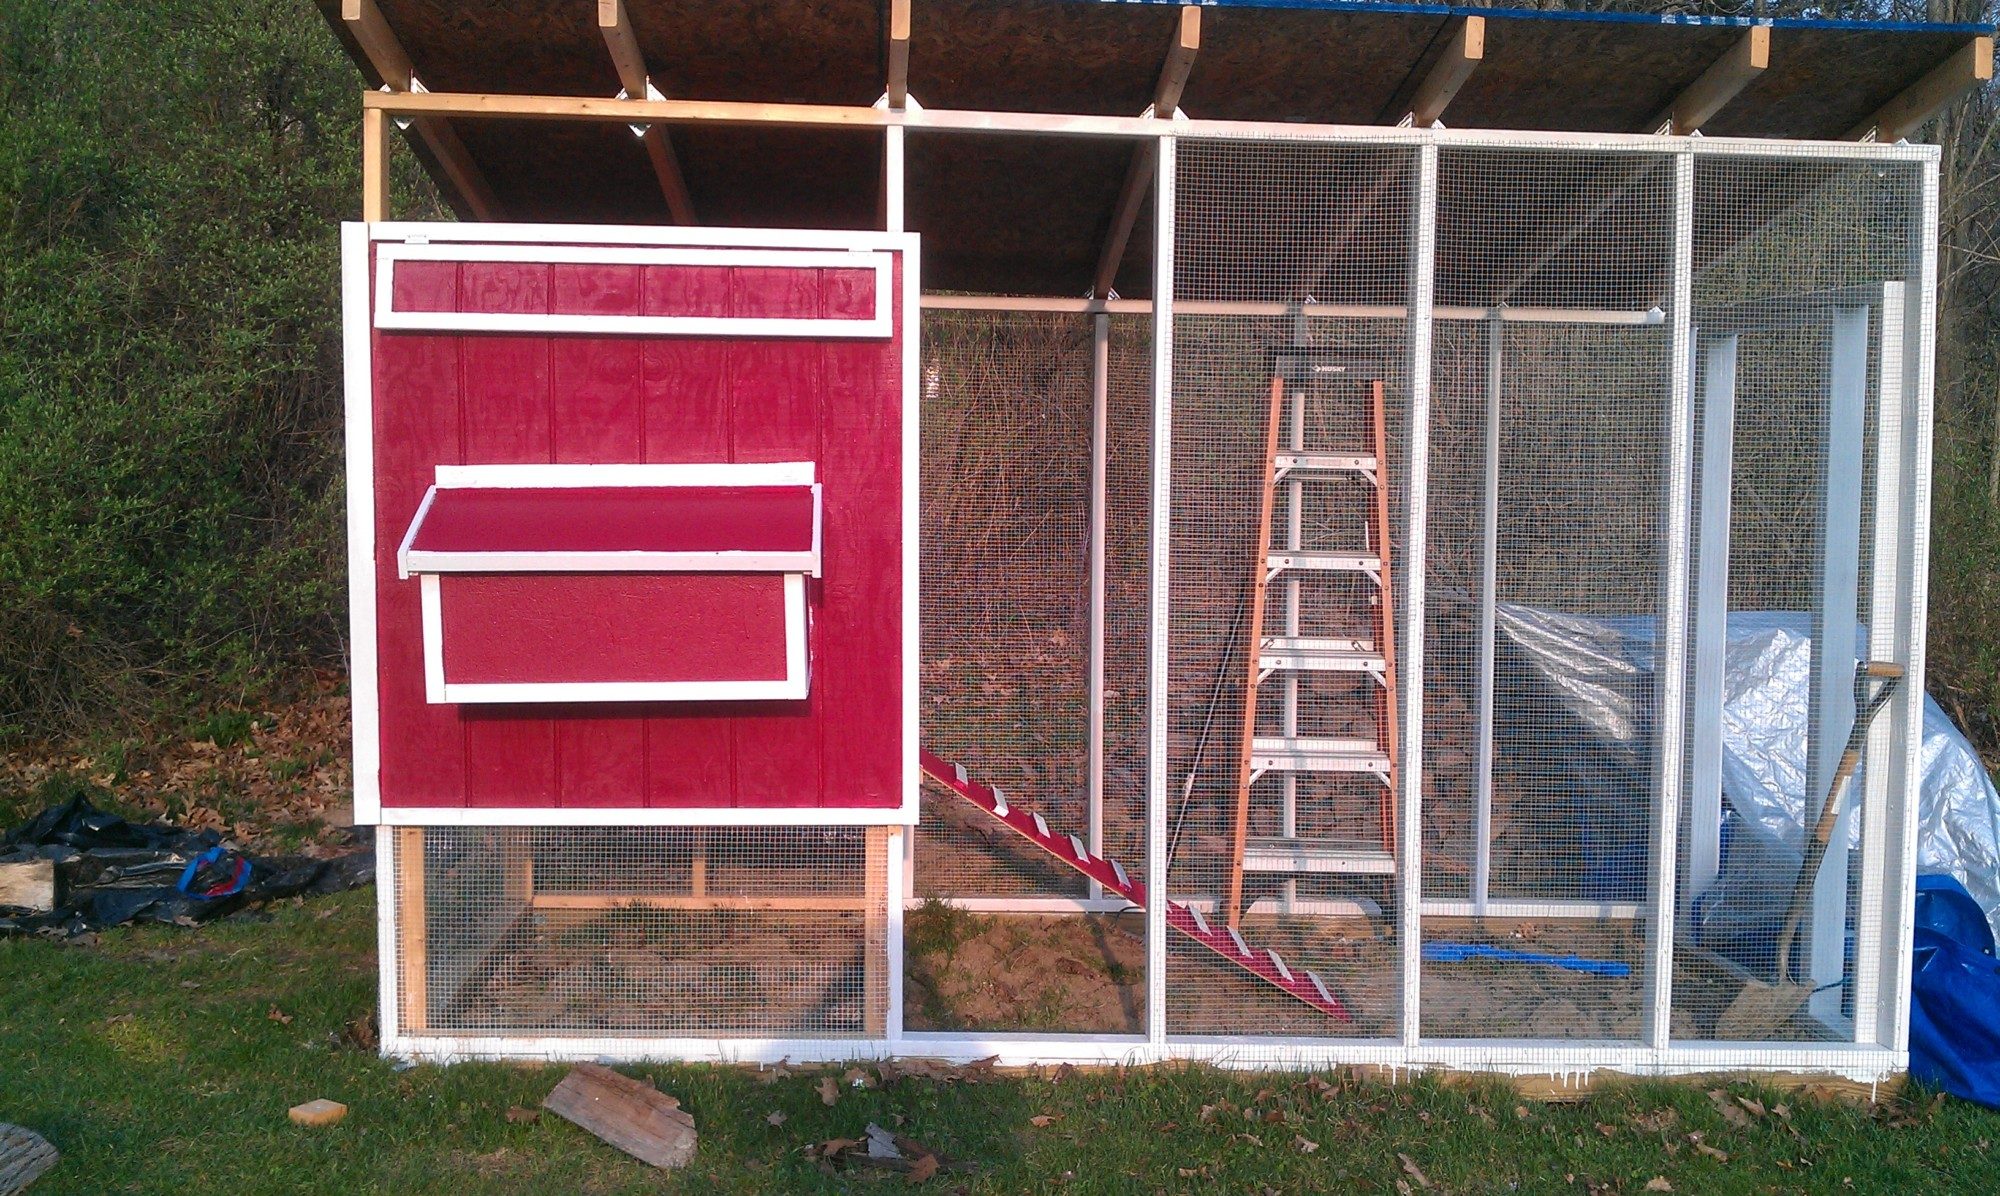
For the nesting box, I used 5/8" zip system osb. I used the zip system roofing board, because I thought the moisture barrier on the outside would be good for this application. The overall dimensions of the box are 16" front height and 14" rear height, by 12" deep, by 32" long. There is a center panel that is the same as the sides which divides the two nesting areas. I framed the bottom of the inside with 1"x2"s for extra support, and then I framed the outside, as you can see from the photos, with 1"x2"s as well. The front side (opening) of the nesting boxes, I framed with 3"x1"s, creating a lip to keep bedding material in, and also creating a smaller opening than the actual dimensions of the box(es).
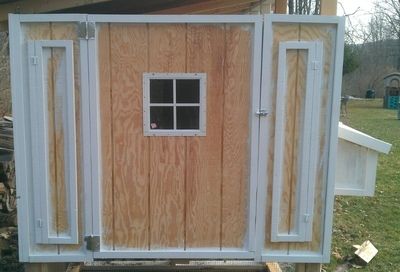
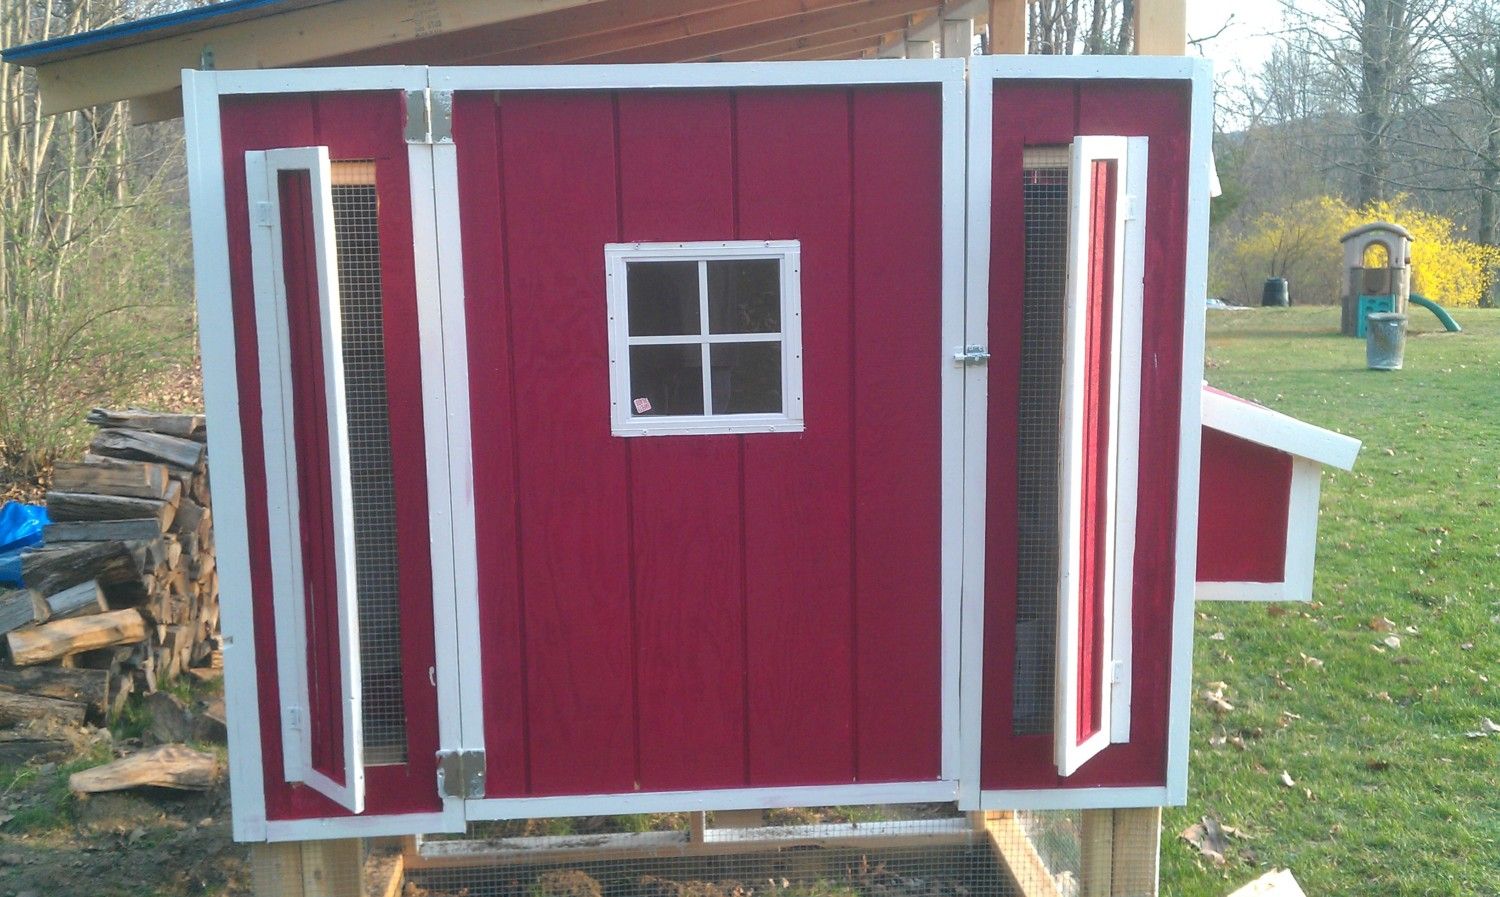
From the reading and research that I've done, particularly on BYC, I know that ventilation is very important. So I made sure I incorporated adjustable/hinged vents on 2 sides of the coop. That way, I have control over the level of ventilation, depending on the time of year. When I cut the siding, I used my circular saw to cut out the ventilation windows. I then used those cutouts, and 1" x 2" furring strips, to create the hinged covers for the vents.
So, it looks like our two week central New York summer in March (unheard of) has come to an end. It was fantastic while it lasted, because it gave me the opportunity to get a ton of work done on the coop.
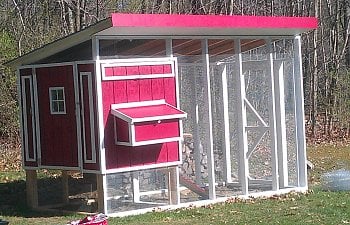
Something I forgot to mention up until this point is that I've done the ENTIRE COOP, from raising the walls to putting on the rafters, all by myself. The only part of the job so far that I called in assistance for was raising the sheets of osb onto the roof. I'm mentioning this, because it's pretty obvious from the pictures of the painted coop, that my nesting box wasn't hung perfectly level, and I'm obsessing about it.
Here are a few shots of the most current progress.
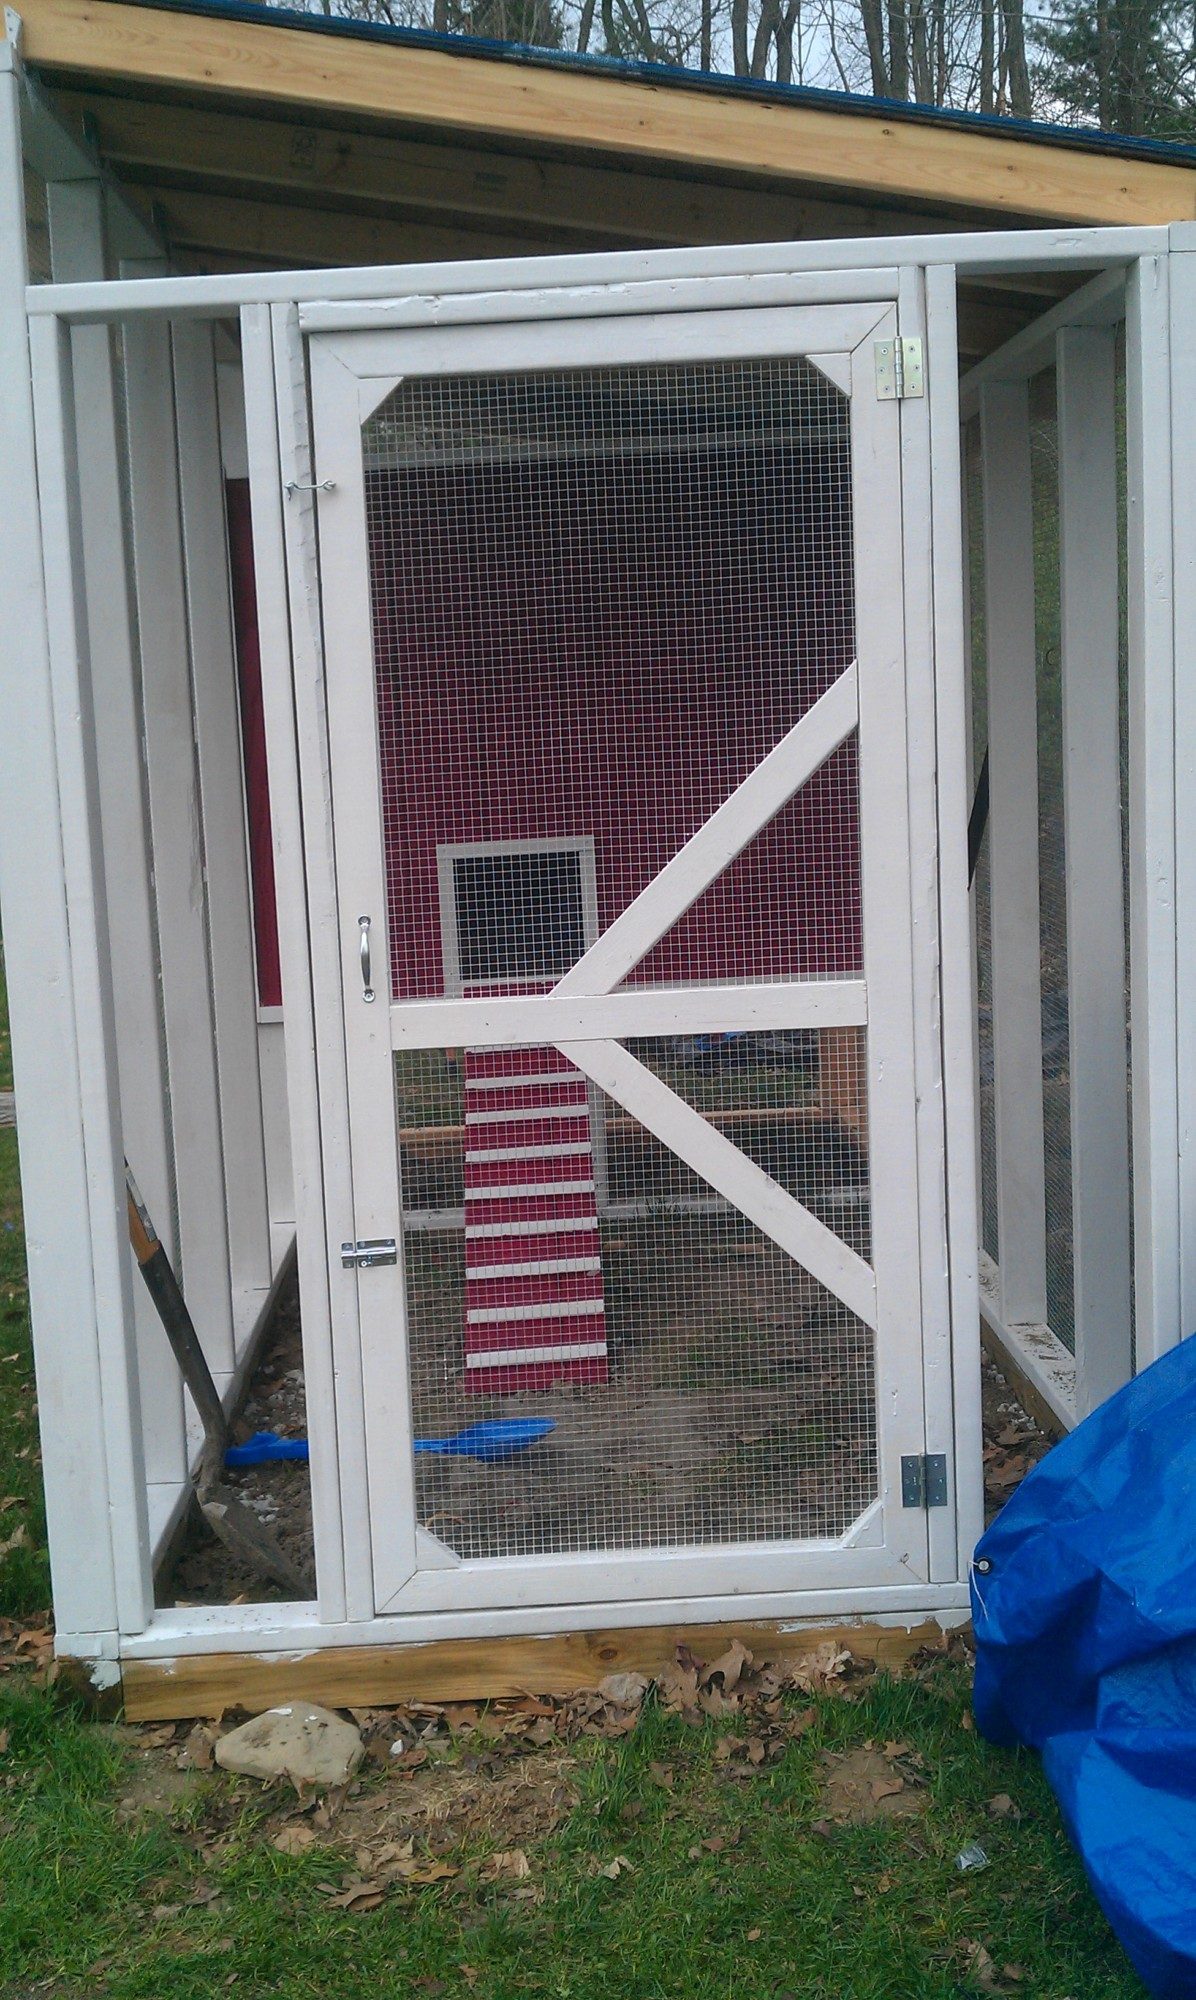
This morning I built the door to the run. To build the door, I made 2 doors out of 1" x 3" lumber, I stapled the hardware cloth to one of them, then I nailed the doors together. I used my finishing nail gun for this job, equipped with 1 1/4" finishing nails. To hang the door, I used a Stanley - Complete Screen Door kit. I liked this, because in addition to the hinges and eye hook latch, it came with a spring, to make sure no one forgets to close the door. Rather than spending money on support brackets, I simply used the triangles that were formed when I made my 45 degree cuts,
NOTE!!!! I snapped this photo really quickly, and I was holding my phone totally crooked...lol. The coop and run are level, but it doesn't look that way in this photo.
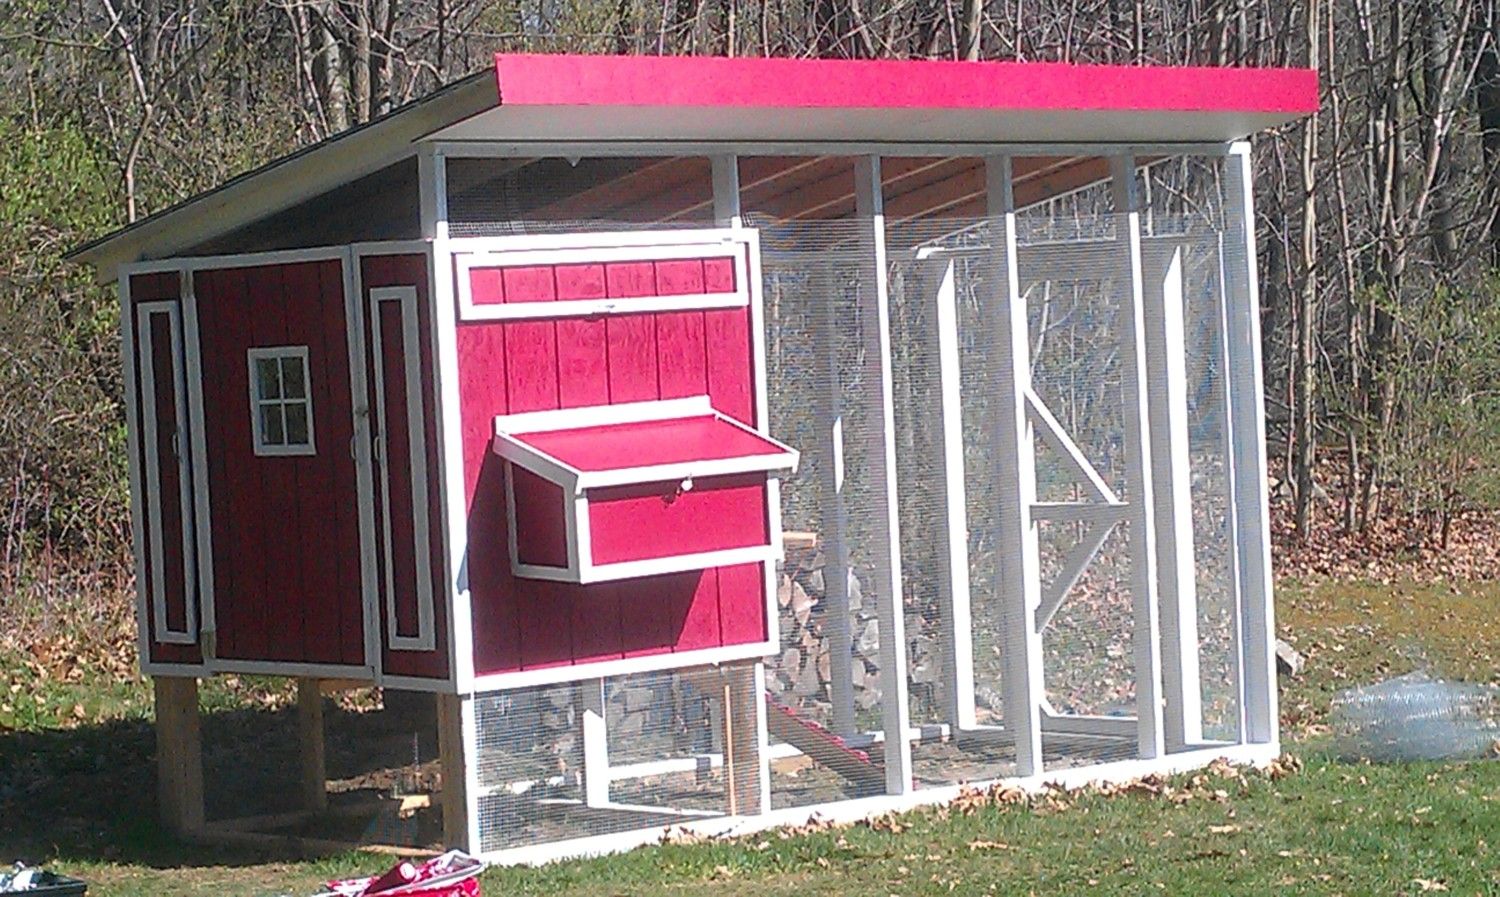
Here's the finished product. I'll post a couple more pictures when I have them.
Before deciding on the type of coop design to use for our first flock, we considered the following things:
- What would be the main purpose for having chickens? We decided that the primary purpose for having chickens would be egg production for personal consumption. We also decided that we wanted to have enough room to produce enough eggs to sell a few to pay for feed. Furthermore, we wanted docile, friendly birds that would make good pets for the family, and that would do well with our two young children.
- What breeds or hybrids would be COLD HARDY, since we can get some pretty harsh winters? We ended up going with a mixed flock, including speckled sussex, golden comets, and easter eggers, because they met all of the criteria we had in mind. Then, we added a couple of silkies to the mix, because my wife wanted a couple of ornamental birds, and they fit the bill for everything except egg laying.
Having ironed out the flock specifics, I started researching coop designs. In doing so, the question came up, "Are we going to free range or not?" The short answer was, no. We only have an acre and a half, and our neighbor's free range chickens tend to be a nuisance. Last year, they ate/destroyed another neighbor's tomatoes, and I'm concerned they are going to destroy my plot of sweet corn and the pumpkin patch we're planting this year. In turn, we decided to go with a design that would allow enough room (coop and run) to keep the chickens happy, with limited time to free range. Then, during supervised time, we would allow the chickens to leave the coop and run. As responsible, respectful neighbors, we felt that this was the best option.
After looking over all of the outstanding designs provided by the members of the BYC community, my wife and I decided to go with something inspired by the "Chichen Paradise Coop" and "The Triple C".
Once I had the concept fixed in my mind, I had to think about placement of the coop. Since our coop/run was going to be fixed and not a tractor, I wanted to make sure I was conforming to local zoning enforcement. Although I don't remember the exact distances, according to our local zoning, the coop had to be built a certain distance from the side and rear borders of our property, so that it wouldn't be encroaching our neighbor's property.
My wife and I chose a location, and then I began digging and leveling the foundation.
Here's a list of the items I needed for my foundation:
- Pressure treated 4" x 4" x 12' (2)
- Pressure treated 4" x 4" x 5' (3)
- Heavy duty flat corner braces (4)
- Heavy duty corner braces (4)
- Heavy duty T brackets (2)
- Hardware cloth (36 inch wide)
- Half inch staples for staple gun
- Stone (bagged or trucked in)
- Sand (coarse - bagged or trucked in)
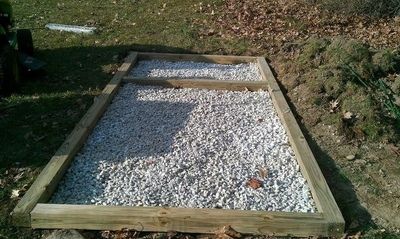
After digging and leveling the foundation, I assembled my foundation using pressure treated 4" x 4"s. Once the frame for the foundation was assembled (a rectangle with a cross support 4' from one end), I stapled hardware cloth to the bottom of the frame, to keep predators from being able to dig in to the coop/run. FYI, all of my T brackets and flat corner brackets are attached UNDERNEATH the framing, so my wall framing could fit flush with the 4" x 4"s.
After making sure the frame/foundation was level, I started filling it in with stone and then sand. I decided to go with stone and sand, beneath some of the removed earth material, because I felt that it would provided a nice drainage medium. I also felt that over time, the stone would break up and make good grit for the chickens.
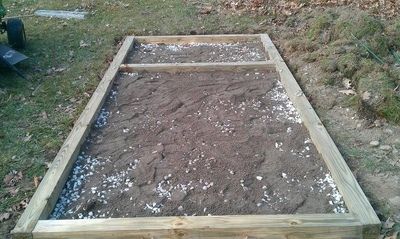
I did find that I hadn't purchased enough sand, so later in the process, I used dirt to top the foundation off. I wanted to make sure there was plenty of top material, so that when the birds are dust bathing, they don't hit the hardware cloth below.
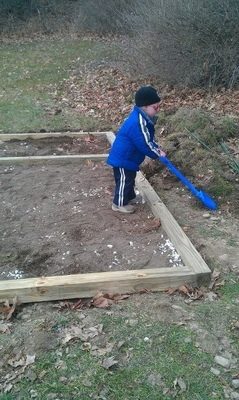
Here's my 3 and a half year old pitching in a hand.
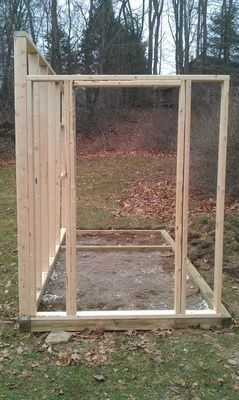
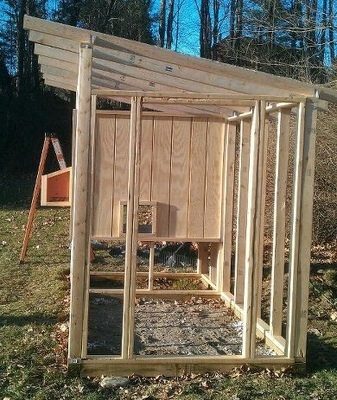
After the foundation was completed, I started putting together the framing for the walls. I built the frames in my driveway and moved them to the coop location once they were assembled. The front wall is 12' long by 7+' tall (the plus is to account for the width of the 2" x 4" header and footer). I used UNTREATED pine 2" x 4"s for all of the above grade framing. Except for the area that will be the coop, all of the studs were spaced 2' on center. I did 2' on center so that I did not have to make any extra cuts (width) in the hardware cloth, just length wise.
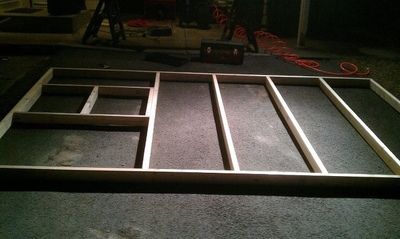
I was working pretty much by sight, so I changed the plans as I proceeded. Originally, the side by side frames you see in the coop area, on the left, were going to be double door access. Later on, I decided to make that the nesting box area, which you will see later. I also decided that I wanted the coop bigger, in terms of height, so I added another support, two feet off the ground, in the coop area on the left.
IMPORTANT NOTE: If you do not have them, investing in a few 90 degree angle clamps to help ensure that everything is squared up. Also, if you have access to a pneumatic FRAMING NAILER, it cuts the work time by hours, and it also helps you avoid splitting/cracking studs.
After completing the front wall, I built the side wall of the run that would incorporate the door frame. The height of this frame is 6 feet, not including the header and footer height.
Once these two frames were completed I raised them, before building the other wall frames.

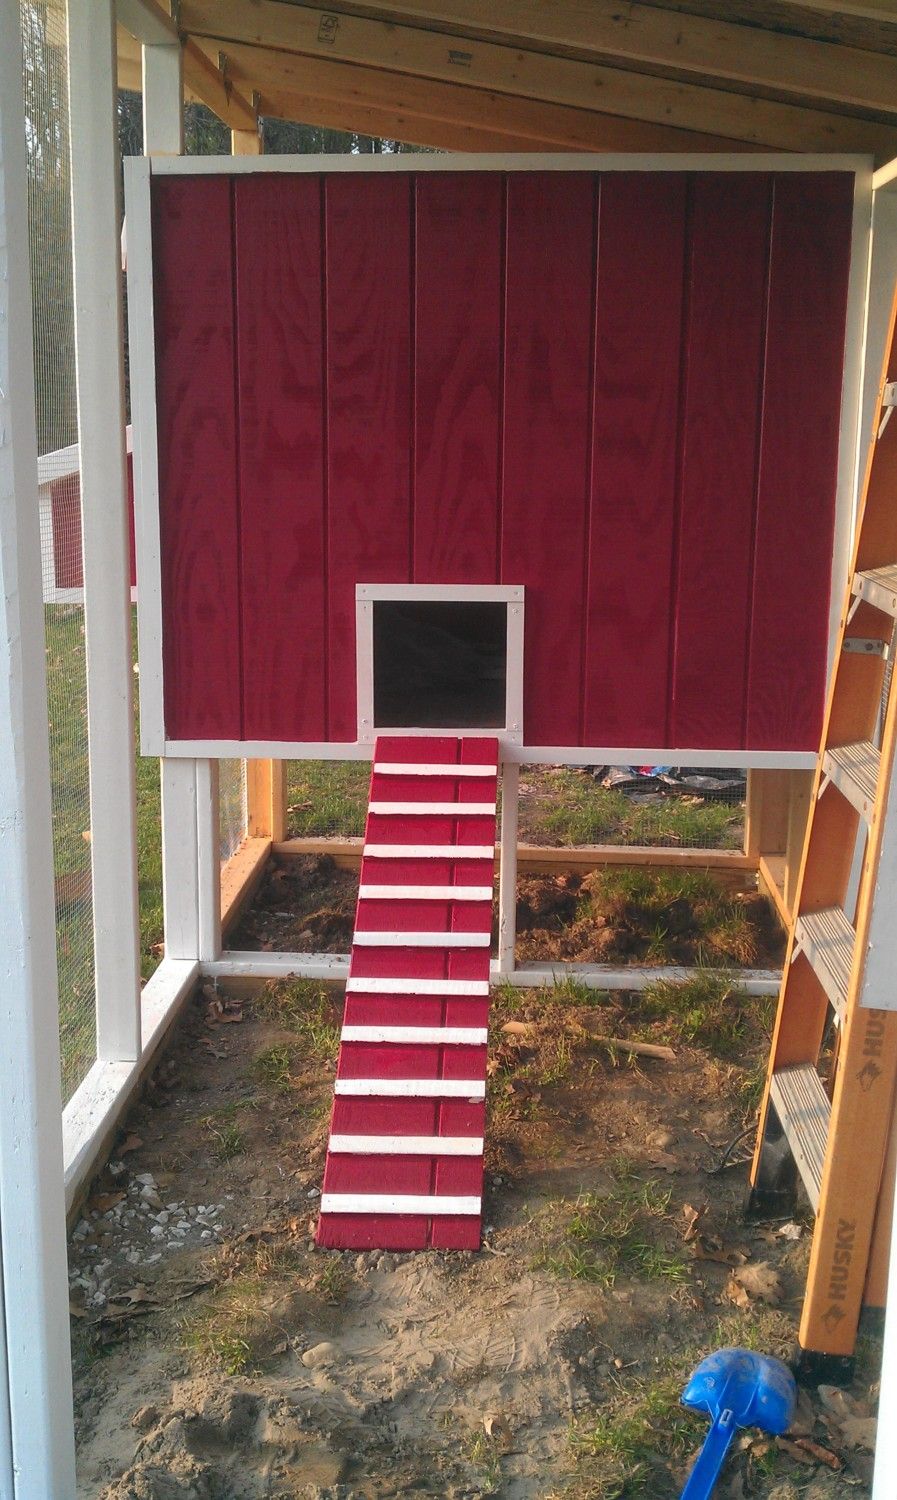
The next wall that I framed and raised was the main access side of the coop. The overall height of this wall, like the frame for the door, is 6', not including the header and footer. The horizontal cross beam is two feet off of the ground. In the end, this will serve as a shady portion of of the run, beneath the coop. The interior vertical framing is for vertical venting and for the main coop access door (for cleaning).
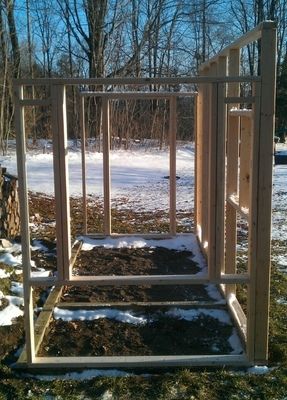
Next I framed the rear wall, which was very basic. It was 6' in height, not including headers and footers, and all of the studs were 2' on center, except for in the coop area. In the coop area, there was a cross/horizontal beam at 2 feet, and then I eded a center support, vertically from that cross beam to the footer (just to sure things up). Next, I created a 2 foot high framed support "wall" for the inner side of the coop, to serve as a floor support.
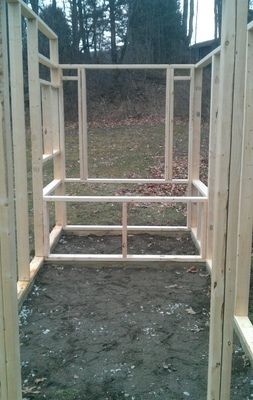
In the following photo, you can see I added another horizontal cross beam in the coop area, which would later serve as a vent, and support for the ceiling.

Now that framing was done, I covered the coop vents with hardware cloth BEFORE putting on the siding. I also covered the run beneath the coop with hardware cloth, because I knew the siding would cover the top edge of the hardware cloth here as well.
NOTE TO SELF AND OTHERS.....I should have painted the frame with white primer BEFORE putting on the hardware cloth and siding, but I didn't. If I were doing it again, I definitely would do that.
For the siding, I used 5/8" thick sheets of paneled siding. I had them pre cut my height, 53", at the lumber shop. I just figured they had the equipment to make more exact cuts there. I did all the other cutting at home using a circular saw, miter saw, and jig saw, depending on the particular application. As you'll see in later photos, I'm no professional carpenter, so many of my internal cuts (vent cuts in the siding) are "wavy", but I guess it doesn't matter. I just had to keep telling my self, "It's a chicken coop!"
After the siding and the hardware cloth were up on the coop end, I hung the rafters. I used truss/rafter anchors to hang the rafters. As you'll notice from my photos, I ended up going off center a bit, because I wanted a slight overhang on the coop side. In turn, I am short a couple of inches on the run side. Oh, well. I toed each rafter, front and back. To figure out the correct angle, I simply held a piece of string attached to a scrap piece of board at the top, front corner of one rafter. I traced the line it made, and then I used my miter to toe all of the rafters, front and back.
Once the rafters were up I started assembly of my nesting box.
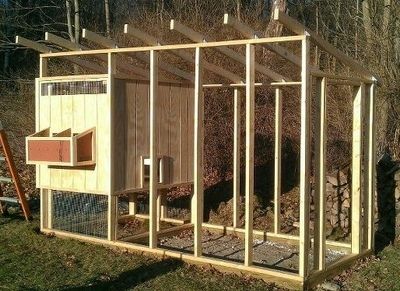
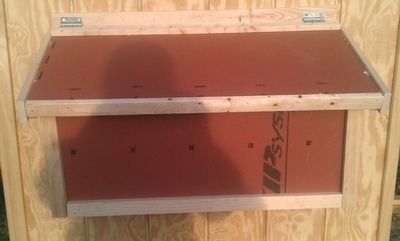
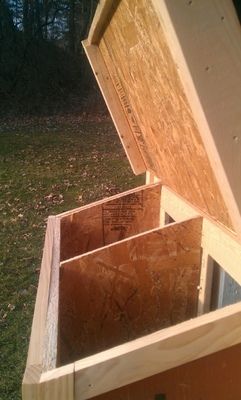
For the nesting box, I used 5/8" zip system osb. I used the zip system roofing board, because I thought the moisture barrier on the outside would be good for this application. The overall dimensions of the box are 16" front height and 14" rear height, by 12" deep, by 32" long. There is a center panel that is the same as the sides which divides the two nesting areas. I framed the bottom of the inside with 1"x2"s for extra support, and then I framed the outside, as you can see from the photos, with 1"x2"s as well. The front side (opening) of the nesting boxes, I framed with 3"x1"s, creating a lip to keep bedding material in, and also creating a smaller opening than the actual dimensions of the box(es).
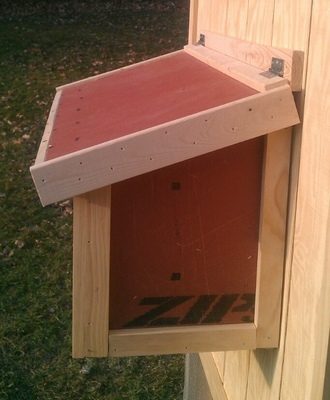
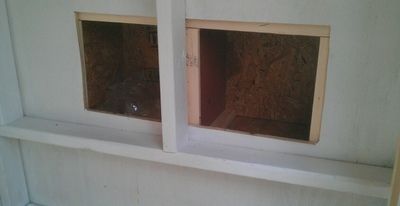
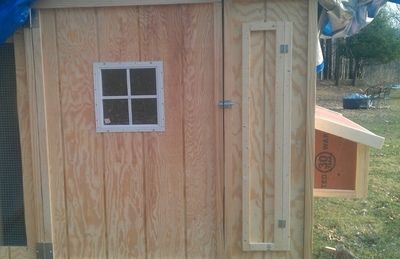
From the reading and research that I've done, particularly on BYC, I know that ventilation is very important. So I made sure I incorporated adjustable/hinged vents on 2 sides of the coop. That way, I have control over the level of ventilation, depending on the time of year. When I cut the siding, I used my circular saw to cut out the ventilation windows. I then used those cutouts, and 1" x 2" furring strips, to create the hinged covers for the vents.
So, it looks like our two week central New York summer in March (unheard of) has come to an end. It was fantastic while it lasted, because it gave me the opportunity to get a ton of work done on the coop.
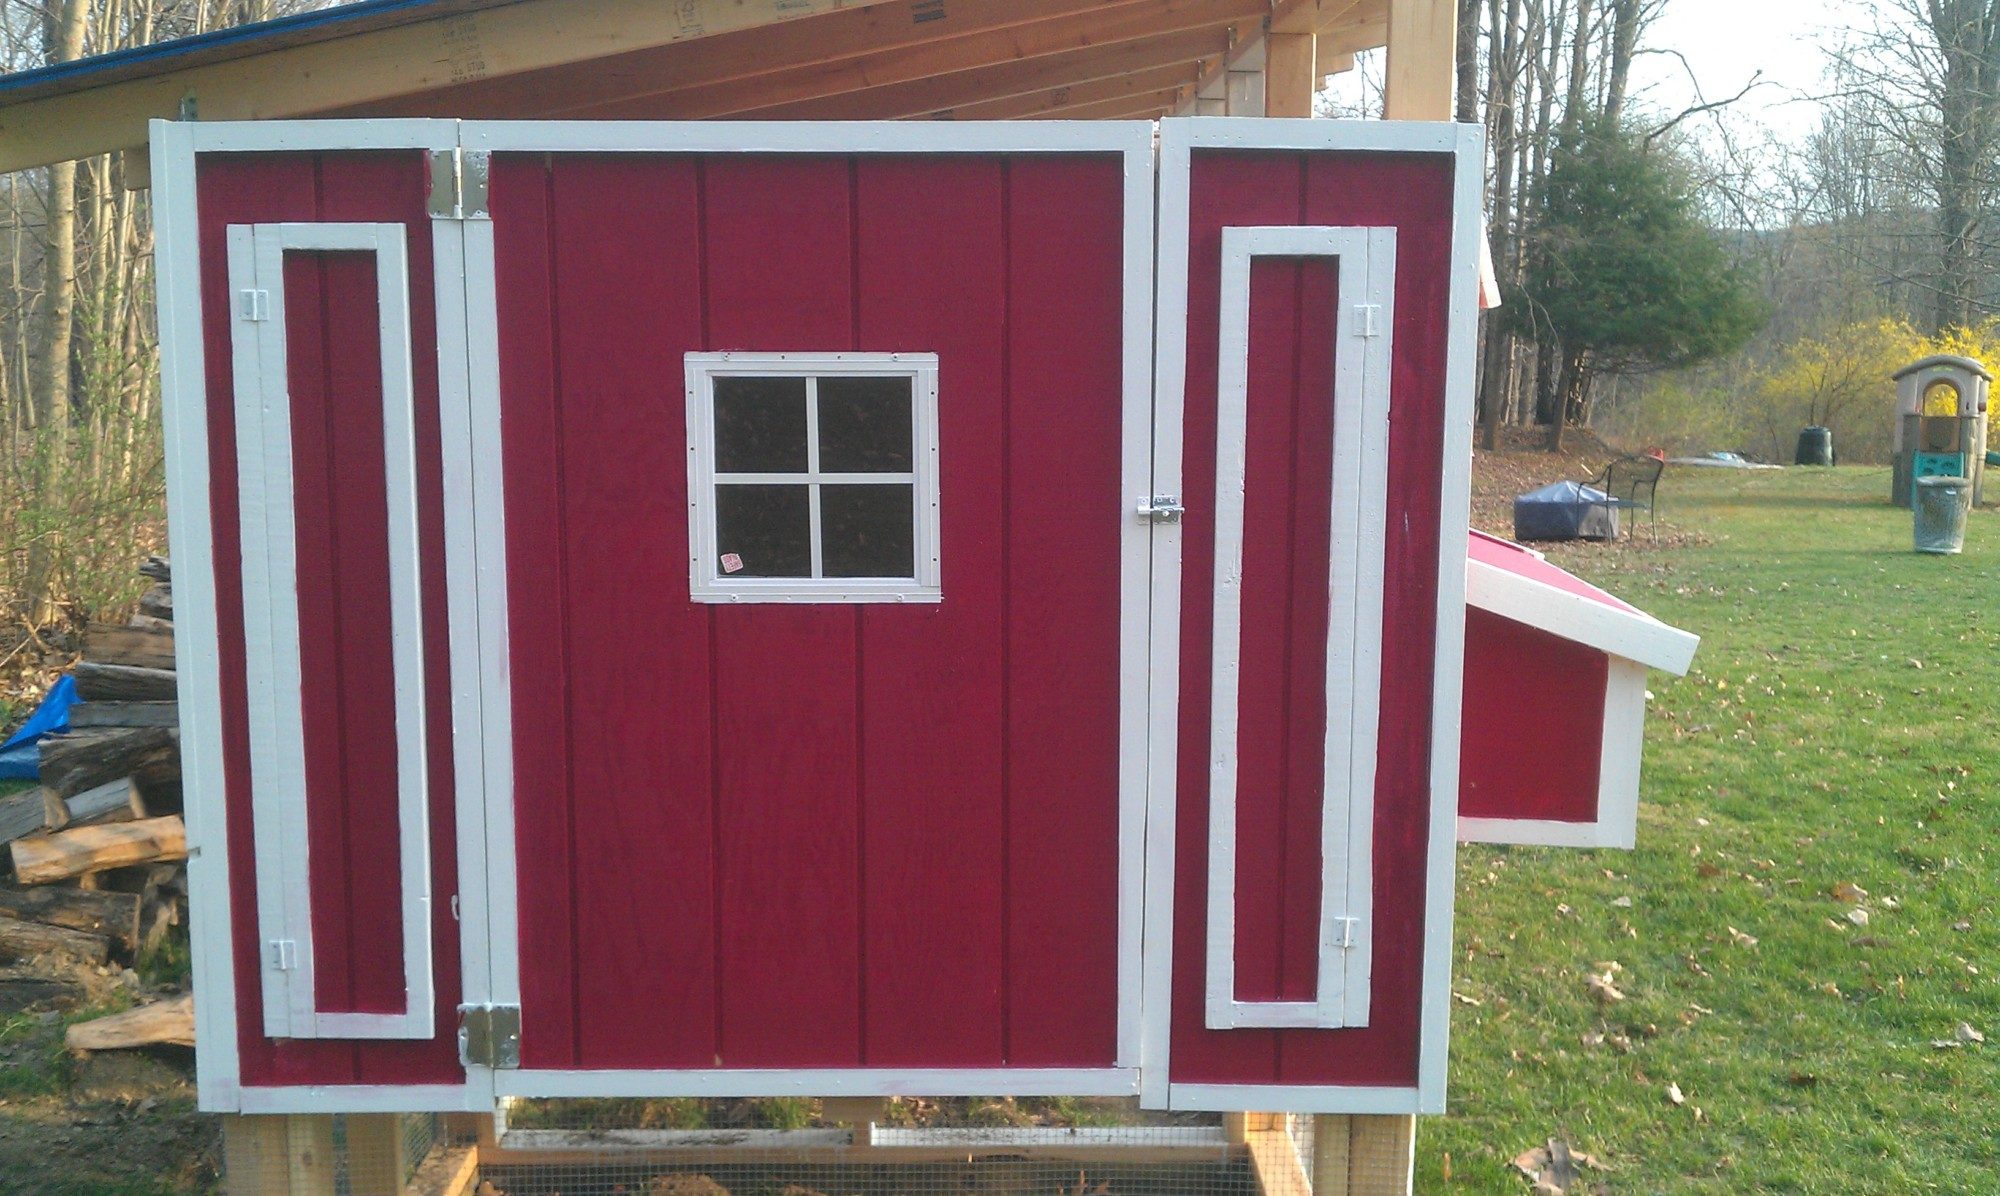
Something I forgot to mention up until this point is that I've done the ENTIRE COOP, from raising the walls to putting on the rafters, all by myself. The only part of the job so far that I called in assistance for was raising the sheets of osb onto the roof. I'm mentioning this, because it's pretty obvious from the pictures of the painted coop, that my nesting box wasn't hung perfectly level, and I'm obsessing about it.
Here are a few shots of the most current progress.
This morning I built the door to the run. To build the door, I made 2 doors out of 1" x 3" lumber, I stapled the hardware cloth to one of them, then I nailed the doors together. I used my finishing nail gun for this job, equipped with 1 1/4" finishing nails. To hang the door, I used a Stanley - Complete Screen Door kit. I liked this, because in addition to the hinges and eye hook latch, it came with a spring, to make sure no one forgets to close the door. Rather than spending money on support brackets, I simply used the triangles that were formed when I made my 45 degree cuts,
NOTE!!!! I snapped this photo really quickly, and I was holding my phone totally crooked...lol. The coop and run are level, but it doesn't look that way in this photo.
Here's the finished product. I'll post a couple more pictures when I have them.