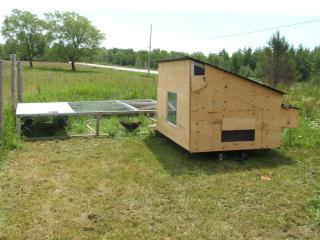
My Chicken Tractor and Coop
June / July 2009
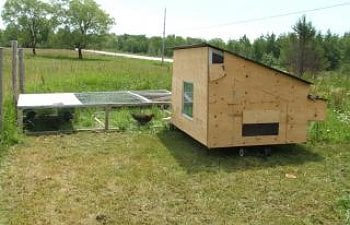
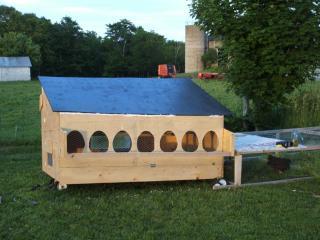
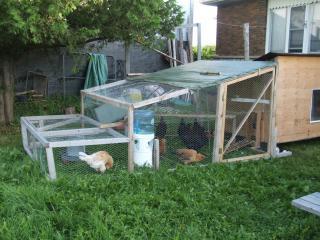
I purchased a load of cedar slabwood (that's what's left over of the tree once they make all the "good" lumber out of it that they can get) for $15 (for a huge flatbed load). Included in it were some very rough (in various condition) 2 x 2's that I used to frame in both the tractor and the coop. The wood is very light. Although the 2 move separately, they are used next to each other... the chickens can get out through their door into the tractor/pen. At night they willingly go into the coop and I close up the door. The floor was chicken wire (the smaller grade) covered with chicken cloth (that's the fine 1/4" x 1/4" holes of plastic mesh). I thought that would be enough, but I've since covered it with black tyvek type paper and put wood chips into it. So in essence it is a "closed" floor although not insulated at all!! We have dogs, so we've not had any trouble with varmints, but I tried to make the coop varmint proof anyways... Here are the pics in process. First the chicken tractor/cage......

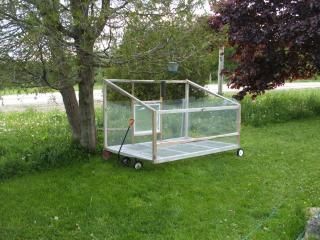
Plans.... I didn't use any plan for the chicken tractor. I used the 4 longest pieces I had (for length) and then the next longest for width. It is approximately 12x6. The smaller section at the opposite end of the wheels now has a door (top opening) and the little weeny hole at the front also has a side opening door in it, in case I want to let the chickens free-range or I want to let them come and go from the side of the tractor instead of the end.
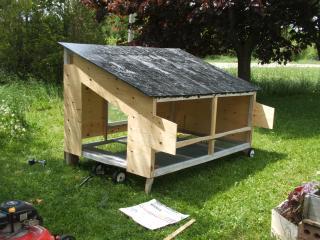
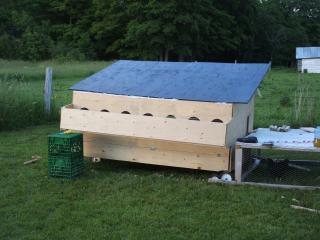
And then the coop.... framed.....

Notice that in the last pic (above) I have already pushed it up to the tractor and the chickens are in it. Notice also the small ventilation window (near the floor) in the "people" door and the smaller ventilation window at the roof line. (There is an identical one on the opposite end). During warm sunny days all of these ventilation holes are opened. However, the chickens are also able to go out so if it gets too hot inside they can sleep under the shaded end outside. Here are more pics of the nest boxes being fashioned. Note also that the coop moves around the yard from place to place (as the grass in one area gets worn down).
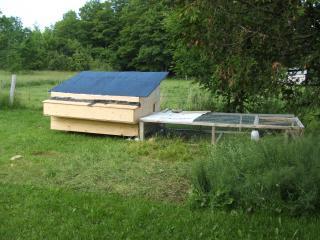
And finally the weather cleared enough for me to get the paint on the nest box covers. Here it is in a different formation. The chickens look right at home!!
Plans... The base is 5 x 7. The front wall is 4' high (from floor to roof peak and the back wall is 2 1/2 ' high. I will try to get the plans scanned somewhere so I can include here. I built the framing first and then I measured each frame "wall" before I cut the plywood to fit the framing. Having the plywood on it really stabilized the structure.
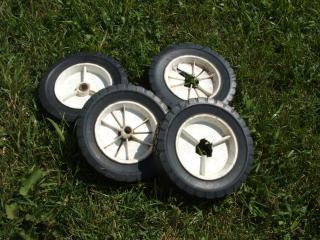
The only thing I'd change is find better wheels / steering structure, perhaps one of those heavy duty garden wagons (instead of a kids wagon). I don't know how long it will last due to the weight of the chicken coop.
Here are the rough plans... and thanks to Mr. Peepers, I figured out how to do up a Sketchup plan and download the jpg.
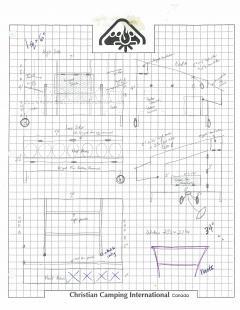

OK: I can't get my rough plans to save any larger and when I try to "enlarge" it here it just gets so blurry that it is basically useless. Sorry about that!!! If you want a copy of the original image, just email me and I can send you the pdf. The Sketchup image is also a bit blurry. I also have it as pdf, so if you want both feel free to ask.
What has changed from the plans.....
1. I ended up putting the wheels on opposite ends, so I switched the two end panels (ie. they are mirror images of what is shown in the plans).
2. The nest boxes that are x'd out..... I removed the dividers and use them for storage/tools, etc. And they provide access to the inside of the coop if I need to replace the roost, etc. I have put cardboard covers (now replaced with plywood so they don't pick at it) over the openings so the chickens don't have access.
3. The roosts. They were originally designed like that so I'd have room at the ends for feed, water, etc. However, the chickens wouldn't use it. So... I replaced it with one long roost going from the bottom right corner (see layout) to the edge of the window on the opposite side at the front. There is lots of room for all 9 of the chickens on the roost and they are now all using it nightly.
Aug 7, 2009 update
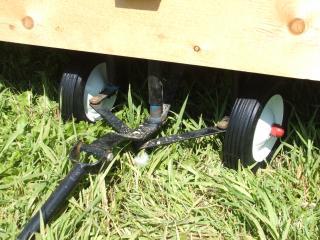
I have put a second set of wheels on the inside at the back end. This has stabilized the back wheel structure and eliminated the rubbing (from the wheels sitting crooked on their posts) and thus made rolling easier. I have replaced the front wheels once (the first set completely broke apart) using the back wheels from the same wagon. I am looking for sturdier wheels to put on the front. I believe the whole steering structure could use replacing but so far this one has survived the moving that I've done. (The whole thing gets moved every two days so they have fresh grass). I just try to be careful when I move it not to crank things too hard. So far... so good!!
The chickens seem to be settled in well. They go in on their own at night and then I go out and close them in. We haven't had any problems with predators, but I think our own two dogs keep up the patrol pretty good. I wouldn't be too confident about the whole thing being predator proof if it weren't for them!
Aug 12, 2009
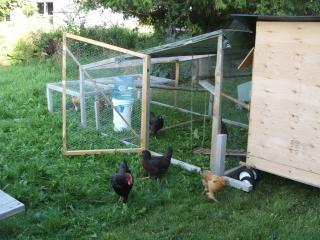
I bought new wheels for the front yesterday and put them on this morning. Here are the three pictures of the new improved..... 1. the old plastic centred wheels.... the first set broke completely and although you can't really see from the pic the second set are already cracked (they were wobbly). 2. The new steel centered wheels on the steering mechanism at the front (I haven't moved it yet). So far the mechanism itself is holding up although I do try not to crank it too hard one way or the other (it has twisted once when I did this). 3. The double wheels on the back. The smaller wheels near the front of the pic are on the chicken tractor (with the chicken wire) which backs up against the coop so they can freely go in and out.

August 19, 2009 ~ The metal wheels are working MUCH BETTER. The whole thing is much sturdier now and I don't have to be so careful moving it around! I'm starting to think about how to winterize the coop (if we are still here for winter and if we still have the chickens at that point ~ I hope so!!). And also, what to do about the run? (I'm sure it will fill with snow with the first snowfall). I'll let you know when I come up with something more.
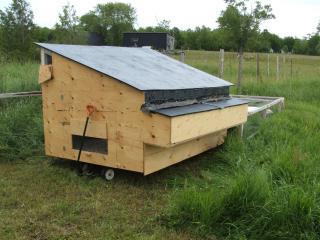
August 22, 2009 ~ Today I did some upgrades on the chicken tractor (see original pic at top of page). I cut off the back 8 feet or so (of the roof) and raised it. This allowed me to install some perches as well as putting the water completely inside the tractor. I also put a "people door" on the tractor so I can get into it if I need to (to catch a chicken or whatever). I fixed up a "tunnel" from the pop door into the tractor so they couldn't sneak out sideways and get out. The upgrades mean they can now stretch (and flap) without hitting the top of the cage. I also feel better leaving them in there through the day because they can roost off the ground and jump around from one level to the other... not so crowded. I also put in "catch plates" at both the pop door and people door of the coop to stop the wood chips from falling out the doorways. This necessitated making the pop door a bit taller and putting in a new "door" to cover the new bigger hole. All in all, I'm very happy with the changes... here are a couple of pics.
October 15, 2009
The steering structure is beginning to twist. It gets moved every second day. (The chickens are now inside the coop/tractor all the time in the interest of preserving my perennial beds!!) I think that by the time the chickens go inside for the winter (I will leave the tractor/run out for them to have some fresh air ~ if they want it), it will be time to think about replacing the steering mechanism with something more heavy duty for next year. Frankly, I'm surprised it lasted as long as it did. (Need one of those heavy duty garden wagons, rather than a kiddy wagon!!)
October 2010 ~ The chicken coop did not move all summer due to....
(OK... so I used to be able to insert a photo here, but now I can't for some reason).... sorry!!
See how the wheels are pointed together?? I could only move it about 8 inches before I had to stop and reposition the wheels.... arggghhh!! So this fall I was walking along the street in town and someone had left the front wheel structure of a wagon (along with the back of the wagon) out for garbage. Well.... I just grabbed ahold of the handle and wheeled my front wheels home.