Hack-O-Tronic Incubator
After a fox attack I found myself with an empty coop and decided to hatch out a new brood. As a first timer to incubating, I would never have found the information that I needed if it wasn't for BYC! All of your hatching stories and pictures gave me the crazy idea that I could do it myself. This is the story of how I set about it. To match the hen house, the incubator would have to be built from scroungeable trash and stuff lying around the house. Fortunately there are always lots of things lying round the house because I hoard junk and never put anything away. I spent a good while thinking about what design to use. I settled on a polystyrene forced-air incubator heated by 12 V halogen bulbs governed by an electronic thermostat, as advertised by http://www.homemadeincubator.co.uk/ and partially reverse engineered by "Daemo". I was also inspired by the GopherBator for its use of improvised materials and the sense that making it was a lot of fun. | ||
One item that I could not avoid buying was a digital thermometer/hygrometer. So I did the next best thing, which was to blow the virtual cobwebs from my PayPal account and allow a ludicrously small amount of money to an eBay seller in Hong Kong. I settled in for a long wait. Days passed, leaves turned brown and fell to the ground. I woke in the night grinding my teeth. Would it arrive before the deadline of the 2010 incubator contest? On the freebie front things were moving more quickly. A handsome polystyrene box came my way, supplied by my local, friendly, and equally well featured lab manager. (This is Bernie.) My nice new box said "Affymetrix" on the top and previously contained very clean hi tech biological equipment. The only trouble was it was a bit small. | 
|
It's actually the second box I got hold of. The first box said "Sea Products of Scotland" on the side and was supplied by my friendly local fishmonger. They are very obliging, nothing is too much trouble. It was nice and big but sadly rather well used and no amount of soap and bleach was going to persuade my wife to have that sitting the house for 21 days, with a heating element inside and a fan on to circulate the warm air. So I threw it behind the shed. |
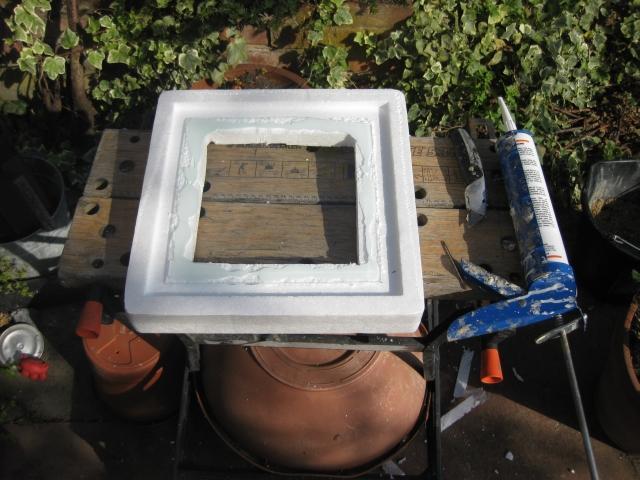
The first thing I did with the new box was install a window. I cut a square hole in the lid and put glass on both sides, for extra insulation, secured with silicone sealant.
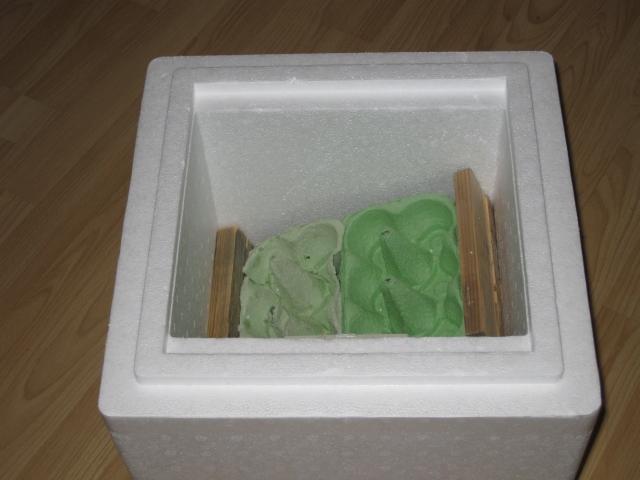
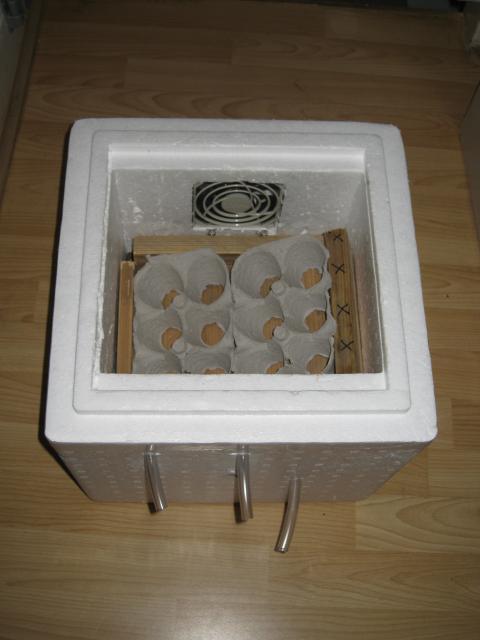
The box had good thick walls but the internal dimensions were only about 9" each side -- just big enough for 12 eggs. I had hoped to use a rocking egg holder mounted on a spindle but there was no wiggle room. Instead I made a simple tray out of scrap plywood and cardboard egg boxes that could be propped at angle against the walls of the box. I would just have to turn it by hand. With the egg holder inside I could see how much space I had left for the thermostat, light bulbs, fan and wiring. Not much! That stuff was all going to have to live outside or be recessed into the walls.
The fan was a 12 V 0.5 A CPU fan liberated from an old computer tower. It seemed a tad large given the size of the box but then again it wouldn't be as effective mounted with its back to a wall. I cut a recess about an inch deep in the end wall to house the fan, with a hole in the back for the wires to come out. Scooping the recess was a nuisance and generated scads of clingy plastic fluff. Shoulda melted it. Wised up, I made the wire hole by jabbing the box with a hot skewer. Man am I wise.

Another poke with a hot skewer and I had a ventilation hole. This time I was so incredibly wise, I even used oven mitts to hold the skewer. | 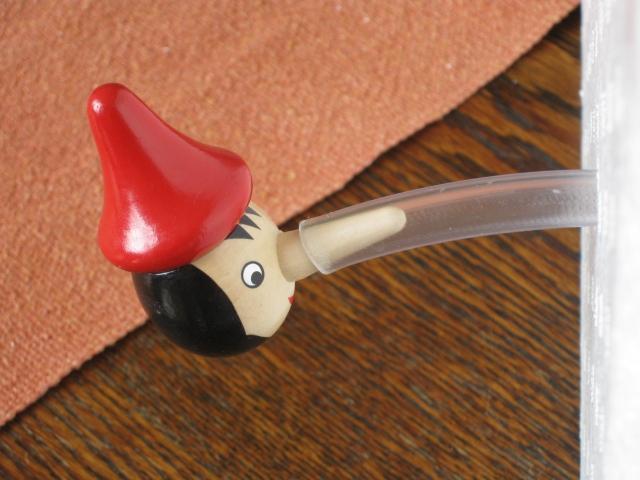
| I caulked a piece of PVC tubing into the hole for easy plugging. Later on I made a few extra ventilation holes the same way. |
The ventilation tubes doubled as water hoses. I put a couple of water pans, each containing a sponge, in the bottom of the box. The pans could be filled without opening the box by squirting water through the tubes. A piece of rigid weldmesh provided a platform over the open pans.

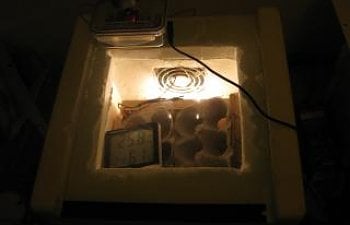
Two 12 V 10 W halogen bulbs supplied heat and light. (Two 10 W bulbs seemed better than one 20 W bulb because there would still be some heat if one bulb blew. I bought four of them to be on the safe side.) I plugged them into ceramic holders -- the G4 bulbs that I bought took MR11 sockets, but I had MR16's that worked fine. Halogen bulbs run very hot, so I didn't want them anywhere near the walls of the box. I built a little lamp fixture out of scrap wood to house the lamp holders. It fit just in front of the fan so that the warm air would circulate quickly. A baffle on the fitting shielded the eggs from radiant heat. Come hatching time, I would bend a piece of 1" weldmesh around it to further protect the chicks from the bulbs. A final wipe over the lamps with an alcohol swab and the light fitting was finished.
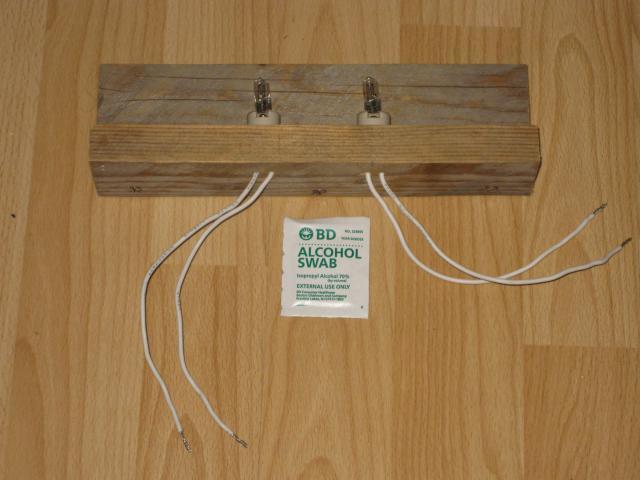
Another stab with a hot skewer and I had a wire hole for the light fitting. On one side of the platform, I placed a wedge-shaped chunk of mortar. This would act as a heat sink to help keep the internal temperature stable, and prop up one end of the egg tray to keep the eggs at an angle to the horizontal. I marked one end of the egg tray with X's so that it would be easier to remember which way to turn it.
The external wires got connected to the Hack-O-Stat homemade temperature regulator -- and making that is a whole other webpage hot dang it! The lights were hooked up in parallel to the thermostat output so that they were only on when necessary. I wired the fan directly to the 12 V supply so that it was on all the time. There were three wires coming out of the fan: red, black, and white. I connected the red one to the positive rail (+12 V), the black one to the negative rail (Ground), and just left the white one unconnected. If I had built the thermostat from the kit, the circuit would have looked like this:

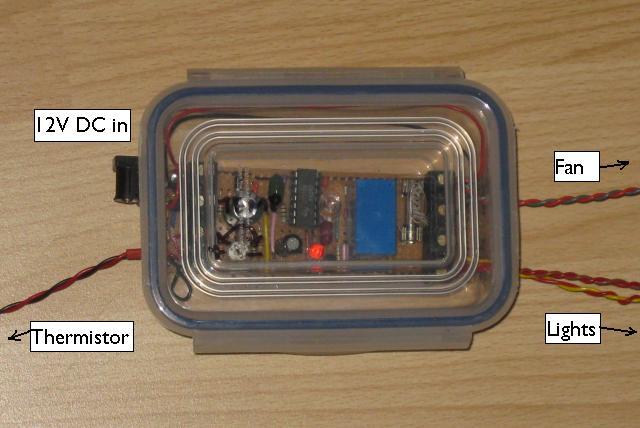
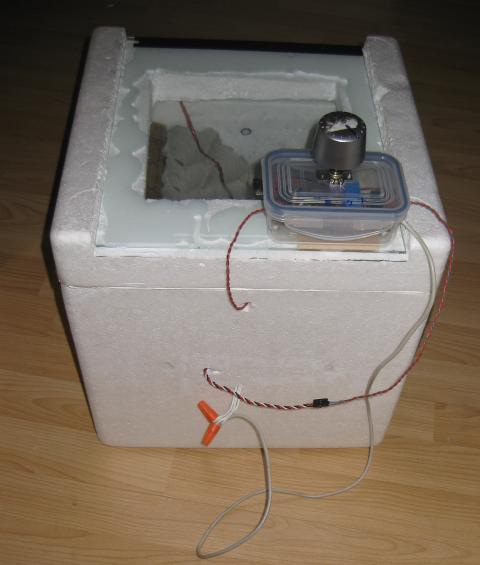
Then I made one last hole towards the top of the box and threaded the thermostat temperature probe inside. I fixed down the thermostat (now with giant temperature dial) by sticking it to the lid with adhesive felt pads and double sided sticky tape. Then I connected up the thermostat to the fan and the lights. The contraption was nearly ready and I was itching to get a load of eggs.
There was just one problem... the "budget" thermometer/hygrometer that I ordered was still traversing the Eurasian land mass. Probably on the back of a camel. At last a tattered package arrived, and I tore it from the postman's grasp. The thermometer was surprisingly large, about 10 cm square. And what I really wanted was one with an external probe. Oh well. |
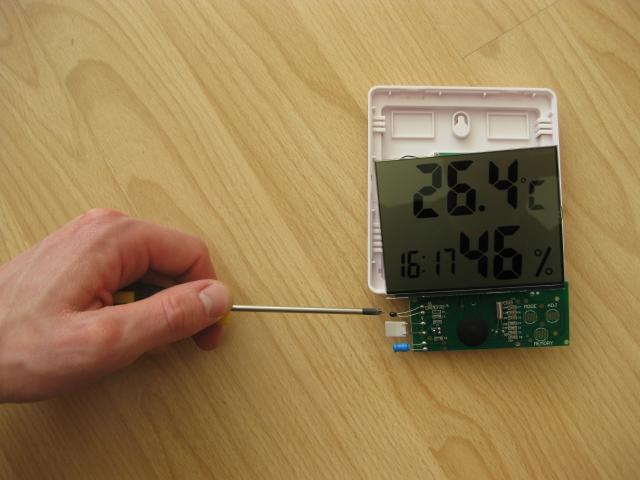
| I couldn't resist opening up the thermometer and poking about inside. It turned out that the thermistor (the little temperature sensor that I'm pointing to with the screwdriver) was just sticking out the side of the chip. It was no problem to jury rig a long probe by snipping its legs and soldering in a double strand of wire. | 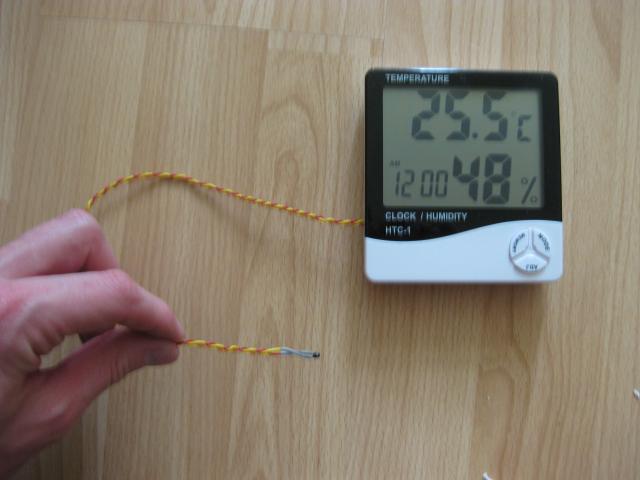
|
At the last minute I got nervous that the digital thermometer readings might drift or be affected by air flow from the fan. Or, heaven forbid, that the battery would run out during lockdown. So I bought a glass wine thermometer that I could stick in alongside. A real cheapie with 1 °C gradations, but useful as a backup, maybe.
But really I should have spent the money on a more accurate thermometer in the first place. The two thermometers gave identical readings at room temperature, but closer to incubation temperature they were consistently 2 °C apart. Fortunately I also had an electronic clinical thermometer for kids. I tested this on myself and it read 98.9 °F (it was from the US) which seemed close enough to reality. Then I dipped all three in a glass of warm oil (not water, which might short out the thermistor probe). The clinical thermometer gave readings about half way between, at 2 °F (1.1 °C) above the digital thermometer. I decided to take the real temperature as being the value on the digital thermometer plus 1.1 °C, and use the wine thermometer reading minus 1 °C as a check. I bundled both thermometers together with the temperature probe from the thermostat and put them all on top of the egg tray -- just above where those little chicks' heads will be! You could put them in a water wiggler if you want.
By the way, the hygrometer function checked out using the salt solution method. I reset the digital thermometer and left it overnight inside a plastic baggie with a little cup of saturated salt solution. In the morning I used the "max" function to read off the highest relative humidity reading during that time (it was 73%). It should have been 75%, so it was accurate to within 5% as advertised. What with opening up the box 3 times daily to turn the eggs I did not expect very good control over humidity so I would be weighing the eggs to check that they were losing 0.65%-0.7% of their weight per day.
All done, now let's test it out! I plugged the thermostat into the ancient 12 V power supply. The lights and fan went on as expected. The fan made a nice gentle breeze but was surprisingly noisy: perhaps a bit of stray fluff was stuck inside. As it warmed up, I adjusted the thermostat until the air temperature cycled between 37.2 °C (99.0 °F) and 37.8 °C (100.0 °F).
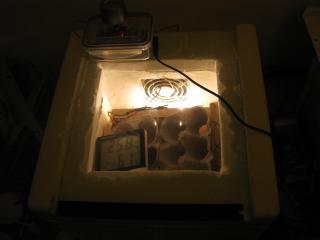
| Now that the box was at temperature I moistened the sponge by squirting a little warm water through the tube. Then I left the finished incubator humming away overnight. Nothing blew out and the maximum and minimum temperature, as recorded by the thermometer/hygrometer, were in a reasonable range. But the relative humidity had increased from 40% to around 70% -- too much. After I had opened up the box to fiddle with the thermometers it dropped back down to 50%, which was just right. All in all I reasoned that I didn't need to adjust the size of the water pan but that I should be on the lookout for humidity drops after turning the eggs. |
So all that remained was to put in the eggs (12 light Sussex large fowls). My man Red posted them 1st class on Thursday so I should have got them Friday morning or Saturday at the outside. When did her majesty's Royal Mail deliver? Monday. Pah. Bring on the revolution. At least it gave me time to twiddle about with the incubator over the weekend. An overnight rest in the cooler, a kiss on each egg for good luck, and in they went. Fingers crossed! Actually don't kiss the eggs. That much I know about chicken anatomy. It won't help their fertility or yours.
For more on my first incubation click here. Take a look at the webcam stream *** LIVE! ***. I will be chatting on the Ustream channel t0mpr1c3-eggcam on hatch day, 4th October. So no cute chick pics yet! Alright then, just a couple:
| 
|
The total outlay, not including the stuff I already had, is approximately equal to the amount of change lying on top of my dresser. To all intents and this project was completed without exposing my wallet to daylight. Coz UV is harmful to leather! You don't want it left out in the sun like Charles Bronson.
Recommended Parts List
Polystyrene box
2 x glass or transparent plastic sheets for window, cut to size
Silicone sealant
Scrap wood for egg tray and light fitting
Wire mesh for platform and to protect lamps
Water pans & sponges
PVC tubing
Thermometer / hygrometer with probe
Water wiggler (optional)
12 VDC 3 A adapter (e.g. laptop power supply)
4 x 12 V 10 W G4 halogen bulbs (preferably long life ones)
2 x MR11 ceramic halogen bulb socket (sometimes sold as "12 V spotlight connectors")
12 VDC brushless fan
For the thermostat:
Velleman MK138 thermostat kit
33 kΩ resistor
10 MΩ resistor
10 kΩ potentiometer
A box to put it in (optional)
You will also need
Craft knife
Skewer
Soldering iron and solder (for electronics not plumbing!)
Wire stripper
Wire cutter
Hook up wire