Half Monitor Chicken Coop from the 1920's re(hatched)born to create sustainable hen house for the early 2000's

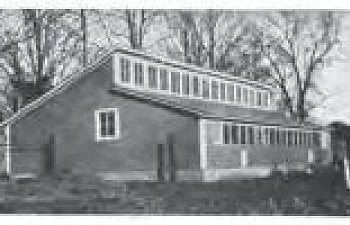
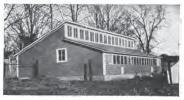
Having grown up in the Midwest on a farm, visiting Grandma's and helping her collect eggs, my idea of a chicken house was the Half Monitor or Sawtooth house that was the rage in the 1920's. Most are in ruins here in Illinois in 2011, but there are a few around so that I could show my husband what type of house I wanted. Visiting with the old timers that had chickens back in the 1920 - 40's they will tell you the reason that the houses were designed that way is that most did not have electricity. They always faced to the south to allow the winter sun to warm the nests that were located on the north wall, protecting the fowl from the sometimes brutual midwest winters. The windows were placed high on the monitor wall to encourage the hot air to rise and exit the building creating necessary air flow, keeping the fowl cool during the humid hot summers.
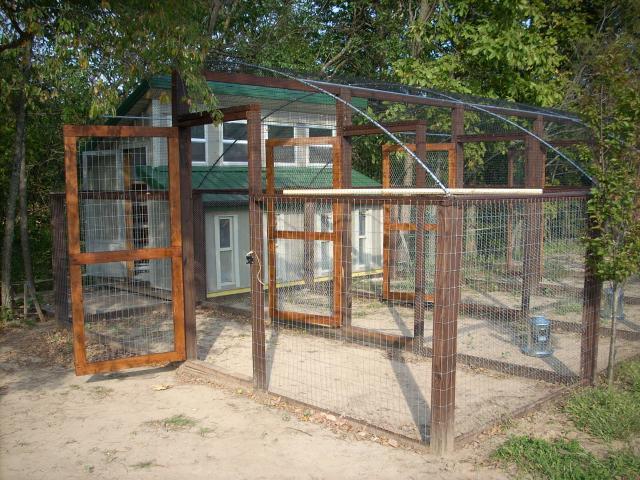
I like to think of myself as being green minded, concerned about sustainability, so the design that would promote those ideals was important to me. And the 90 year old design from early extension centers just goes to prove that sometimes there is nothing really 'new'. Our coop is now 2 years old and it does everything that those early plans said it would. When the midwest sun is low in the sky during December and January, the light from the windows shines directly on the nesting boxes. When the outside temperature is in the lower teens the temperature in the half monitor never dips below 50 degrees. Of course we put 4 inches of closed cell insulation in the walls and ceiling, a luxury that the houses built in the 20's did not have. And likewise, during our humid summers with temperatures into the 90's our hens keep laying and take long naps in their now shaded, the sun is high in the sky, nesting boxes. The generous 18" overhang that my husband added to the monitor design completely blocks the sun from June until September from heating up the house. This was a design element that was not on the original half monitor.
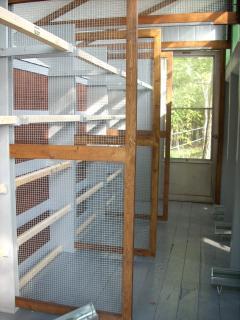
The front of the coop has removable trapizoid inserts for easy cleaning. The tall chicken run doors are half covered with plexiglass allowing light and sun to enter. The galvanized doors, lower half, are hooked to cables and can easily be opened from outside of the runs.
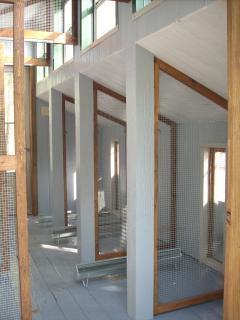
The back wall of the monitor has four rows of nesting boxes with panels that can be removed to give chickens access to 16 x 20 nesting cubes. We also have individual panels with hardware cloth, so that individual birds can be seperated to recover from an injury or sit on a nest of eggs without being disturbed by the rest of the flock. The doors between the pens, slide into slots to allow passage thru all the pens to gather eggs. There are roosts in front of each row of nests and one high above the nests, rooster tails like to perch there.
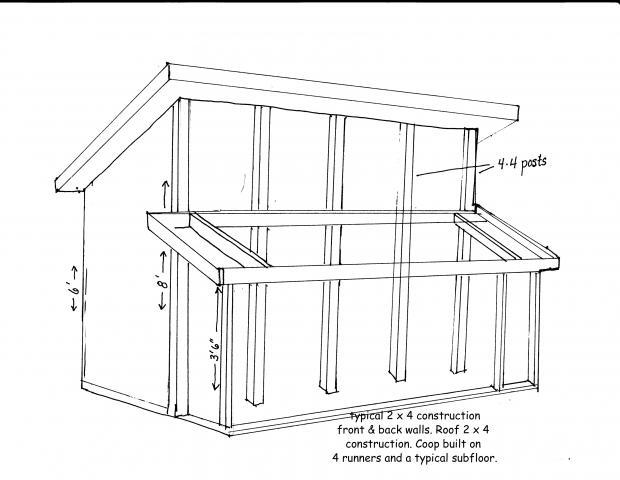
Here is a rough sketch of the coop, we didn't really use plans, we had an idea what we wanted it to look like and then the wall heights and lengths were determined by our boards and tin scrap size. The back of the coop is 6 feet high, the height of the monitor wall is 8 feet high. The coop is 16 feet long and 8 feet wide. All of the coop is typical 2x4 construction with the exception of the Monitor wall which we used 4x4s. The coop was built on four 4x6 runners with typical subfloor construction floor. We chose to build the coop on runners, elimated the need for a building permit and our county does not tax non-permanent (runner) buildings. Win win!
The outside runs are 8 feet by 20 feet long. We used 5 foot netting on the pen dividers. The circular roof is constructed of 1/2 electrical conduct that we ran through a bender. Each semi circle is four pieces put together with brackets, t's, crosses, and angles that my husband welded up. This allowed us to run straight pieces crossways at three points to keep the structure from tipping. Weaving the deer netting was a bit of a challenge, each section was woven onto the conduct before we put it on top of the runs. But, hey, we are still married, so I guess it wasn't that tough.
This coop has served us well over the last two years, I keep about 20 birds in each section. I clean the coop once a month, using about 3 bags of the pine chips. The birds are allowed access to their runs 24/7, only locked indoors when the weather dips below 25 degrees. Lots of nights during the summer, many roost outdoors under the trees. That is what the strange white stick is in the photo, a roost that runs across the front of the first pen. I have since added an electrical fence charger and hot wire runs around the outside edge of the run, even across the front of the building. (Screens are thin on those windows, easy entry for a racoon). We have tons of coons and other varmits, but they have never gained access to the runs or coop. We have also added, since the photo was taken, small 12 x 12 inch doors on the front of the runs. Every fourth day each pen gets to free range during the daylight hours.
Having grown up in the Midwest on a farm, visiting Grandma's and helping her collect eggs, my idea of a chicken house was the Half Monitor or Sawtooth house that was the rage in the 1920's. Most are in ruins here in Illinois in 2011, but there are a few around so that I could show my husband what type of house I wanted. Visiting with the old timers that had chickens back in the 1920 - 40's they will tell you the reason that the houses were designed that way is that most did not have electricity. They always faced to the south to allow the winter sun to warm the nests that were located on the north wall, protecting the fowl from the sometimes brutual midwest winters. The windows were placed high on the monitor wall to encourage the hot air to rise and exit the building creating necessary air flow, keeping the fowl cool during the humid hot summers.
I like to think of myself as being green minded, concerned about sustainability, so the design that would promote those ideals was important to me. And the 90 year old design from early extension centers just goes to prove that sometimes there is nothing really 'new'. Our coop is now 2 years old and it does everything that those early plans said it would. When the midwest sun is low in the sky during December and January, the light from the windows shines directly on the nesting boxes. When the outside temperature is in the lower teens the temperature in the half monitor never dips below 50 degrees. Of course we put 4 inches of closed cell insulation in the walls and ceiling, a luxury that the houses built in the 20's did not have. And likewise, during our humid summers with temperatures into the 90's our hens keep laying and take long naps in their now shaded, the sun is high in the sky, nesting boxes. The generous 18" overhang that my husband added to the monitor design completely blocks the sun from June until September from heating up the house. This was a design element that was not on the original half monitor.
The front of the coop has removable trapizoid inserts for easy cleaning. The tall chicken run doors are half covered with plexiglass allowing light and sun to enter. The galvanized doors, lower half, are hooked to cables and can easily be opened from outside of the runs.
The back wall of the monitor has four rows of nesting boxes with panels that can be removed to give chickens access to 16 x 20 nesting cubes. We also have individual panels with hardware cloth, so that individual birds can be seperated to recover from an injury or sit on a nest of eggs without being disturbed by the rest of the flock. The doors between the pens, slide into slots to allow passage thru all the pens to gather eggs. There are roosts in front of each row of nests and one high above the nests, rooster tails like to perch there.
The outside runs are 8 feet by 20 feet long. We used 5 foot netting on the pen dividers. The circular roof is constructed of 1/2 electrical conduct that we ran through a bender. Each semi circle is four pieces put together with brackets, t's, crosses, and angles that my husband welded up. This allowed us to run straight pieces crossways at three points to keep the structure from tipping. Weaving the deer netting was a bit of a challenge, each section was woven onto the conduct before we put it on top of the runs. But, hey, we are still married, so I guess it wasn't that tough.
This coop has served us well over the last two years, I keep about 20 birds in each section. I clean the coop once a month, using about 3 bags of the pine chips. The birds are allowed access to their runs 24/7, only locked indoors when the weather dips below 25 degrees. Lots of nights during the summer, many roost outdoors under the trees. That is what the strange white stick is in the photo, a roost that runs across the front of the first pen. I have since added an electrical fence charger and hot wire runs around the outside edge of the run, even across the front of the building. (Screens are thin on those windows, easy entry for a racoon). We have tons of coons and other varmits, but they have never gained access to the runs or coop. We have also added, since the photo was taken, small 12 x 12 inch doors on the front of the runs. Every fourth day each pen gets to free range during the daylight hours.