I could not be more excited to finally share our BELOVED chicken coop. When we bought our house, I knew that I wanted to add chickens to our fur/feather family. After months of planning, discussing, more planning, and finally just DOING - our coop is complete! We were lucky that our property came with an old metal shed, and I'm sure my husband was happy to not have to build something from scratch (although he may have changed his mind after his labor intensive experience with the reciprocating saw!
") )
)THE PLAN
I adapted this plan from our hand drawn plans. It's mostly to scale and should help give you an idea of the interior.

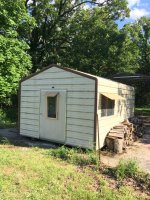
BEFORE
We started with an old, metal shed that had been used as a workshop by the previous owners.


Obviously, it was lacking pretty much everything a happy chook needs, especially VENTILATION! "Can you put lots of windows in it?" I asked sweet hubs. "Sure, no problem! I'll just cut them out!" He probably regretted that statement, but he sure delivered!
 First, we framed out the windows using the existing supports as the sides of the window and fresh 2x4s as the top and bottom.
Then, ever so carefully using a reciprocating saw with a blade designed for cutting metal, hubs cut out the window opening. Word of warning - you will need earplugs, and some strong muscles. But it worked beautifully!

So open! So fresh! We could immediately feel the ventilation working to cool the coop. Only two more windows to go! We added another window on the opposite wall, plus replaced the existing glass window on the door with hardware cloth.


Now for security - can't spend all this time and money on a coop just to have our babies eaten by all of our native predators! We covered the windows with 1/2" hardware cloth, secured with 3/16 x 1 fender washers and screws.


The washers really help flatten out the hardware cloth against the walls to prevent any little raccoon fingers from prying it open.
We didn't want any rain to get in through these huge openings, and struggled for a bit to find a solution. For our original design, we bought 90 degree brackets, bent them to the angle we wanted, and then secured them to the coop and a piece of plywood.


This worked ok, but we have since painted the plywood with waterproofing paint, and sealed the top edge of the awning with flashing tape - sealing out any rain much more effectively.


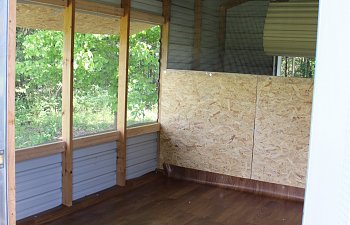
The inside of the shed was about 10'x16', and even with "chicken math" we knew it didn't need to be that big. So, hubs came up with the idea to build a wall, so that we would have storage access for feed, tools, etc, that could be accessed by the garage door. This leaves the footprint of our coop as 10x12, more than large enough for our 10 birdies! It's a mansion. He framed out the lower half of the wall, attached plywood, and then covered the top half with hardware cloth. We still need to close off the top 1' of the space, but our girls haven't started flying up that high yet so it hasn't been an issue.


We then attached some corner roosts made from 2x4's, big side up. It took about a month for the girls to start using them, but now they love it! Poop board is still under construction, since the girls are still sleeping on the floor in a pile, it hasn't been a necessity yet.
Then we got lucky at Lowe's - we found a scrap piece of vinyl flooring, already 10'x12'! The perfect size for our coop floor! We got it for super cheap, too! We screwed it in using some leftover washers. This will make cleaning SO much easier.


We added this latch to the door - we keep it locked at night just to be safe.

Then, we added sand, feeders, and waterers. I had some large pavers lying around and used that as a stand for their waterers. It really helps keep the water nice and clean. Hubs also added a little ramp for the girls to use to get up on their big roost! I mixed some Sweet PDZ into their sand bedding- that's the white powder you see - it really helps with smells.


The Finished Product


Tools We Used

Our drill and reciprocating saw were definitely the star of the show, but we also used the jigsaw and circular saw.
Supplies
I feel like we used a thousand fender washers. Definitely get more than you think need. In reality we probably used around 100, maybe 150.
Wood screws
Sheet metal screws (most of these we were able to take out of the shed and then re-use in their original hole to attach the hardware cloth).
8 brackets for the awnings
Several 2x4s
Several sheets of plywood
A 48"x50' roll of 1/2" hardware cloth. I got it from amazon for $69 with free 2-day shipping, and we probably only used half of it.
Tin snips - we found that these were by far the easiest thing for cutting the hardware cloth.
Blades for cutting through metal for the reciprocating saw
Hole punching thing - I have no idea what it's called but it was a little tool with a sharp end on it that we used to start holes in the sheet metal so we could drill the hardware cloth on. It's just a little poker thing and made the whole job a lot easier.
Ear plugs
Safety Glasses
Vinyl Flooring scrap - ask at your Lowe's or Home Depot for their vinyl flooring remnants and you can get a sweet deal.
All Purpose sand for the bedding, mixed with Sweet PDZ and a little Diatomaceos Earth.
PVC feeders - there are lots of tutorials on Pinterest and here on BYC!
Changes since construction
We changed the awnings, as previously described.
We added a short roost - just a 2x4 stuck between two cinderblocks - for the girls to use until they got used to their big girl roost.
We added pavers in front of both feeders, this helps with any spilled food.
We added a fan in one of the windows - it's amazing for these 100 degree days! We can change the direction of the fan, so we can either blow air into the coop or use it to suck out stale/stinky air.

Planned changes (not yet done)
We would like to add some gable-style vents on either end of the roof - I feel like we still need some airflow up high where that heat accumulates.
Permanent run - our next big project is an attached predator proof run, so that the girls can be out during the day and us not have to worry about them. Currently we have a makeshift run made out of stakes and chicken wire, and while I love sitting out there with them, I'd really love for them to have a little more independence
Nest boxes - they haven't started laying yet so we've been kind of putting this off
Window boxes - I would love to dress the exterior up a little bit with some window boxes with edible flowers and herbs.
An automatic door!!!!
 This is the ultimate dream!
But for now, I think our peeps are pretty happy here on Happy Dog Hill - they love their coop and they love their free range time in the evenings! Thanks for reading!