It just looks so happy!

So, although we were only starting with four chickens, I wanted to build something that would be big enough to allow for chicken math. Basing it on 4x8 sheets of plywood also seemed like it might simplify a bit. So I decided on a 4x8 coop, which should allow for up to eight chickens or so. So a simple box with a slanted roof, right? Wrong.
My husband being from Vermont, he requested a barn-like structure, complete with a gambrel roof. Yay.
But it was a good opportunity for me to learn some basic construction skills, since I’ve only ever built very simple, small-scale things before.
First was lots of planning, graph paper, and running ideas by my dad. I'll put all of my plans here at the front. Hopefully they'll be somewhat helpful. Note that in the third photo, I have horizontal 2x4s running along the middle of the sides and ends. I didn't end up needing those, once I realized that this isn't really all that big a structure. A few other things changed as I proceeded with the build, but some of the measurements may come in handy.
After taking stock of my wood inventory and buying what I needed, I was finally ready to start the build. I used exterior screws for pretty much everything but the roof. They’re a little more expensive than nails, but easier to put in and, more importantly, easier to take out for the inevitable screw-ups (er, “learning opportunities”). First up was putting together the frame. I used 6’ treated 4x4s for the corner posts, 2x6s for the top and bottom headers. I just set the corners onto concrete pavers.
Note that even though the plan was to use 4x8 sheets for the siding, that didn’t mean I could simply make the dimensions of the frame 4x8. I had to factor in the thickness of the siding and how everything was going to fit together. I planned to have the side sheets of siding overlap the end sheets, meaning the sides had to hang out over the edge of the frame a little so the ends would nestle in between and butt up against them. My siding sheets were ½” thick, so I had to allow the long piece of siding to overhang the frame ½” on either end. (This is hard to explain in words—hopefully you can see what I’m talking about in the photos.) This meant that the frame itself had to be an inch less than 8’. So each of the long header boards was trimmed to 7’11”. Then, to allow the shorter end headers to fit in between, the corner posts were inset 1.5” (the thickness of the 2x6 end header) on the long boards:
The shorter end boards were cut to 45” long. That plus the thicknesses of the two long boards equaled 48”, so half a 4x8 sheet of siding would fit flush to the edges.
I only realized all these measurement nuances when I actually pre-fit the boards and siding together before cutting and screwing together. So I highly recommend laying everything out and measuring to make sure it’s all going to fit the way you expect!
Here’s the finished frame:
If you look closely, you can see how the boards butt up against one another. This is what I did with the siding later, as well. Maybe it will help explain my rambling text above. In later photos, you’ll see that I also added a 6’ 2x4 in the middle on the back side. That’s where the doors will go.
With all the vertical supports in place, I added three 2x4 floor joists, with about 2-foot spacing. They’re just screwed into the bottom headers:
The floor went on next:
Just a 4x8 sheet. I had to notch the plywood around each of the posts, so I just measured as carefully as I could, marked the plywood, and cut out the notches.
Because of the way the boards were attached to the 4x4 posts, there was a gap between the post and the edge of the frame. In order to have something to attach the siding to, I filled those gaps with scrap 2x4s:
Same thing with the 2x4 post in the back to give the doors something to close against:
Easy peasy.
On to the roof! The angles and lengths for the gambrel rafters were actually made really easy by this calculator: http://www.blocklayer.com/Roof/GambrelEng.aspx:
I don’t know how I would have done this without that calculator. (Well, I do know: I would have ended up with a standard A-frame roof.) I just put in my dimensions and voila! Lengths, angles, etc. all calculated for me. I was a bit skeptical about how accurate it was, but it was pretty much spot on. I had to do a little tweaking once they were cut, but that was more because my saw apparently wasn’t set up correctly. You can also make small adjustments when you’re fitting them onto the frame (i.e., push and/or pull really hard to make them fit).
I used an overhang, so I cut notches in the bottoms of the rafters so they rest on the top of the frame (also calculated out for you on that site). Rafter pieces are held together by pieces of scrap plywood cut to fit the angles:
I used four rafters:
The two end rafters are flush with the ends of the frame. The middle two are evenly spaced in between. Note that the two middle rafters have the little house-shaped plywood pieces on both sides. The end rafters only have them on the inside--otherwise, the siding wouldn't sit flush against the rafters. The rafters are attached with hurricane ties…and screwed directly to the frame…and the end rafters have angle supports:
This is what happens when dads are involved.
But this roof is NOT coming off.
This next step is VERY IMPORTANT. This is the time when you want to trace around the outside edge of each of the end rafters so you have a template for the gable siding that you’ll eventually be putting on:
You can trace it on the siding itself, a scrap piece of plywood, a piece of cardboard—it doesn’t matter, as long as you do it now BEFORE THE ROOF IS ON. Be sure to make a separate template for each end, as they’re not likely to be exactly the same. I was in a hurry to get the roof on while my dad was still in town to assist and so I could more easily drape tarps to protect the flooring from the weather, so I wasn’t thinking about the siding template. It would have saved me literally hours of wasted time and the cause of the one and only breakdown into tears of the entire build. For the love of all that is holy, trace your siding template before you put the roof on.
The plywood part of the roof was pretty straightforward. A row of plywood for each angle of the roof:
I wanted to have an overhang on each end, which meant it was going to be longer than 8’. So I had to use two pieces for each row to get the right length. I made sure to angle the edges to follow the rafter angles, so each row fit flush with the row below/above. Also, be sure to stagger the pieces so that there’s not one long seam going down the whole roof. I used nails to attach the roof to the rafters, not screws.
Tar paper came next, starting with the bottom and overlapping over the peak:
This was just stapled on, since the roofing itself was eventually going to be attached on top and would hold everything down. I also wrapped it around the gable edges (not the bottom edges) of the roof plywood:
I moved on to the window frames and pop door framing next, again so I could have my dad’s assistance. But if that hadn’t been a factor, I would have just put the roofing material on right away. As it was, the stapled tar paper was left to the elements for a while. It turned out fine, but it probably would have been better to have it fully protected right away, particularly against wind.
I got the two windows on this side from Craigslist. (I’m likely going to screw up the window terminology, but I’ll do my best not to be too confusing.) I made the window frames from 1x4s on three sides and a 1x5 for the bottom sill:
The bottoms of the vertical jambs were cut at about 10 degrees, to give the sill a bit of a slant for the water to run off:
Inside measurements of the frame are about ¼-inch bigger than the window itself, to make sure the window has room to move.
Once the frames were built, we could place the 2x4 wall studs that would hold them. For each, a 2x4 cut to the width of the frame was screwed flat to the 2x6 header on the coop. 2x4 studs were fitted to the sides and screwed to the header and the floor. Holding the frame tight against the top, another 2x4 was fit tight to the bottom of the frame (matching the angled sill) and screwed to the studs.
The pop door frame was just a few 2x4s screwed between the studs to make the top and sides:
You can move them around to make the door whatever size you want.
Here's what it looks like with the window frames sitting in the studs:
Since it was about to start raining, we tacked on the siding just to keep out the rain:
But the front piece needed holes cut for the windows and pop door, so on that side we traced the window and door holes on the inside of the siding. At this point, my dad showed me the magic of cutting holes in the middle of plywood with a circular saw:
We tacked the siding back up:
then set the window frames back in the holes to make sure they still fit with the siding there. (It did take a little filing down of some of the edges of the holes.) Satisfied with that, I taped the cut-out pieces back in the holes to keep the rain out until I could get back to the construction.
From here on, it was mostly up to me, because my parents had to go back home. I did the dripedge next:
What I used isn’t technically dripedge, because that wasn’t going to work for my steeply angled roof—it would have bent back way underneath the eaves. Instead, I found long, thin strips of metal flashing at the local Big Box and just bent them to the angle I needed. The rest was pretty straightforward. For the ends, I cut the pieces a couple of inches longer than the width of each roof piece, so they would overlap. I cut out little triangles near the end of each piece of dripedge so they would fold around the angles. Be aware of how you’re overlapping the pieces—you’ll want to start at the bottom and work your way up, so the water doesn’t run down into a seam.
There seems to be a Great Debate on the internet about whether to install dripedge over or under the tar paper. The method I went with seemed to make sense: On the long, straight edges on the bottom of the roof, I slid the dripedge underneath the tar paper: Any water that somehow makes its way under the top layer of roofing onto the tar paper will run down over the dripedge, not underneath and onto the wood of the roof. On the gambrel ends, I installed it on top of the tar paper: Rain won’t get blown up underneath the tar paper on the exposed ends.
The final layer of roofing was next. I used roll roofing, because it’s simple to install and, along with the tar paper, my dad just happened to have a bunch lying around their house. (Because, you know, who doesn’t?) It's simple enough that I was actually able to install this all on my own. Perhaps not the easiest, but it can be done. Starting at the bottom again, I let it overhang the edges of the roof a bit (on the ends and on the bottom), then put a few nails along the top edge:
Clamps came in handy again to help with positioning and to hold it in place until I got it nailed down. I did the same with the next layer, overlapping the bottom piece, then repeated the process on the other side:
The final piece draped over the peak, overlapping the upper pieces on each side. This last piece didn’t get any nails, of course, just roofing tar to hold it on. I also tarred the bottom and side edges of the other pieces to hold them flat to the roof. (Note that the eaves on both sides are open for ventilation along the entire length.)
Roof complete!
I think it was around this time that I coated the floor with one coat of Blackjack 57, as you'll see in the later photos. I've been happy with it so far. I should have done it much sooner in the process, probably at least one coat right after the floor was installed, to better protect the wood floor from moisture while I was messing around with the rest of the construction. The second coat was applied after the walls and everything were complete, to seal it to the walls.
Next up were the windows. I had the frames made, but the windows themselves weren’t yet attached to the frames. I chiseled out depressions in both the frames and the windows to countersink the hinges (i.e., make them flush with the wood) so there wouldn’t be a gap from the thickness of the hinges:
I was intimidated by this at first, but it really wasn’t as difficult as I’d expected, especially with new, sharp wood chisels. Once the windows were installed in the frames
and everything painted, I installed the whole shebang in the coop. I made sure the edges of the frame were flush with the siding, then screwed them into the studs:
It was finally time for the gable end siding. I’m not going to recap the multiple exercises in futility, rending of garments, and gnashing of teeth. Suffice to say that if my husband hadn’t come to my rescue, the coop might have excess ventilation to this day. In the end, he helped me cobble together pieces of cardboard to match the angles of the roof, which I then traced onto the remaining pieces of siding to be cut. They still don’t fit great if you look closely, but they’re doggone good enough. I also cut the gable vents before nailing these pieces on:
That out of the way, I built the stud framing for the end window and nest boxes:
I couldn't find a cheap window the size I wanted for this end, so I built one with a piece of Lexan and some 1x2s. I just cut slots in the 1x2s with a table saw, slid the Lexan into the slots, and glued the pieces together. Corner clamps came in handy for this.
I won’t go into the details of how I built the nest box. I just followed the fantastic instructions at The Garden Coop (http://www.thegardencoop.com/blog/2011/03/10/external-nest-box-plans/). I positioned mine so the box is resting directly on the floor of the coop inside. (I might not position it this way again, as I’ll explain later, but it was easy.) The only difference in construction was due to my different siding. Instead of notching the siding around the roof of the nest box, I notched the roof of the nest box to fit my siding.
Next I traced and cut the holes in the siding for the window and the nest box:
It took a bit of finagling to get the nest box through the hole, because it’s actually taller at the back, where it’s inside the coop, than the hole is:
I had to stick the box through the hole from the rear of the siding, then shove everything back into place. This was a two-person job. Screwed the box to the floor and the studs, then put the window in:
Last major item: the back doors. I wanted the whole side to open up, so I just cut a full sheet of siding in half. I put some 1x4s around the edges of each door, to give them some stability and to give the hinges something to grab. I did countersink the hinges into the back of the doors, but if you can figure out a different way to hinge the doors, do it. Countersinking these was a pain in the neck. Much more so than the hinges on the windows. When you screw the doors onto the coop, make sure they're positioned low enough so that they'll open easily underneath the roof edge:
Painting time! Then I made a temporary pop door from the piece of siding that had been cut out, just hinged on. (I now have an automatic door.) Did the same for the gable vent covers (which are almost always open, anyway). Fully screwed in all the siding panels, a couple coats of paint, latches on the big doors and the pop door, and the outside was done!
The inside still needed a little finishing before it was ready for its residents. Everything got a coat of white paint. And boy, do I recommend using a sprayer of some sort. Any sort. It took a ridiculous amount of time to do it all by hand. Then I screwed strips of wood around the frame of each window, both to stop drafts and to create a stop for the hinged windows to close against:
Then all the windows, vent holes, and eaves were covered with ¼” hardware cloth, held on with strips of wood screwed to the coop:
Any small holes I found I covered with pieces of wood and/or stuffed with steel wool:
I added strips to the inside of each of the big doors, as well, to help with gapping and drafts:
One last bit of paint, roost, droppings board, food, water—ready for the residents!
I also added screw hooks and chains to allow the windows to be propped open at various angles:
I won’t go into too many details on the run construction; it was pretty straightforward. But here's a little info. It's 8'x8'. Three 4x4s are the base, just laid on the ground with a couple of screws holding them to the legs of the coop. I built all three sides separately:
then attached hardware cloth along the bottom with screws and fender washers, welded wire fencing around the top with fencing staples:
Then I stood them up:
and screwed them to the base and to 4x4 posts I stood at the corners. Then the door:
which I covered all in hardware cloth because it was just the right width for a piece of hardware cloth to cover it, making it easy to do so. Installed it in the doorway with three hinges. I also covered the bottom of the coop in hardware cloth, with an apron out on the ground about a foot or so, to keep things from digging under it:
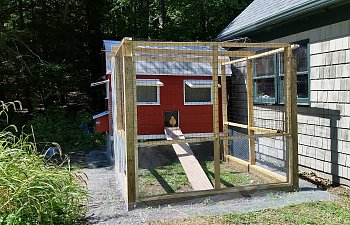
Complete!
This stupid thing took my entire summer, causing me to neglect everything else around the property. But it was worth it.
When I took this photo, the top was just draped with deer netting to keep the hawks out. It's now covered in welded wire, as well as clear corrugated plastic. There’s a swing and a couple of roosts in the run, and I’m planning to add another roost inside the coop this summer, so they can look out the window more easily.
The dogs approve:
Since the initial build, I've also replaced the temporary pop door with the Brinsea ChickSafe automatic door:
I just used some random pieces of moulding that I had lying around to make the rails for it to slide in. The bottom piece is held out from the siding, to hopefully help keep snow and ice from building up too much. The door itself is a plastic cutting board.
Things I’d do again
Things I’d change

So, although we were only starting with four chickens, I wanted to build something that would be big enough to allow for chicken math. Basing it on 4x8 sheets of plywood also seemed like it might simplify a bit. So I decided on a 4x8 coop, which should allow for up to eight chickens or so. So a simple box with a slanted roof, right? Wrong.
My husband being from Vermont, he requested a barn-like structure, complete with a gambrel roof. Yay.

First was lots of planning, graph paper, and running ideas by my dad. I'll put all of my plans here at the front. Hopefully they'll be somewhat helpful. Note that in the third photo, I have horizontal 2x4s running along the middle of the sides and ends. I didn't end up needing those, once I realized that this isn't really all that big a structure. A few other things changed as I proceeded with the build, but some of the measurements may come in handy.
After taking stock of my wood inventory and buying what I needed, I was finally ready to start the build. I used exterior screws for pretty much everything but the roof. They’re a little more expensive than nails, but easier to put in and, more importantly, easier to take out for the inevitable screw-ups (er, “learning opportunities”). First up was putting together the frame. I used 6’ treated 4x4s for the corner posts, 2x6s for the top and bottom headers. I just set the corners onto concrete pavers.
Note that even though the plan was to use 4x8 sheets for the siding, that didn’t mean I could simply make the dimensions of the frame 4x8. I had to factor in the thickness of the siding and how everything was going to fit together. I planned to have the side sheets of siding overlap the end sheets, meaning the sides had to hang out over the edge of the frame a little so the ends would nestle in between and butt up against them. My siding sheets were ½” thick, so I had to allow the long piece of siding to overhang the frame ½” on either end. (This is hard to explain in words—hopefully you can see what I’m talking about in the photos.) This meant that the frame itself had to be an inch less than 8’. So each of the long header boards was trimmed to 7’11”. Then, to allow the shorter end headers to fit in between, the corner posts were inset 1.5” (the thickness of the 2x6 end header) on the long boards:
The shorter end boards were cut to 45” long. That plus the thicknesses of the two long boards equaled 48”, so half a 4x8 sheet of siding would fit flush to the edges.
I only realized all these measurement nuances when I actually pre-fit the boards and siding together before cutting and screwing together. So I highly recommend laying everything out and measuring to make sure it’s all going to fit the way you expect!
Here’s the finished frame:
If you look closely, you can see how the boards butt up against one another. This is what I did with the siding later, as well. Maybe it will help explain my rambling text above. In later photos, you’ll see that I also added a 6’ 2x4 in the middle on the back side. That’s where the doors will go.
With all the vertical supports in place, I added three 2x4 floor joists, with about 2-foot spacing. They’re just screwed into the bottom headers:
The floor went on next:
Just a 4x8 sheet. I had to notch the plywood around each of the posts, so I just measured as carefully as I could, marked the plywood, and cut out the notches.
Because of the way the boards were attached to the 4x4 posts, there was a gap between the post and the edge of the frame. In order to have something to attach the siding to, I filled those gaps with scrap 2x4s:
Same thing with the 2x4 post in the back to give the doors something to close against:
Easy peasy.
On to the roof! The angles and lengths for the gambrel rafters were actually made really easy by this calculator: http://www.blocklayer.com/Roof/GambrelEng.aspx:
I don’t know how I would have done this without that calculator. (Well, I do know: I would have ended up with a standard A-frame roof.) I just put in my dimensions and voila! Lengths, angles, etc. all calculated for me. I was a bit skeptical about how accurate it was, but it was pretty much spot on. I had to do a little tweaking once they were cut, but that was more because my saw apparently wasn’t set up correctly. You can also make small adjustments when you’re fitting them onto the frame (i.e., push and/or pull really hard to make them fit).
I used an overhang, so I cut notches in the bottoms of the rafters so they rest on the top of the frame (also calculated out for you on that site). Rafter pieces are held together by pieces of scrap plywood cut to fit the angles:
I used four rafters:
The two end rafters are flush with the ends of the frame. The middle two are evenly spaced in between. Note that the two middle rafters have the little house-shaped plywood pieces on both sides. The end rafters only have them on the inside--otherwise, the siding wouldn't sit flush against the rafters. The rafters are attached with hurricane ties…and screwed directly to the frame…and the end rafters have angle supports:
This is what happens when dads are involved.
This next step is VERY IMPORTANT. This is the time when you want to trace around the outside edge of each of the end rafters so you have a template for the gable siding that you’ll eventually be putting on:
You can trace it on the siding itself, a scrap piece of plywood, a piece of cardboard—it doesn’t matter, as long as you do it now BEFORE THE ROOF IS ON. Be sure to make a separate template for each end, as they’re not likely to be exactly the same. I was in a hurry to get the roof on while my dad was still in town to assist and so I could more easily drape tarps to protect the flooring from the weather, so I wasn’t thinking about the siding template. It would have saved me literally hours of wasted time and the cause of the one and only breakdown into tears of the entire build. For the love of all that is holy, trace your siding template before you put the roof on.
The plywood part of the roof was pretty straightforward. A row of plywood for each angle of the roof:
I wanted to have an overhang on each end, which meant it was going to be longer than 8’. So I had to use two pieces for each row to get the right length. I made sure to angle the edges to follow the rafter angles, so each row fit flush with the row below/above. Also, be sure to stagger the pieces so that there’s not one long seam going down the whole roof. I used nails to attach the roof to the rafters, not screws.
Tar paper came next, starting with the bottom and overlapping over the peak:
This was just stapled on, since the roofing itself was eventually going to be attached on top and would hold everything down. I also wrapped it around the gable edges (not the bottom edges) of the roof plywood:
I moved on to the window frames and pop door framing next, again so I could have my dad’s assistance. But if that hadn’t been a factor, I would have just put the roofing material on right away. As it was, the stapled tar paper was left to the elements for a while. It turned out fine, but it probably would have been better to have it fully protected right away, particularly against wind.
I got the two windows on this side from Craigslist. (I’m likely going to screw up the window terminology, but I’ll do my best not to be too confusing.) I made the window frames from 1x4s on three sides and a 1x5 for the bottom sill:
The bottoms of the vertical jambs were cut at about 10 degrees, to give the sill a bit of a slant for the water to run off:
Inside measurements of the frame are about ¼-inch bigger than the window itself, to make sure the window has room to move.
Once the frames were built, we could place the 2x4 wall studs that would hold them. For each, a 2x4 cut to the width of the frame was screwed flat to the 2x6 header on the coop. 2x4 studs were fitted to the sides and screwed to the header and the floor. Holding the frame tight against the top, another 2x4 was fit tight to the bottom of the frame (matching the angled sill) and screwed to the studs.
The pop door frame was just a few 2x4s screwed between the studs to make the top and sides:
You can move them around to make the door whatever size you want.
Here's what it looks like with the window frames sitting in the studs:
Since it was about to start raining, we tacked on the siding just to keep out the rain:
But the front piece needed holes cut for the windows and pop door, so on that side we traced the window and door holes on the inside of the siding. At this point, my dad showed me the magic of cutting holes in the middle of plywood with a circular saw:
We tacked the siding back up:
then set the window frames back in the holes to make sure they still fit with the siding there. (It did take a little filing down of some of the edges of the holes.) Satisfied with that, I taped the cut-out pieces back in the holes to keep the rain out until I could get back to the construction.
From here on, it was mostly up to me, because my parents had to go back home. I did the dripedge next:
What I used isn’t technically dripedge, because that wasn’t going to work for my steeply angled roof—it would have bent back way underneath the eaves. Instead, I found long, thin strips of metal flashing at the local Big Box and just bent them to the angle I needed. The rest was pretty straightforward. For the ends, I cut the pieces a couple of inches longer than the width of each roof piece, so they would overlap. I cut out little triangles near the end of each piece of dripedge so they would fold around the angles. Be aware of how you’re overlapping the pieces—you’ll want to start at the bottom and work your way up, so the water doesn’t run down into a seam.
There seems to be a Great Debate on the internet about whether to install dripedge over or under the tar paper. The method I went with seemed to make sense: On the long, straight edges on the bottom of the roof, I slid the dripedge underneath the tar paper: Any water that somehow makes its way under the top layer of roofing onto the tar paper will run down over the dripedge, not underneath and onto the wood of the roof. On the gambrel ends, I installed it on top of the tar paper: Rain won’t get blown up underneath the tar paper on the exposed ends.
The final layer of roofing was next. I used roll roofing, because it’s simple to install and, along with the tar paper, my dad just happened to have a bunch lying around their house. (Because, you know, who doesn’t?) It's simple enough that I was actually able to install this all on my own. Perhaps not the easiest, but it can be done. Starting at the bottom again, I let it overhang the edges of the roof a bit (on the ends and on the bottom), then put a few nails along the top edge:
Clamps came in handy again to help with positioning and to hold it in place until I got it nailed down. I did the same with the next layer, overlapping the bottom piece, then repeated the process on the other side:
The final piece draped over the peak, overlapping the upper pieces on each side. This last piece didn’t get any nails, of course, just roofing tar to hold it on. I also tarred the bottom and side edges of the other pieces to hold them flat to the roof. (Note that the eaves on both sides are open for ventilation along the entire length.)
Roof complete!
I think it was around this time that I coated the floor with one coat of Blackjack 57, as you'll see in the later photos. I've been happy with it so far. I should have done it much sooner in the process, probably at least one coat right after the floor was installed, to better protect the wood floor from moisture while I was messing around with the rest of the construction. The second coat was applied after the walls and everything were complete, to seal it to the walls.
Next up were the windows. I had the frames made, but the windows themselves weren’t yet attached to the frames. I chiseled out depressions in both the frames and the windows to countersink the hinges (i.e., make them flush with the wood) so there wouldn’t be a gap from the thickness of the hinges:
I was intimidated by this at first, but it really wasn’t as difficult as I’d expected, especially with new, sharp wood chisels. Once the windows were installed in the frames
and everything painted, I installed the whole shebang in the coop. I made sure the edges of the frame were flush with the siding, then screwed them into the studs:
It was finally time for the gable end siding. I’m not going to recap the multiple exercises in futility, rending of garments, and gnashing of teeth. Suffice to say that if my husband hadn’t come to my rescue, the coop might have excess ventilation to this day. In the end, he helped me cobble together pieces of cardboard to match the angles of the roof, which I then traced onto the remaining pieces of siding to be cut. They still don’t fit great if you look closely, but they’re doggone good enough. I also cut the gable vents before nailing these pieces on:
That out of the way, I built the stud framing for the end window and nest boxes:
I couldn't find a cheap window the size I wanted for this end, so I built one with a piece of Lexan and some 1x2s. I just cut slots in the 1x2s with a table saw, slid the Lexan into the slots, and glued the pieces together. Corner clamps came in handy for this.
I won’t go into the details of how I built the nest box. I just followed the fantastic instructions at The Garden Coop (http://www.thegardencoop.com/blog/2011/03/10/external-nest-box-plans/). I positioned mine so the box is resting directly on the floor of the coop inside. (I might not position it this way again, as I’ll explain later, but it was easy.) The only difference in construction was due to my different siding. Instead of notching the siding around the roof of the nest box, I notched the roof of the nest box to fit my siding.
Next I traced and cut the holes in the siding for the window and the nest box:
It took a bit of finagling to get the nest box through the hole, because it’s actually taller at the back, where it’s inside the coop, than the hole is:
I had to stick the box through the hole from the rear of the siding, then shove everything back into place. This was a two-person job. Screwed the box to the floor and the studs, then put the window in:
Last major item: the back doors. I wanted the whole side to open up, so I just cut a full sheet of siding in half. I put some 1x4s around the edges of each door, to give them some stability and to give the hinges something to grab. I did countersink the hinges into the back of the doors, but if you can figure out a different way to hinge the doors, do it. Countersinking these was a pain in the neck. Much more so than the hinges on the windows. When you screw the doors onto the coop, make sure they're positioned low enough so that they'll open easily underneath the roof edge:
Painting time! Then I made a temporary pop door from the piece of siding that had been cut out, just hinged on. (I now have an automatic door.) Did the same for the gable vent covers (which are almost always open, anyway). Fully screwed in all the siding panels, a couple coats of paint, latches on the big doors and the pop door, and the outside was done!
The inside still needed a little finishing before it was ready for its residents. Everything got a coat of white paint. And boy, do I recommend using a sprayer of some sort. Any sort. It took a ridiculous amount of time to do it all by hand. Then I screwed strips of wood around the frame of each window, both to stop drafts and to create a stop for the hinged windows to close against:
Then all the windows, vent holes, and eaves were covered with ¼” hardware cloth, held on with strips of wood screwed to the coop:
Any small holes I found I covered with pieces of wood and/or stuffed with steel wool:
I added strips to the inside of each of the big doors, as well, to help with gapping and drafts:
One last bit of paint, roost, droppings board, food, water—ready for the residents!
I also added screw hooks and chains to allow the windows to be propped open at various angles:
I won’t go into too many details on the run construction; it was pretty straightforward. But here's a little info. It's 8'x8'. Three 4x4s are the base, just laid on the ground with a couple of screws holding them to the legs of the coop. I built all three sides separately:
then attached hardware cloth along the bottom with screws and fender washers, welded wire fencing around the top with fencing staples:
Then I stood them up:
and screwed them to the base and to 4x4 posts I stood at the corners. Then the door:
which I covered all in hardware cloth because it was just the right width for a piece of hardware cloth to cover it, making it easy to do so. Installed it in the doorway with three hinges. I also covered the bottom of the coop in hardware cloth, with an apron out on the ground about a foot or so, to keep things from digging under it:
Complete!

When I took this photo, the top was just draped with deer netting to keep the hawks out. It's now covered in welded wire, as well as clear corrugated plastic. There’s a swing and a couple of roosts in the run, and I’m planning to add another roost inside the coop this summer, so they can look out the window more easily.

The dogs approve:
Since the initial build, I've also replaced the temporary pop door with the Brinsea ChickSafe automatic door:
I just used some random pieces of moulding that I had lying around to make the rails for it to slide in. The bottom piece is held out from the siding, to hopefully help keep snow and ice from building up too much. The door itself is a plastic cutting board.
Things I’d do again
- I used screws rather than nails for almost everything. Slightly more expensive, but the ability to back out the screws and re-do it came in valuable many a time. Plus, if I ever need to disassemble parts of it, it will be much easier with screws than with nails.
- Although it didn’t end up being easy to close all the cracks around the big back doors, I do really like having the entire back open up. Adding a slide bolt latch at the bottom of the doors solved the gapping problem.
Things I’d change
- I’d suggest digging postholes and using concrete for the corner posts. The coop has already started sinking on one corner, putting the doors out of whack. Given the condition of our “soil,” it would have been extremely difficult for me to do this, so I don’t know that I’d actually do it differently if I had to do it over. But I’d suggest putting the posts in a solid foundation if you can. (In the spring, I’ll try jacking up the corner to put another slab under the offending post to raise it up—something I’ll probably have to end up doing a number of times over its lifetime.)
- I would have put the BlackJack on the floor sooner than I did, to help protect it until the roof and walls were up.
- I would have built the nest boxes up higher. They were easy to build right on the floor, but even I have to bend over to reach in from the outside, and I’m only 5’1”. Not the end of the world, but I might have been able to make it a little more convenient for myself.
- I would have used a paint sprayer to paint the inside, rather than a brush.
- I might have preferred to have the coop be on the ground so I could walk right into it. It’s a real pain to climb up into it when I need to (sometimes literally, if I hit my head on the header). It’s not often that I need to, but it’s not going to be uncommon when I need to give it a good cleaning. It's fine now, but it's not going to be great if it's still around when I get older. But the chickens really do like having the shaded, protected-feeling space under the coop, and it expanded the square footage of their run without my having to extend it farther into the yard.
- I'd probably just cover the whole thing in hardware cloth, or at least all of the sides. I saved a little bit of money going with welded wire for part of it, but given how much I spent overall on the darn thing, the savings wasn't really all that much in the scheme of things. And it would have made the run that much more secure.