(Please note that images do not belong to me, I found them all via google)

A guide to Incubating~Read the story's of our fellow BYC members and their Incubating journeys~ Enjoy!
___________________________________________________________________________________
So its that time of year where you have began Incubating...Those days where you sit in front of the incubator unable to take your eyes of the eggs! But inside your thinking what am I going to do on hatching day? Should I be helping them out of the egg? What should I do after they hatch? What should I do on day 10? On lockdown? The incubating process is actually quite a nerve racking experience. I continuously see questions about Lockdown and hatching days. And especially if their egg should look like that on x- amount of days. Whilst Incubating can be a lot of hard work its always worth seeing those cute little beaks pip their external pip. Wether you have 2-3 or 40-50 eggs in your incubator its always worth to know what your doing!
Here is a complete guide to incubating!
(Not all of this information might be correct I am writing this article from personal experience and what I know)
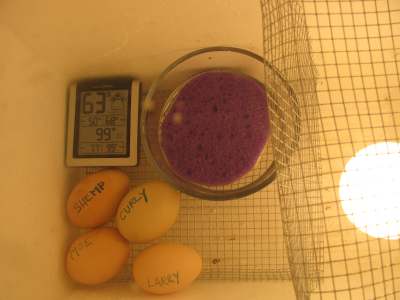
Temperature and Humidity set
Before you think of even touching those eggs to place in the incubator, you have to set your Temperature and Humidity. Correctly. I am assuming you have an incubator. And your probably wondering what you should do before setting your eggs?
First of all set your incubator up in a cool place where your incubator wont be bumped. When it is really humid and hot I set my incubators up on the cool floor or a isolated table (-cough- By where I am -cough-) , That way I know for sure that the Incubators wont be disturbed by anyone but me and the temperature will be even and stay undisturbed by the hot weather. In the cool and dry seasons I place my Incubators by my work desks (Addiction much?). Wherever you set your incubators make sure the temperature is fine with its surroundings because a Incubator Temp can rise if its surroundings is hot.
Once you've set your incubator up in a trusted and cool place plug it in! And set your Humidity and Temperature. Below Is a guide on your temp for chicken incubating temperatures.
Day 1 set your temperature at 38.2 C~
Day 8 Change your temperature to 38 C~
Day 15 Change to 38.7 C~
Day 16 Change to 37.2 C- 37.5 C~
Humidity has always been a problem for me...And you can actually dry hatch BUT The ideal humidity level for hatching eggs is still being debated among experts, but many agree that it should not fall below 25% or above 60% between setting and three days prior to hatching. During the last three days (the "lock-down" period), the humidity level should be increased to between 70-80%.
Setting your eggs
One of the most important steps in Incubating.
If your eggs aren't set properly you can not only say good bye to your chicks but it will have a huge impact on your incubating. The first step would to be to check your eggs. Bad shaped eggs will not usually hatch.. there is a chance they can but its not overly possible. Hence that small eggs don't do well in incubators, They can grow (usually) like any other normal egg but most of time the chick can be deformed or much smaller than its siblings. For a egg to turn into a hatch -able healthy chick it has to be a reasonable size, As well as having flat surface and a pointy end (Easily recognizable).
Size M and up are good sizes for your incubator. Size S is a reasonable small egg. Many people still go ahead and place these eggs in the incubator but if you want my advise try your hardest to stay away from Size S eggs
~
So now that you know which eggs to set in your incubator and which ones not to set its up to you wether you are going to collect your own eggs or order them. Beware the hatching rate of shipped eggs is largely decreased for a number of reasons (But that's a different story for a different article
)
Now its time to set your eggs!
So you have your incubator right? Wether its homemade
or brought online (or store brought)
Its important to mark your eggs. But first you have to figure which way your setting your eggs.
Flat:
(I generally prefer flat because it mimics how a broody hen would set her eggs)
Or Upright:
~
Decided? Great! Lets get to marking.
Marking your eggs is a great way to know if they have been turned. Turning of the eggs prevents the membrane sticking to the shell and mimics what a broody hen would do. If you are setting your eggs flat you can mark your eggs with a x on one of the flat surfaces (As shown below) You may whish to write O on the other side of the egg but it isn't absolutely necessary (Leans over to the side of your choice). With marking you'll know your eggs have been turned. For instance In the morning your eggs all have their x side facing up, Around midday you check on them again and their blank sides (or the sides marked with o) are facing up. Have my eggs been turned? Yes! Or if you are manually turning them it is easy to keep track of turning marked eggs
So now you have set your humidity and Temperature, gathered (or ordered) your eggs. You have successfully marked them and are now heading over to the incubator to set them (Either flat or upright) Great! You are on the way to a successful hatch!
Some Tips to remember:
1. Its best to let your Incubator run for a whole day before you set your eggs this will ensure the Incubator is running smoothly. Don't rush with the process, You have nothing to loose.
2. Adding water to your incubator every two days is a good idea-Which is what I do.
3. Its a good idea to mark your calendar with the day you set your eggs, The days you need to add water or change temp, As well as 'Lock down' Day and Hatching day. It makes it easier for everyone!
4. Chicken Eggs take 21 Days to hatch, It is known for some to hatch on day 18 or later than day 25. Don't stress!
Day 1 Of Incubating
Before you call it a day of Incubating your eggs would of have to be in the Incubator for a full 24 hours. Bravo! Day 1 has been a successful day. (I hope)
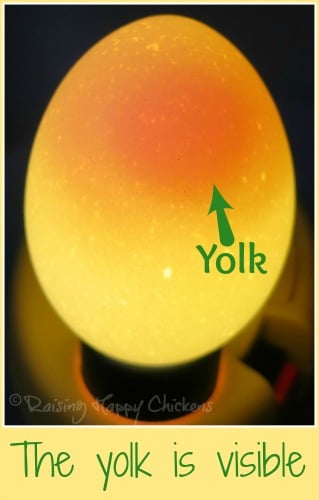
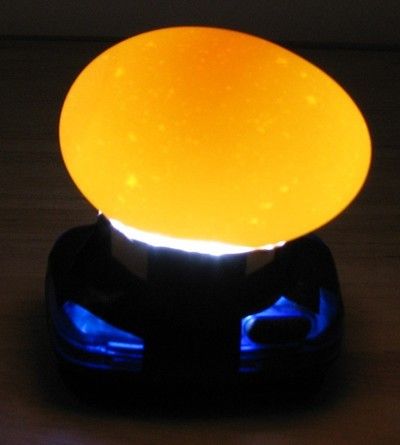
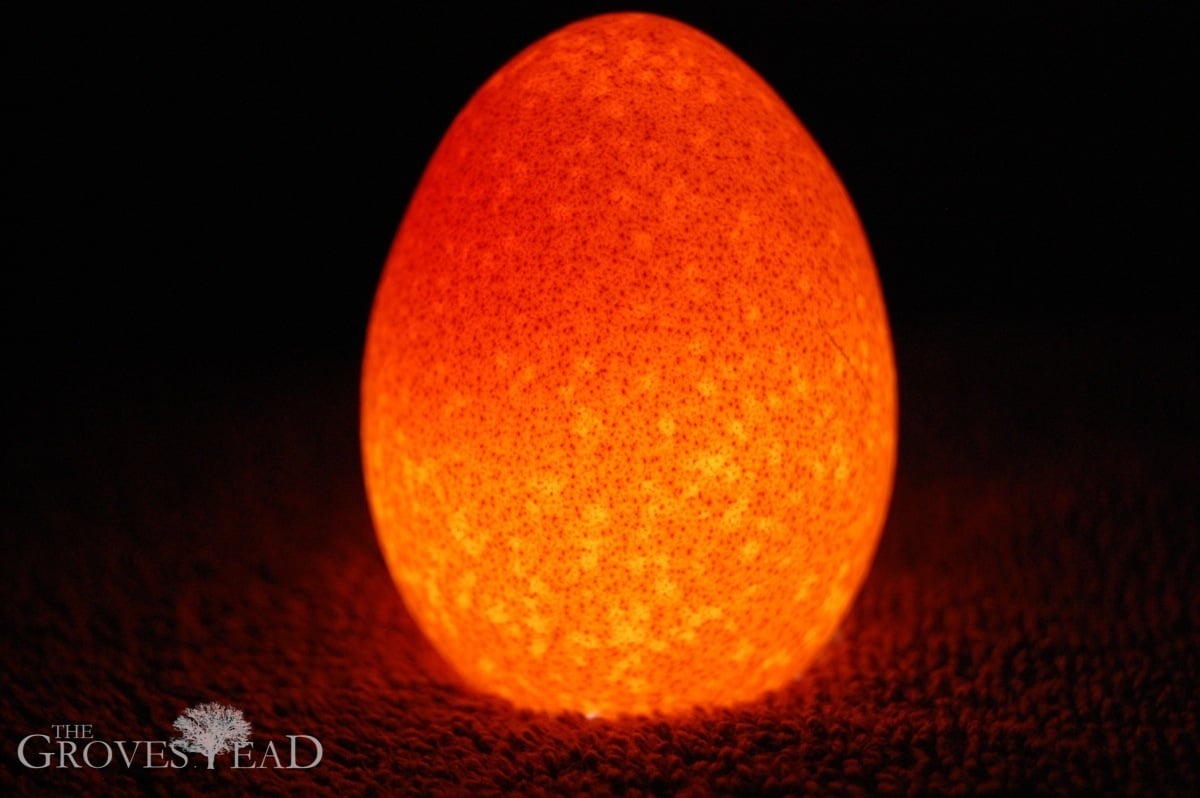
So what should your egg look like on day 1? Is it worth a candle? If you candle on Day 1 a 'Bulls eye' Is recognizable, This is where your chick will soon be. It can be very hard to see so really all that's visible (if you candle) is Yolk and more Yolk. In my opinion its not worth a candle and I don't recommend candling at this early stage. Day 1-2-3 is a fragile stage of incubation therefore any mistakes can lead to some problems with your eggs...
But just to ease your excitement here's what the inside of your egg will look like on day 1:
<-----The Bullseye, It can be seen because the egg has been cracked open..
See? Not much to see, So calm down
Day 2 of Incubation
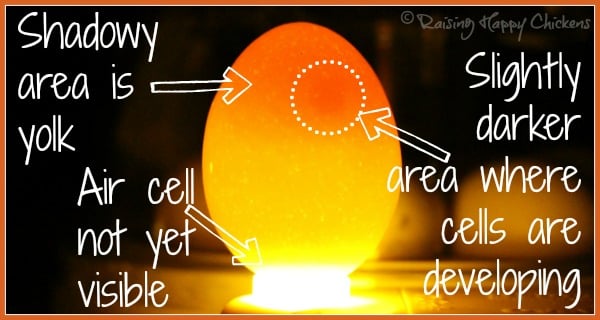
So its day 2 eh? Usually at this stage I just leave the Incubator alone because as the same as day 1 there is not much to be seen. Not only that but if I had to pick one of the most fragile stages of development it would have to be day 2. Why? Because today the chicken Cells are developing! Heres some picture to ease your need to want to candle. Don't say I don't know it!
Getting there!
___________________________________________________________________________________________________________
Story's of fellow BYC members Incubating journeys
A guide to Incubating~Read the story's of our fellow BYC members and their Incubating journeys~ Enjoy!
___________________________________________________________________________________
So its that time of year where you have began Incubating...Those days where you sit in front of the incubator unable to take your eyes of the eggs! But inside your thinking what am I going to do on hatching day? Should I be helping them out of the egg? What should I do after they hatch? What should I do on day 10? On lockdown? The incubating process is actually quite a nerve racking experience. I continuously see questions about Lockdown and hatching days. And especially if their egg should look like that on x- amount of days. Whilst Incubating can be a lot of hard work its always worth seeing those cute little beaks pip their external pip. Wether you have 2-3 or 40-50 eggs in your incubator its always worth to know what your doing!

Here is a complete guide to incubating!

(Not all of this information might be correct I am writing this article from personal experience and what I know)
Temperature and Humidity set
Before you think of even touching those eggs to place in the incubator, you have to set your Temperature and Humidity. Correctly. I am assuming you have an incubator. And your probably wondering what you should do before setting your eggs?
First of all set your incubator up in a cool place where your incubator wont be bumped. When it is really humid and hot I set my incubators up on the cool floor or a isolated table (-cough- By where I am -cough-) , That way I know for sure that the Incubators wont be disturbed by anyone but me and the temperature will be even and stay undisturbed by the hot weather. In the cool and dry seasons I place my Incubators by my work desks (Addiction much?). Wherever you set your incubators make sure the temperature is fine with its surroundings because a Incubator Temp can rise if its surroundings is hot.
Once you've set your incubator up in a trusted and cool place plug it in! And set your Humidity and Temperature. Below Is a guide on your temp for chicken incubating temperatures.
Day 1 set your temperature at 38.2 C~
Day 8 Change your temperature to 38 C~
Day 15 Change to 38.7 C~
Day 16 Change to 37.2 C- 37.5 C~
Humidity has always been a problem for me...And you can actually dry hatch BUT The ideal humidity level for hatching eggs is still being debated among experts, but many agree that it should not fall below 25% or above 60% between setting and three days prior to hatching. During the last three days (the "lock-down" period), the humidity level should be increased to between 70-80%.
Setting your eggs
One of the most important steps in Incubating.
If your eggs aren't set properly you can not only say good bye to your chicks but it will have a huge impact on your incubating. The first step would to be to check your eggs. Bad shaped eggs will not usually hatch.. there is a chance they can but its not overly possible. Hence that small eggs don't do well in incubators, They can grow (usually) like any other normal egg but most of time the chick can be deformed or much smaller than its siblings. For a egg to turn into a hatch -able healthy chick it has to be a reasonable size, As well as having flat surface and a pointy end (Easily recognizable).

Size M and up are good sizes for your incubator. Size S is a reasonable small egg. Many people still go ahead and place these eggs in the incubator but if you want my advise try your hardest to stay away from Size S eggs

~
So now that you know which eggs to set in your incubator and which ones not to set its up to you wether you are going to collect your own eggs or order them. Beware the hatching rate of shipped eggs is largely decreased for a number of reasons (But that's a different story for a different article

Now its time to set your eggs!
So you have your incubator right? Wether its homemade
 or brought online (or store brought)
Its important to mark your eggs. But first you have to figure which way your setting your eggs.
Flat:

(I generally prefer flat because it mimics how a broody hen would set her eggs)
Or Upright:


~
Decided? Great! Lets get to marking.
Marking your eggs is a great way to know if they have been turned. Turning of the eggs prevents the membrane sticking to the shell and mimics what a broody hen would do. If you are setting your eggs flat you can mark your eggs with a x on one of the flat surfaces (As shown below) You may whish to write O on the other side of the egg but it isn't absolutely necessary (Leans over to the side of your choice). With marking you'll know your eggs have been turned. For instance In the morning your eggs all have their x side facing up, Around midday you check on them again and their blank sides (or the sides marked with o) are facing up. Have my eggs been turned? Yes! Or if you are manually turning them it is easy to keep track of turning marked eggs


So now you have set your humidity and Temperature, gathered (or ordered) your eggs. You have successfully marked them and are now heading over to the incubator to set them (Either flat or upright) Great! You are on the way to a successful hatch!
Some Tips to remember:
1. Its best to let your Incubator run for a whole day before you set your eggs this will ensure the Incubator is running smoothly. Don't rush with the process, You have nothing to loose.
2. Adding water to your incubator every two days is a good idea-Which is what I do.
3. Its a good idea to mark your calendar with the day you set your eggs, The days you need to add water or change temp, As well as 'Lock down' Day and Hatching day. It makes it easier for everyone!
4. Chicken Eggs take 21 Days to hatch, It is known for some to hatch on day 18 or later than day 25. Don't stress!
Day 1 Of Incubating
Before you call it a day of Incubating your eggs would of have to be in the Incubator for a full 24 hours. Bravo! Day 1 has been a successful day. (I hope)
So what should your egg look like on day 1? Is it worth a candle? If you candle on Day 1 a 'Bulls eye' Is recognizable, This is where your chick will soon be. It can be very hard to see so really all that's visible (if you candle) is Yolk and more Yolk. In my opinion its not worth a candle and I don't recommend candling at this early stage. Day 1-2-3 is a fragile stage of incubation therefore any mistakes can lead to some problems with your eggs...
But just to ease your excitement here's what the inside of your egg will look like on day 1:

See? Not much to see, So calm down
Day 2 of Incubation
So its day 2 eh? Usually at this stage I just leave the Incubator alone because as the same as day 1 there is not much to be seen. Not only that but if I had to pick one of the most fragile stages of development it would have to be day 2. Why? Because today the chicken Cells are developing! Heres some picture to ease your need to want to candle. Don't say I don't know it!

Getting there!
___________________________________________________________________________________________________________
Story's of fellow BYC members Incubating journeys