Firstly we would like to say that this coop was a hybrid of many ideas from many other designs and we just took what we liked and ended up with Henlop. We would like to make a special thanks to Brounii's CCC coup as if not for their ideas we would still be going UMM UMM UMMMMMM. Most of the stuff used in producing this coop has come from seconds that was even given away or next to nothing on cost.
Henlop.
We hope you enjoy our experience in building our coop.

What we started with. As you can see the tradies hard at work.
The size of the floor space is approx. 2.4m wide X 4.5m long and 2.1m high.
Frames are up time for the coop.
We wanted to build a coop that could be some what automated. We had the idea of putting in 20ltr kegs that could be fitted to a drinking system. This way there would be no issues of water if the family was away. Below is the idea of installing 2 X 20ltr drums for water
Keeping with the idea of automation we flirted with the idea of a food shoot to supply a continuous food supply whilst having a larger bulk storage area above.
Food shoot underneath the coop itself saves on space but more importantly there is no way this food can get wet. This is made out of 100mm PVC storm pipe with a cut out at the top so the kiddies can get to.
Water trough. This is has been designed to fit a small dog dish float system on one side which would connect to one of the 20ltr drum.
This holds about 2ltrs of water at any given time it is made from 90mm pvc pipe and is 60cm long with a drinking area of 38cm X 5cm.
With the food shoot in and water storage ready. We placed the egg collection facility below this.
All it is waiting for now is the last bit of ply to be attached to enclose this area. Access to this is via entry panels on the out side of the coop so you don't even need to go inside if you don't wish to do so (wife option") )
)
Backing Ply installed and braced.
Had read in a BYC forum that sand would be a better option for the coop. We had sand in the brood box so figured no point in changing now. The Kiddies seem to like it if not just to scratch about.
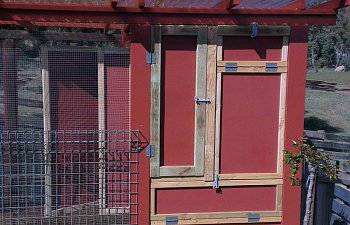
The outside view of the food / water storage and with a access door below for the egg Factory.
Water supply behind the Left door as viewed. Food door - top right drop down door. Egg factory is the long door on the bottom that accesses both egg collection facilities.
We covered the walls with 12mmX12mm small bird aviary mesh and the attached decking board to the back of it to strengthen the mesh and also stop anything small trying to work there way in. Also put on the front some 4ft fence to stop the Tradies from trying to join in and play with the new kiddies.
We decided to install the entrance for the kiddies into the coop in the floor. So they would go under the coop and up a ramp into the coop. The main reason for this was to try and maximise our area for when the kiddies wanted to come out in the morning.
The roosts for the girls to get a good night sleep. We made the roosts so that they could be removed and cleaned.
A few pics to show what we come up with.
Water trough up and running. The kiddies have taken to them really well.
Would like to say a special thankyou to the crazy chicken lady (she knows who she is JO- JO) for giving us these two beautiful Australorps. They have settled in and are keeping the rest of the flock in order. So calm and gentle and only after two days they are allowing me to pick them up with minimal fuss.
Final shot
From this we would have to say it was a blast making it. Took us just on 5 weeks to build from scratch.
The kiddies consist of
3 Australorps - Bella, Thomas and Charlie
3 Rhode Island Whites (so we were told) - Percy Pearl, Toby and James.
3 Rhode Island Reds - Kaitlyn ( eldest sons name if he ended up a girl). Emma-Lee (youngest sons name if was a girl) and Jnr (just because)
And the two big girls from the crazy chicken lady - Spencer and Bocco.
It is what we do in keeping a 3y/o happy.
Hope you enjoyed our tour and thankyou for the time taken.
Henlop.
We hope you enjoy our experience in building our coop.
What we started with. As you can see the tradies hard at work.
The size of the floor space is approx. 2.4m wide X 4.5m long and 2.1m high.
Frames are up time for the coop.
We wanted to build a coop that could be some what automated. We had the idea of putting in 20ltr kegs that could be fitted to a drinking system. This way there would be no issues of water if the family was away. Below is the idea of installing 2 X 20ltr drums for water
Keeping with the idea of automation we flirted with the idea of a food shoot to supply a continuous food supply whilst having a larger bulk storage area above.
Food shoot underneath the coop itself saves on space but more importantly there is no way this food can get wet. This is made out of 100mm PVC storm pipe with a cut out at the top so the kiddies can get to.
Water trough. This is has been designed to fit a small dog dish float system on one side which would connect to one of the 20ltr drum.
This holds about 2ltrs of water at any given time it is made from 90mm pvc pipe and is 60cm long with a drinking area of 38cm X 5cm.
With the food shoot in and water storage ready. We placed the egg collection facility below this.
All it is waiting for now is the last bit of ply to be attached to enclose this area. Access to this is via entry panels on the out side of the coop so you don't even need to go inside if you don't wish to do so (wife option
)
Backing Ply installed and braced.
Had read in a BYC forum that sand would be a better option for the coop. We had sand in the brood box so figured no point in changing now. The Kiddies seem to like it if not just to scratch about.
The outside view of the food / water storage and with a access door below for the egg Factory.
Water supply behind the Left door as viewed. Food door - top right drop down door. Egg factory is the long door on the bottom that accesses both egg collection facilities.
We covered the walls with 12mmX12mm small bird aviary mesh and the attached decking board to the back of it to strengthen the mesh and also stop anything small trying to work there way in. Also put on the front some 4ft fence to stop the Tradies from trying to join in and play with the new kiddies.
We decided to install the entrance for the kiddies into the coop in the floor. So they would go under the coop and up a ramp into the coop. The main reason for this was to try and maximise our area for when the kiddies wanted to come out in the morning.
The roosts for the girls to get a good night sleep. We made the roosts so that they could be removed and cleaned.
A few pics to show what we come up with.
Water trough up and running. The kiddies have taken to them really well.
Would like to say a special thankyou to the crazy chicken lady (she knows who she is JO- JO) for giving us these two beautiful Australorps. They have settled in and are keeping the rest of the flock in order. So calm and gentle and only after two days they are allowing me to pick them up with minimal fuss.
Final shot
From this we would have to say it was a blast making it. Took us just on 5 weeks to build from scratch.
The kiddies consist of
3 Australorps - Bella, Thomas and Charlie
3 Rhode Island Whites (so we were told) - Percy Pearl, Toby and James.
3 Rhode Island Reds - Kaitlyn ( eldest sons name if he ended up a girl). Emma-Lee (youngest sons name if was a girl) and Jnr (just because)
And the two big girls from the crazy chicken lady - Spencer and Bocco.
It is what we do in keeping a 3y/o happy.
Hope you enjoyed our tour and thankyou for the time taken.