Our move to the country was initally based on the desire for our dogs to run.... then as we spent months and months driving to see where we wanted to be the "dream" began and morphed into a hobby farm..... after joining this site I started to research what it is I wanted to build. We have a rather interesting house which is quite new with rounded out windowed walls and a sun room which has a turret (castle style) roof so we wanted our coop to be cool, clean and interesting as well.
I started the search here then hit the local hardware store web sites for ideas on designs.... the play house here:
http://www.homedepot.ca/webapp/wcs/...ode+matchall&recN=112963&N=0&Ntk=P_PartNumber
was my inspiration. Obvously I needed to change some things to accomodate the materials available to me at a reasonable price but we will come close to this when completed....
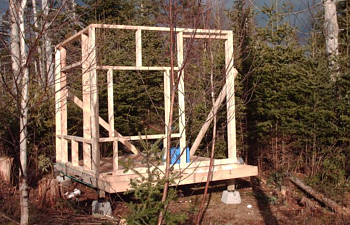
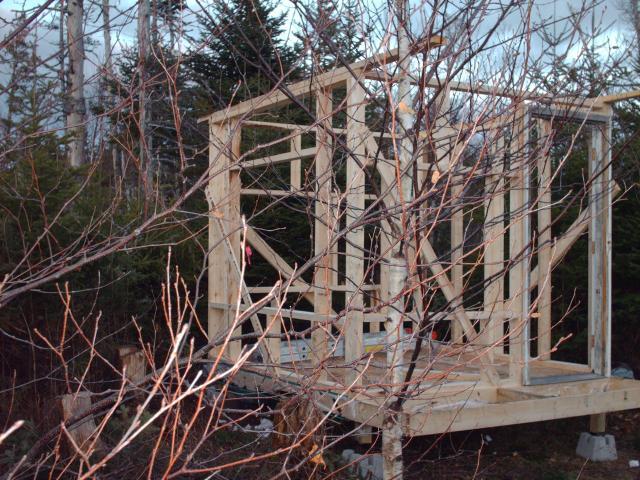
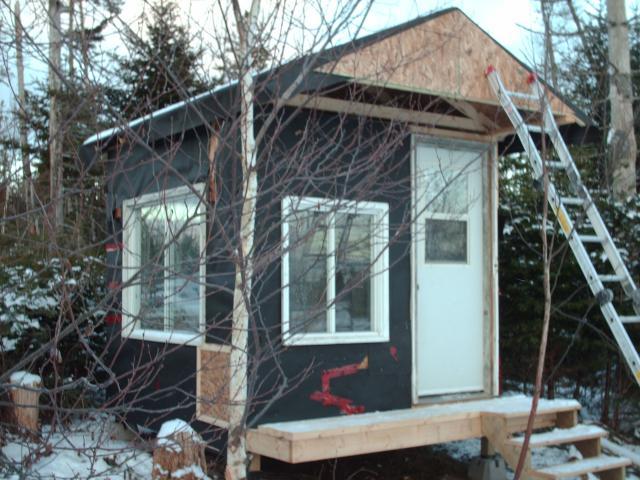
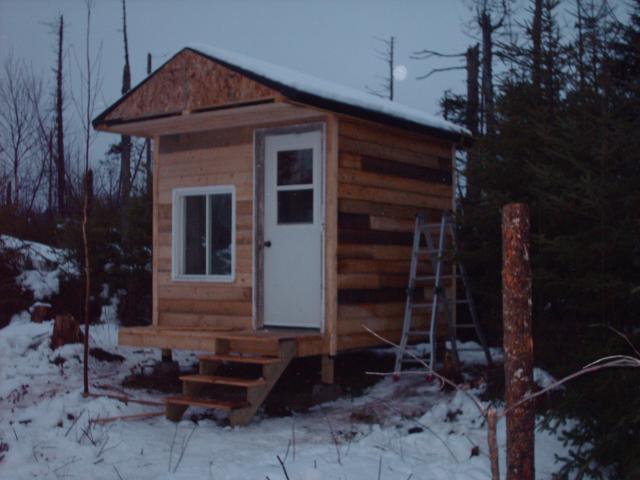
My coop, 8x8 with 7' height, with a 2 foot veranda for afternoon sunning!

This is the front and left side of the coop, the front is primarily east facing and the left side primarily south.
There is a door on the front right (I hoped to change it to out swing.. but didn't). The window to the left is approximately 38" x 42" to the left side is also a window, it is 60" x 45", the pop door will be in the corner closest to the camera..
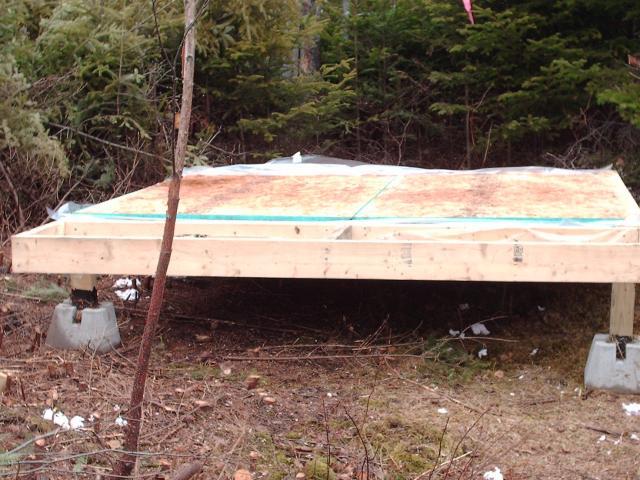
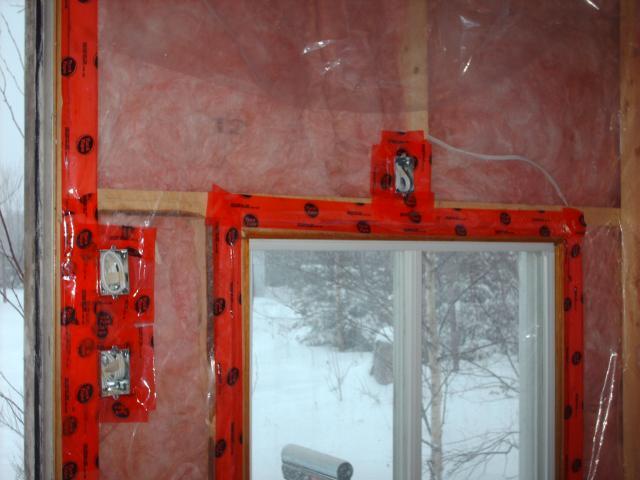
The coop itself is on a funny grade but I left it open for shade. The floor has a whole bag of blown in insulation and vapour barrier.
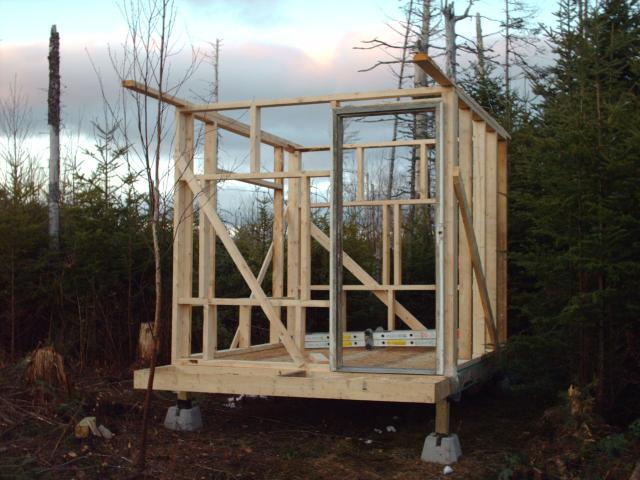
Still the front view, here you can see the 2 1/2 foot front "veranda" and the roof will extend a further foot; the 2x4's on the top are the start of the roof... I hadn't gotten my head around the roof until I put those up and decided that since the walls are a bit higher than 7' I would build "trusses" and enclose the ceiling, I will have a vent or trap door in the ceiling to open in the summer so the heat can escape.
On the back wall you can see where two other windows will fill the width of the back and sit about 24" off the ground.... I keep hemming and hawing on whether to put in those windows. I also have an overhang in the back roof of one foot.
My plans thus far are to put the roosts from roughly the door to the left corner and the left corner to the back left corner above the edge of the windows... this will put the birds about 18" from the "ceiling", I hope that if I put a ladder for the it won't be too steep? Nesting boxes will be in the back right corner (I still consider leaving out the back right window)
The right side is just solid, no windows... this is where I will extend the coop on an interesting angle, it will house the meat birds.
kind of blurry shot of the underside shaded area. Simon didn't understand why I insisted on having the coop raised until I warned him of requiring umbrellas if they had no shade.. he did remind me of the trees in the yard.
once again the south and east side... big window.
So all the windows operate, they are the old vinyl slider style; the door I also bought has a half door light that opens. My intention is to enclose the underside of the coop on the north side and the back (west) with wood buried into the ground. Simon is working on the fencing around the coop, the run will be about 40 x 50 and will incorporate welded wire fence and barbed wire as we will use with the other critters. I will be running power underground and am thinking of an interior water catchment for the water off the roof, it will go well with the automatic waterer Malcolm and Lucy gave me(the people I bought the windows and door from... I think I owe them a Christmas turkey next year)... the coop is completely inside the fence (or will be when there is fence up!) and at some point I will put a roof over some on the run, I can't completely cover it over with netting because the chickens have trees all their own.
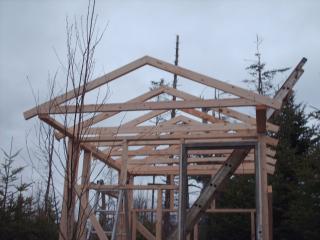
These are my home made roof trusses...
Installed trusses
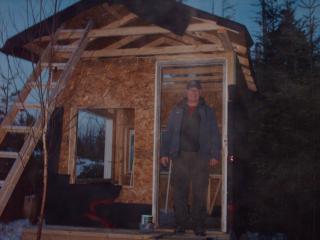
Here is my Simon... he has been taking his life in his hands climbing up the ladder on the uneven ground to put up the tar paper for me, just for that....
he got to try out the stairs first... these should have been put in a long time ago!
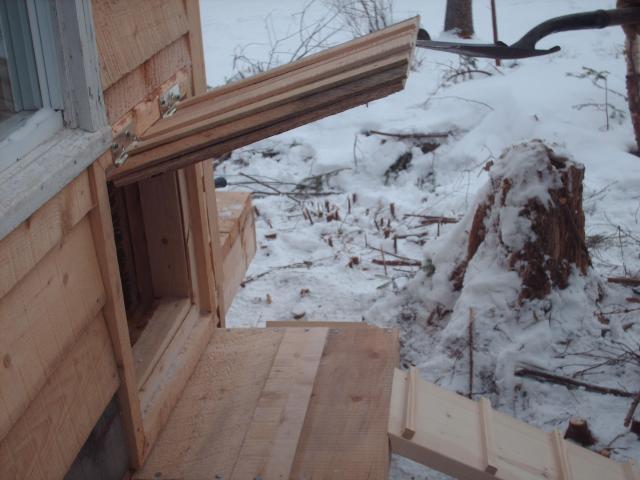
The start of the pop door... it will open up so there is a little "roof" over the door when opened.
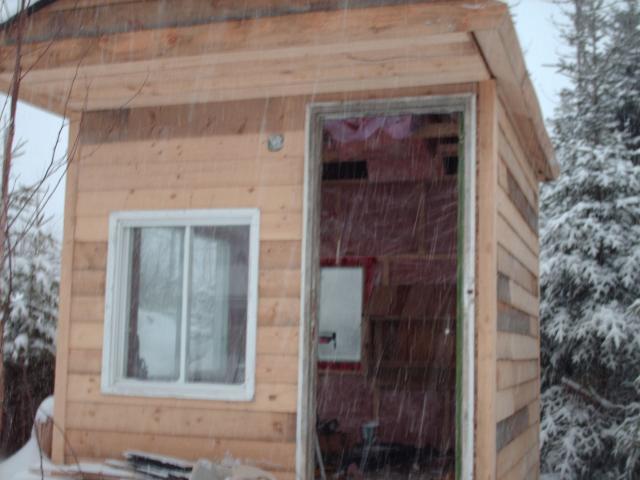
Some doors and windows installed....lots of light for the chickens...
Start of the wood siding
more siding...
better view , see the little veranda?
Insulation so they stay warm... the spots are snow! and of course the nesting boxes as yet undivided. I later lowered the to 12" off the floor.
The girls view from the nesting boxes
plugs and light switches
the outdoor electrics...
We finally chiped the crusty snow and ice off the second half of the roof and finished the shingles..... this was wearing on me so I am very happy about completing this task... we also added some more OSB to the inside walls and lowered the nesting boxes as suggested.... 12" off the ground.
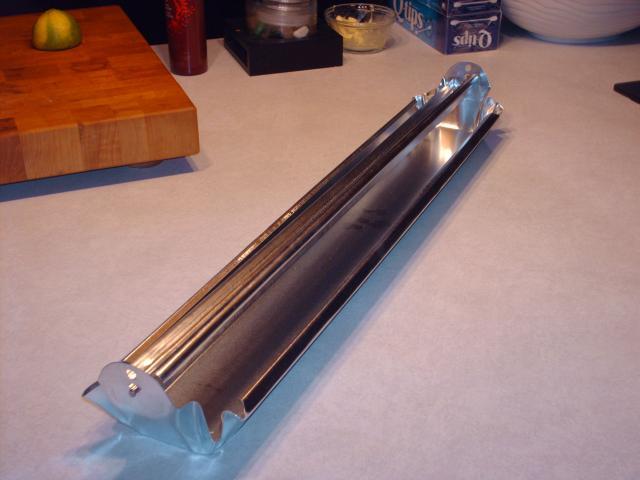
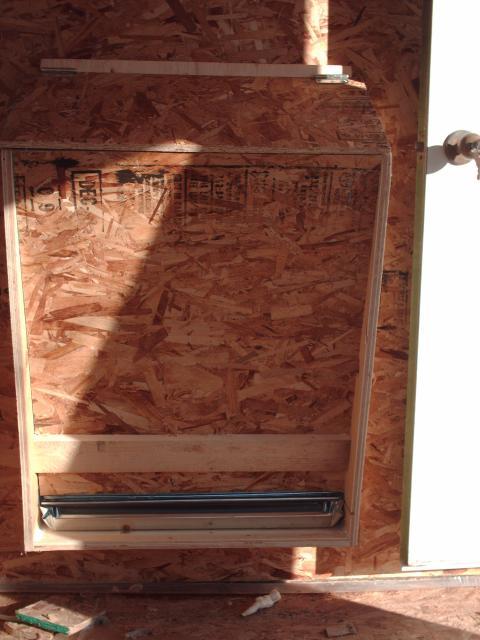
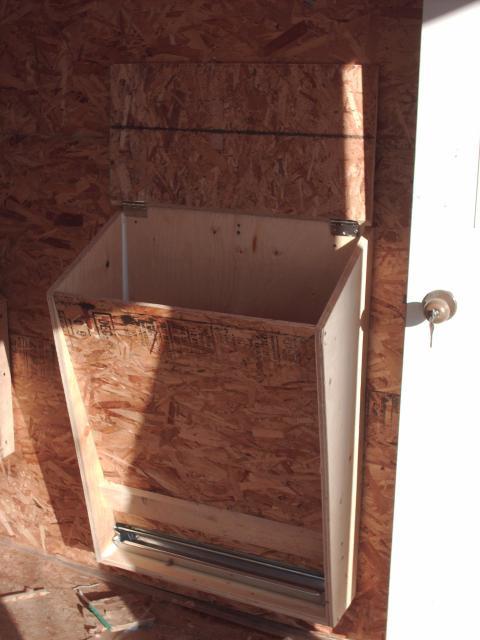
Today I made a feeder box compelte with this galvanized tray with a twirly bit that I hope will help contain the feed.... it is about 7" off the floor but is easy to move... just above the galvanized bit is a piece of OSB which is tilted from 11" at the top so around 3" at the bottem about 30" below.... the feeder will hold about 75 lbs of feed.
You can see the hinged lid here... you can also see the door handle and keys... looks sort of funny!
pop door will be held up with a small chain to provide a bit of shelter when exiting the coop
and then there is the chicken porch and ramps.... that stump wil rovide hours of entertainment.. bug wise .... ick
So we are very close to being done, electrics underground in the spring... ground is a tad too hard right now. The roof is shingled all totaled thus far we have spent about two month of weekends building this, while I have always been handy this is my first "from scratch" building so we learned lots.... especially with the inspiration coming from a picture on the internet and the coop morphed as we went along.
Of course honorable mention goes to my Simon because he put up with my wacky concepts and took direction very well, and gentle redirected me when I completely lost my sanity... even when it made no sense to either of us! We hope our flock will be very happy in their home.
We will still need to install the lights, pillars out front and linoleum and paint.... I plan on designing a self feeder (complete Jan 24 2010) to handle a bag of feed and hopefully a self watering system that can go to the waterer donated to the cause.
And a great big thank you to BYC whose help has been immeasurable!!
I started the search here then hit the local hardware store web sites for ideas on designs.... the play house here:
http://www.homedepot.ca/webapp/wcs/...ode+matchall&recN=112963&N=0&Ntk=P_PartNumber
was my inspiration. Obvously I needed to change some things to accomodate the materials available to me at a reasonable price but we will come close to this when completed....
My coop, 8x8 with 7' height, with a 2 foot veranda for afternoon sunning!

This is the front and left side of the coop, the front is primarily east facing and the left side primarily south.
There is a door on the front right (I hoped to change it to out swing.. but didn't). The window to the left is approximately 38" x 42" to the left side is also a window, it is 60" x 45", the pop door will be in the corner closest to the camera..
The coop itself is on a funny grade but I left it open for shade. The floor has a whole bag of blown in insulation and vapour barrier.
Still the front view, here you can see the 2 1/2 foot front "veranda" and the roof will extend a further foot; the 2x4's on the top are the start of the roof... I hadn't gotten my head around the roof until I put those up and decided that since the walls are a bit higher than 7' I would build "trusses" and enclose the ceiling, I will have a vent or trap door in the ceiling to open in the summer so the heat can escape.
On the back wall you can see where two other windows will fill the width of the back and sit about 24" off the ground.... I keep hemming and hawing on whether to put in those windows. I also have an overhang in the back roof of one foot.
My plans thus far are to put the roosts from roughly the door to the left corner and the left corner to the back left corner above the edge of the windows... this will put the birds about 18" from the "ceiling", I hope that if I put a ladder for the it won't be too steep? Nesting boxes will be in the back right corner (I still consider leaving out the back right window)
The right side is just solid, no windows... this is where I will extend the coop on an interesting angle, it will house the meat birds.
kind of blurry shot of the underside shaded area. Simon didn't understand why I insisted on having the coop raised until I warned him of requiring umbrellas if they had no shade.. he did remind me of the trees in the yard.
once again the south and east side... big window.
So all the windows operate, they are the old vinyl slider style; the door I also bought has a half door light that opens. My intention is to enclose the underside of the coop on the north side and the back (west) with wood buried into the ground. Simon is working on the fencing around the coop, the run will be about 40 x 50 and will incorporate welded wire fence and barbed wire as we will use with the other critters. I will be running power underground and am thinking of an interior water catchment for the water off the roof, it will go well with the automatic waterer Malcolm and Lucy gave me(the people I bought the windows and door from... I think I owe them a Christmas turkey next year)... the coop is completely inside the fence (or will be when there is fence up!) and at some point I will put a roof over some on the run, I can't completely cover it over with netting because the chickens have trees all their own.
These are my home made roof trusses...
Installed trusses
Here is my Simon... he has been taking his life in his hands climbing up the ladder on the uneven ground to put up the tar paper for me, just for that....
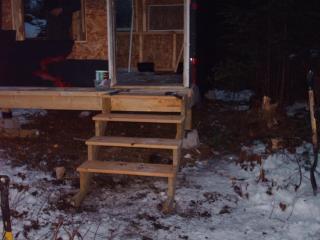
he got to try out the stairs first... these should have been put in a long time ago!

The start of the pop door... it will open up so there is a little "roof" over the door when opened.
Some doors and windows installed....lots of light for the chickens...
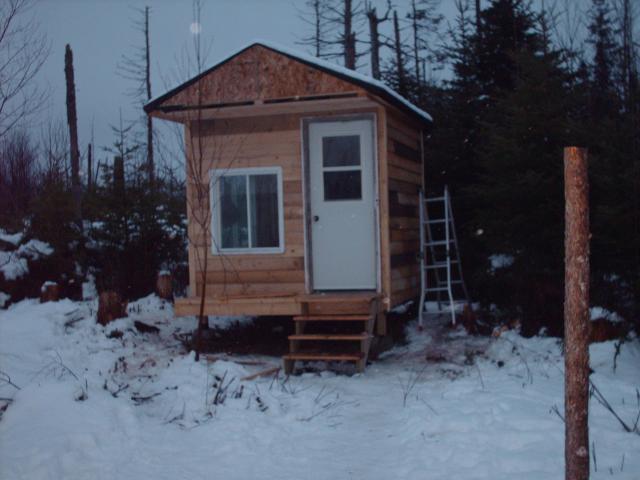
Start of the wood siding
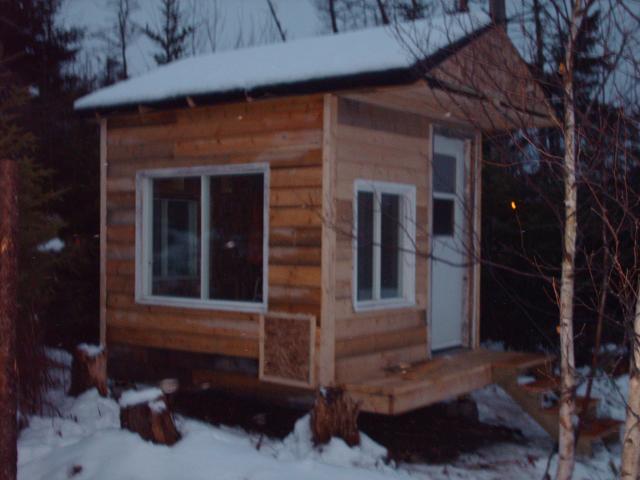
more siding...
better view , see the little veranda?

Insulation so they stay warm... the spots are snow! and of course the nesting boxes as yet undivided. I later lowered the to 12" off the floor.
The girls view from the nesting boxes
plugs and light switches
the outdoor electrics...

We finally chiped the crusty snow and ice off the second half of the roof and finished the shingles..... this was wearing on me so I am very happy about completing this task... we also added some more OSB to the inside walls and lowered the nesting boxes as suggested.... 12" off the ground.
Today I made a feeder box compelte with this galvanized tray with a twirly bit that I hope will help contain the feed.... it is about 7" off the floor but is easy to move... just above the galvanized bit is a piece of OSB which is tilted from 11" at the top so around 3" at the bottem about 30" below.... the feeder will hold about 75 lbs of feed.
You can see the hinged lid here... you can also see the door handle and keys... looks sort of funny!
pop door will be held up with a small chain to provide a bit of shelter when exiting the coop

and then there is the chicken porch and ramps.... that stump wil rovide hours of entertainment.. bug wise .... ick
So we are very close to being done, electrics underground in the spring... ground is a tad too hard right now. The roof is shingled all totaled thus far we have spent about two month of weekends building this, while I have always been handy this is my first "from scratch" building so we learned lots.... especially with the inspiration coming from a picture on the internet and the coop morphed as we went along.
Of course honorable mention goes to my Simon because he put up with my wacky concepts and took direction very well, and gentle redirected me when I completely lost my sanity... even when it made no sense to either of us! We hope our flock will be very happy in their home.
We will still need to install the lights, pillars out front and linoleum and paint.... I plan on designing a self feeder (complete Jan 24 2010) to handle a bag of feed and hopefully a self watering system that can go to the waterer donated to the cause.
And a great big thank you to BYC whose help has been immeasurable!!