HOME of the FLUFFLEBUTTS
For some reason I got an idea in my head: I wanted to raise chickens. My poor hubby, who is used to my crazy antics and desires, said no, but with the help of Backyard Chickens I was ready to take on this project. After lurking around and getting ideas from the coop design page I had a vague idea on where to begin. The starting point proved to be my 25-year-old couch. It was comfortable enough, but hideously ugly and worn. It needed to go, but I didn't want it to go to waste. The wooden structure underneath the upholstery could be the frame for my coop. Besides getting rid of an eyesore in my living room, I would be keeping costs at a minimum, one of my major goals. The other goal was to make the coop look good.
The best spot for the coop was a shaded area beneath redwood trees that stayed cool during the afternoons. I figured from what I read on BYC that the size of the couch, 3' x 5', would be good for 6 hens. I started the foundation with four redwood posts in concrete blocks filled in with post-hole cement. Next I took the bottom of the couch and hack-sawed it to the proper size, drilling it into the redwood posts.
I found out that a small bookcase in the house would work as the nest box, so I turned it on its side and drilled the shelf in. I also took the cabinet door from our kitchen and attached it to the back of the nest box. It will make both cleaning the nest box and accessing the eggs from outside a lot easier.
Fencing boards worked for the guillotine door, along with lots of left over paint from when we had our home painted.
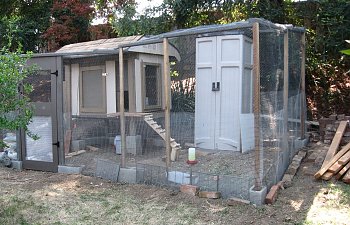
The arm rails and back board from the old couch helped make the roof.
I found shingles on sale at Home Depot, and my Great Love patiently gave me advice on how to put them on the roof.
Overall, I am happy with how it came out.
I ordered six chicks from the local 4-H and picked them up on April 5th from the feed store. I ordered two Black Australorps, two Silver-laced Wyandottes and two Light Brahmas, all of them 10 days old and the cutest little balls of fluff you've ever seen. My daughter and son are rabid geeks, so naturally all the chicks had to be named after characters from Doctor Who, Harry Potter, Avatar: The Last Airbender, My Little Pony: Friendship is Magic, and The Chronicles of Narnia. Rose, Clara, Luna, Toph, Derpy, and Lucy are the proud members of the Flufflebutt Clan. After getting the chicks, completing the coop and run became even more important. I had to work harder, especially since I was doing it all from gut feelings.
A window here and a door there. The storage shed would support for the run's wire roofing and hold the hay and feed.
The babies grew so fast!
Getting the coop done was great, but I needed to have the run completed and secure from the rats, raccoons, possums and hawks.
Because I was running out of time and the chick smell in the house was getting a bit fresh, I stopped taking pictures of my process until I secured the run for the girls
Setting up ventilation, making the coop both easy to clean, and keeping the coop predator-proof became my main goals for the girls new home. My goals for the chickens were for them to have shade, room and comfort.
Over all the girls get along very well.
Flufflebutts Assemble!
I didn't draw out any plans or designs. I just built the coop as I went along and prayed that it would turn out. I made the door for the run before I made the walls, the coop is a bit crocket and a few posts are sideways, but over all it is secure and strong. When I didn't know what to do next, my kids and I painted while I tried to figure out how to solve my latest mistake. For the longest time I didn't know whether I would finish the coop on time, and I feared that the chicks wouldn't have a home when they started growing. All that mad panic and confusion seems far away now, and all I see is the joy our chickens bring us. The Flufflebutts have become part of the family, and everyone is helping to take care of them. So much of this is because of the guidance and knowledge I gained from Backyard Chickens. I would've stalled at four redwood posts in the ground if it weren't for the members of this site, and I am grateful for the help I've found. This project has been a year in the making, but now it's a reality for my family and me. Thank you Backyard Chickens, you are an encyclopedia of information and support!
Added in garden/dust bath area for the girls.
At first I thought it would be great to grow a few thing for the chickens, but I get this feeling that for now it going to be a dust bath and maybe some composting.