Hi Backyard Chicken community! I'd like to share our entry into the great world of raising your own chickens. The experience of building the coop, seeing the chicks grow, and seeing our kids take on a strong sense of responsibility in raising them has been so fulfilling. Let us show you a bit of our journey. Here goes! 4 chicks arrive at our CT home in April of 2103. 2 Buff Orpingtons and 2 Golden Buffs. They were just a few days old. Heat lamp on and our daughter reads them a bedtime story! At this point I haven't started building the coop yet. I figured I had lots of time! That was my biggest mistake!

As the chicks started growing fast, I suddenly knew I was way behind, so I started to get to work! Here's a shot of the skeleton of the project. Using coop ideas from the web, but mostly a design of my own creation, I started to come up with this. The tile floor on the coop floor was something I had to have for ease of cleaning. Now let me explain that I am not a contractor, but did grow up with a handy Dad that I learned a lot from. I had no building plans for this. I treated the whole process as a form of creative expression, aided by a set of cordless power tools and materials all from Home Depot.
Once the frame was up, I started putting up the paneling.
Next I started on the nest box. 4 in this setup. Research I did explained that chickens share nest boxes. So, 1 nest box can be shared by 3 chickens.
Then I started the entry to the coop. A door attached to a pulley system, which I can open from outside the coop. I also started painting. Great turquoise color my wife chose.
Here's the nest box completed. The orange planks are shutters I built for the windows. Windows are vertical sliding type. Note the chain to hold door open.
Then I started work on the run. The ladder into the run was quite a bit of work. Bought feeder and waterer too. When done, the chickens were ready to move in! It was about time, since they were already quite big.
Here's a pic of the rear door access to the coop. Needed for cleaning. You can also notice the asphalt shingles for the roof in this shot. Almost like a real home!
The door to the run. Due to the sloping roof, I had to get the angles just right. It all worked out well. About half inch all around. Wire mesh all around run to keep predators out.
Here are 2 shots of the inside of the coop. You can see the sliding coop door open and nest boxes in the other shot. I use pine wood chips/mulch from a tree taken down in our property for bedding.
Here's a pic of the roof of the coop and the roof of the run, corrugated plastic, which will allow them to keep safe from rain and snow.
Got decorative at the end. Built a flower box for the front window. Note the cable and hook to pull coop door open.
After having 4 chicks at the start, a few weeks later we got 4 more: Astarlorpes and Easter Eggers. This is the set up for raising them. We also ended up getting 4 more after that! 2 French Blue Copper Marans and 2 Speckeled Sussex. We are ending it here. No more birds, besides, the specs of the coop I built were for 12 max.
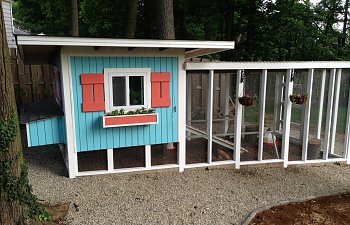
Finally, here's a shot of all said and done! Note the blocks at the base of the coop. This keeps raccoons out. The gravel at the base keeps dirt from splashing on the coop when it rains. We do let the chickens free-range a lot when we are supervising. The property is fully fenced. They've got it great. Although they haven't started laying yet, we are really looking forward to it. Well, thanks for viewing our experience into the world of chickens!
As the chicks started growing fast, I suddenly knew I was way behind, so I started to get to work! Here's a shot of the skeleton of the project. Using coop ideas from the web, but mostly a design of my own creation, I started to come up with this. The tile floor on the coop floor was something I had to have for ease of cleaning. Now let me explain that I am not a contractor, but did grow up with a handy Dad that I learned a lot from. I had no building plans for this. I treated the whole process as a form of creative expression, aided by a set of cordless power tools and materials all from Home Depot.
Once the frame was up, I started putting up the paneling.
Next I started on the nest box. 4 in this setup. Research I did explained that chickens share nest boxes. So, 1 nest box can be shared by 3 chickens.
Then I started the entry to the coop. A door attached to a pulley system, which I can open from outside the coop. I also started painting. Great turquoise color my wife chose.
Here's the nest box completed. The orange planks are shutters I built for the windows. Windows are vertical sliding type. Note the chain to hold door open.
Then I started work on the run. The ladder into the run was quite a bit of work. Bought feeder and waterer too. When done, the chickens were ready to move in! It was about time, since they were already quite big.
Here's a pic of the rear door access to the coop. Needed for cleaning. You can also notice the asphalt shingles for the roof in this shot. Almost like a real home!
The door to the run. Due to the sloping roof, I had to get the angles just right. It all worked out well. About half inch all around. Wire mesh all around run to keep predators out.
Here are 2 shots of the inside of the coop. You can see the sliding coop door open and nest boxes in the other shot. I use pine wood chips/mulch from a tree taken down in our property for bedding.
Here's a pic of the roof of the coop and the roof of the run, corrugated plastic, which will allow them to keep safe from rain and snow.
Got decorative at the end. Built a flower box for the front window. Note the cable and hook to pull coop door open.
After having 4 chicks at the start, a few weeks later we got 4 more: Astarlorpes and Easter Eggers. This is the set up for raising them. We also ended up getting 4 more after that! 2 French Blue Copper Marans and 2 Speckeled Sussex. We are ending it here. No more birds, besides, the specs of the coop I built were for 12 max.
Finally, here's a shot of all said and done! Note the blocks at the base of the coop. This keeps raccoons out. The gravel at the base keeps dirt from splashing on the coop when it rains. We do let the chickens free-range a lot when we are supervising. The property is fully fenced. They've got it great. Although they haven't started laying yet, we are really looking forward to it. Well, thanks for viewing our experience into the world of chickens!