2-17-2010
Since finding this group I have had a huge attraction for experimenting with incubators. I have been reading up on them trying to get an idea of what materials and components seem to be more or less successful and that sort of thing. More of a learn from what others have done approach than anything. it is pretty hard to see clearly what contributed to success and what did not though so what I have learned is limited and largely a matter of gut feeling and related knowledge that I have. still the desire to make a box that will hold an egg to 99.5 degrees for 21 days is something I just can't walk away from. it sounds simple when put that way but as most of you all know it is anything but. here are some preliminary thoughts I have as to why.
Accuracy of components. First of all an incubator that is defined as holding a temperature of 99.5 degrees (as it should) is asking for an extremely tight tolerance on temperature control. devices that function with this sort of tolerance are expensive if they can be found at all. once they are found and purchased there is still the question of reliability. It is common that the more accurate a device is the more fragile it is. As an example a typical $10 thermostat will vary 3 degrees above and below it's set temperature. so even if it is accurate to the temperature it is set at for this example I will say 100 degrees. it will not turn on until the temp is 97 degrees and will not shut of until the temp is 103. this is not nearly accurate enough. any thermostat can be fiddled with and make it more accurate but this requires that the person doing the fiddling has an understanding of the mechanics of a thermostat. not likely for the average chicken keeper. So the search for a reliable yet economical thermostat is on. I am thinking of something like a mercury thermometer that makes connection with a wire when the mercury rises to a certain point. the distance the wire sets from the mercury would adjust the temperature the thermostat connects. basically this is a thermometer that acts as an electrical connection. In theory you could simply drill a hole in a mercury thermometer at exactly the 100 degree point and insert and seal a wire and insert a wire in the bulb end of the thermometer to make a complete circuit. in practice it will not be nearly that easy. but I have had ides of things like laboratory pipettes etc. not necessarily impossible but I want to see if I can find some other liquid to use other than mercury. It will be far more likely to simply identify and already existing but accurate thermostat.
heat control: it is common practice to simply use a light bulb as a heat source. One of my suspicions is that the light bulb although hot, does not radiate that heat well. It is actually much harder to get heat to disperse than most people think. in nature unlike things tend to repel each other. Such as hot and cold air. heat are in a cold space and it will tend to stratify or form into layers of warmer and cooler air rather than warm equally. If you have ever gotten chills and tried to wrap up in a blanket. Notice how you might get your entire body warm except maybe a portion of one leg, or a part of your shoulder etc. The incubator is much like that but you do not have the convenience of being able to feel the chilly parts. it is still just as important to get all the parts covered evenly though. a heat source that "Radiates" strongly would help in getting all the nooks and crannies covered. One solution to the air separating rather than evenly warming is to "Mix" it. this would commonly be called "Forced air" typically accomplished with fans. Air movement is actually something I know a lot about. and if getting heat to spread around evenly sounds harder than you might expect. you ain't seen nothing yet. air does not like to move. sure you can get a stream of air to move. but to get an entire body of air to move is the next best thing to impossible. It is common practice to use computer fans to move air in an incubator. so as an example try this. place your hand right in front of your computers fan. you feel the air moving right? now move your hand just an inch or two on either side of the fan. do you still feel the air moving. you can even try the lighted match test to see how much air is moving at even two or three inches from the fan. you probably have more of a draft around your living room door than you have from that fan. right in front of the fan you have a very small amount of air moving very fast. 2 inches away you have a whole lot of air that is barely moving at all. that is basically the idea. On top of that air likes to move like water. Imagine a river. the water at the edges is barely moving while the deeper water in the middle is rushing by. there is actually some mixing of the still water with the rushing water but it is a very slow exchange and you can actually measure a significant temperature difference in the fast water and the slow water. in the same way there will be a stream of air that will form in an incubator that runs from the outlet to the inlet of your fan. the air outside this stream will be measurably cooler or warmer depending on how you set up your heat source. the answer to this streaming effect is to break up the stream or cause it to travel through the space as much as possible. One idea is to not point the fan toward the center of the incubator. but point it directly at the wall. the fast moving air then collides with the wall and is pushed out in every direction. another simple answer is to place two fans one in each corner so that they blow diagonally across the incubator this creating two streams of air that cross each other.
Co2 plays an important roll in the last few days. it causes spasms in the chick that are result in the hatching, the drawing of the yolk into the abdomen and strengthening the chicks legs. I hope to spend significant time in trying to preserve the Co2 as it builds up during the hatch.
Some specific issues I have listed in regard to an efficient incubator are listed below. addressing each issue as a single goal is my prefered way to progress toward the final completion of an incubator.
1. temperature control (Thermostat)
2. oxygenation (ventilation)
3. heat generation
4. humidity generation
5 Humidity control
6. air dispersion
In short condition the air than deliver it . non of which is as easy as you might think. the holding and turnigngof eggs is a distant side issue in comparison to the above issues. it does not matter how you hold an egg if you do not provide the conditions for it to develop.
I also see one other issue that is seldom if ever considered in egg incubation and that is the containment of Co2 which I have information that leaves me believing that this is more important than any other issue at the time of hatching. so for now i will also add
7. Co2 containment.
since the entire idea is to have air that is 99.5 degrees and at 50% humidity as the only thing to come in contact with the eggs. My first and favorite idea is to have a chamber where the eggs are that contains nothing else except the rack holding them. Preferable an auto turning. Once the eggs are placed in the rack and the incubator is turned on. there would be no reason to open this chamber again until the eggs need to be moved into hatching position on the day of lock down. In fact the smaller and more sealed this chamber is the better. In a completely separate chamber you would have vent for fresh air, the heat source, the water source and the fan for moving the air. I call this the Environment Conditioning chamber (EC Chamber) At this time I am considering a small chamber where the air can be conditioned to the proper levels in a very short period of time. sort of like how a hot water heater can warm water so their is a never ending supply of hot water.
I have had lots of thought concerning all of the the 7 issues above. i will try to log a many of them as I can and also track results of those that I am actually able to try.
Temperature Control:
This seems to be one of the most difficult part of the process for most people. Mainly I see this due to the limits of the mechanical parts being used. Actually this is the only part of the entire process the reies on Mechanical control and is effected by the tolerances of the components used. I was actually pleasantly surprised when my hot water heater indicated that it has only a one degree variation between switching off and turning back on. from some other fiddling around i think that it has a cycle or frequency that is fairly long but a well built incubator should not be effected by that. in a simple since a thermostat has a temperature at which it will turn on. in this case it is 86 degrees, and a temperature at which it will turn off. In addition they may have a setting that prevents them from turning back on for a period of time after having turned off. it can damage a thermostat to turn on and off to quickly so they are sometimes given this safety feature that is known as it's frequency. from what I can tell the Hot water heater stat has a frequency of 2 to 3 minutes.
some other thought I have had on temperature control are centered around a balanced conditioning system. basically heat the air to the perfect temperature in a never ending stream of air that is blown across the eggs. this solves any problems with oxygen but falls apart with my concerns for Co2 at lock down and humidity would be very difficult to control as equally well. I think the heating part is easily doable but it would require a lot of energy compared to a contained system that conserves the heat.
Finally the ultimate system would be one that can be heated to the proper temperature and then contain that heat energy for the entire 21 day period. it is this ultimate perfect cenario that will be the focus of my experiments. in a little clearer way of putting it. insulation and eliminating leaks. heat the incubator and then keep that heat as long as possible.
Oxygenation:
Supplying oxygen is counter productive to all the other goals we have. in short there is no way around the fact that new unconditioned air must be added to our carefully controled environment. short of actually hooking up an axygen bottle to the incubator. the oxygen must come from outside air. since this cannot be done and still keep our egg chamber air tight. the focus will be on limiting the exposure the egg chamber has to this outside air. with an EC chamber this is simply a matter of making the vents in that chamber prior to the air passing through the conditioning process. this even fresh air is heated and humidified before being forced into the egg chamber. if this is done in correct balance and the air actually reaches the proper temperature and humidity. other than fresh oxygen the eggs will never know the difference.
Heat generation:
The most common method of producing heat is simply a light bulb. One I have some thought as to the effect of this light on the embryos. Also it has some predominate weaknesses to failure. it is fairly intense and local heat that does not radiate well. this means the bulb itself is so hot that you cannot touch it but just an inch away you can only feel a fairly warm sensation. a few more inches and you can barely feel the heat at all. this heat must be moved to be of maximum use. other sources of heat that I have considered and would like to experiment with are ceramic plate heaters. reptile mats. heat sinks with a heating source for loading, and heating cables. I also intend to start my EC Chamber experiments with the use of a light bulb that is placed directly in the air stream this keeping a steady flow of air passing by a very hot surface.
humidity generation
Humidifying air is nothing more than getting it wet. warm air will absorb water faster than cool air and will hold more moisture as well. The most efficient way to moisten air is to warm it then pass it by a source of water. the more surface area there is to the source of moisture the better chance the air has of gaining maximum moisture. a large shallow pan of water is one of the first things that comes to mind as far as increasing available surface area. but in truth that is about the very least that can be done. there are actually very simple ways to increase the available surface area by a factor of 10 or more over a flat surface. as a simple example a pile of marbles that has water pouring over them to keep them wet. this would increase the surface area exposed to air by at least 4 or 5 times over the same area being taken up by a flat pan of water. a screen like that used for a swamp cooler would have a similar effect. but just like a swamp cooler the wetting of the air also tend to have the effect of cooling it. this can be limited by using heated water and having the air overly heated as well.
Other was to generate humidity would be with Humidifiers of several types. all generally of the type used to humidify terrariums for reptiles.
Humidity control
For the most part Humidity control is finding the balance of surface area of water to air movement that results in the correct humidity level. Not necessarily an easy balance to achieve. I am not sure if Hygrostat even exists (a thermostat for humidifiers) but a way to switch a humidifier on and off could remove a lot of the difficulty associated with achieving this balance.
Air dispersion
I have so many thoghts on this subject that it will actually take a while to write about all of them. but my favorite idea at this time for returnign conditioned air to the egg chamber in a gentle but very even manner is plate that is very much like an air hocky table. this will create hundreds of very tiny jets of air all across the incubator. As I have pointed out before moving an entire body of air and geting it to evenly mix is not really all that easy to do. air does not create a lot of friction and it is this friction that causes the air around it to move as well. It is true even in a pipe of very fast moving air that a stream in the very center of the pipe will form while the aire near the pipe walls will move much slower. In an incubator we are trying to mix the air not necessarily move it. several things will cause air to move. Mecanical forcing of the air otherwise known as a fan. Warm air will rise, cool air will fall, both are motion but as I mentioned before not necessarily mix.
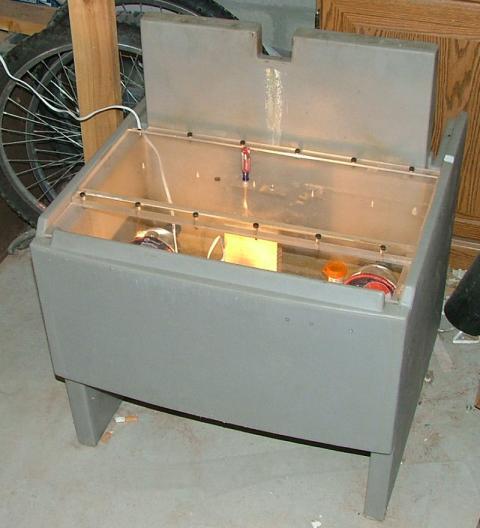
At this time I have constructed an incubator from the bottom half of a small ice maker. this is basically a plastic box about the size of a large ice chest that other than an open top only has one hole in the bottom that served as a drain when it was an ice maker. I also got 4 Alcohol thermometers that all agree in temperature reading and one digital thermometer / Humidity meter that agrees with the other 4 thermometers at to temperature and reads 10% low according to the Salt solution method of calibration. I have made a cover of 1/4 inch thick plexiglass that is sealed at the edges with weather stripping. although there are still some leaks at the edges they are small. I also made a lamp holder and will use an encondescent lamp for a heat source at this time. I Got the top made today, assembled the lamp and have the incubator plugged in for the past hour. it has increased in temperature from 74 to 87 degrees in about an hour and 15 min with a 40 watt bulb. I would rather have a 75 watt bulb but do not have one around the house right now.

cost at this point
Chamber: Free (any air tight well insulated container of the proper size will work).
Quick lamp kit: $9.97 Home Depot
Water Heater thermostat: $7.57 Home Depot
Weather Stripping: $8.37 Home Depot
Plexiglass sheet for cover: $14.97
Digital Thermometer: $6.97 Wal-Mart
Liquid thermometers: $1.97 ea. times 4 Wal-Mart
Total not including tax at this time $47.85
I expect to have additional cots when I am finished with my experimenting and go to install the components permanently I still have not incorporated any forced air system as well.
I set the entire thing up with the lamp at the far right of the chamber with a thermometer near it. the digital thermometer in the center and the thermostat and another thermometer to the far left. the Incubator started at 73 degrees and ran for approx. 1 hour and 15 minutes before turning off. The lamp was at 97 degrees, the digital read 94.8 degrees and the stat read 87 degrees. This making a 10 degree difference from one side of incubator to the other. the lamp remained off for 40 minutes even though I adjusted it a bit higher. when the lamp came back on the thermometers read 85-86 degrees at the lamp, 86.5 at the digital and 86 degrees at the stat. in short the incubator equalized in temperature before the temp started to fall and allow the thermostat to close. This indicates that the thermostat was a 1 degree difference from opening to closing. I am actually very surprised it is that close. In the second cycle the Incubator ran for 52 minutes and shut off with, Lamp at 100, Digital at 97.8 and the stat at 92. notice my adjustment increased the temp by 5 degrees and the temp difference fro lamp to stat has fallen to 8 degrees. I then shut down the Incubator for the night. I am not ready to trust this set up to run on it's own just yet.
I did notice that when the lamp shuts off the entire incubator equalizes in temperature. I picture it as a big pile up of heat at one side and all this heat flows to the left away from the heat source keeping it warm until the entire incubator finally begins to cool. I was also thinking that moving the thermostat closer to the lamp would cause the overall temperature to stabilize. I expect the lamp will cycle far more often but the temperature difference fro the left to the right of the chamber will become much closer. that is exactly why I have set the components up the way I have. the lamp is mounted on a piece of 2X6 and the thermostat is wired into the lamp cord but can be placed at any location on the chamber as desired. nothing is mounted in any sort of permanent fashion. this allows me to observe the effect that different locations for both the lamp and the thermostat etc will have on the chamber.
2-28-2010
I am up at 2;20 a.m and turned on the incubator with all thermometers at 74 degrees. I re arranged the chamber to, Lamp center back, stat center front, Digital thermometer is still at the center and I added two more thermometers one at the right and one at the left side of the chamber. It took a couple of minutes to make these changes while the lamp was already running so this will effect the time needed for the chamber to heat up. at 4:07 am lamp shut off with the following lamp 112+ actually went off the chart. Center 105, stat 105, right 100 left 101. I also added a bowl of water with approx 9 sq inches of surface area with the humidity at 40% at 4:07 humidity read 37%. Reading at this time are not reliable as I moved the digital thermometer to the stat and the liquid thermometer to the center just before the lamp shut off. I estimate the stat was actually at 100-101 degrees at shut down. I will know more when it turns back on. At this time I am focusing on getting the stat set as close to 99.5 as possible so I can mark that setting. Also note that there was a 12+ degree temp difference between the lamp and the stat. i positioned the meter at the lamp much closer to the lamp itself than it was before. I did have it setting on the bottom of the chamber it is now setting next to the lamp socket on the block of wood. 1 1/2 inch higher and a couple of inches closer to the socket. Humidity actually started to rise when I added the water but then fell again when I opened the lid to arrange things. it is rising again and is back to 40% at 4:22 am. Thermometer at stat is now reading 101.2 degrees as i suspected it would do as it stabilizes. Keep in mind that last night showed thetemp at the far end fro the lamp will not drop as the heat in the chamber dissipates. I should be able to get a fairly stable reading of what temp the stat is set at.
3-3-2010
Well after 4 days of tinkering re arranging carving out the faces of WH Stats and finally just about throwing a fit. i think I finally found the magic of making a Water Heater Thermostat hold a temp to 1 tenth of 1 degree. I built a rack that hold the thermostat about an inch away from the bulb, with the back facing the bulb. The thermostat now runs at about a 4 minute cycle and the temperature is stabalizing at a single tenth of a degree reading I had to adjust the stat this morning before leaving for work because it was only at 97.6 degrees. I was able to run buy a couple hours later and the temp was at 99.6 degrees and holding there. hope I finally have the stat dialed in. the bulb does not fllicker as the bad stat did before. it is a solid on for a couple of minutes and then off for a couple of minutes. at most the temp may go up one or two tenths for a few seconds but then go right back to 99.6. so as far as i can tell the Water Heater thermostat needs have the back exposed to the heat and be very close to the bulb to get tight temperature control. i am going to experiment with getting tight control with the heat source in one chamber and the thermostat in another next.
3-5-2010
well this is twice now that I have had the incubator holding a temperature for 24 hours and then crash. I have no idea what is going on but this time the stat is acting different. it is starting to act like the broken one. I am at the point I am ready to scrap the idea of still air or having the stat close to the heat source. I am working on a forced air set up and will set the stat in the egg chamber and adjust it to 99.5 degrees there. will see what sort of temp swings that produces.The lamp and fan will be in a box and air will travel through pipes into the egg chamber. I think I will have to make a different top for the incubator because I think the one I have warps and leaks to much when temperature reaches 100 degrees. am planing to make a frame for it first. I will have to make a different top to test the heat box since I am not willing to cut holes in the plexiglass top at this time. I have some scrap plexi that I can make window in a plywood top or something. will likely tape it in place with the stat located so it can be adjust without opening the incubator.
3-7-2010
I built a new top from 1 inch thick plexiglass friday afternoon. as of late saturday evening the incubator was holding a temp of about 101 and had for almost 36 hours. the temperature across the incubator is starting to level out at between 98 and 100 degrees as well. I started working on a box that contains a fan and will have three light fixtures in it. I also got 90 watt bulbs to place in it. this box is supposed to serve as a separate chamber where the air is heated and humidified and will then pass through a one and a half inch pipe to the egg chamber. there will also be another pipe for air to return to the heat box. the only thing that will have to be in the egg chamber (maybe) is the thermostat. I want to be able to adjust the stat so that it can be adjusted without opening the incubator. any problems with lights burning out or water needing to be added or taken will be done without opening the incubator directly and the syatem could be shut down for a coupel of minutes resulting in minimal fluctuation to the egg chamber. fresh air will also be able to be introduced at the heat box and be heated and humidified before it ever pases to the eggs as well. I want to run a longer test but think I finally have an incubator that I could hatch eggs in though.
3-11-2010
Well I have gone and gotten myself to busy again lol. haven't gotten back tot his page due to reading to much about breeding Hackle Chickens. Lots of homework to do in that regard.
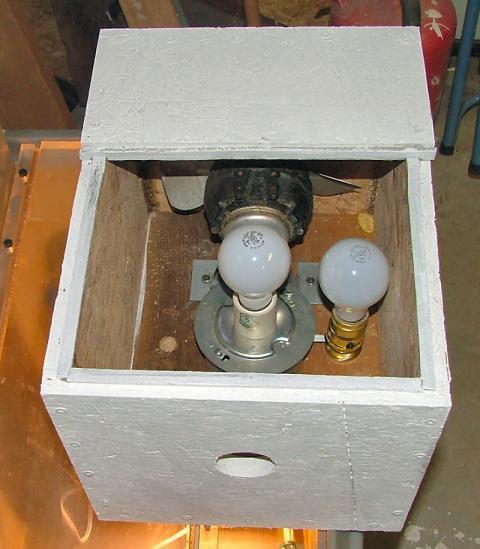
About the incubator. i managed to get my first desing to stabalize except for a coupel of factors i coudl account for for three days straight. I considered that realiable but it was a design that had no backup features to it. It only had one light bulb so failure meant the incubator had no heat source. it only has one thermostat and so on. it also sacraficed lots of egg chamber room to all the heat source and thermostat set up. adding additional componenets was out of the question. My solution is the heat echange box pictured above. this box is seperate from the incubator and egg chamber and holds a fan, three lamps for triple failure coverage the botle of water for humidity and basically makes it so that anythign that needs to be fixed about the incubator except the thermostat can be gotten to without opening the egg chamber. I attached it to the egg chamber by running 1 1/2 inch pvc pipe from the box through the top of the incubator. the old set up had ony 40 watts of heating power. this one has 270 watts and heated the egg chamber from 70 degrees to 105 degress in about 50 minutes. it has now been running for about 16 hours and is now holding tem[erature between 99.5 and 100.2 degrees. I am hoping it iwll stabalize even more through the night. I am thinking through appling better insulation to the entire system as well. the heat echange box is simply made of OSB and I suspect it is not only loosing a lot of heat but is also causing the humidity to drop to 30%. so far I am incouraged for this to be a first run with this design. i think an exhcange box well insulated and made of plastic or metal will work even better and possibly moving the thermostat to the exhanger will help stabalize temperatures in the egg chamber as well. I will start testing other arrangments tomorrow when the vedict is in about getting more stable temps as it is. at any rate this desing woudl be very sisative to being opened at the very least.
In order to be ready for the next phase I need to start researching other components. digital thermostats, waffers, other systems for supplying heat. heat sinks for the exchanger. heat exhange grids for the exchanger, etc. I also want to add indicators to every component so that verificatioin that all components are operating from a single panel can be accomplished. it is easy to tell the lights are working because as it is they are blinding. the fan is out of sight but can be heard. the thermostat is obvious becasue it is the only one so I know it works if the system starts. but eventually i want to add more backup components and and then it iwll not be so obvious just what is working and what is not. I also plan to conceal the lights so that they are not so bright.
Now the only problem is I am getting an itch to hatch some eggs but have no use for the chicks. i am hoping to get some Quail eggs when they start laying this spring and can get at least some hatching experience.
Since finding this group I have had a huge attraction for experimenting with incubators. I have been reading up on them trying to get an idea of what materials and components seem to be more or less successful and that sort of thing. More of a learn from what others have done approach than anything. it is pretty hard to see clearly what contributed to success and what did not though so what I have learned is limited and largely a matter of gut feeling and related knowledge that I have. still the desire to make a box that will hold an egg to 99.5 degrees for 21 days is something I just can't walk away from. it sounds simple when put that way but as most of you all know it is anything but. here are some preliminary thoughts I have as to why.
Accuracy of components. First of all an incubator that is defined as holding a temperature of 99.5 degrees (as it should) is asking for an extremely tight tolerance on temperature control. devices that function with this sort of tolerance are expensive if they can be found at all. once they are found and purchased there is still the question of reliability. It is common that the more accurate a device is the more fragile it is. As an example a typical $10 thermostat will vary 3 degrees above and below it's set temperature. so even if it is accurate to the temperature it is set at for this example I will say 100 degrees. it will not turn on until the temp is 97 degrees and will not shut of until the temp is 103. this is not nearly accurate enough. any thermostat can be fiddled with and make it more accurate but this requires that the person doing the fiddling has an understanding of the mechanics of a thermostat. not likely for the average chicken keeper. So the search for a reliable yet economical thermostat is on. I am thinking of something like a mercury thermometer that makes connection with a wire when the mercury rises to a certain point. the distance the wire sets from the mercury would adjust the temperature the thermostat connects. basically this is a thermometer that acts as an electrical connection. In theory you could simply drill a hole in a mercury thermometer at exactly the 100 degree point and insert and seal a wire and insert a wire in the bulb end of the thermometer to make a complete circuit. in practice it will not be nearly that easy. but I have had ides of things like laboratory pipettes etc. not necessarily impossible but I want to see if I can find some other liquid to use other than mercury. It will be far more likely to simply identify and already existing but accurate thermostat.
heat control: it is common practice to simply use a light bulb as a heat source. One of my suspicions is that the light bulb although hot, does not radiate that heat well. It is actually much harder to get heat to disperse than most people think. in nature unlike things tend to repel each other. Such as hot and cold air. heat are in a cold space and it will tend to stratify or form into layers of warmer and cooler air rather than warm equally. If you have ever gotten chills and tried to wrap up in a blanket. Notice how you might get your entire body warm except maybe a portion of one leg, or a part of your shoulder etc. The incubator is much like that but you do not have the convenience of being able to feel the chilly parts. it is still just as important to get all the parts covered evenly though. a heat source that "Radiates" strongly would help in getting all the nooks and crannies covered. One solution to the air separating rather than evenly warming is to "Mix" it. this would commonly be called "Forced air" typically accomplished with fans. Air movement is actually something I know a lot about. and if getting heat to spread around evenly sounds harder than you might expect. you ain't seen nothing yet. air does not like to move. sure you can get a stream of air to move. but to get an entire body of air to move is the next best thing to impossible. It is common practice to use computer fans to move air in an incubator. so as an example try this. place your hand right in front of your computers fan. you feel the air moving right? now move your hand just an inch or two on either side of the fan. do you still feel the air moving. you can even try the lighted match test to see how much air is moving at even two or three inches from the fan. you probably have more of a draft around your living room door than you have from that fan. right in front of the fan you have a very small amount of air moving very fast. 2 inches away you have a whole lot of air that is barely moving at all. that is basically the idea. On top of that air likes to move like water. Imagine a river. the water at the edges is barely moving while the deeper water in the middle is rushing by. there is actually some mixing of the still water with the rushing water but it is a very slow exchange and you can actually measure a significant temperature difference in the fast water and the slow water. in the same way there will be a stream of air that will form in an incubator that runs from the outlet to the inlet of your fan. the air outside this stream will be measurably cooler or warmer depending on how you set up your heat source. the answer to this streaming effect is to break up the stream or cause it to travel through the space as much as possible. One idea is to not point the fan toward the center of the incubator. but point it directly at the wall. the fast moving air then collides with the wall and is pushed out in every direction. another simple answer is to place two fans one in each corner so that they blow diagonally across the incubator this creating two streams of air that cross each other.
Co2 plays an important roll in the last few days. it causes spasms in the chick that are result in the hatching, the drawing of the yolk into the abdomen and strengthening the chicks legs. I hope to spend significant time in trying to preserve the Co2 as it builds up during the hatch.
Some specific issues I have listed in regard to an efficient incubator are listed below. addressing each issue as a single goal is my prefered way to progress toward the final completion of an incubator.
1. temperature control (Thermostat)
2. oxygenation (ventilation)
3. heat generation
4. humidity generation
5 Humidity control
6. air dispersion
In short condition the air than deliver it . non of which is as easy as you might think. the holding and turnigngof eggs is a distant side issue in comparison to the above issues. it does not matter how you hold an egg if you do not provide the conditions for it to develop.
I also see one other issue that is seldom if ever considered in egg incubation and that is the containment of Co2 which I have information that leaves me believing that this is more important than any other issue at the time of hatching. so for now i will also add
7. Co2 containment.
since the entire idea is to have air that is 99.5 degrees and at 50% humidity as the only thing to come in contact with the eggs. My first and favorite idea is to have a chamber where the eggs are that contains nothing else except the rack holding them. Preferable an auto turning. Once the eggs are placed in the rack and the incubator is turned on. there would be no reason to open this chamber again until the eggs need to be moved into hatching position on the day of lock down. In fact the smaller and more sealed this chamber is the better. In a completely separate chamber you would have vent for fresh air, the heat source, the water source and the fan for moving the air. I call this the Environment Conditioning chamber (EC Chamber) At this time I am considering a small chamber where the air can be conditioned to the proper levels in a very short period of time. sort of like how a hot water heater can warm water so their is a never ending supply of hot water.
I have had lots of thought concerning all of the the 7 issues above. i will try to log a many of them as I can and also track results of those that I am actually able to try.
Temperature Control:
This seems to be one of the most difficult part of the process for most people. Mainly I see this due to the limits of the mechanical parts being used. Actually this is the only part of the entire process the reies on Mechanical control and is effected by the tolerances of the components used. I was actually pleasantly surprised when my hot water heater indicated that it has only a one degree variation between switching off and turning back on. from some other fiddling around i think that it has a cycle or frequency that is fairly long but a well built incubator should not be effected by that. in a simple since a thermostat has a temperature at which it will turn on. in this case it is 86 degrees, and a temperature at which it will turn off. In addition they may have a setting that prevents them from turning back on for a period of time after having turned off. it can damage a thermostat to turn on and off to quickly so they are sometimes given this safety feature that is known as it's frequency. from what I can tell the Hot water heater stat has a frequency of 2 to 3 minutes.
some other thought I have had on temperature control are centered around a balanced conditioning system. basically heat the air to the perfect temperature in a never ending stream of air that is blown across the eggs. this solves any problems with oxygen but falls apart with my concerns for Co2 at lock down and humidity would be very difficult to control as equally well. I think the heating part is easily doable but it would require a lot of energy compared to a contained system that conserves the heat.
Finally the ultimate system would be one that can be heated to the proper temperature and then contain that heat energy for the entire 21 day period. it is this ultimate perfect cenario that will be the focus of my experiments. in a little clearer way of putting it. insulation and eliminating leaks. heat the incubator and then keep that heat as long as possible.
Oxygenation:
Supplying oxygen is counter productive to all the other goals we have. in short there is no way around the fact that new unconditioned air must be added to our carefully controled environment. short of actually hooking up an axygen bottle to the incubator. the oxygen must come from outside air. since this cannot be done and still keep our egg chamber air tight. the focus will be on limiting the exposure the egg chamber has to this outside air. with an EC chamber this is simply a matter of making the vents in that chamber prior to the air passing through the conditioning process. this even fresh air is heated and humidified before being forced into the egg chamber. if this is done in correct balance and the air actually reaches the proper temperature and humidity. other than fresh oxygen the eggs will never know the difference.
Heat generation:
The most common method of producing heat is simply a light bulb. One I have some thought as to the effect of this light on the embryos. Also it has some predominate weaknesses to failure. it is fairly intense and local heat that does not radiate well. this means the bulb itself is so hot that you cannot touch it but just an inch away you can only feel a fairly warm sensation. a few more inches and you can barely feel the heat at all. this heat must be moved to be of maximum use. other sources of heat that I have considered and would like to experiment with are ceramic plate heaters. reptile mats. heat sinks with a heating source for loading, and heating cables. I also intend to start my EC Chamber experiments with the use of a light bulb that is placed directly in the air stream this keeping a steady flow of air passing by a very hot surface.
humidity generation
Humidifying air is nothing more than getting it wet. warm air will absorb water faster than cool air and will hold more moisture as well. The most efficient way to moisten air is to warm it then pass it by a source of water. the more surface area there is to the source of moisture the better chance the air has of gaining maximum moisture. a large shallow pan of water is one of the first things that comes to mind as far as increasing available surface area. but in truth that is about the very least that can be done. there are actually very simple ways to increase the available surface area by a factor of 10 or more over a flat surface. as a simple example a pile of marbles that has water pouring over them to keep them wet. this would increase the surface area exposed to air by at least 4 or 5 times over the same area being taken up by a flat pan of water. a screen like that used for a swamp cooler would have a similar effect. but just like a swamp cooler the wetting of the air also tend to have the effect of cooling it. this can be limited by using heated water and having the air overly heated as well.
Other was to generate humidity would be with Humidifiers of several types. all generally of the type used to humidify terrariums for reptiles.
Humidity control
For the most part Humidity control is finding the balance of surface area of water to air movement that results in the correct humidity level. Not necessarily an easy balance to achieve. I am not sure if Hygrostat even exists (a thermostat for humidifiers) but a way to switch a humidifier on and off could remove a lot of the difficulty associated with achieving this balance.
Air dispersion
I have so many thoghts on this subject that it will actually take a while to write about all of them. but my favorite idea at this time for returnign conditioned air to the egg chamber in a gentle but very even manner is plate that is very much like an air hocky table. this will create hundreds of very tiny jets of air all across the incubator. As I have pointed out before moving an entire body of air and geting it to evenly mix is not really all that easy to do. air does not create a lot of friction and it is this friction that causes the air around it to move as well. It is true even in a pipe of very fast moving air that a stream in the very center of the pipe will form while the aire near the pipe walls will move much slower. In an incubator we are trying to mix the air not necessarily move it. several things will cause air to move. Mecanical forcing of the air otherwise known as a fan. Warm air will rise, cool air will fall, both are motion but as I mentioned before not necessarily mix.
At this time I have constructed an incubator from the bottom half of a small ice maker. this is basically a plastic box about the size of a large ice chest that other than an open top only has one hole in the bottom that served as a drain when it was an ice maker. I also got 4 Alcohol thermometers that all agree in temperature reading and one digital thermometer / Humidity meter that agrees with the other 4 thermometers at to temperature and reads 10% low according to the Salt solution method of calibration. I have made a cover of 1/4 inch thick plexiglass that is sealed at the edges with weather stripping. although there are still some leaks at the edges they are small. I also made a lamp holder and will use an encondescent lamp for a heat source at this time. I Got the top made today, assembled the lamp and have the incubator plugged in for the past hour. it has increased in temperature from 74 to 87 degrees in about an hour and 15 min with a 40 watt bulb. I would rather have a 75 watt bulb but do not have one around the house right now.
cost at this point
Chamber: Free (any air tight well insulated container of the proper size will work).
Quick lamp kit: $9.97 Home Depot
Water Heater thermostat: $7.57 Home Depot
Weather Stripping: $8.37 Home Depot
Plexiglass sheet for cover: $14.97
Digital Thermometer: $6.97 Wal-Mart
Liquid thermometers: $1.97 ea. times 4 Wal-Mart
Total not including tax at this time $47.85
I expect to have additional cots when I am finished with my experimenting and go to install the components permanently I still have not incorporated any forced air system as well.
I set the entire thing up with the lamp at the far right of the chamber with a thermometer near it. the digital thermometer in the center and the thermostat and another thermometer to the far left. the Incubator started at 73 degrees and ran for approx. 1 hour and 15 minutes before turning off. The lamp was at 97 degrees, the digital read 94.8 degrees and the stat read 87 degrees. This making a 10 degree difference from one side of incubator to the other. the lamp remained off for 40 minutes even though I adjusted it a bit higher. when the lamp came back on the thermometers read 85-86 degrees at the lamp, 86.5 at the digital and 86 degrees at the stat. in short the incubator equalized in temperature before the temp started to fall and allow the thermostat to close. This indicates that the thermostat was a 1 degree difference from opening to closing. I am actually very surprised it is that close. In the second cycle the Incubator ran for 52 minutes and shut off with, Lamp at 100, Digital at 97.8 and the stat at 92. notice my adjustment increased the temp by 5 degrees and the temp difference fro lamp to stat has fallen to 8 degrees. I then shut down the Incubator for the night. I am not ready to trust this set up to run on it's own just yet.
I did notice that when the lamp shuts off the entire incubator equalizes in temperature. I picture it as a big pile up of heat at one side and all this heat flows to the left away from the heat source keeping it warm until the entire incubator finally begins to cool. I was also thinking that moving the thermostat closer to the lamp would cause the overall temperature to stabilize. I expect the lamp will cycle far more often but the temperature difference fro the left to the right of the chamber will become much closer. that is exactly why I have set the components up the way I have. the lamp is mounted on a piece of 2X6 and the thermostat is wired into the lamp cord but can be placed at any location on the chamber as desired. nothing is mounted in any sort of permanent fashion. this allows me to observe the effect that different locations for both the lamp and the thermostat etc will have on the chamber.
2-28-2010
I am up at 2;20 a.m and turned on the incubator with all thermometers at 74 degrees. I re arranged the chamber to, Lamp center back, stat center front, Digital thermometer is still at the center and I added two more thermometers one at the right and one at the left side of the chamber. It took a couple of minutes to make these changes while the lamp was already running so this will effect the time needed for the chamber to heat up. at 4:07 am lamp shut off with the following lamp 112+ actually went off the chart. Center 105, stat 105, right 100 left 101. I also added a bowl of water with approx 9 sq inches of surface area with the humidity at 40% at 4:07 humidity read 37%. Reading at this time are not reliable as I moved the digital thermometer to the stat and the liquid thermometer to the center just before the lamp shut off. I estimate the stat was actually at 100-101 degrees at shut down. I will know more when it turns back on. At this time I am focusing on getting the stat set as close to 99.5 as possible so I can mark that setting. Also note that there was a 12+ degree temp difference between the lamp and the stat. i positioned the meter at the lamp much closer to the lamp itself than it was before. I did have it setting on the bottom of the chamber it is now setting next to the lamp socket on the block of wood. 1 1/2 inch higher and a couple of inches closer to the socket. Humidity actually started to rise when I added the water but then fell again when I opened the lid to arrange things. it is rising again and is back to 40% at 4:22 am. Thermometer at stat is now reading 101.2 degrees as i suspected it would do as it stabilizes. Keep in mind that last night showed thetemp at the far end fro the lamp will not drop as the heat in the chamber dissipates. I should be able to get a fairly stable reading of what temp the stat is set at.
3-3-2010
Well after 4 days of tinkering re arranging carving out the faces of WH Stats and finally just about throwing a fit. i think I finally found the magic of making a Water Heater Thermostat hold a temp to 1 tenth of 1 degree. I built a rack that hold the thermostat about an inch away from the bulb, with the back facing the bulb. The thermostat now runs at about a 4 minute cycle and the temperature is stabalizing at a single tenth of a degree reading I had to adjust the stat this morning before leaving for work because it was only at 97.6 degrees. I was able to run buy a couple hours later and the temp was at 99.6 degrees and holding there. hope I finally have the stat dialed in. the bulb does not fllicker as the bad stat did before. it is a solid on for a couple of minutes and then off for a couple of minutes. at most the temp may go up one or two tenths for a few seconds but then go right back to 99.6. so as far as i can tell the Water Heater thermostat needs have the back exposed to the heat and be very close to the bulb to get tight temperature control. i am going to experiment with getting tight control with the heat source in one chamber and the thermostat in another next.
3-5-2010
well this is twice now that I have had the incubator holding a temperature for 24 hours and then crash. I have no idea what is going on but this time the stat is acting different. it is starting to act like the broken one. I am at the point I am ready to scrap the idea of still air or having the stat close to the heat source. I am working on a forced air set up and will set the stat in the egg chamber and adjust it to 99.5 degrees there. will see what sort of temp swings that produces.The lamp and fan will be in a box and air will travel through pipes into the egg chamber. I think I will have to make a different top for the incubator because I think the one I have warps and leaks to much when temperature reaches 100 degrees. am planing to make a frame for it first. I will have to make a different top to test the heat box since I am not willing to cut holes in the plexiglass top at this time. I have some scrap plexi that I can make window in a plywood top or something. will likely tape it in place with the stat located so it can be adjust without opening the incubator.
3-7-2010
I built a new top from 1 inch thick plexiglass friday afternoon. as of late saturday evening the incubator was holding a temp of about 101 and had for almost 36 hours. the temperature across the incubator is starting to level out at between 98 and 100 degrees as well. I started working on a box that contains a fan and will have three light fixtures in it. I also got 90 watt bulbs to place in it. this box is supposed to serve as a separate chamber where the air is heated and humidified and will then pass through a one and a half inch pipe to the egg chamber. there will also be another pipe for air to return to the heat box. the only thing that will have to be in the egg chamber (maybe) is the thermostat. I want to be able to adjust the stat so that it can be adjusted without opening the incubator. any problems with lights burning out or water needing to be added or taken will be done without opening the incubator directly and the syatem could be shut down for a coupel of minutes resulting in minimal fluctuation to the egg chamber. fresh air will also be able to be introduced at the heat box and be heated and humidified before it ever pases to the eggs as well. I want to run a longer test but think I finally have an incubator that I could hatch eggs in though.
3-11-2010
Well I have gone and gotten myself to busy again lol. haven't gotten back tot his page due to reading to much about breeding Hackle Chickens. Lots of homework to do in that regard.
About the incubator. i managed to get my first desing to stabalize except for a coupel of factors i coudl account for for three days straight. I considered that realiable but it was a design that had no backup features to it. It only had one light bulb so failure meant the incubator had no heat source. it only has one thermostat and so on. it also sacraficed lots of egg chamber room to all the heat source and thermostat set up. adding additional componenets was out of the question. My solution is the heat echange box pictured above. this box is seperate from the incubator and egg chamber and holds a fan, three lamps for triple failure coverage the botle of water for humidity and basically makes it so that anythign that needs to be fixed about the incubator except the thermostat can be gotten to without opening the egg chamber. I attached it to the egg chamber by running 1 1/2 inch pvc pipe from the box through the top of the incubator. the old set up had ony 40 watts of heating power. this one has 270 watts and heated the egg chamber from 70 degrees to 105 degress in about 50 minutes. it has now been running for about 16 hours and is now holding tem[erature between 99.5 and 100.2 degrees. I am hoping it iwll stabalize even more through the night. I am thinking through appling better insulation to the entire system as well. the heat echange box is simply made of OSB and I suspect it is not only loosing a lot of heat but is also causing the humidity to drop to 30%. so far I am incouraged for this to be a first run with this design. i think an exhcange box well insulated and made of plastic or metal will work even better and possibly moving the thermostat to the exhanger will help stabalize temperatures in the egg chamber as well. I will start testing other arrangments tomorrow when the vedict is in about getting more stable temps as it is. at any rate this desing woudl be very sisative to being opened at the very least.
In order to be ready for the next phase I need to start researching other components. digital thermostats, waffers, other systems for supplying heat. heat sinks for the exchanger. heat exhange grids for the exchanger, etc. I also want to add indicators to every component so that verificatioin that all components are operating from a single panel can be accomplished. it is easy to tell the lights are working because as it is they are blinding. the fan is out of sight but can be heard. the thermostat is obvious becasue it is the only one so I know it works if the system starts. but eventually i want to add more backup components and and then it iwll not be so obvious just what is working and what is not. I also plan to conceal the lights so that they are not so bright.
Now the only problem is I am getting an itch to hatch some eggs but have no use for the chicks. i am hoping to get some Quail eggs when they start laying this spring and can get at least some hatching experience.